
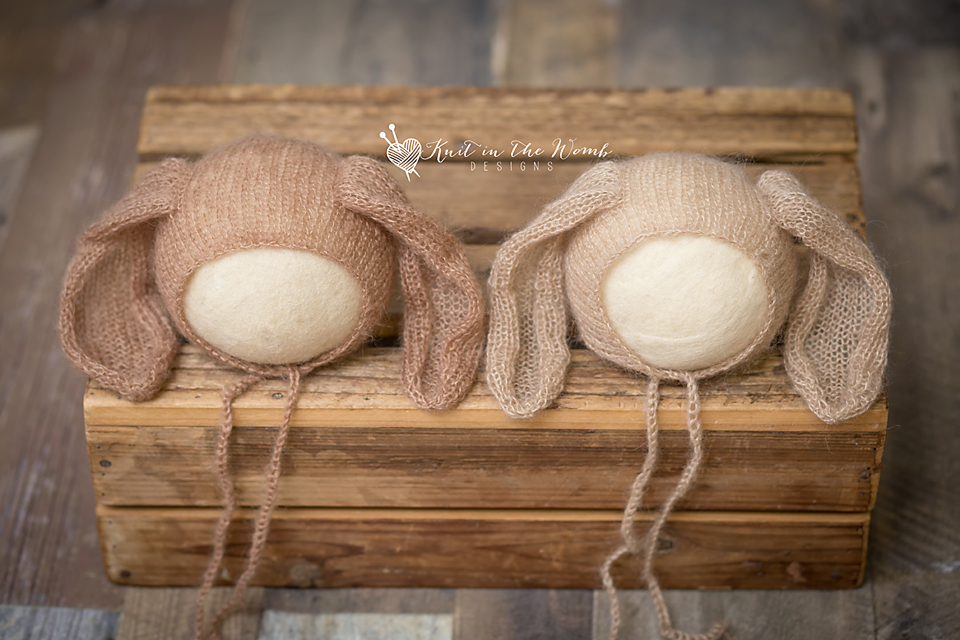
This mohair bunny bonnet pattern is a photo prop dream! Find this cutie at the bottom of the post and more at the photo prop pattern page.

There’s just something about long, floppy bunny ears that gets me every time. Especially when they’re knit in a whisper-soft mohair yarn and perched perfectly on a newborn’s tiny head. Let me tell you all about the mohair bunny bonnet pattern that’s quickly hopped its way to the top of my favorites list—yes, pun intended!
This particular mohair bunny bonnet pattern was inspired by a combination of Easter season, chocolate cravings, and a good old-fashioned knitting itch I couldn’t ignore. It’s soft, it’s fluffy, and it’s everything you want in a newborn photo prop. I used KnitPicks Aloft (affiliate link) for this project, and I’m telling you—it was love at first stitch.

A Bunny Bonnet Was Born
It all started during one of those late-night knitting sessions when the house is finally quiet. I was playing around with some KnitPicks Aloft (affiliate link), and the way the yarn fluffed up reminded me so much of baby bunny fur. Add that to the fact that I had a friend due in April and BOOM—this mohair bunny bonnet pattern practically wrote itself.
Honestly, I couldn’t stop picturing a little chocolate-colored bunny cap snuggled around a squishy baby face. I knew it had to happen, and fast.

Why This Yarn Was Meant to Be
Let’s talk yarn for a second, because choosing the right one really makes or breaks a project—especially one meant for a newborn. I went with KnitPicks Aloft (affiliate link) for this mohair bunny bonnet pattern for a few fluffy reasons:
- Softness: It’s made of super kid mohair and silk, and it feels like a cloud. No scratchy ears here!
- Texture: That halo effect is what dreams are made of. It gives the bonnet that irresistible fuzzy look.
- Colors: I picked the most delicious chocolate brown, but you can absolutely go pastel for spring babies.
- Durability: Despite looking super delicate, it holds up just fine for gentle use and the occasional spit-up rinse.
Every time I mention this mohair bunny bonnet pattern to a fellow knitter, I always say: trust me, this yarn is worth it (affiliate link).

Getting Into the Mohair Bunny Bonnet Pattern
The pattern itself is one of those quick, satisfying knits you’ll want to make again and again. I grabbed my circular needles, a few stitch markers, and got to work. I also had a tapestry needle on hand for finishing—and yes, the finishing touches absolutely matter for this one!
What I love about this mohair bunny bonnet pattern is that it’s accessible. You don’t have to be a lace wizard or cable queen to pull it off. Just a few increases, some decreases, and a whole lot of love.

The Star of the Show: Those Ears
Now let’s be honest—the ears are why we’re all here.
This mohair bunny bonnet pattern features big, floppy, stitched-on ears that just beg to be photographed. I knit them separately from the bonnet body and stitched them on afterward for the perfect little flop. They’re just oversized enough to get all the “awwws” during a newborn shoot.
And let me tell you—I could NOT stop smiling while knitting them. I mean, tiny bunny ears? Come on. It doesn’t get better than that.

Finishing Touches That Make a Difference
Once the body and ears were done, it was time to sew everything together. I always take my time with this part—meticulous ear placement is crucial in a mohair bunny bonnet pattern like this. I used a tapestry needle to stitch them down securely, then wove in all the ends.
After that, I gave the whole thing a gentle bath and blocked it lightly. That step is key for mohair—it helps the fibers bloom and gives your project that polished, fluffy look.

Behind the Scenes of the Cutest Photo Shoot Ever
The day of the photo shoot was everything I hoped for. My friend’s baby looked like a literal bunny marshmallow in this mohair bunny bonnet pattern. The chocolate brown shade of the KnitPicks Aloft (affiliate link) popped perfectly against her skin, and the floppy ears practically bounced every time she moved.
We snapped pictures of her lying on a sherpa rug, nestled in a basket, and snuggled up on a knit blanket. Each one turned out sweeter than the last. Honestly, this mohair bunny bonnet pattern stole the whole show.

Why This Pattern is Such a Winner
There are a few reasons why this mohair bunny bonnet pattern has a permanent spot in my go-to photo prop list:
- It’s fast. Like “knit in a weekend” fast.
- It’s easy. Perfect for when you want something relaxing but still satisfying.
- It’s giftable. I mean, who wouldn’t love this as a baby shower gift?
- It uses mohair. Which, let’s be real, makes everything feel a little fancier.
If you’ve never tried knitting with mohair before, this is the perfect intro. You’ll fall in love with the yarn and the process, and by the time you’re sewing on those ears, you’ll already be planning your next one.

Ready to Make Your Own?
So if you’re in the mood for a quick, adorable knit that’s guaranteed to be a hit with new moms and photographers alike, I highly recommend trying out this mohair bunny bonnet pattern. It’s sweet, it’s soft, and it’s stuffed with cuteness.
You’ll find THIS pattern at the bottom of this post, but don’t stop there—if you’re looking for more photo prop inspiration, head over to my Photo Prop Pattern Page for even more freebies.
Whether you’re stocking your photography studio stash or looking for the perfect baby shower gift, this mohair bunny bonnet pattern is a sure win.
Happy knitting! And don’t forget to tag me if you make one—I love seeing your adorable projects come to life.

Materials and Info
Materials: 1 skein of lace weight (size 0) mohair yarn (I used Knitpicks Aloft), size 7 (4.5mm) straight and dpn needles, yarn needle
Gauge: 4.5sts x 8r per in ~GAUGE IS VERY IMPORTANT~
Stitch Key:
K – knit
P – purl
yo – yarn over
k2tog – knit 2 together
ssk – slip slip knit (slip sts purlwise)
m1 – make one
Head circumference: nb (13ins). 0-3mths (14ins), 3-6mth (15ins), 6- 12mths (16ins)

Chocolate Bunny Bonnet Pattern
Newborn
Cast on 52 sts using the E- cast on or your favorite stretchy cast on.
Row 1 – (k1p1) repeat across
Repeat row 1 until you have worked 4 rows total.
Continue working in stockinette st until your work measures 4ins from the cast on edge ending after completing a right side row.
You will now start working in the round. Switch to dpn here.
Round 1 – (k2tog, k11) repeat around(48sts)
Round 2 – (k2tog, k4) repeat around (40sts)
Round 3 – knit
Round 4 – (k2tog, k3) repeat around (32sts)
Round 5 – knit
Round 6 – (k2tog, k2) repeat around (24sts)
Round 7 – knit
Round 8 – (k2tog, k1) repeat around (16sts)
Do not bind off. Cut yarn and pull through remaining stitches. Cut 6 pieces of yarn approximately 30ins long. Fold three in half and pull a loop through the front corner of the bonnet. Pull the ends through this loop and braid. Repeat on the other side.
Ears (Make 2)
Cast on 12sts leaving a long enough tail to sew the ear onto the hat with.
Row 1 – knit
Row 2 – purl
Row 3 – k1, m1, k10, m1, k1 (14sts)
Row 4 – purl
Row 5 – k1, m1, k12, m1, k1 (16sts)
Row 6 – purl
Row 7 – k1, m1, k14, m1, k1 (18sts)
Continue in stockinette st until your work measures 5ins from cast on edge ending after finishing a purl row.
Decreases
Row 1 – k1, ssk, k12, k2tog, k1 (16sts)
Row 2 – purl
Row 3 – k1, ssk, k10, k2tog, k1 (14sts)
Row 4 – purl
Row 5 – k1, ssk, ssk, k4, k2tog, k2tog, k1 (10sts)
Row 6 – purl
Row 7 – k1, ssk, ssk, k2tog, k2tog, k1 (6sts)
Do no bind off. Cut yarn leaving appx 6-8ins, pull through remaining 6sts. Cinch together tightly like the back of the bonnet. Weave in ends. Use the top end to sew the ears onto the hat. I like my ears about 1.5ins from the front edge and about 2ins apart. That is my personal preference but placement can be where ever you feel looks best. I just whip stitch them on but you can use whatever method you prefer to attach them.
0-3mths
Cast on 56 sts using the E- cast on or your favorite stretchy cast on.
Row 1 – (k1p1) repeat across
Repeat row 1 until you have worked 4 rows total.
Continue working in stockinette st until your work measures 4.5ins from the cast on edge ending after completing a right side row.
You will now start working in the round. Switch to dpn here.
Round 1 – (k2tog, 26) repeat around (54sts)
Round 2 – (k2tog, k4) repeat around (45sts)
Round 3 – knit
Round 4 – (k2tog, k3) repeat around (36sts)
Round 5 – knit
Round 6 – (k2tog, k2) repeat around (27sts)
Round 7 – knit
Round 8 – (k2tog, k1) repeat around (18sts)
Do not bind off. Cut yarn and pull through remaining stitches. Cut 6 pieces of yarn approximately 30ins long. Fold three in half and pull a loop through the front corner of the bonnet. Pull the ends through this loop and braid. Repeat on the other side.
Ears (Make 2)
Cast on 12sts leaving a long enough tail to sew the ear onto the hat with.
Row 1 – knit
Row 2 – purl
Row 3 – k1, m1, k10, m1, k1 (14sts)
Row 4 – purl
Row 5 – k1, m1, k12, m1, k1 (16sts)
Row 6 – purl
Row 7 – k1, m1, k14, m1, k1 (18sts)
Continue in stockinette st until your work measures 5.5ins from cast on edge ending after finishing a purl row.
Decreases
Row 1 – k1, ssk, k12, k2tog, k1 (16sts)
Row 2 – purl
Row 3 – k1, ssk, k10, k2tog, k1 (14sts)
Row 4 – purl
Row 5 – k1, ssk, ssk, k4, k2tog, k2tog, k1 (10sts)
Row 6 – purl
Row 7 – k1, ssk, ssk, k2tog, k2tog, k1 (6sts)
Do no bind off. Cut yarn leaving appx 6-8ins, pull through remaining 6sts. Cinch together tightly like the back of the bonnet. Weave in ends. Use the top end to sew the ears onto the hat. I like my ears about 1.5ins from the front edge and about 2ins apart. That is my personal preference but placement can be where ever you feel looks best. I just whip stitch them on but you can use whatever method you prefer to attach them.
3-6mths
Cast on 62 sts using the E- cast on or your favorite stretchy cast on.
Row 1 – (k1p1) repeat across
Repeat row 1 until you have worked 6 rows total.
Continue working in stockinette st until your work measures 5ins from the cast on edge ending after completing a right side row.
You will now start working in the round. Switch to dpn here.
Round 1 – (k2tog, k29) repeat around (60sts)
Round 2 – (k2tog, k4) repeat around (50sts)
Round 3 – knit
Round 4 – (k2tog, k3) repeat around (40sts)
Round 5 – knit
Round 6 – (k2tog, k2) repeat around (30sts)
Round 7 – knit
Round 8 – (k2tog, k1) repeat around (20sts)
Do not bind off. Cut yarn and pull through remaining stitches. Cut 6 pieces of yarn approximately 30ins long. Fold three in half and pull a loop through the front corner of the bonnet. Pull the ends through this loop and braid. Repeat on the other side.
Ears (Make 2)
Cast on 14sts leaving a long enough tail to sew the ear onto the hat with.
Row 1 – knit
Row 2 – purl
Row 3 – k1, m1, k12, m1, k1 (16sts)
Row 4 – purl
Row 5 – k1, m1, k14, m1, k1 (18sts)
Row 6 – purl
Row 7 – k1, m1, k16, m1, k1 (20sts)
Continue in stockinette st until your work measures 6ins from cast on edge ending after finishing a purl row.
Decreases
Row 1 – k1, ssk, k14, k2tog, k1 (18sts)
Row 2 – purl
Row 3 – k1, ssk, k12, k2tog, k1 (16sts)
Row 4 – purl
Row 5 – k1, ssk, k10, k2tog, k1 (14sts)
Row 6 – purl
Row 7 – k1, ssk, ssk, k4, k2tog, k2tog, k1 (10sts)
Row 8 – purl
Row 9 – k1, ssk, ssk, k2tog, k2tog, k1 (6sts)
Do no bind off. Cut yarn leaving appx 6-8ins, pull through remaining 6sts. Cinch together tightly like the back of the bonnet. Weave in ends. Use the top end to sew the ears onto the hat. I like my ears about 1.5ins from the front edge and about 3ins apart. That is my personal preference but placement can be where ever you feel looks best. I just whip stitch them on but you can use whatever method you prefer to attach them.
6-12mths
Cast on 66 sts using the E- cast on or your favorite stretchy cast on.
Row 1 – (k1p1) repeat across
Repeat row 1 until you have worked 6 rows total.
Continue working in stockinette st until your work measures 5.5ins from the cast on edge ending after completing a right side row.
You will now start working in the round. Switch to dpn here.
Round 1 – (k2tog, k9) repeat around (60sts)
Round 2 – (k2tog, k4) repeat around (50sts)
Round 3 – knit
Round 4 – (k2tog, k3) repeat around (40sts)
Round 5 – knit
Round 6 – (k2tog, k2) repeat around (30sts)
Round 7 – knit
Round 8 – (k2tog, k1) repeat around (20sts)
Do not bind off. Cut yarn and pull through remaining stitches. Cut 6 pieces of yarn approximately 30ins long. Fold three in half and pull a loop through the front corner of the bonnet. Pull the ends through this loop and braid. Repeat on the other side.
Ears (Make 2)
Cast on 14sts leaving a long enough tail to sew the ear onto the hat with.
Row 1 – knit
Row 2 – purl
Row 3 – k1, m1, k12, m1, k1 (16sts)
Row 4 – purl
Row 5 – k1, m1, k14, m1, k1 (18sts)
Row 6 – purl
Row 7 – k1, m1, k16, m1, k1 (20sts)
Continue in stockinette st until your work measures 6ins from cast on edge ending after finishing a purl row.
Decreases
Row 1 – k1, ssk, k14, k2tog, k1 (18sts)
Row 2 – purl
Row 3 – k1, ssk, k12, k2tog, k1 (16sts)
Row 4 – purl
Row 5 – k1, ssk, k10, k2tog, k1 (14sts)
Row 6 – purl
Row 7 – k1, ssk, ssk, k4, k2tog, k2tog, k1 (10sts)
Row 8 – purl
Row 9 – k1, ssk, ssk, k2tog, k2tog, k1 (6sts)
Do no bind off. Cut yarn leaving appx 6-8ins, pull through remaining 6sts. Cinch together tightly like the back of the bonnet. Weave in ends. Use the top end to sew the ears onto the hat. I like my ears about 1.5ins from the front edge and about 3ins apart. That is my personal preference but placement can be where ever you feel looks best. I just whip stitch them on but you can use whatever method you prefer to attach them.

Chocolate Bunny Bonnet PDF

Disclaimer: This page contains affiliate links. If you choose to make a purchase after clicking a link, I may receive a commission at no additional cost to you. Thank you for your support!