
Looking for a knit lace mohair bonnet pattern? This sweet photo prop is at the bottom—find more at the featured photo prop pattern page!

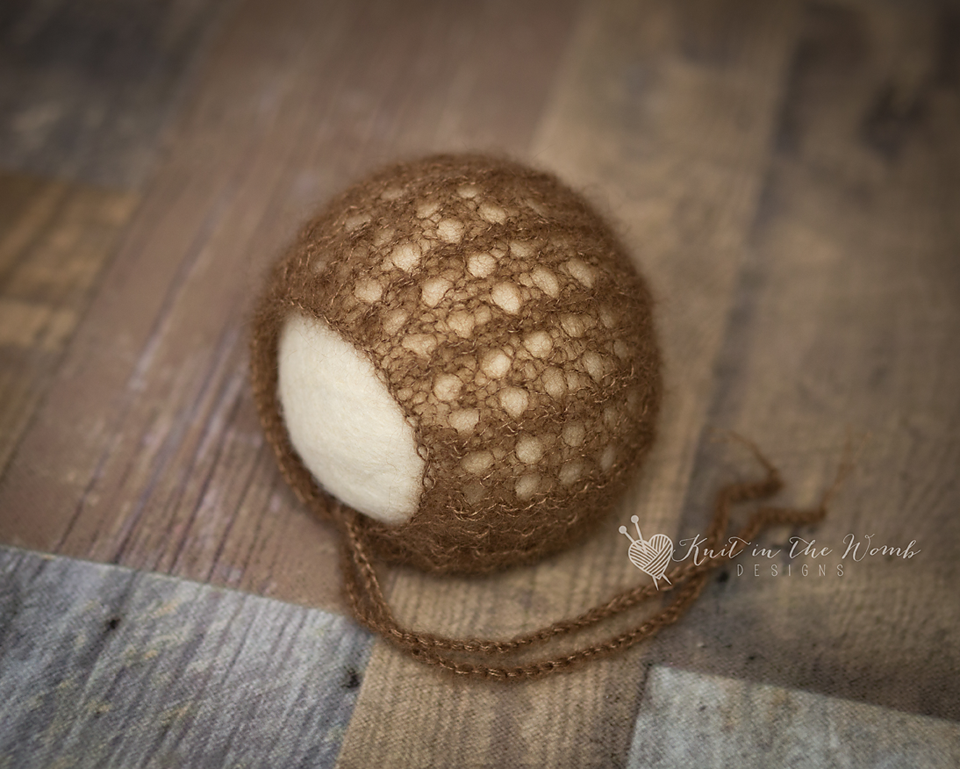
If you’ve ever felt the irresistible urge to knit something delicate and dreamy for a brand-new baby, then let me introduce you to my latest obsession: the Babel Bonnet. This knit lace mohair bonnet pattern is equal parts soft, sweet, and stylish—and I can’t wait to share all the juicy details with you.
THIS pattern is tucked down at the bottom of this post, but if you’re looking for even more delicate, cuddly newborn pieces, head over to my photo prop pattern page where the rest of the bonnets and wraps are waiting for you.
The Inspiration Behind This Knit Lace Mohair Bonnet Pattern
The idea for this knit lace mohair bonnet pattern started during a quiet moment reflecting on how many baby bonnets I’ve knit over the years. As a mom of eight, you can imagine I’ve gone through my fair share of newborn knits! But I realized I was missing something—a go-to lace mohair bonnet that was unisex, timeless, and elegant without being too frilly.
Enter the Babel Bonnet. I wanted this one to be a classic that could be passed down, borrowed by photographer friends, or tucked in a keepsake box for the next generation.

Yarn Matters: Why I Chose KnitPicks Aloft (affiliate link)
When I say this yarn is heavenly, I mean it. I used KnitPicks Aloft (affiliate link) for this knit lace mohair bonnet pattern, and let me tell you—it was love at first stitch. The blend of super kid mohair and silk gives it that perfect airy halo, just enough structure for the lace, and a buttery softness that makes you pause mid-row just to squish it.
KnitPicks Aloft (affiliate link) comes in a whole rainbow of shades, but I kept things classic with a soft, neutral hue. It photographs like a dream and keeps the attention right where it belongs: on that beautiful geometric lace.
The Design: Simple Geometry Meets Delicate Lace
What makes this knit lace mohair bonnet pattern pop is the lace motif—clean, crisp lines in a repeating geometric pattern. It’s got a fresh feel that makes it totally appropriate for both baby boys and girls. I know some folks hear “lace” and immediately think ruffles and bows, but this is not that. This is lace with an edge. Soft and snuggly? Yes. But still modern enough to feel fresh and current.
And even better? It’s knit flat. If you’re not ready to jump into the world of DPNs just yet, this one’s for you.

Let’s Talk Construction: Flat-Knit and Friendly
This knit lace mohair bonnet pattern is knit in one flat piece, seamed up the back, and finished with simple ties. I used straight needles for mine (my happy place!), and the pattern just flows off the needles once you get into the rhythm.
Even though the lace looks fancy, it’s made up of basic stitches—just arranged in a way that makes you look like a total pro. And yes, you’ll feel like one too.
The Joy of Mohair (Especially KnitPicks Aloft—affiliate link)
I know mohair sometimes gets a bad rap for being finicky, but KnitPicks Aloft (affiliate link) is a dream to work with. The silk content helps give it a little slip, so it doesn’t catch on your needles or make you feel like you’re fighting cobwebs. It’s fluff without the fuss.
And because it’s so light, the bonnet doesn’t feel bulky on baby’s head—it’s warm, breathable, and oh-so-soft. The perfect trio.
My Knitting Sessions with This Bonnet
Every time I sat down with this knit lace mohair bonnet pattern, I found myself completely in the zone. There’s something meditative about lace knitting once you hit your groove. Watching the shapes grow row by row is so satisfying.
And as I worked, I kept imagining the sweet little newborn who would wear it one day—those squishy cheeks framed by the fluffiest lace bonnet you ever did see.

Perfect for Photos and Keepsakes
Now let’s talk about why this knit lace mohair bonnet pattern is a photo prop superstar. The airy lace and gentle fluff catch the light just right, whether you’re snapping pictures at home with natural light or heading into a professional studio. It elevates every shot, turning a basic onesie into an heirloom look.
This bonnet also pairs well with just about any backdrop, wrap, or outfit—especially if you’re working in soft neutrals. And because it’s gender-neutral, you can reuse it again and again (ask me how I know!).
A Thoughtful Gift or Handmade Treasure
Whether you’re knitting this for your own baby, a grandchild, or a photographer friend who needs props, this knit lace mohair bonnet pattern hits all the marks. It’s quick enough to finish in a weekend, but special enough to become a keepsake.
The feedback I’ve gotten from knitters and photographers has been so encouraging—this one’s become a fast favorite in many handmade wardrobes and prop baskets.
KnitPicks Aloft (affiliate link): A Yarn Worth Repeating
I don’t often go on and on about a specific yarn, but KnitPicks Aloft (affiliate link) deserves the spotlight. It’s affordable, luxurious, and made this knit lace mohair bonnet pattern come alive in a way that wouldn’t have been possible with a heavier or less-textured yarn.
It’s my go-to for lace bonnets now, and I already have a few more colorways in my cart. Whoops.
Final Thoughts: Try This Knit Lace Mohair Bonnet Pattern Yourself
If you’ve been on the lookout for a knit lace mohair bonnet pattern that feels special but is still practical and wearable, the Babel Bonnet is it. Whether you’re knitting for a new baby in your life, stocking up your photo prop collection, or just looking for something relaxing and lovely to knit—this one’s a winner.
Don’t forget—THIS pattern is at the bottom of the post, but the rest of my lacey, fluffy favorites are hanging out over at the photo prop pattern page.
Go grab your KnitPicks Aloft (affiliate link), pour a cup of something warm, and enjoy a cozy evening of lace knitting. And when you’re done, snap a pic and tag me—I’d love to see your finished bonnet!

Materials and Info
Materials: Knit Picks Aloft (lace weight – 0), size 7 (4.5mm) straight needles, yarn needle, stitch markers
Gauge: 4.5sts x 8r per in ~GAUGE IS VERY IMPORTANT~
Stitch Key:
K – knit
P – purl
yo – yarn over
k2tog – knit 2 together
vdd – vertical double decrease – Insert right needle through the first 2 sts on the left needle as if to knit and slip both together to the right hand needle. Knit the next stitch. Insert the left hand needle through the front of the 2 slipped stitches and pull the slipped stitches over the knitted stitch.
Head circumference: nb (13ins). 0-3mths (14ins), 3-6mth (15ins), 6- 12mths (16ins)

Babel Bonnet Pattern
NEWBORN
Cast on 51sts.
Row 1 – purl across
Row 2 – knit across
Row 3 – purl across
Row 4 – k2 [yo, vdd, yo, k1] repeat [to] across to last st, k1
Repeat rows 1-4 until your work measures appx 3.75ins from cast on edge ending after completing a wrong side (purl) row.
DECREASES
Place one stitch marker on either end of the row just completed.
Row 1 – k1 [k2tog, k5] repeat [to] across to last sts, k1(44sts)
Row 2 – purl across
Row 3 – k1 [k2tog, k4] repeat [to] across to last sts, k1 (37sts)
Row 4 – purl across
Row 5 – k1 [k2tog, k3] repeat [to] across to last sts, k1 (30sts)
Row 6 – purl across
Row 7 – k1 [k2tog, k2] repeat [to] across to last sts, k1 (23sts)
Row 8 – purl across
Row 9 – k1 [k2tog, k1] repeat [to] across to last sts, k1 (16sts)
Row 10 – purl across
Row 11 – p1 [p2tog] repeat [to] across to last st, p1 (9sts)
Do not bind off.
Cut yarn leaving appx 12ins and pull through remaining stitches. Using this end sew the crown together to your stitch markers. (I like to use the mattress stitch since it is nearly invisible).
Cut 6 pieces of yarn approximately 30ins long. Fold 3 in half and pull a loop through the front corner of the bonnet. Pull the ends through this loop. Repeat on the other front corner. Braid ends. OR cut 2 pieces appx 30-36ins long, fold 1 piece through as above. Using a crochet hook (I use a size d for this), slip stitch until your ties are appx 8-10ins long.
0-3 MONTHS
Cast on 55sts.
Row 1 – purl across
Row 2 – knit across
Row 3 – purl across
Row 4 – k2 [yo, vdd, yo, k1] repeat [to] across to last st, k1
Repeat rows 1-4 until your work measures appx 4.25ins from cast on edge ending after completing a right side (knit) row.
DECREASES
Set up row – p12, p2tog, p11, p2tog, p12, p2tog, p11, p2tog, p1 (51sts)
Place one stitch marker on either end of the row just completed.
Row 1 – k1 [k2tog, k5] repeat [to] across to last sts, k1(44sts)
Row 2 – purl across
Row 3 – k1 [k2tog, k4] repeat [to] across to last sts, k1 (37sts)
Row 4 – purl across
Row 5 – k1 [k2tog, k3] repeat [to] across to last sts, k1 (30sts)
Row 6 – purl across
Row 7 – k1 [k2tog, k2] repeat [to] across to last sts, k1 (23sts)
Row 8 – purl across
Row 9 – k1 [k2tog, k1] repeat [to] across to last sts, k1 (16sts)
Row 10 – purl across
Row 11 – p1 [p2tog] repeat [to] across to last st, p1 (9sts)
Do not bind off.
Cut yarn leaving appx 12ins and pull through remaining stitches. Using this end sew the crown together to your stitch markers. (I like to use the mattress stitch since it is nearly invisible).
Cut 6 pieces of yarn approximately 30ins long. Fold 3 in half and pull a loop through the front corner of the bonnet. Pull the ends through this loop. Repeat on the other front corner. Braid ends. OR cut 2 pieces appx 30-36ins long, fold 1 piece through as above. Using a crochet hook (I use a size d for this), slip stitch until your ties are appx 8-10ins long.
3-6 MONTHS
Cast on 59sts.
Row 1 – purl across
Row 2 – knit across
Row 3 – purl across
Row 4 – k2 [yo, vdd, yo, k1] repeat [to] across to last st, k1
Repeat rows 1-4 until your work measures appx 4.75ins from cast on edge ending after completing a right side (knit) row.
DECREASES
Set up row 1 – p56, p2tog, p1 (58sts)
Place one stitch marker on either end of the row just completed.
Row 1 – k1 [k2tog, k5] repeat [to] across to last sts, k1(50sts)
Row 2 – purl across
Row 3 – k1 [k2tog, k4] repeat [to] across to last sts, k1 (42sts)
Row 4 – purl across
Row 5 – k1 [k2tog, k3] repeat [to] across to last sts, k1 (34sts)
Row 6 – purl across
Row 7 – k1 [k2tog, k2] repeat [to] across to last sts, k1 (26sts)
Row 8 – purl across
Row 9 – k1 [k2tog, k1] repeat [to] across to last sts, k1 (18sts)
Row 10 – purl across
Row 11 – p1 [p2tog] repeat [to] across to last st, p1 (10sts)
Do not bind off.
Cut yarn leaving appx 12ins and pull through remaining stitches. Using this end sew the crown together to your stitch markers. (I like to use the mattress stitch since it is nearly invisible).
Cut 6 pieces of yarn approximately 30ins long. Fold 3 in half and pull a loop through the front corner of the bonnet. Pull the ends through this loop. Repeat on the other front corner. Braid ends. OR cut 2 pieces appx 30-36ins long, fold 1 piece through as above. Using a crochet hook (I use a size d for this), slip stitch until your ties are appx 8-10ins long.
6-12 MONTHS
Cast on 65sts.
Row 1 – purl across
Row 2 – knit across
Row 3 – purl across
Row 4 – k3 [yo, vdd, yo, k1] repeat [to] across to last 2sts, k2
Repeat rows 1-4 until your work measures appx 5.5ins from cast on edge ending after completing a wrong side (purl) row.
DECREASES
Place one stitch marker on either end of the row just completed.
Row 1 – k1 [k2tog, k5] repeat [to] across to last sts, k1(56sts)
Row 2 – purl across
Row 3 – k1 [k2tog, k4] repeat [to] across to last sts, k1 (47sts)
Row 4 – purl across
Row 5 – k1 [k2tog, k3] repeat [to] across to last sts, k1 (38sts)
Row 6 – purl across
Row 7 – k1 [k2tog, k2] repeat [to] across to last sts, k1 (29sts)
Row 8 – purl across
Row 9 – k1 [k2tog, k1] repeat [to] across to last sts, k1 (20sts)
Row 10 – purl across
Row 11 – p1 [p2tog] repeat [to] across to last st, p1 (11sts)
Do not bind off.
Cut yarn leaving appx 12ins and pull through remaining stitches. Using this end sew the crown together to your stitch markers. (I like to use the mattress stitch since it is nearly invisible).
Cut 6 pieces of yarn approximately 30ins long. Fold 3 in half and pull a loop through the front corner of the bonnet. Pull the ends through this loop. Repeat on the other front corner. Braid ends. OR cut 2 pieces appx 30-36ins long, fold 1 piece through as above. Using a crochet hook (I use a size d for this), slip stitch until your ties are appx 8-10ins long.
Babel Bonnet PDF

Disclaimer: This page contains affiliate links. If you choose to make a purchase after clicking a link, I may receive a commission at no additional cost to you. Thank you for your support!