
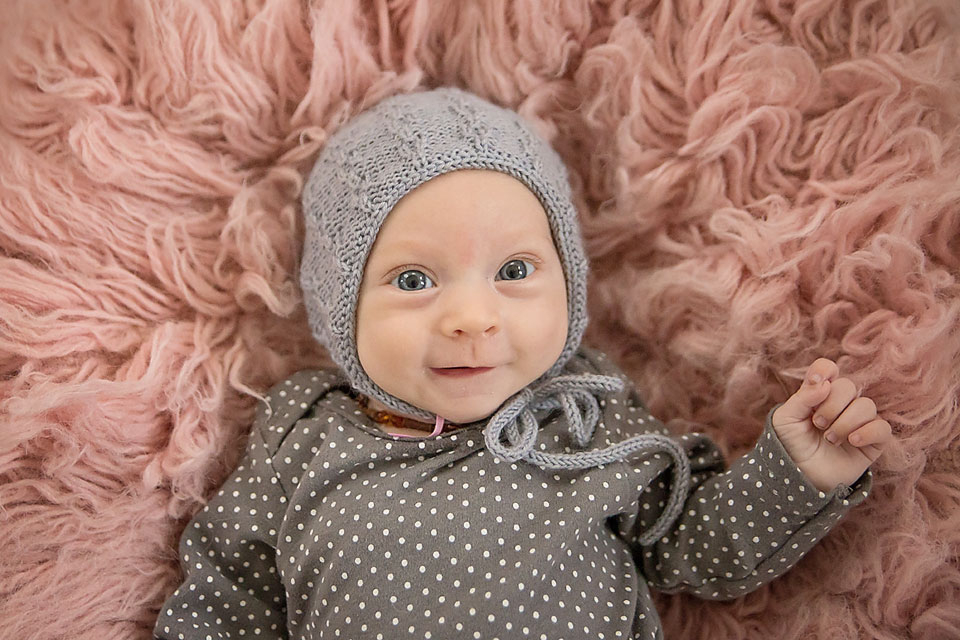
This fingering knit bonnet pattern is the perfect photo prop! Find it at the bottom, and more photo prop patterns at the featured link.

As someone who adores designing newborn photo props, I always keep an eye out for patterns that strike the perfect balance between beautiful and practical. That’s exactly what I found with this fingering knit bonnet pattern—the Cadwyn Bonnet. This little gem is simple, sweet, and packed with just the right amount of texture to make it stand out in a photo shoot.
In this post, I’ll walk you through the entire knitting process for this fingering knit bonnet pattern—why I chose it, the yarn I used, what makes it so fun to knit, and why it’s become one of my favorite go-to props. You’ll find the Cadwyn Bonnet fingering knit bonnet pattern at the bottom of this post, and you can explore even more newborn photo prop patterns right here.
Why This Fingering Knit Bonnet Pattern Stole My Heart
The moment I laid eyes on the Cadwyn Bonnet, I knew it was something special. The stitch pattern has a soft, chain-like texture that gives off a vintage feel without being overly intricate. It’s the kind of look that works perfectly in delicate baby photos without stealing the spotlight.
What really sealed the deal? This fingering knit bonnet pattern is worked flat. Yes, flat! If you’re like me and occasionally need a break from knitting in the round, this is the kind of refreshing project that brings back your knitting mojo.
Yarn Talk: Let’s Chat About KnitPicks Capretta Fingering
For this fingering knit bonnet pattern, I picked KnitPicks Capretta Fingering (affiliate link). It’s this dreamy blend of merino, cashmere, and nylon that glides across your needles like butter. And let’s be real—if I’m making something for a baby, softness is non-negotiable.
The yarn has just the right amount of halo to give the bonnet a luxe vibe, and the stitch definition makes that chain-like texture pop. Plus, since it’s fingering weight, the fabric stays light and delicate, which is ideal for little ones. You can find the yarn I used right here (affiliate link).
Getting Started with the Cadwyn Bonnet
When I first cast on for this fingering knit bonnet pattern, I was giddy. There’s just something about those first few rows—the possibilities, the rhythm, the quiet joy of it. The pattern begins with a simple edge and moves into that lovely chain texture almost immediately.
The stitch pattern itself is just knits and purls, but arranged in a way that’s surprisingly elegant. It’s the kind of project that doesn’t require total silence and a spreadsheet to keep track—just a comfy spot and a good podcast.
The Joy of Flat Knitting
There’s a cozy rhythm to knitting flat that I really appreciated with this fingering knit bonnet pattern. I didn’t have to fiddle with double-pointed needles or worry about tension shifting around the circle. Just back and forth, row after row, watching the texture slowly come to life.
Even better, the instructions are clear enough that I didn’t need to hover over the pattern the entire time. I could actually enjoy the process instead of constantly checking if I messed something up (don’t act like that’s never happened to you).
A Chain-Like Texture That’s Soft and Sophisticated
Let’s talk texture. This fingering knit bonnet pattern features a soft, repeating stitch that mimics little chains—subtle, sweet, and very photogenic. It’s just enough detail to be interesting but not so much that it feels busy.
Every time I held up the bonnet to admire my progress, I found myself smiling. The KnitPicks Capretta Fingering yarn (affiliate link) worked beautifully to bring the pattern to life. The chains stood out cleanly, and the overall fabric had such a lovely hand-feel.
Shaping It Just Right
Shaping this fingering knit bonnet pattern was intuitive and flowed nicely with the stitch pattern. I followed the decrease rows in the instructions and loved how smoothly it transitioned into the back shaping. There’s nothing worse than a stitch pattern that falls apart during shaping, but this one holds its beauty all the way through.
By the time I reached the crown, I had a perfectly rounded shape that framed a newborn’s head just right—snug, but not tight. Soft, but structured.
Adding the Final Touches
Once I finished the main body, it was time to sew the back seam and attach ties. I went with simple i-cord ties because they’re clean and classic—and honestly, they look adorable on literally every bonnet.
Sewing the seam went quickly, and I was careful to line up the stitch pattern as neatly as possible. This fingering knit bonnet pattern deserved a polished finish, and I was proud of how it came together.

A Sweet Project with Big Payoff
This fingering knit bonnet pattern is the kind of project that reminds me why I knit. It’s simple, sweet, and oh-so-satisfying. The KnitPicks Capretta Fingering yarn (affiliate link) made the experience even better with its softness and stitch definition.
Whether you’re knitting for a client’s newborn shoot, making a gift for a baby shower, or simply adding to your photo prop stash, this pattern has you covered. The process is calming, and the finished piece is timeless.
Why You’ll Want to Knit This Again and Again
If you’re anything like me, once you knit one fingering knit bonnet pattern, you’ll want to make five more. The Cadwyn Bonnet has this addictive quality—the kind that makes you reach for your needles the moment your coffee is brewed.
It’s beginner-friendly but elegant, practical but beautiful. And you can easily make it in a range of soft neutrals or soft pastels, depending on your vibe. I’ve got plans to knit this one in every shade of KnitPicks Capretta Fingering (affiliate link) I can get my hands on.
Looking for More Photo Props?
This fingering knit bonnet pattern is just one of many I’ve created for newborn photo sessions. If you love styling your own shoots or need quick handmade gifts, definitely check out the rest of my photo prop knitting patterns right here.
You’ll find a variety of styles, yarn weights, and stitch patterns—all designed with that same balance of cuteness and comfort in mind.
Grab the Pattern Below
And now, the moment you’ve been waiting for—the Cadwyn Bonnet fingering knit bonnet pattern is available at the bottom of this post! Scroll down, download it for free, and get ready for your next baby bonnet obsession.
Happy knitting, and may your project basket always be full of soft yarn, sweet textures, and tiny things that bring you joy.

Materials and Info
Materials: 70-140yds fingering yarn (I used knitpicks capretta), size 3 (3.25mm) needles (straight and dpn),
Gauge: 7sts/in in stockinette st ~GAUGE IS VERY IMPORTANT!!!~
Appx finished size when laid flat: newborn (5x5ins), infant (5.75×5.75ins), sitter/crawler (6.5×6.5ins), toddler (7.25×7.25ins)
Stitch Key:
k – knit
p – purl
p2tog – purl 2 stitches together
k2tog – knit 2 stitches together
ssk – slip 1 knitwise, slip1 knitwise, knit the 2 slipped stitches together

Cadwyn Bonnet Pattern
NEWBORN
Provisional Cast on 72sts
Row 1 (ws) – knit across
Row 2 (rs) – k2, p2, k1, p1 [p5, k1, p1] repeat [to] across to last 3sts, p1, k2
Row 3 – k4, p1, k1 [k5, p1, k1] repeat [to] across to last 3sts, k3
Row 4 – repeat row 2
Row 5 – repeat row 3
Row 6 – k2, p1,k1, p1, k1 [p4, k1, p1, k1] repeat [to] across to last 3sts, p1, k2
Row 7 – k3, p1, k1, p1 [k4, p1, k1, p1] repeat [to] across to last 3sts, k3
Row 8 – repeat row 6
Row 9 – repeat row 7
Repeat rows 2-9 until your work measures appx 3.5ins from cast on edge ending after completing a row 5. Place markers on either end of your final row. These will mark where the crown seam ends.
Decreases
Row 1 – k1, p2, k1, p1, k1 [p1, p2tog, P1, k1, p1, k1] repeat [to] across to last 3 sts, p3 (63sts)
Row 2 – k3, p1, k1, p1 [k3, p1, k1 ,p1] repeat [to] across to last 3sts, k3
Row 3 – p3, k, p1, k1 [p2tog, p1, k1, p1, k1] repeat [to] across to last 3 sts, p3 (54sts)
Row 4 – k3, p1, k1, p1 [k2, p1, k1, p1] repeat [to] across to last 3 sts, k3
Row 5 – p1, p2tog, p1, k1, p1 [p2tog, p1, k1, p1] repeat [to] across to last 3 sts, p2tog, p1 (43sts)
Row 6 – k3, p1 [k3, p1] repeat [to] across to last 3sts, k3
Row 7 – p1, p2tog, k1 [p2tog, p1, k1] repeat [to] across to last 3 sts, p2tog, p1 (32sts)
Row 8 – [k2, p1] repeat [to] across to last 2sts, k2
Row 9 – p1, [k1, p1, k1] repeat [to] across to last st, p1
Row 10 – k1 [p1, k1, p1] repeat [to] across to last st, k1
Row 11 – p1, k1, p1, [k2tog, p1] repeat [to] to last 2sts, k1, p1 (23sts)
Row 12 – k1, [p1, k1] repeat [to] across
Row 13 – p1 [ssk] repeat [to] across (12sts)
Do not bind off. Cut yarn leaving appx -10ins. Pull yarn through remaining stitches and cinch the back tight. Using this end sew the crown together to your stitch markers. (I like to use the mattress stitch since it is nearly invisible).
Ties
Cast on 3sts on double pointed needles and work appx 8-9ins for personal use and 12-14ins for photography use of i-cord (tutorial at the end of the pattern). Place all of the provisional cast on sts on your straight needle (I like to use a circular needle for this but straight will do) and begin i-cord bind off using the length of i-cord you have already worked. Once all of the sts have been bound off work an additional length of i-cord that matches the other tie. Weave in ends.

INFANT
Provisional Cast on 79sts
Row 1 (ws) – knit across
Row 2 (rs) – k2, p2, k1, p1 [p5, k1, p1] repeat [to] across to last 3sts, p1, k2
Row 3 – k4, p1, k1 [k5, p1, k1] repeat [to] across to last 3sts, k3
Row 4 – repeat row 2
Row 5 – repeat row 3
Row 6 – k2, p1,k1, p1, k1 [p4, k1, p1, k1] repeat [to] across to last 3sts, p1, k2
Row 7 – k3, p1, k1, p1 [k4, p1, k1, p1] repeat [to] across to last 3sts, k3
Row 8 – repeat row 6
Row 9 – repeat row 7
Repeat rows 2-9 until your work measures appx 4.25ins from cast on edge ending after completing a row 5. Place markers on either end of your final row. These will mark where the crown seam ends.
Decreases
Row 1 – k1, p2, k1, p1, k1 [p1, p2tog, P1, k1, p1, k1] repeat [to] across to last 3 sts, p3 (69sts)
Row 2 – k3, p1, k1, p1 [k3, p1, k1 ,p1] repeat [to] across to last 3sts, k3
Row 3 – p3, k, p1, k1 [p2tog, p1, k1, p1, k1] repeat [to] across to last 3 sts, p3 (59sts)
Row 4 – k3, p1, k1, p1 [k2, p1, k1, p1] repeat [to] across to last 3 sts, k3
Row 5 – p1, p2tog, p1, k1, p1 [p2tog, p1, k1, p1] repeat [to] across to last 3 sts, p2tog, p1 (47sts)
Row 6 – k3, p1 [k3, p1] repeat [to] across to last 3sts, k3
Row 7 – p1, p2tog, k1 [p2tog, p1, k1] repeat [to] across to last 3 sts, p2tog, p1 (35sts)
Row 8 – [k2, p1] repeat [to] across to last 2sts, k2
Row 9 – p1, [k1, p1, k1] repeat [to] across to last st, p1
Row 10 – k1 [p1, k1, p1] repeat [to] across to last st, k1
Row 11 – p1, k1, p1, [k2tog, p1] repeat [to] to last 2sts, k1, p1 (25sts)
Row 12 – k1, [p1, k1] repeat [to] across
Row 13 – p1 [ssk] repeat [to] across (13sts)
Do not bind off. Cut yarn leaving appx -10ins. Pull yarn through remaining stitches and cinch the back tight. Using this end sew the crown together to your stitch markers. (I like to use the mattress stitch since it is nearly invisible).
Ties
Cast on 3sts on double pointed needles and work appx 8-9ins for personal use and 12-14ins for photography use of i-cord (tutorial at the end of the pattern). Place all of the provisional cast on sts on your straight needle (I like to use a circular needle for this but straight will do) and begin i-cord bind off using the length of i-cord you have already worked. Once all of the sts have been bound off work an additional length of i-cord that matches the other tie. Weave in ends.

SITTER
Provisional Cast on 86sts
Row 1 (ws) – knit across
Row 2 (rs) – k2, p2, k1, p1 [p5, k1, p1] repeat [to] across to last 3sts, p1, k2
Row 3 – k4, p1, k1 [k5, p1, k1] repeat [to] across to last 3sts, k3
Row 4 – repeat row 2
Row 5 – repeat row 3
Row 6 – k2, p1,k1, p1, k1 [p4, k1, p1, k1] repeat [to] across to last 3sts, p1, k2
Row 7 – k3, p1, k1, p1 [k4, p1, k1, p1] repeat [to] across to last 3sts, k3
Row 8 – repeat row 6
Row 9 – repeat row 7
Repeat rows 2-9 until your work measures appx 5ins from cast on edge ending after completing a row 5. Place markers on either end of your final row. These will mark where the crown seam ends.
Decreases
Row 1 – k1, p2, k1, p1, k1 [p1, p2tog, P1, k1, p1, k1] repeat [to] across to last 3 sts, p3 (75sts)
Row 2 – k3, p1, k1, p1 [k3, p1, k1 ,p1] repeat [to] across to last 3sts, k3
Row 3 – p3, k, p1, k1 [p2tog, p1, k1, p1, k1] repeat [to] across to last 3 sts, p3 (64sts)
Row 4 – k3, p1, k1, p1 [k2, p1, k1, p1] repeat [to] across to last 3 sts, k3
Row 5 – p1, p2tog, p1, k1, p1 [p2tog, p1, k1, p1] repeat [to] across to last 3 sts, p2tog, p1 (51sts)
Row 6 – k3, p1 [k3, p1] repeat [to] across to last 3sts, k3
Row 7 – p1, p2tog, k1 [p2tog, p1, k1] repeat [to] across to last 3 sts, p2tog, p1 (38sts)
Row 8 – [k2, p1] repeat [to] across to last 2sts, k2
Row 9 – p1, [k1, p1, k1] repeat [to] across to last st, p1
Row 10 – k1 [p1, k1, p1] repeat [to] across to last st, k1
Row 11 – p1, k1, p1, [k2tog, p1] repeat [to] to last 2sts, k1, p1 (27sts)
Row 12 – k1, [p1, k1] repeat [to] across
Row 13 – p1 [ssk] repeat [to] across (14sts)
Do not bind off. Cut yarn leaving appx -10ins. Pull yarn through remaining stitches and cinch the back tight. Using this end sew the crown together to your stitch markers. (I like to use the mattress stitch since it is nearly invisible).
Ties
Cast on 3sts on double pointed needles and work appx 8-9ins for personal use and 12-14ins for photography use of i-cord (tutorial at the end of the pattern). Place all of the provisional cast on sts on your straight needle (I like to use a circular needle for this but straight will do) and begin i-cord bind off using the length of i-cord you have already worked. Once all of the sts have been bound off work an additional length of i-cord that matches the other tie. Weave in ends.

TODDLER
Provisional Cast on 93sts
Row 1 (ws) – knit across
Row 2 (rs) – k2, p2, k1, p1 [p5, k1, p1] repeat [to] across to last 3sts, p1, k2
Row 3 – k4, p1, k1 [k5, p1, k1] repeat [to] across to last 3sts, k3
Row 4 – repeat row 2
Row 5 – repeat row 3
Row 6 – k2, p1,k1, p1, k1 [p4, k1, p1, k1] repeat [to] across to last 3sts, p1, k2
Row 7 – k3, p1, k1, p1 [k4, p1, k1, p1] repeat [to] across to last 3sts, k3
Row 8 – repeat row 6
Row 9 – repeat row 7
Repeat rows 2-9 until your work measures appx 5.75ins from cast on edge ending after completing a row 5. Place markers on either end of your final row. These will mark where the crown seam ends.
Decreases
Row 1 – k1, p2, k1, p1, k1 [p1, p2tog, P1, k1, p1, k1] repeat [to] across to last 3 sts, p3 (81sts)
Row 2 – k3, p1, k1, p1 [k3, p1, k1 ,p1] repeat [to] across to last 3sts, k3
Row 3 – p3, k, p1, k1 [p2tog, p1, k1, p1, k1] repeat [to] across to last 3 sts, p3 (69sts)
Row 4 – k3, p1, k1, p1 [k2, p1, k1, p1] repeat [to] across to last 3 sts, k3
Row 5 – p1, p2tog, p1, k1, p1 [p2tog, p1, k1, p1] repeat [to] across to last 3 sts, p2tog, p1 (55sts)
Row 6 – k3, p1 [k3, p1] repeat [to] across to last 3sts, k3
Row 7 – p1, p2tog, k1 [p2tog, p1, k1] repeat [to] across to last 3 sts, p2tog, p1 (41sts)
Row 8 – [k2, p1] repeat [to] across to last 2sts, k2
Row 9 – p1, [k1, p1, k1] repeat [to] across to last st, p1
Row 10 – k1 [p1, k1, p1] repeat [to] across to last st, k1
Row 11 – p1, k1, p1, [k2tog, p1] repeat [to] to last 2sts, k1, p1 (29sts)
Row 12 – k1, [p1, k1] repeat [to] across
Row 13 – p1 [ssk] repeat [to] across (15sts)
Do not bind off. Cut yarn leaving appx -10ins. Pull yarn through remaining stitches and cinch the back tight. Using this end sew the crown together to your stitch markers. (I like to use the mattress stitch since it is nearly invisible).
Ties
Cast on 3sts on double pointed needles and work appx 8-9ins for personal use and 12-14ins for photography use of i-cord (tutorial at the end of the pattern). Place all of the provisional cast on sts on your straight needle (I like to use a circular needle for this but straight will do) and begin i-cord bind off using the length of i-cord you have already worked. Once all of the sts have been bound off work an additional length of i-cord that matches the other tie. Weave in ends.
Cadwyn Bonnet PDF
Disclaimer: This page contains affiliate links. If you choose to make a purchase after clicking a link, I may receive a commission at no additional cost to you. Thank you for your support!