
Looking for an easy knit bonnet pattern? This one’s sweet, simple, and featured on my photo prop pattern page—link below! This specific pattern is at the bottom of this post.

There’s just something about a baby in a hand-knit bonnet that gets me every time. The soft yarn, the sweet shape, and the knowledge that every stitch was made with love—what’s not to swoon over? If you’ve been on the hunt for an easy knit bonnet pattern that brings timeless charm without the overwhelm, I’ve got you. Let me introduce you to one of my favorite little projects: the Cailloux Bonnet.
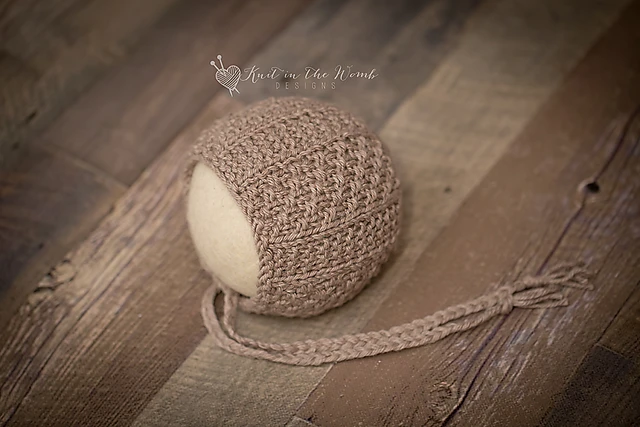
Yes, it’s French. And yes, it’s as lovely as it sounds. “Cailloux” means pebbles, which perfectly captures the look of this bonnet’s textured fabric. But don’t worry—despite the fancy name, this is 100% an easy knit bonnet pattern, perfect for adventurous beginners or seasoned knitters wanting a relaxing project.
Why I Love a Good Easy Knit Bonnet Pattern
Whenever I sit down to create a new design, I try to think about what’s missing in my collection. I have plenty of lace, cables, and quirky textures, but I wanted something calm—something meditative to knit and beautiful to photograph. That’s exactly what this easy knit bonnet pattern delivers.
The texture was inspired by a stroll I took on a pebbled path in a tiny French village. I know, it sounds like a scene from a postcard—but I promise, it happened! I loved how the uneven stones somehow created a natural harmony, and it reminded me of newborns: each unique, soft, and full of personality.
That little walk became the seed of this easy knit bonnet pattern.
Yarn Talk (Let’s Get Squishy)
For this pattern, I used KnitPicks Comfy Worsted yarn (affiliate link), which has been my go-to for soft baby knits lately. It’s a blend of cotton and acrylic—super soft, easy to wash, and gentle on those fresh little baby cheeks. The worsted weight gives it just the right amount of warmth without making it bulky or heavy.
You could definitely substitute with any worsted weight yarn you love, but I’m partial to the way KnitPicks Comfy Worsted (affiliate link) knits up in this texture. The definition is beautiful, and it makes the pattern look way more complicated than it is. Win-win!
What Makes This an Easy Knit Bonnet Pattern?
Oh, I’m so glad you asked. Let me count the ways:
- No complicated shaping. The pattern uses basic increases and decreases—nothing fancy or confusing.
- Simple stitch repeat. You’ll have the rhythm of it down in no time, and it’s the kind of pattern you can knit while watching your favorite show (or hiding from your kids in the laundry room, no judgment).
- Perfect for gifting. If you’re like me, you’re always looking for a quick but meaningful baby shower gift. This easy knit bonnet pattern checks all the boxes.
My Knitting Process (and How Many Times I Frogged It)
You’d think something simple wouldn’t require much trial and error, but I was determined to get the texture just right. I knit and re-knit this easy knit bonnet pattern three times before I settled on the perfect balance of simplicity and interest. Once it clicked? Magic. Well—metaphorically speaking.
I knit the whole thing over two evenings, sipping chamomile tea and rewatching season three of my favorite show. The rhythm of the pattern is soothing, and you end up with a bonnet that looks way more complicated than it actually is.
The Ideal Newborn Photo Prop
As someone who designs a lot of newborn photo prop patterns, I can confidently say this one is a star. The subtle texture of this easy knit bonnet pattern photographs beautifully. It’s soft, timeless, and looks great from every angle.
I’ve seen it paired with chunky swaddles, vintage rompers, and even just a bare baby belly—and it adds that little something extra without stealing the spotlight. It frames those tiny faces just perfectly.
And if you’re using it in your own newborn sessions, get ready—parents are going to ask where you got it.
Helpful Tips for Knitting Your Own
If you’re planning to give this easy knit bonnet pattern a try (yay!), here are a few things I learned along the way:
- Stick with worsted weight yarn. I used KnitPicks Comfy Worsted (affiliate link), and the thickness is perfect—not too warm, not too light.
- Block it gently. The textured pattern opens up just a bit with blocking, and it really makes a difference in the final shape.
- Try it in neutral tones. I’ve knit this in soft grey, dusty pink, and cream, and they all look beautiful. But of course, bold colors would be fun too.
- Don’t rush the ties! A good i-cord tie finishes it off so nicely, and you don’t want to slap that on after doing all the beautiful work.
More Patterns Where That Came From
If you’re loving the idea of an easy knit bonnet pattern, you’re in the right place. I have tons of other photo prop patterns you can check out on my free photo prop pattern page. From lacy wraps to fluffy mohair sets, there’s something for every knitter and every baby.
But if you’re here for this specific easy knit bonnet pattern, the Cailloux Bonnet, scroll down to the bottom of this post to find it. It’s all yours!
Why I Keep Coming Back to This Pattern
Sometimes a pattern just sticks with you. The Cailloux Bonnet is one of those for me. It’s simple, sweet, and so rewarding to knit. I’ve made it in five different colors now, gifted a couple to friends, and used it in multiple photoshoots.
It’s the kind of easy knit bonnet pattern that becomes a staple in your handmade gift rotation. And honestly? It’s hard not to feel proud when you finish it.
Whether you’re new to knitting or just want a quick win, this easy knit bonnet pattern is one you’ll want to bookmark.
So, ready to cast on?
You can find the Cailloux Bonnet free pattern at the bottom of this post, and make sure to browse through my full collection of photo prop knitting patterns here. Happy knitting—and let me know in the comments what color you’ll knit yours in!

Materials and Info
Materials: appx 40-80yd worsted weight yarn, size 8 (5mm) straight
needles or (size needed to obtain gauge), yarn needle
Gauge: appx 4sts/inch Gauge is very important!
Sizes (appx finished head circumference) : newborn (13ins), sitter (16ins)
Stitch Key
K – knit
p – purl
K2tog – knit 2 stitches together
Cailloux Bonnet Pattern
NEWBORN
Cast on 45sts.
Row 1 – knit across
Row 2 – k1 [k4, p1, k1, p1, k1, p1, k1] repeat [to] to last 4 sts, k4
Row 3 – k1 [k3, p1, k1, p1, k1, p1, k1, p1,] repeat [to] to last 4 sts, k4
Row 4 – k1 [k5, p1, k1, p1, k2] repeat [to] to last 4 sts, k4
Row 5 – k1 [k3, p2, k1, p1, k1, p2] repeat [to] to last 4sts, k4
Repeat rows 2-5 unitl your work measures appx 3.5ins from cast on edge ending after completing a wrong side (odd) row. Place stitch markers at either end of your last row.
DECREASES
Row 1 – k1, k2tog, k42 (44sts)
Row 2 – purl across
Row 3 – k1 (k2tog, k4) repeat (to) to last st, k1 (37sts)
Row 4 – purl across
Row 5 – k1 (k2tog, k3) repeat (to) to last st, k1 (30sts)
Row 6 – purl across
Row 7 – k1 (k2tog, k2) repeat (to) to last st, k1 (23sts)
Row 8 – purl across
Row 9 – k1 (k2tog, k1) repeat (to) to last st, k1 (16sts)
Row 10 – purl across
Row 11 – k1 (k2tog) repeat (to) to last st, k1 (9sts)
Do not bind off. Cut yarn leaving appx -10ins. Pull yarn through remaining stitches and cinch the back tight. Using this end sew the crown together to your stitch markers. (I like to use the mattress stitch since it is nearly invisible). Cut 3 pieces of yarn approximately 30ins long. Fold them in half and pull a loop through the front corner of the hood. Pull the ends through this loop and braid. Repeat on the other side. These are your ties.
SITTER
Cast on 55sts.
Row 1 – knit across
Row 2 – k1 [k4, p1, k1, p1, k1, p1, k1] repeat [to] to last 4 sts, k4
Row 3 – k1 [k3, p1, k1, p1, k1, p1, k1, p1,] repeat [to] to last 4 sts, k4
Row 4 – k1 [k5, p1, k1, p1, k2] repeat [to] to last 4 sts, k4
Row 5 – k1 [k3, p2, k1, p1, k1, p2] repeat [to] to last 4sts, k4
Repeat rows 2-5 until your work measures appx 5ins from cast on edge ending after completing a wrong side (odd) row. Place stitch markers at either end of your last row.
DECREASES
Row 1 – k1 (k2tog, k4) repeat (to) across(46sts)
Row 2 – purl across
Row 3 – knit across
Row 4 – purl across
Row 5 – k1 (k2tog, k3) repeat (to) across (37sts)
Row 6 – purl across
Row 7 – k1 (k2tog, k2) repeat (to) across (28sts)
Row 8 – purl across
Row 9 – k1 (k2tog, k1) repeat (to) across (19sts)
Row 10 – purl across
Row 11 – k1 (k2tog) repeat (to) across (10sts)
Do not bind off. Cut yarn leaving appx -10ins. Pull yarn through remaining stitches and cinch the back tight. Using this end sew the crown together to your stitch markers. (I like to use the mattress stitch since it is nearly invisible). Cut 3 pieces of yarn approximately 30ins long. Fold them in half and pull a loop through the front corner of the hood. Pull the ends through this loop and braid. Repeat on the other side. These are your ties.
Cailloux Bonnet PDF
Disclaimer: This page contains affiliate links. If you choose to make a purchase after clicking a link, I may receive a commission at no additional cost to you. Thank you for your support!