
Looking for a free lace knit bonnet pattern? The Mary Bonnet is below—find more on my hat pattern page!

Creating a free lace knit bonnet pattern is one of my favorite things to do—especially when it’s designed with newborn photo props in mind. There’s just something so heartwarming about knitting a delicate little bonnet that’s meant to frame a baby’s sweet face in those early, blink-and-you’ll-miss-it moments.
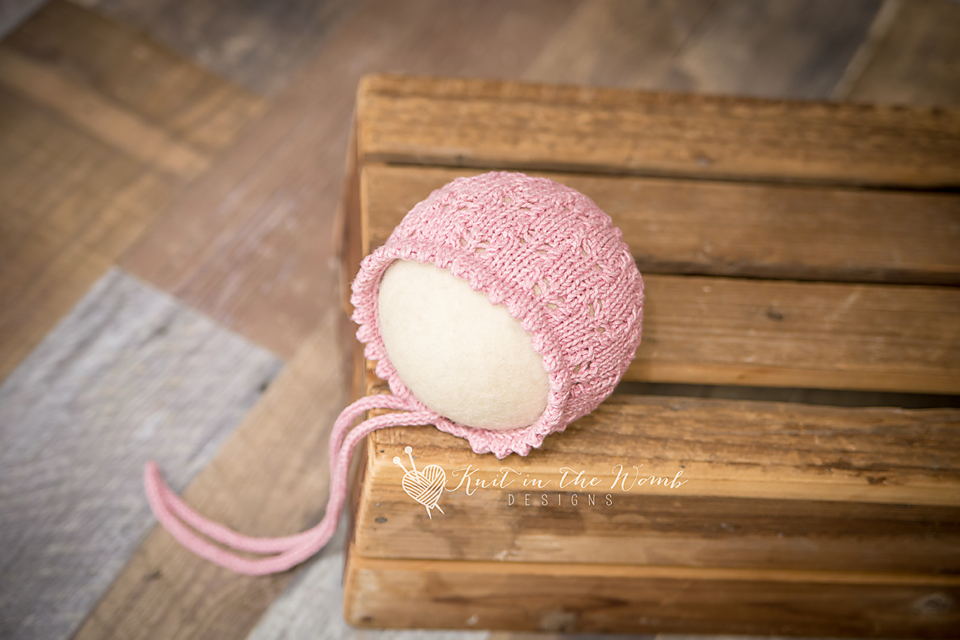
The Mary Bonnet is one of those projects that stole my heart from the moment the idea popped into my head. It shares its gorgeous lace stitch with the Mary Pixie Bonnet and has the same precious picot hem edge you’ll recognize if you’ve knit the June Dress. If you’re on the hunt for a free lace knit bonnet pattern that’s both photo-worthy and sweet enough to pass down, this one’s for you.
This exact pattern is at the bottom of this post, but you can find the rest of my free bonnet, beanie, and hat patterns right over on my hat pattern page.

The Sweet Charm of a Picot Hem
Let’s talk about that picot hem edge for a minute. I knew right away that the Mary Bonnet needed something soft and feminine to finish it off—and the picot hem was it! This tiny touch adds a vintage feel that makes the bonnet so photogenic. You might even recognize it from my June Dress patterns, which have the same dainty detail around the hem and sleeves.
Not only does this little hem look polished, it also sits gently against baby’s delicate skin. And yes—please remember that while these bonnets are lovely for photos, babies should never be left unattended while wearing them.

Why I Fell in Love with Lace
The heart of this free lace knit bonnet pattern is the lace stitch itself. I’ve always had a soft spot for lace knitting. It’s like this magical little transformation of yarn into air—almost like painting with thread. There’s rhythm, there’s grace, and at the end, there’s this stunning textured fabric that looks way more complicated than it actually is.
I designed this lace stitch to be beginner-friendly, with just enough challenge to keep it interesting. Whether you’re watching reruns or sipping iced coffee during nap time, it’s a relaxing knit that still feels rewarding. And best of all—it stretches a little to fit snuggly, which makes it ideal for tiny newborn heads.

I-Cord Ties That Are Cute and Functional
Another feature I absolutely adore in this free lace knit bonnet pattern is the i-cord ties. They’re clean, classic, and give the bonnet that tailored, professional finish. They also keep everything securely in place during photo shoots (because let’s be honest, newborns are wiggle monsters). I love how the i-cord detail balances the lacy look with something a little more structured.

Yarn Choices: What I Used and What I Recommend
Originally, I knit the Mary Bonnet using Berroco Corsica, a cotton and cashmere blend that was perfectly soft and dreamy. Unfortunately, it’s been discontinued (I know, tragic). But don’t worry—I’ve got your back!
A great substitute is KnitPicks Heatherly (affiliate link). It’s buttery soft and has excellent stitch definition, which makes the lace pattern pop. It’s also gentle enough for baby’s sensitive skin—because let’s be real, if we’re going to the trouble of knitting a free lace knit bonnet pattern, we want it to be comfy as well as cute.
So whether you’re digging through your stash for something similar to Corsica, or ordering a fresh skein of Heatherly (affiliate link), you’re in good hands.

Picking the Perfect Color
One of the things I love most about this free lace knit bonnet pattern is how versatile it is with color. Neutral tones like cream, soft gray, or dusty pink give that timeless, heirloom feel, while bold choices like mustard or forest green make the bonnet pop in modern photo shoots.
Whatever palette you lean toward, make sure you pick something that complements the softness of the lace pattern. Even bright colors look elegant when paired with that vintage-style picot hem.

Handmade Keepsakes That Matter
This free lace knit bonnet pattern isn’t just about the knitting—it’s about creating keepsakes. I can’t count the number of times I’ve seen one of my patterns pop up in a new baby’s announcement photos or tucked in a shadowbox alongside hospital bracelets and footprints. It means so much to be part of those memories.
And if you’re the gift-giving type? The Mary Bonnet makes an incredible handmade baby shower gift. It’s thoughtful, it’s practical, and it says “I made this just for your little one.” Few things are more special than that.

Seeing Your Finished Projects
One of my favorite things ever is seeing your finished versions of this free lace knit bonnet pattern. Whether you’re tagging me on Instagram or sharing in knitting groups, I just love how each knitter puts their own spin on the Mary Bonnet. Different colors, yarn swaps, or even a few added embellishments—every version has its own story.
And hey, if you haven’t already, make sure to check out the matching Mary Pixie Bonnet and June Dress too. There’s nothing cuter than a fully coordinated photo shoot setup!

A Few Friendly Reminders
If you’re giving it as a gift, include a little card with safety tips for the parents—trust me, they’ll appreciate it.
Always choose soft, baby-safe yarn like KnitPicks Heatherly (affiliate link).
This free lace knit bonnet pattern is intended for supervised newborn photography use only. Never leave baby alone wearing the bonnet.

In Case You Missed It…
You’ve now heard the backstory, the yarn secrets, and the styling ideas for this free lace knit bonnet pattern. Ready to get those needles moving? The Mary Bonnet pattern is right below—scroll down and dive in!
And if you’re looking for even more adorable baby hat patterns (some lacy, some classic), I’ve got a whole collection waiting for you on my hat pattern page. Go take a peek!

Materials and Info
Materials – appx 65-150yds sport weight (size 3) yarn (I used Berroco Corisca which is discontinued. A great option instead is KnitPicks Heatherly), size 4 (3.5mm) straight AND dpn, 2 stitch markers, yarn needle
Gauge -6sts/in
Sizes – newborn, 0-3mth, (3-6mth, 6- 12m), toddler, child
Appx Finished Measurements – Newborn 5x5ins, 0-3m 5.5×5.5ins, 3-6m 6x6ins, 6- 12mth 6.5×6.5ins, toddler 7x7ins, child 7.5×7.5ins (measurements are for bonnet when laid flat)
ABBREVIATIONS
k – knit
P – purl
k2tog -knit 2 stitches together
ssk – slip next st knitwise, slip next st knitwise, place stitches back onto left needle, knit both slipped sts together
yo – yarn over

Mary Bonnet Pattern
NEWBORN
Cast on 62sts using long tail cast on – leave a very long tail (appx 3ft) so you can sew your hemmed edge
Row 1 – Purl across
Row 2 – Knit across
Row 3 – Purl across
Row 4 (picot row) – K2 [k2tog, yo] repeat [to] across to last 2sts, k2
Row 5 – Purl across
Row 6 – Knit across
Row 7 – Purl across
Row 8 – knit across
Row 9 – purl across
Row 10 – k3, [k2tog, yo, k1, yo, ssk, k3] repeat [to] across to last 3sts, k3
Row 11 – purl across
Row 12 – repeat row 10
Row 13 – purl across
Row 14 – knit across
Row 15 – purl across
Row 16 – k4, [k3, k2tog, yo, k1, yo, ssk] repeat [to] to last 2sts, k2
Row 17 – purl across
Row 18 – repeat row 16
Row 19 – purl across
Row 20 – knit across
Row 21 – purl across
Repeat rows 10-21 until your work measures 4ins from the picot row. End after completing a purl row. Place a marker on either end of this last row. This will be where your seam ends to form the crown.
DECREASES
Row 1 – k1, [k2tog, k4] repeat [to] across to last st, k1 (52sts)
Row 2 – purl across
Row 3 – k1, [k2tog, k3] repeat [to] across to last st, k1 (42sts)
Row 4 – purl across
Row 5 – k1, [k2tog, k2] repeat [to] across to last st, k1 (32sts)
Row 6 – purl across
Row 7 – k1, [k2tog, k1] repeat [to] across to last st, k1 (22sts)
Row 8 – purl across
Row 9 – k1, [k2tog] repeat [to] across to last st, k1 (12sts)
Do not bind off. Cut yarn leaving appx 12ins and pull through remaining stitches. Using this end sew the crown together to your stitch markers. (I like to use the mattress stitch since it is nearly invisible). Sew your hemmed edge folding it on the picot row. I do a simple whip stitch here. Pick up 3sts along the front corner of your bonnet and work an i-cord for 12ins. Do the same on the opposite front corner. Weave in ends and block
0-3 MONTHS
Cast on 66sts using long tail cast on – leave a very long tail (appx 3ft) so you can sew your hemmed edge
Row 1 – Purl across
Row 2 – Knit across
Row 3 – Purl across
Row 4 (picot row) – K2 [k2tog, yo] repeat [to] across to last 2sts, k2
Row 5 – Purl across
Row 6 – Knit across
Row 7 – Purl across
Row 8 – knit across
Row 9 – purl across
Row 10 – k1, [k2tog, yo, k1, yo, ssk, k3] repeat [to] across to last st
Row 11 – purl across
Row 12 – repeat row 10
Row 13 – purl across
Row 14 – knit across
Row 15 – purl across
Row 16 – k2, [k3, k2tog, yo, k1, yo, ssk] repeat [to] across
Row 17 – purl across
Row 18 – repeat row 16
Row 19 – purl across
Row 20 – knit across
Row 21 – purl across
Repeat rows 10-21 until your work measures 4.5ins from the picot row. End after completing a purl row. Place a marker on either end of this last row. This will be where your seam ends to form the crown.
DECREASES
Row 1 – [k2tog, k4] repeat [to] across (55sts)
Row 2 – purl across
Row 3 – [k2tog, k3] repeat [to] across (44sts)
Row 4 – purl across
Row 5 – [k2tog, k2] repeat [to] across (33sts)
Row 6 – purl across
Row 7 – [k2tog, k1] repeat [to] across (22sts)
Row 8 – purl across
Row 9 – [k2tog] repeat [to] across (11sts)
Do not bind off. Cut yarn leaving appx 12ins and pull through remaining stitches. Using this end sew the crown together to your stitch markers. (I like to use the mattress stitch since it is nearly invisible). Sew your hemmed edge folding it on the picot row. I do a simple whip stitch here. Pick up 3sts along the front corner of your bonnet and work an i-cord for 12ins. Do the same on the opposite front corner. Weave in ends and block
3-6 MONTH
Cast on 70sts using long tail cast on – leave a very long tail (appx 3ft) so you can sew your hemmed edge
Row 1 – Purl across
Row 2 – Knit across
Row 3 – Purl across
Row 4 (picot row) – K2 [k2tog, yo] repeat [to] across to last 2sts, k2
Row 5 – Purl across
Row 6 – Knit across
Row 7 – Purl across
Row 8 – knit across
Row 9 – purl across
Row 10 – k3, [k2tog, yo, k1, yo, ssk, k3] repeat [to] across to last 3sts, k3
Row 11 – purl across
Row 12 – repeat row 10
Row 13 – purl across
Row 14 – knit across
Row 15 – purl across
Row 16 – k4, [k3, k2tog, yo, k1, yo, ssk] repeat [to] to last 2sts. K2
Row 17 – purl across
Row 18 – repeat row 16
Row 19 – purl across
Row 20 – knit across
Row 21 – purl across
Repeat rows 10-21 until your work measures 4.75ins from the picot row. End after completing a purl row. Place a marker on either end of this last row. This will be where your seam ends to form the crown.
DECREASES
Row 1 – [k2tog, k5] repeat [to] across (60sts)
Row 2– purl across
Row 3 – [k2tog, k4] repeat [to] across (50sts)
Row 4 – purl across
Row 5 – [k2tog, k3] repeat [to] across (40sts)
Row 6 – purl across
Row 7 – [k2tog, k2] repeat [to] across (30sts)
Row 8 – purl across
Row 9 – [k2tog, k1] repeat [to] across (20sts)
Row 10 – purl across
Row 11 – [k2tog] repeat [to] across (10sts)
Do not bind off. Cut yarn leaving appx 12ins and pull through remaining stitches. Using this end sew the crown together to your stitch markers. (I like to use the mattress stitch since it is nearly invisible). Sew your hemmed edge folding it on the picot row. I do a simple whip stitch here. Pick up 3sts along the front corner of your bonnet and work an i-cord for 12ins. Do the same on the opposite front corner. Weave in ends and block

6-12 MONTH
Cast on 78sts using long tail cast on – leave a very long tail (appx 3ft) so you can sew your hemmed edge
Row 1 – Purl across
Row 2 – Knit across
Row 3 – Purl across
Row 4 (picot row) – K2 [k2tog, yo] repeat [to] across to last 2sts, k2
Row 5 – Purl across
Row 6 – Knit across
Row 7 – Purl across
Row 8 – knit across
Row 9 – purl across
Row 10 – k3, [k2tog, yo, k1, yo, ssk, k3] repeat [to] across to last 3sts, k3
Row 11 – purl across
Row 12 – repeat row 10
Row 13 – purl across
Row 14 – knit across
Row 15 – purl across
Row 16 – k4, [k3, k2tog, yo, k1, yo, ssk] repeat [to] to last 2sts. K2
Row 17 – purl across
Row 18 – repeat row 16
Row 19 – purl across
Row 20 – knit across
Row 21 – purl across
Repeat rows 10-21 until your work measures 5.25ins from the picot row. End after completing a purl row. Place a marker on either end of this last row. This will be where your seam ends to form the crown.
DECREASES
Row 1 – k1 [k2tog, k5] repeat [to] across to last st, k1 (67sts)
Row 2– purl across
Row 3 – k1 [k2tog, k4] repeat [to] across to last st, k1 (56sts)
Row 4 – purl across
Row 5 – k1 [k2tog, k3] repeat [to] across to last st, k1 (45sts)
Row 6 – purl across
Row 7 – k1 [k2tog, k2] repeat [to] across to last st, k1 (34sts)
Row 8 – purl across
Row 9 – k1 [k2tog, k1] repeat [to] across to last st, k1 (23sts)
Row 10 – purl across
Row 11 – k1 [k2tog] repeat [to] across to last st, k1 (12sts)
Do not bind off. Cut yarn leaving appx 12ins and pull through remaining stitches. Using this end sew the crown together to your stitch markers. (I like to use the mattress stitch since it is nearly invisible). Sew your hemmed edge folding it on the picot row. I do a simple whip stitch here. Pick up 3sts along the front corner of your bonnet and work an i-cord for 12ins. Do the same on the opposite front corner. Weave in ends and block.
TODDLER
Cast on 86sts using long tail cast on – leave a very long tail (appx 3ft) so you can sew your hemmed edge
Row 1 – Purl across
Row 2 – Knit across
Row 3 – Purl across
Row 4 (picot row) – K2 [k2tog, yo] repeat [to] across to last 2sts, k2
Row 5 – Purl across
Row 6 – Knit across
Row 7 – Purl across
Row 8 – knit across
Row 9 – purl across
Row 10 – k3, [k2tog, yo, k1, yo, ssk, k3] repeat [to] across to last 3sts, k3
Row 11 – purl across
Row 12 – repeat row 10
Row 13 – purl across
Row 14 – knit across
Row 15 – purl across
Row 16 – k4, [k3, k2tog, yo, k1, yo, ssk] repeat [to] to last 2sts. K2
Row 17 – purl across
Row 18 – repeat row 16
Row 19 – purl across
Row 20 – knit across
Row 21 – purl across
Repeat rows 10-21 until your work measures 5.75ins from the picot row. End after completing a purl row. Place a marker on either end of this last row. This will be where your seam ends to form the crown.
DECREASES
Row 1 – k1 [k2tog, k5] repeat [to] across to last st, k1 (74sts)
Row 2– purl across
Row 3 – k1 [k2tog, k4] repeat [to] across to last st, k1 (62sts)
Row 4 – purl across
Row 5 – k1 [k2tog, k3] repeat [to] across to last st, k1 (50sts)
Row 6 – purl across
Row 7 – k1 [k2tog, k2] repeat [to] across to last st, k1 (38sts)
Row 8 – purl across
Row 9 – k1 [k2tog, k1] repeat [to] across to last st, k1 (26sts)
Row 10 – purl across
Row 11 – k1 [k2tog] repeat [to] across to last st, k1 (14sts)
Do not bind off. Cut yarn leaving appx 12ins and pull through remaining stitches. Using this
end sew the crown together to your stitch markers. (I like to use the mattress stitch since it is
nearly invisible). Sew your hemmed edge folding it on the picot row. I do a simple whip stitch here. Pick up 3sts along the front corner of your bonnet and work an i-cord for 12ins. Do the same on the opposite front corner. Weave in ends and block
CHILD
Cast on 90sts using long tail cast on – leave a very long tail (appx 3ft) so you can sew your hemmed edge
Row 1 – Purl across
Row 2 – Knit across
Row 3 – Purl across
Row 4 (picot row) – K2 [k2tog, yo] repeat [to] across to last 2sts, k2
Row 5 – Purl across
Row 6 – Knit across
Row 7 – Purl across
Row 8 – knit across
Row 9 – purl across
Row 10 – k1, [k2tog, yo, k1, yo, ssk, k3] repeat [to] across to last st, k1
Row 11 – purl across
Row 12 – repeat row 10
Row 13 – purl across
Row 14 – knit across
Row 15 – purl across
Row 16 – k2, [k3, k2tog, yo, k1, yo, ssk] repeat [to] across
Row 17 – purl across
Row 18 – repeat row 16
Row 19 – purl across
Row 20 – knit across
Row 21 – purl across
Repeat rows 10-21 until your work measures 6.25ins from the picot row. End after completing a purl row. Place a marker on either end of this last row. This will be where your seam ends to form the crown.
DECREASES
Row 1 – k1 [k2tog, k6] repeat [to] across to last st, k1 (79sts)
Row 2 – purl across
Row 3 – k1 [k2tog, k5] repeat [to] across to last st, k1 (68sts)
Row 4 – purl across
Row 5 – k1 [k2tog, k4] repeat [to] across to last st, k1 (57sts)
Row 6 – purl across
Row 7 – k1 [k2tog, k3] repeat [to] across to last st, k1 (46sts)
Row 8 – purl across
Row 9 – k1 [k2tog, k2] repeat [to] across to last st, k1 (35sts)
Row 10 – purl across
Row 11 – k1 [k2tog, k1] repeat [to] across to last st, k1 (24sts)
Row 12 – purl across
Row 13 – k1 [k2tog] repeat [to] across to last st, k1 (13sts)
Do not bind off. Cut yarn leaving appx 12ins and pull through remaining stitches. Using this end sew the crown together to your stitch markers. (I like to use the mattress stitch since it is nearly invisible). Sew your hemmed edge folding it on the picot row. I do a simple whip stitch here.

Mary Bonnet PDF

Disclaimer: This page contains affiliate links. If you choose to make a purchase after clicking a link, I may receive a commission at no additional cost to you. Thank you for your support!