
Discover your new favorite newborn photo prop on my photo prop pattern page! Find this adorable free cable bonnet pattern at the bottom of this post.

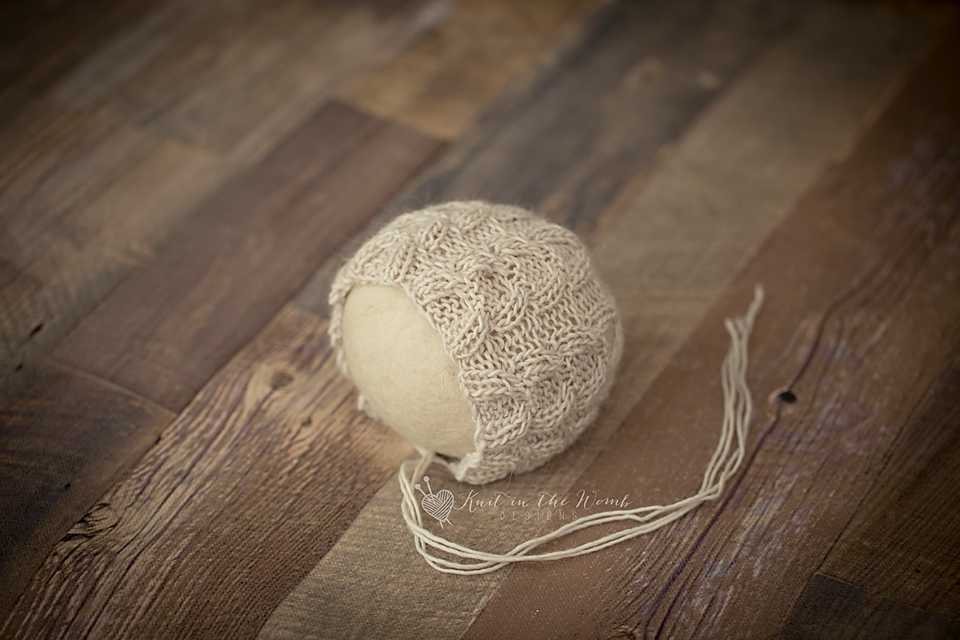
If there’s one thing I love more than knitting, it’s knitting adorable baby props. Today, I’m beyond excited to share my newest creation with you—the Samson Bonnet, a free cable bonnet pattern that checks all my boxes for cuteness, coziness, and photo-worthy charm.
Keep reading for all the cozy details (and don’t forget—this pattern is right at the bottom of this post, while more delightful designs await you at my featured photo prop pattern page. Let’s dive in!

Inspiration Behind This Free Cable Bonnet Pattern
I wanted to create something elegant and timeless for newborn photography—something special that photographers and parents alike would instantly fall in love with. When I think of classic and cozy, I immediately picture beautiful, intricate cables. So naturally, cables became the star of this free cable bonnet pattern.
I named it “Samson” because, to me, the cable details feel both strong and charming—qualities perfect for a sweet newborn photo prop.
Why Choose Cables for Your Bonnet?
Let’s talk cables. Yes, I know—cables can look tricky at first, but trust me, they’re worth every twist. Nothing elevates a knitting pattern quite like gorgeous cable texture. The Samson Bonnet’s cables provide visual depth and sophistication, making it the ideal accessory to highlight those precious newborn moments.
And honestly, once you master cables, you’ll find yourself craving more cable projects—consider yourself warned!

Selecting Yarn for Your Free Cable Bonnet Pattern
When crafting a newborn photo prop, choosing the right yarn is essential. It must be soft and cozy for baby’s delicate skin while sturdy enough for handling during a photo shoot. Initially, I used a dreamy alpaca/wool blend (which is discontinued but a great replacement is KnitPicks Woolen Cotton (affiliate link)). It provided incredible softness, breathability, and the crisp stitch definition necessary to make those cables pop.
Even though my original yarn pick is no longer available, don’t worry—I’ve found that KnitPicks Woolen Cotton (affiliate link) is the perfect substitute. It checks all the same boxes and ensures your bonnet will turn out beautifully.
My Journey Knitting the Free Cable Bonnet Pattern
Knitting the Samson Bonnet was pure joy. I began with a provisional cast-on to create a seamless edge that ensures comfort around a newborn’s head. A few garter stitch rows make a soft, stretchy brim, gently framing the intricate cable patterns above it.
Now, let’s talk about those cables again (because they’re that good!). Using a cable needle, I crossed stitches back and forth, creating stunning twists and texture. Watching those cables slowly emerge as the bonnet grew row-by-row felt like witnessing a tiny knitting miracle unfold.
Don’t be intimidated by cables—they’re repetitive enough to relax you but interesting enough to keep your attention. It’s knitting bliss!

The Perfect Finishing Touches
No free cable bonnet pattern is complete without the sweetest finishing touches. To ensure the bonnet stays put during photo sessions, I added a simple I-cord tie under the chin. It’s secure, comfortable, and adorable (a winning combination!).
After casting off, blocking is a must. Blocking really helps cables bloom, revealing their full beauty. Gently wash, pin, and stretch your bonnet slightly to let those gorgeous cables shine. Trust me, it’s totally worth the extra effort.
Why Photographers Love This Free Cable Bonnet Pattern
Photographers (and proud parents!) are always on the hunt for standout props. The Samson Bonnet quickly became popular because of its elegant, timeless design. Plus, it’s practical—keeping babies comfy, warm, and photo-ready.
I’ve loved seeing how photographers style this bonnet. Every photo captures something unique and precious, which makes sharing this pattern even more rewarding. Seeing handmade creations becoming part of family memories truly warms my knitter’s heart!

Join the Knitting Community and Knit This Free Cable Bonnet Pattern!
One of the best things about releasing a free cable bonnet pattern is seeing how other knitters bring their own flair to it. Knitters truly make each bonnet their own, customizing yarn choices, colors, and personal touches. I adore seeing your finished projects—seriously, it makes my day!
Knitting is more than just a hobby; it’s a creative community filled with inspiration, support, and camaraderie. So, grab your needles and some KnitPicks Woolen Cotton (affiliate link), and join me on this knitting adventure. Whether knitting for your own little bundle, a thoughtful gift, or your photography business, this bonnet is a keeper.
Final Thoughts on This Adorable Free Cable Bonnet Pattern
Knitting the Samson Bonnet has been such a joyful experience from the first stitch to the final tie. The cable design paired with cozy yarn makes it a standout in my growing collection of knitting patterns. I hope it becomes one of your favorites too!
Whether you’re a seasoned knitter or a brave beginner ready for cables, this free cable bonnet pattern offers the perfect opportunity to showcase your skills. There’s nothing quite as rewarding as seeing your hand-knit creation in those first precious photos.
Ready to knit your own? Scroll down to grab this pattern and then check out my full photo prop pattern page for even more sweet inspiration!
Happy knitting—may your cables always twist perfectly!

Materials and Info
Materials: appx 60-120yd dk weight yarn (I like KnitPicks Woolen Cotton (affiliate link)), size 7 (4.5mm) and 6 (4mm) straight needles (or size needed to obtain gauge), cable needle, stitch markers
Gauge: appx 5sts/inch in your smaller needle size Gauge is very important!
Sizes (appx finished head circumference) : newborn (13ins), 0-3mths (14 ins), 3-6mths (15ins), 6-12mths (16ins), 1-3yrs (17ins)
Stitch Key
K – knit
p – purl
sl – slip
K2tog – knit 2 stitches together
fpc – sl 2sts onto cable needle, hold in front, k2, p2 from cable needle
rpc – sl 2sts onto cable needle, hold in back, p2, k2 from cable needle

Samson Bonnet Pattern
NEWBORN
Cast on 62sts in larger sized needle.
Row 1 (wrong side) – k2, p2, k4, p2 [k2, p2, k4, p2] repeat from [to] across to last 2sts, k2.
Row 2 (right side) – k4, p4, k2 [p2, k2, p4, k2] repeat from [to] across to last 2sts, k2.
Row 3 – Repeat row 1
Row 4 – Repeat row 2
Row 5 – Repeat row 1
Row 6 – k2, fpc, rpc [p2, fpc, rpc] repeat from [to] across to last 2sts, k2.
Repeat rows 1-6 across until your work measure appx 4ins from cast on ending after completing an odd (wrong side) row. Place stitch markers on either end of your last row.
DECREASES
Using your smaller sized needles decrease as follows:
Row 1 – k1 [k2tog, k4] repeat from [to] across to last stitch, k1 (52sts)
Row 2 – Purl across
Row 3 – k1 [k2tog, k3] repeat from [to] across to last stitch, k1 (42sts)
Row 4 – Purl across
Row 5 – k1 [k2tog, k2] repeat from [to] across to last stitch, k1 (32sts)
Row 6 – Purl across
Row 7 – k1 [k2tog, k1] repeat from [to] across to last stitch, k1 (22sts)
Row 8 – Purl across
Row 9 – k1 [k2tog] repeat from [to] across to last stitch, k1 (12sts)
Do not bind off. Cut yarn leaving appx -10ins. Pull yarn through remaining stitches and cinch the back tight. Using this end sew the crown together to your stitch markers. (I like to use the mattress stitch since it is nearly invisible). Weave in ends. Cut 2 pieces of dk yarn approximately 30ins long.
Fold them in half and pull a loop through the front corner of the bonnet. Pull the ends through this loop.
0-3 MONTHS
Cast on 67sts in larger sized needle.
Row 1 (wrong side) – k2, p2, k4, p2 [k3, p2, k4, p2] repeat from [to] across to last 2sts, k2.
Row 2 (right side) – k4, p4, k2 [p3, k2, p4, k2] repeat from [to] across to last 2sts, k2.
Row 3 – Repeat row 1
Row 4 – Repeat row 2
Row 5 – Repeat row 1
Row 6 – k2, fpc, rpc [p3, fpc, rpc] repeat from [to] across to last 2sts, k2.
Repeat rows 1-6 across until your work measure appx 4.5ins from cast on ending after completing an odd (wrong side) row. Place stitch markers on either end of your last row.
DECREASES
Using your smaller sized needles decrease as follows:
Row 1 – k1 [k2tog, k4] repeat from [to] across (56sts)
Row 2 – Purl across
Row 3 – k1 [k2tog, k3] repeat from [to] across (43sts)
Row 4 – Purl across
Row 5 – k1 [k2tog, k2] repeat from [to] across (34sts)
Row 6 – Purl across
Row 7 – k1 [k2tog, k1] repeat from [to] across (23sts)
Row 8 – Purl across
Row 9 – k1 [k2tog] repeat from [to] across (12sts)
Do not bind off. Cut yarn leaving appx -10ins. Pull yarn through remaining stitches and cinch the back tight. Using this end sew the crown together to your stitch markers. (I like to use the mattress stitch since it is nearly invisible). Weave in ends. Cut 2 pieces of dk yarn approximately 30ins long.
Fold them in half and pull a loop through the front corner of the bonnet. Pull the ends through this loop.

3-6 MONTHS
Cast on 72sts in larger sized needle.
Row 1 (wrong side) – k2, p2, k4, p2 [k2, p2, k4, p2] repeat from [to] across to last 2sts, k2.
Row 2 (right side) – k4, p4, k2 [p2, k2, p4, k2] repeat from [to] across to last 2sts, k2.
Row 3 – Repeat row 1
Row 4 – Repeat row 2
Row 5 – Repeat row 1
Row 6 – k2, fpc, rpc [p2, fpc, rpc] repeat from [to] across to last 2sts, k2.
Repeat rows 1-6 across until your work measure appx 5ins from cast on ending after completing an odd (wrong side) row. Place stitch markers on either end of your last row.
DECREASES
Using your smaller sized needles decrease as follows:
Row 1 – k1 [k2tog, k5] repeat from [to] across to last stitch, k1 (62sts)
Row 2 – Purl across
Row 3 – k1 [k2tog, k4] repeat from [to] across to last stitch, k1 (52sts)
Row 4 – Purl across
Row 5 – k1 [k2tog, k3] repeat from [to] across to last stitch, k1 (42sts)
Row 6 – Purl across
Row 7 – k1 [k2tog, k2] repeat from [to] across to last stitch, k1 (32sts)
Row 8 – Purl across
Row 9 – k1 [k2tog, k1] repeat from [to] across to last stitch, k1 (22sts)
Row 10 – Purl across
Row 11 – k1 [k2tog] repeat from [to] across to last stitch, k1 (12sts)
Do not bind off. Cut yarn leaving appx -10ins. Pull yarn through remaining stitches and cinch the back tight. Using this end sew the crown together to your stitch markers. (I like to use the mattress stitch since it is nearly invisible). Weave in ends. Cut 2 pieces of dk yarn approximately 30ins long.
Fold them in half and pull a loop through the front corner of the bonnet. Pull the ends through this loop.
6-12 MONTHS
Cast on 78sts in larger sized needle.
Row 1 (wrong side) – k2, p2, k4, p2 [k3, p2, k4, p2] repeat from [to] across to last 2sts, k2.
Row 2 (right side) – k4, p4, k2 [p3, k2, p4, k2] repeat from [to] across to last 2sts, k2.
Row 3 – Repeat row 1
Row 4 – Repeat row 2
Row 5 – Repeat row 1
Row 6 – k2, fpc, rpc [p3, fpc, rpc] repeat from [to] across to last 2sts, k2.
Repeat rows 1-6 across until your work measure appx 5.5ins from cast on ending after completing an odd (wrong side) row. Place stitch markers on either end of your last row.
DECREASES
Using your smaller sized needles decrease as follows:
Row 1 – k1, [k2tog, k5] repeat from [to] across (66sts)
Row 2 – Purl across
Row 3 – k1, [k2tog, k4] repeat from [to] across (55sts)
Row 4 – Purl across
Row 5 – k1, [k2tog, k3] repeat from [to] across (44sts)
Row 6 – Purl across
Row 7 – k1, [k2tog, k2] repeat from [to] across (33sts)
Row 2 – Purl across
Row 7 – k1, [k2tog, k1] repeat from [to] across (22sts)
Row 2 – Purl across
Row 3 – k1, [k2tog] repeat from [to] across (11sts)
Do not bind off. Cut yarn leaving appx -10ins. Pull yarn through remaining stitches and cinch the back tight. Using this end sew the crown together to your stitch markers. (I like to use the mattress stitch since it is nearly invisible). Weave in ends. Cut 2 pieces of dk yarn approximately 30ins long.
Fold them in half and pull a loop through the front corner of the bonnet. Pull the ends through this loop.

Samson Bonnet PDF
Disclaimer: This page contains affiliate links. If you choose to make a purchase after clicking a link, I may receive a commission at no additional cost to you. Thank you for your support!