
This free cable bonnet pattern is the perfect photo prop for newborns! Find more prop patterns at the link below—this one’s at the bottom of the post! Click here to browse all free photo prop patterns

There’s just something so satisfying about the combo of squishy cables and squishier babies. I designed this free cable bonnet pattern—the Selah Bonnet—with both in mind. As a knitter who can’t resist anything with cables and a photographer who spends a lot of time capturing newborn sweetness, I wanted a design that felt timeless, textured, and elegant. And y’all, this little bonnet hit the mark.
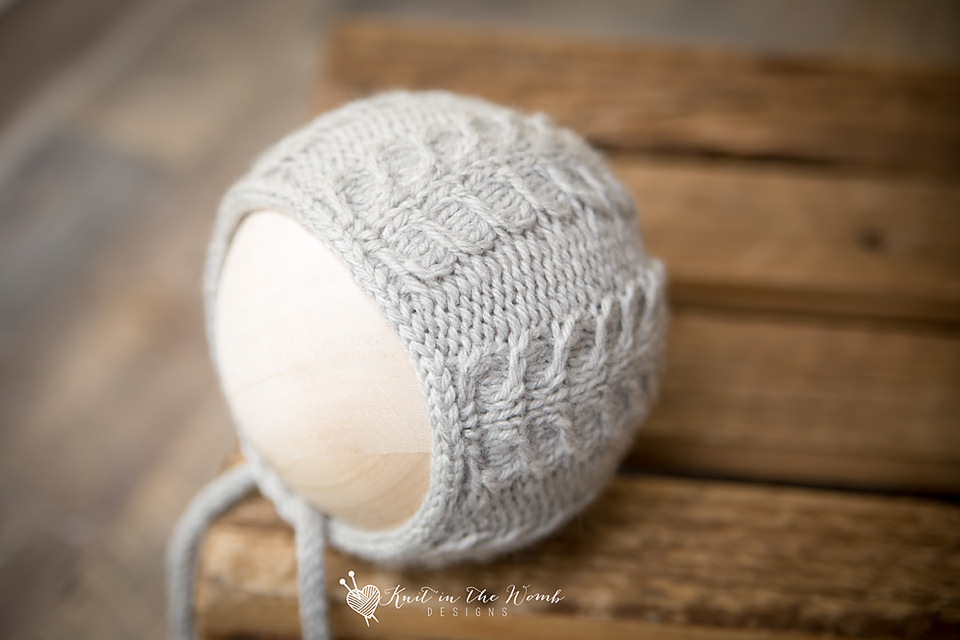
Whether you’re planning your next newborn shoot or just love knitting tiny hats, this free cable bonnet pattern is a beautiful project that combines stitchy detail with baby snuggles. It’s knit in KnitPicks Capra (affiliate link)—a dreamy mix of merino and cashmere—and the cables, fit, and shaping make it a photo prop you’ll reach for again and again.

Why I Named It the Selah Bonnet
I tend to name my patterns with meaning, and the word Selah always stood out to me. It’s a pause. A moment to reflect. And honestly, that’s how I feel every time I knit something for a newborn. It’s not just about stitches and yarn—it’s about creating something precious for a brand-new life.
This free cable bonnet pattern mirrors that idea. The cables remind me of life’s winding path, and the soft, star-like shaping at the back of the bonnet feels like everything gently coming together. Isn’t that exactly how those early days with a newborn feel?

The Yarn That Brings It All Together
Let’s talk yarn—because choosing the right one for a free cable bonnet pattern is crucial. For something that touches delicate skin and is photographed up close, I always reach for the softest fibers. That’s why I went with KnitPicks Capra (affiliate link).
This yarn is 85% merino and 15% cashmere, which makes it silky smooth, perfectly warm, and oh-so-luxurious. It’s not just soft—it’s got incredible stitch definition. Every cable twist and decrease shines, and it blocks like a dream. I picked a neutral shade to complement any outfit or wrap, but you really can’t go wrong—KnitPicks Capra (affiliate link) comes in some seriously gorgeous colors.
And bonus? It’s machine-washable on delicate. That’s a huge win when you’re knitting for little ones.

Cables Are My Love Language
If you’ve ever been intimidated by cables, let me just say: they’re not as scary as they look! This free cable bonnet pattern is a great way to practice cable knitting in a small, manageable project.
The cables in the Selah Bonnet run along both sides, adding gorgeous texture without overwhelming the overall look. I included a chart in the pattern and wrote out the directions row-by-row—because I know we all have our preferences. Whether you’re a chart person or not, you’ll find this free cable bonnet pattern approachable and fun to knit.
Once you get into the rhythm, there’s something peaceful about watching the pattern emerge. I often find myself smiling as I knit, imagining how sweet it’s going to look on a newborn.

That Back Decrease Though…
Okay, let’s talk about the back of this bonnet—because it’s hands-down one of my favorite parts of this free cable bonnet pattern. The decreases aren’t just there to shape the hat. They actually add to the beauty of the design.
They converge into this lovely star-like detail that finishes the bonnet off in such a polished way. And the way they’re worked keeps the cables flowing right up to the final stitches. It’s tidy, intentional, and just plain satisfying to knit.
Pro tip: don’t skip the blocking step! With a pattern like this, blocking opens up the cables and helps that back detail shine. Just soak it gently, squeeze out the extra water, shape it on a towel, and let it dry flat. Your bonnet will go from “cute” to “WOW” with just that one step.

How It All Came Together
The Selah Bonnet was one of those projects that kind of designed itself. Once I started knitting with KnitPicks Capra (affiliate link), I knew I had the right yarn. The stitches felt like butter on the needles, and the cables practically danced into place.
From cast-on to bind-off, I was hooked. There’s something so peaceful about knitting for newborns—it feels like preparing a gift of love and warmth. This free cable bonnet pattern let me combine my love of cables, cozy yarn, and photography into one sweet little project.
I’ve used the Selah Bonnet in a few of my newborn photo shoots now, and it frames those tiny baby faces beautifully. It’s soft enough for their delicate skin, and the texture makes the photos pop. Every time I use it, I fall in love with it all over again.

Tips for Knitting the Selah Bonnet
If you’re ready to try this free cable bonnet pattern, here are a few tips that might help:
- Go for soft and squishy yarn. I highly recommend KnitPicks Capra (affiliate link) for this project. It’s worth every penny.
- Practice your cables. If you’re new to cables, knit a little swatch first to get the hang of moving stitches around. It’s fun once you get into the rhythm!
- Follow the pattern closely. The decreases, especially at the back, are key to the look of this bonnet. Take your time and enjoy the process.
- Block it! Seriously, don’t skip this step. Blocking makes everything lay just right and shows off all that lovely detail.

Make It Part of Your Newborn Prop Collection
Whether you’re a photographer like me or just love gifting handmade items, this free cable bonnet pattern is one you’ll want to add to your collection. I have a whole page full of other newborn photo prop patterns, and you can find those right here:
👉 See all the free photo prop patterns
The Selah Bonnet pattern is at the bottom of that page, so don’t miss it!
Why You’ll Love This Free Cable Bonnet Pattern
If you’ve been searching for the perfect free cable bonnet pattern, I hope the Selah Bonnet brings as much joy to your needles as it has to mine. It’s soft, it’s detailed, and it’s full of meaning. Every stitch is a little reminder to pause, reflect, and celebrate the sweetness of life’s newest little blessings.
Whether you knit it for your own baby, a gift, or your prop stash, this bonnet is sure to become a favorite. Just don’t forget to pick up a skein (or two) of KnitPicks Capra (affiliate link) to make it just right.
Happy knitting, friend! Let me know in the comments if you try it—I’d love to see your finished bonnet!

Materials and Info
Materials Needed: 60-120yds dk weight yarn (I used knitpicks capra(affiliate link)), size 6 straight needles, size 6 dpn needles for icord, cable needle, yarn needle
Gauge: 5.5sts/in in stockinette st (cable pattern should measure 2ins/repeat)
Sizes (appx head circumference) [appx finished measurements] – newborn (13ins) [5x5ins], infant (14.5 ins) [5.75×5.75ins], sitter (16ins) [6.5×6.5ins], toddler (17ins) [7.25×7.25ins]
Stitch Key:
K – knit p – purl
C4b – slip next 3sts onto cable needle, hold in back, knit the next st, knit 3 sts from cable needle
C4f – slip next st onto cable needle, hold in front, knit the next 3sts, knit st from cable needle
C3b – slip next 2sts onto cable needle, hold in back, knit the next st, knit 2 sts from cable needle
C3f – slip next st onto cable needle, hold in front, knit the next 2sts, knit st from cable needle
C2b – slip next st onto cable needle, hold in back, knit the next st, knit st from cable needle
C2f – slip next st onto cable needle, hold in front, knit the next st, knit st from cable needle
Vdd – slip the next 2 sts together as if to knit, knit the next st, pass over the 2 slipped sts together

Selah Bonnet Pattern
NEWBORN
Provisional cast on 63sts (tutorial and helpful links at the end of the pattern)
Row 1 – Purl across
Row 2 – K3 [k9,p3] repeat [to] across but on last repeat knit the last 3 sts not purl
Row 3 – K3 [p9, k3] repeat [to] across
Row 4 – K3 [c4b, k1, c4f, p3] repeat [to] across but on last repeat knit the last 3 sts not purl
Row 5 – K3 [p9, k3] repeat [to] across
Repeat rows 2-5 until your work measures appx 3.5ins from cast on edge ending after completing a row 5. Place stitch markers on either end of your last row to mark where to sew crown closed to.
DECREASES
Row 1 – p3 [k3, vdd, k3, p3] repeat [to] across (53sts)
Row 2 – k3 [p7, k3] repeat [to] across
Row 3 – p1, p2tog, [c3b, k1, c3f, p2tog, p1] repeat [to] across (47sts)
Row 4 – k2 [p7, k2] repeat [to] across to last st
Row 5 – p2 [k2, vdd, k2, p2] repeat [to] across (37sts)
Row 6 – k2 [p5, k2] repeat [to] across
Row 7 – p2tog, [c2b, k1, c2f, p2tog] repeat [to] across (31sts)
Row 8 – k1 [p5, k1] repeat [to] across
Row 9 – p1 [k1, vdd, k1, p1] repeat [to] across (21sts)
Row 10 – k1 [p2, p2tog] repeat [to] across but on last repeat p3, k1 (17sts)
Row 11 – p1 [vdd] repeat [to] across to last st, p1 (7sts)
Do not bind off. Cut yarn leaving appx -10ins. Pull yarn through remaining stitches and cinchthe back tight. Using this end sew the crown together to your stitch markers. (I like to use the mattress stitch since it is nearly invisible).
Cast on 3sts on double pointed needles and work appx 8ins of i-cord for personal use and 12ins for photography use. Place all of the provisional cast on sts on your straight needle (I like to use a circular needle for this but straight will do) and begin i-cord bind off using the icord you have already worked. Once all of the bonnet sts have been bound off work an additional icord to the same length as the other tie with your 3 left over icord sts. (tutorial and helpful links at the end of the pattern) Weave in ends.
INFANT
Provisional cast on 75sts (tutorial and helpful links at the end of the pattern)
Row 1 – Purl across
Row 2 – K3 [k9,p3] repeat [to] across but on last repeat knit the last 3 sts not purl
Row 3 – K3 [p9, k3] repeat [to] across
Row 4 – K3 [c4b, k1, c4f, p3] repeat [to] across but on last repeat knit the last 3 sts not purl
Row 5 – K3 [p9, k3] repeat [to] across
Repeat rows 2-5 until your work measures appx 4.25ins from cast on edge ending after completing a row 5. Place stitch markers on either end of your last row to mark where to sew crown closed to.
DECREASES
Row 1 – p3 [k3, vdd, k3, p3] repeat [to] across (63sts)
Row 2 – k3 [p7, k3] repeat [to] across
Row 3 – p1, p2tog, [c3b, k1, c3f, p2tog, p1] repeat [to] across (56sts)
Row 4 – k2 [p7, k2] repeat [to] across to last st
Row 5 – p2 [k2, vdd, k2, p2] repeat [to] across (44sts)
Row 6 – k2 [p5, k2] repeat [to] across
Row 7 – p2tog, [c2b, k1, c2f, p2tog] repeat [to] across (37sts)
Row 8 – k1 [p5, k1] repeat [to] across
Row 9 – p1 [k1, vdd, k1, p1] repeat [to] across (25sts)
Row 10 – k1 [p2, p2tog] repeat [to] across but on last repeat p3, k1 (20sts)
Row 11 – p1 [vdd] repeat [to] across to last st, p1 (8sts)
Do not bind off. Cut yarn leaving appx -10ins. Pull yarn through remaining stitches and cinch the back tight. Using this end sew the crown together to your stitch markers. (I like to use the mattress stitch since it is nearly invisible).
Cast on 3sts on double pointed needles and work appx 8ins of i-cord for personal use and 12ins for photography use. Place all of the provisional cast on sts on your straight needle (I like to use a circular needle for this but straight will do) and begin i-cord bind off using the icord you have already worked. Once all of the bonnet sts have been bound off work an additional icord to the same length as the other tie with your 3 left over icord sts. (tutorial and helpful links at the end of the pattern) Weave in ends

SITTER
Provisional cast on 87sts (tutorial and helpful links at the end of the pattern)
Row 1 – Purl across
Row 2 – K3 [k9,p3] repeat [to] across but on last repeat knit the last 3 sts not purl
Row 3 – K3 [p9, k3] repeat [to] across
Row 4 – K3 [c4b, k1, c4f, p3] repeat [to] across but on last repeat knit the last 3 sts not purl
Row 5 – K3 [p9, k3] repeat [to] across
Repeat rows 2-5 until your work measures appx 5.5ins from cast on edge ending after completing a row 5. Place stitch markers on either end of your last row to mark where to sew crown closed to.
DECREASES
Row 1 – p3 [k3, vdd, k3, p3] repeat [to] across (73sts)
Row 2 – k3 [p7, k3] repeat [to] across
Row 3 – p1, p2tog, [c3b, k1, c3f, p2tog, p1] repeat [to] across (65sts)
Row 4 – k2 [p7, k2] repeat [to] across to last st
Row 5 – p2 [k2, vdd, k2, p2] repeat [to] across (51sts)
Row 6 – k2 [p5, k2] repeat [to] across
Row 7 – p2tog, [c2b, k1, c2f, p2tog] repeat [to] across (43sts)
Row 8 – k1 [p5, k1] repeat [to] across
Row 9 – p1 [k1, vdd, k1, p1] repeat [to] across (29sts)
Row 10 – k1 [p2, p2tog] repeat [to] across but on last repeat p3, k1 (23sts)
Row 11 – p1 [vdd] repeat [to] across to last st, p1 (9sts)
Do not bind off. Cut yarn leaving appx -10ins. Pull yarn through remaining stitches and cinch the back tight. Using this end sew the crown together to your stitch markers. (I like to use the mattress stitch since it is nearly invisible).
Cast on 3sts on double pointed needles and work appx 8ins of i-cord for personal use and 12ins for photography use. Place all of the provisional cast on sts on your straight needle (I like to use a circular needle for this but straight will do) and begin i-cord bind off using the icord you have already worked. Once all of the bonnet sts have been bound off work an additional icord to the same length as the other tie with your 3 left over icord sts. (tutorial and helpful links at the end of the pattern) Weave in ends.
TODDLER
Provisional cast on 99sts (tutorial and helpful links at the end of the pattern)
Row 1 – Purl across
Row 2 – K3 [k9,p3] repeat [to] across but on last repeat knit the last 3 sts not purl
Row 3 – K3 [p9, k3] repeat [to] across
Row 4 – K3 [c4b, k1, c4f, p3] repeat [to] across but on last repeat knit the last 3 sts not purl
Row 5 – K3 [p9, k3] repeat [to] across
Repeat rows 2-5 until your work measures appx 6.25ins from cast on edge ending after completing a row 5. Place stitch markers on either end of your last row to mark where to sew crown closed to.
DECREASES
Row 1 – p3 [k3, vdd, k3, p3] repeat [to] across (83sts)
Row 2 – k3 [p7, k3] repeat [to] across
Row 3 – p1, p2tog, [c3b, k1, c3f, p2tog, p1] repeat [to] across (74sts)
Row 4 – k2 [p7, k2] repeat [to] across to last st
Row 5 – p2 [k2, vdd, k2, p2] repeat [to] across (58sts)
Row 6 – k2 [p5, k2] repeat [to] across
Row 7 – p2tog, [c2b, k1, c2f, p2tog] repeat [to] across (49sts)
Row 8 – k1 [p5, k1] repeat [to] across
Row 9 – p1 [k1, vdd, k1, p1] repeat [to] across (33sts)
Row 10 – k1 [p2, p2tog] repeat [to] across but on last repeat p3, k1 (26sts)
Row 11 – p1 [vdd] repeat [to] across to last st, p1 (10sts)
Do not bind off. Cut yarn leaving appx -10ins. Pull yarn through remaining stitches and cinch the back tight. Using this end sew the crown together to your stitch markers. (I like to use the mattress stitch since it is nearly invisible).
Cast on 3sts on double pointed needles and work appx 8ins of i-cord for personal use and 12ins for photography use. Place all of the provisional cast on sts on your straight needle (I like to use a circular needle for this but straight will do) and begin i-cord bind off using the icord you have already worked. Once all of the bonnet sts have been bound off work an additional icord to the same length as the other tie with your 3 left over icord sts. (tutorial and helpful links at the end of the pattern) Weave in ends.
Selah Bonnet PDF
Disclaimer: This page contains affiliate links. If you choose to make a purchase after clicking a link, I may receive a commission at no additional cost to you. Thank you for your support!