
Looking for a dreamy mohair photo prop bonnet pattern? You’ll adore this sweet knit! Find more adorable props on my free photo prop pattern page.

Knitting has always held a special place in my heart, but creating gorgeous pieces for tiny newborns? Now, that’s my happy place! There’s something incredibly rewarding about designing a delicate, soft bonnet that captures the pure sweetness of a newborn’s first days. And when it comes to newborn props, nothing beats my favorite mohair photo prop bonnet pattern—the Sophia Bonnet!
Stick around—I’ll walk you through why I’m so obsessed with this mohair photo prop bonnet pattern, why KnitPicks Aloft (affiliate link) is the ultimate yarn for the job, and all the fun ways you can style this precious bonnet. The full pattern for THIS bonnet is at the bottom of this post, and if you’re craving even more adorable options, head over to my free photo prop pattern page!
Why I Fell in Love with this Mohair Photo Prop Bonnet Pattern
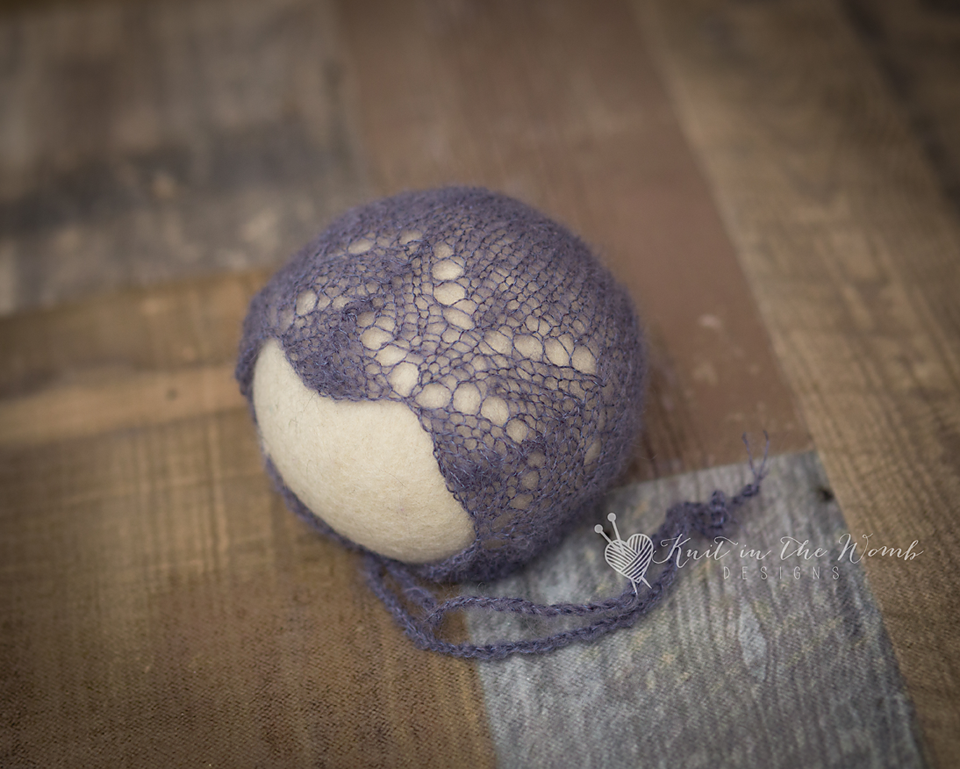
From the moment I first knit the Sophia Bonnet, I knew it was special. There’s something magical about how this simple lace pattern transforms into the softest, sweetest accessory for newborn photography sessions. It’s no wonder it quickly became my go-to mohair photo prop bonnet pattern for capturing those precious newborn moments.

Discovering My Go-To Yarn: KnitPicks Aloft (affiliate link)
When it comes to yarn choices, KnitPicks Aloft (affiliate link) is always my first pick. It’s an irresistible blend of mohair and silk, giving each bonnet that soft, fluffy halo effect photographers dream about. KnitPicks Aloft (affiliate link) effortlessly turns any bonnet into a dreamy, cloud-like creation.
The first time I knit this mohair photo prop bonnet pattern using KnitPicks Aloft (affiliate link), I was blown away by the gorgeous results. The yarn is lightweight yet durable—perfect for delicate lace patterns like this one. Plus, Aloft (affiliate link) comes in a rainbow of beautiful shades. Personally, I can’t resist blush and ivory—they add just the right amount of classic charm to this adorable bonnet.
Knitting the Sophia Bonnet is Pure Joy!
If you’ve never tried knitting a mohair photo prop bonnet pattern, you’re in for a treat! Creating this bonnet is a relaxing, soothing experience. The lace pattern keeps my attention but never overwhelms me, and watching the KnitPicks Aloft (affiliate link) yarn glide through my fingers is like therapy. Each stitch feels like a little hug going out to a new baby.
Knitting this mohair photo prop bonnet pattern is more than crafting—it’s a heartfelt gesture, one delicate stitch at a time.

Endless Styling Possibilities with the Mohair Photo Prop Bonnet Pattern
One reason I keep coming back to the Sophia Bonnet is its versatility. This mohair photo prop bonnet pattern adapts effortlessly to any styling vision. For timeless newborn photos, pair it with a classic white onesie and cozy blanket. Want a dash of whimsy? Add a tiny floral headband or a dainty bow.
Whatever your style, this bonnet always delivers picture-perfect elegance. Trust me, this mohair photo prop bonnet pattern never disappoints!
Beginner-Friendly but Still Fun for Experts!
Another thing I love about this mohair photo prop bonnet pattern is that it suits knitters at every skill level. Beginners find it a gentle introduction to lace knitting, while seasoned knitters appreciate the delicate stitchwork and luxurious yarn.
Whether you’re just starting your knitting journey or you’ve got hundreds of projects under your belt, knitting the Sophia Bonnet with KnitPicks Aloft (affiliate link) is always enjoyable.
The Perfect Companion Pieces
This sweet bonnet doesn’t stand alone! If you’re looking to create an adorable newborn set, pair this mohair photo prop bonnet pattern with the coordinating Sophia Sleep Cap and Romper. The sleep cap features delicate lace edging that complements the bonnet beautifully, and the romper—with its charming lace panels—rounds out the perfect newborn ensemble.
Photographers and parents alike fall head-over-heels for this cohesive look. It’s photo-shoot-ready and irresistibly cute!

A Labor of Love, One Stitch at a Time
I’ve knit countless Sophia Bonnets over the years, each uniquely special. I’ve gifted them to family and friends, sold them through my Etsy shop, and have seen them grace countless newborn photoshoots. Seeing a precious newborn wearing something I’ve created fills me with joy and pride every single time.
This mohair photo prop bonnet pattern is more than just a project—it’s become a meaningful way to share love, warmth, and beauty.
Why Knit This Mohair Photo Prop Bonnet Pattern?
If you’re thinking of casting on a new knitting project, this mohair photo prop bonnet pattern is a must-try! It’s a rewarding knit you’ll fall in love with instantly. And if you’re a photographer or parent searching for that perfect handmade newborn prop, you won’t find a sweeter bonnet than this one.
The delicate lacework, luxurious texture, and the softness of KnitPicks Aloft (affiliate link) combine to make this bonnet truly unforgettable.
Knitting as an Act of Love and Creativity
When I knit, especially something as special as this mohair photo prop bonnet pattern, I reconnect with why I started knitting in the first place. There’s something deeply satisfying about transforming a skein of yarn into a cherished keepsake. With KnitPicks Aloft (affiliate link), the process is even more magical.
Ready to Start Knitting Your Own Mohair Photo Prop Bonnet Pattern?
I hope you’re as excited about knitting this gorgeous mohair photo prop bonnet pattern as I am about sharing it with you! Whether it’s for your own little one, a thoughtful gift, or a photographer’s prop collection, this bonnet promises joy with every stitch.
You’ll find the complete mohair photo prop bonnet pattern for the Sophia Bonnet right here at the bottom of this post. But remember, if you’re hungry for more sweet newborn photo props, be sure to visit my free photo prop pattern page for tons more patterns!
Happy knitting, friends—I can’t wait to see the beautiful bonnets you create with this delightful mohair photo prop bonnet pattern!

Materials and Info
Materials: 60-150 yds of lace weight (size 0) mohair yarn (I used knitpicks aloft), size 7 (4.5mm) straight needles, yarn needle, 2 stitch markers
Gauge: 5sts/in ~GAUGE IS VERY IMPORTANT~
Abbreviation Key:
K – knit
P – purl
yo – yarn over
k2tog – knit 2 together
sl – slip st knitwise
psso – pass slipped stitch over
p2tog – purl 2 together
Head circumference: nb (13ins). 0-3mths (14ins), 3-6mth (15ins), 6- 12mths (16ins)

Sophia Bonnet Pattern
NEWBORN
Cast on 53sts.
Row 1 (right side)– k2 [yo, k3, sl1, k2tog, psso, k3, yo, k1] repeat [to] across to last stitch, k1
Row 2 (wrong side) – purl across
Row 3 – k2[k1, yo, k2, sl1, k2tog, psso, k2, yo, k2] repeat [to] across to last stitch, k1
Row 4 – purl across
Row 5 – k2 [k2, yo, k1, sl1, k2tog, psso, k1, yo, k3] repeat [to] across to last stitch, k1
Row 6 – purl across
Row 7 – k2[k3, yo, sl1, k2tog, psso, yo, k4] repeat [to] across to last stitch, k1
Row 8 – purl across
Work rows 1-8 one more time.
Work in stockinette st until your work measures 3.5ins from the cast on edge ending after completing a right side row.
DECREASES
Set up row – p1, p2tog, p47, p2tog, p1 (51sts)
Place one stitch marker on either end of the row just completed.
Row 1 – k1 [k2tog, k5] repeat [to] across to last sts, k1(44sts)
Row 2 – purl across
Row 3 – k1 [k2tog, k4] repeat [to] across to last sts, k1 (37sts)
Row 4 – purl across
Row 5 – k1 [k2tog, k3] repeat [to] across to last sts, k1 (30sts)
Row 6 – purl across
Row 7 – k1 [k2tog, k2] repeat [to] across to last sts, k1 (23sts)
Row 8 – purl across
Row 9 – k1 [k2tog, k1] repeat [to] across to last sts, k1 (16sts)
Row 10 – purl across
Row 11 – p1 [p2tog] repeat [to] across to last st, p1 (9sts)
Do not bind off.
Cut yarn leaving appx 12ins and pull through remaining stitches. Using this end sew the crown together to your stitch markers. (I like to use the mattress stitch since it is nearly invisible).
Cut 6 pieces of yarn approximately 30ins long. Fold 3 in half and pull a loop through the front corner of the bonnet. Pull the ends through this loop. Repeat on the other front corner.
0-3 MONTHS
Cast on 57sts.
Row 1 (right side) – k4 [yo, k3, sl1, k2tog, psso, k3, yo, k1] repeat [to] across to last 3 stitches, k3
Row 2 (wrong side) – purl across
Row 3 – k4 [k1, yo, k2, sl1, k2tog, psso, k2, yo, k2] repeat [to] across to last 3 stitches, k3
Row 4 – purl across
Row 5 – k4 [k2, yo, k1, sl1, k2tog, psso, k1, yo, k3] repeat [to] across to last 3 stitches, k3
Row 6 – purl across
Row 7 – k4 [k3, yo, sl1, k2tog, psso, yo, k4] repeat [to] across to last 3 stitches, k3
Row 8 – purl across
Work rows 1-8 one more time.
Work in stockinette st until your work measures 4ins from the cast on edge ending after completing a right side row.
DECREASES
Set up row – p2 [p9,p2tog] repeat [to] across to last sts, k1 p1 (51sts)
Place one stitch marker on either end of the row just completed.
Row 1 – k1 [k2tog, k5] repeat [to] across to last sts, k1(44sts)
Row 2 – purl across
Row 3 – k1 [k2tog, k4] repeat [to] across to last sts, k1 (37sts)
Row 4 – purl across
Row 5 – k1 [k2tog, k3] repeat [to] across to last sts, k1 (30sts)
Row 6 – purl across
Row 7 – k1 [k2tog, k2] repeat [to] across to last sts, k1 (23sts)
Row 8 – purl across
Row 9 – k1 [k2tog, k1] repeat [to] across to last sts, k1 (16sts)
Row 10 – purl across
Row 11 – p1 [p2tog] repeat [to] across to last st, p1 (9sts)
Do not bind off.
Cut yarn leaving appx 12ins and pull through remaining stitches. Using this end sew the crown together to your stitch markers. (I like to use the mattress stitch since it is nearly invisible).
Cut 6 pieces of yarn approximately 30ins long. Fold 3 in half and pull a loop through the front corner of the bonnet. Pull the ends through this loop. Repeat on the other front corner.

3-6 MONTHS
Cast on 63sts.
Row 1 (right side)– k2 [yo, k3, sl1, k2tog, psso, k3, yo, k1] repeat [to] across to last st, k1
Row 2 (wrong side) – purl across
Row 3 – k2 [k1, yo, k2, sl1, k2tog, psso, k2, yo, k2] repeat [to] across to last st, k1
Row 4 – purl across
Row 5 – k2 [k2, yo, k1, sl1, k2tog, psso, k1, yo, k3] repeat [to] across to last st, k1
Row 6 – purl across
Row 7 – k2 [k3, yo, sl1, k2tog, psso, yo, k4] repeat [to] across to last st, k1
Row 8 – purl across
Work rows 1-8 one more time.
Work in stockinette st until your work measures 4.5ins from the cast on edge ending after completing a right side row.
DECREASES
Set up row – p2, [p10, p2tog] repeat [to] across to last st, p1 (58sts)
Place one stitch marker on either end of the row just completed.
Row 1 – k1 [k2tog, k5] repeat [to] across to last sts, k1(50sts)
Row 2 – purl across
Row 3 – k1 [k2tog, k4] repeat [to] across to last sts, k1 (42sts)
Row 4 – purl across
Row 5 – k1 [k2tog, k3] repeat [to] across to last sts, k1 (34sts)
Row 6 – purl across
Row 7 – k1 [k2tog, k2] repeat [to] across to last sts, k1 (26sts)
Row 8 – purl across
Row 9 – k1 [k2tog, k1] repeat [to] across to last sts, k1 (18sts)
Row 10 – purl across
Row 11 – p1 [p2tog] repeat [to] across to last st, p1 (10sts)
Do not bind off.
Cut yarn leaving appx 12ins and pull through remaining stitches. Using this end sew the crown together to your stitch markers. (I like to use the mattress stitch since it is nearly invisible).
Cut 6 pieces of yarn approximately 30ins long. Fold 3 in half and pull a loop through the front corner of the bonnet. Pull the ends through this loop. Repeat on the other front corner.
6-12 MONTHS
Cast on 67sts.
Row 1 (right side) – k4 [yo, k3, sl1, k2tog, psso, k3, yo, k1] repeat [to] across to last 2 stitches, k3
Row 2 (wrong side) – purl across
Row 3 – k4 [k1, yo, k2, sl1, k2tog, psso, k2, yo, k2] repeat [to] across to last 2 stitches, k3
Row 4 – purl across
Row 5 – k4 [k2, yo, k1, sl1, k2tog, psso, k1, yo, k3] repeat [to] across to last 2 stitches, k3
Row 6 – purl across
Row 7 – k4 [k3, yo, sl1, k2tog, psso, yo, k4] repeat [to] across to last 2 stitches, k3
Row 8 – purl across
Work rows 1-8 one more time.
Work in stockinette st until your work measures 5ins from the cast on edge ending after completing a side row.
DECREASES
Set up row – p1, p2tog, p61, p2tog, p1 (65sts)
Place one stitch marker on either end of the row just completed.
Row 1 – k1 [k2tog, k5] repeat [to] across to last sts, k1(56sts)
Row 2 – purl across
Row 3 – k1 [k2tog, k4] repeat [to] across to last sts, k1 (47sts)
Row 4 – purl across
Row 5 – k1 [k2tog, k3] repeat [to] across to last sts, k1 (38sts)
Row 6 – purl across
Row 7 – k1 [k2tog, k2] repeat [to] across to last sts, k1 (29sts)
Row 8 – purl across
Row 9 – k1 [k2tog, k1] repeat [to] across to last sts, k1 (20sts)
Row 10 – purl across
Row 11 – p1 [p2tog] repeat [to] across to last st, p1 (11sts)
Do not bind off.
Cut yarn leaving appx 12ins and pull through remaining stitches. Using this end sew the crown together to your stitch markers. (I like to use the mattress stitch since it is nearly invisible).
Cut 6 pieces of yarn approximately 30ins long. Fold 3 in half and pull a loop through the front corner of the bonnet. Pull the ends through this loop. Repeat on the other front corner.
Sophia Bonnet PDF
Disclaimer: This page contains affiliate links. If you choose to make a purchase after clicking a link, I may receive a commission at no additional cost to you. Thank you for your support!