
Looking for a dreamy mohair photo prop romper pattern? Check out my favorite free photo prop patterns page! THIS pattern is featured below.

Have you ever found yourself scrolling through newborn photography props and swooning over the fluffy, dreamy pieces? Yeah, me too! That’s exactly why I created this mohair photo prop romper pattern: the Sophia Romper. If you’re a knitter obsessed with making adorable props for newborn photo sessions, you’re definitely in the right place. And guess what? THIS romper pattern is waiting for you at the bottom of this post! The other patterns featured are conveniently found at the free photo prop pattern page.
Discovering the Inspiration for This Mohair Photo Prop Romper Pattern
Let me set the scene for you—I was out for an early morning walk, coffee in hand, soaking up the peaceful vibes. The sunlight was just starting to peek through the trees, and there was this gorgeous, delicate mist lingering in the air. It was so soft, so dreamy, that I immediately thought: this needs to become a knitting project. And thus, my latest mohair photo prop romper pattern was born.
I wanted the romper to have that same gentle beauty—airy and soft, highlighting the innocence of a newborn without overpowering their sweet features. So, I headed home with a mission!
Why I Chose KnitPicks Aloft for My Mohair Photo Prop Romper Pattern
When it comes to knitting dreamy newborn props, yarn choice is key. For this mohair photo prop romper pattern, there was no question: I reached right for my favorite yarn, KnitPicks Aloft (affiliate link). It’s a luxurious blend of 72% Super Kid Mohair and 28% Silk, which basically means it’s ridiculously soft, super fluffy, and has the most lovely, subtle shine.
One of the best things about KnitPicks Aloft (affiliate link) is the stunning color range. Seriously, each shade feels more beautiful than the last. For the Sophia Romper, I chose a soft pastel shade perfect for capturing those delicate newborn skin tones in photographs. Trust me, photographers absolutely love it!
Embracing the Charm (and Challenges!) of Mohair Lace
Alright, let’s be real—knitting with mohair lace yarn like KnitPicks Aloft (affiliate link) can be a tiny bit challenging. It’s delicate and demands a gentle hand. But here’s the thing: the finished result makes every careful stitch worth it. Watching the intricate lace patterns slowly emerge into something absolutely stunning is so satisfying. This mohair photo prop romper pattern features a lace yoke that’s charming yet simple enough to knit while binge-watching your favorite show.
Knitting Up the Sophia Romper: The Process
As soon as I started knitting this mohair photo prop romper pattern, I fell head-over-heels in love. Each stitch felt like capturing that dreamy, misty morning inspiration all over again. The pattern begins with a beautiful lace yoke, transitioning effortlessly into the soft, fluffy body of the romper.
Thanks to KnitPicks Aloft (affiliate link), the romper is wonderfully lightweight yet warm enough to keep a tiny newborn cozy without being bulky. Plus, the fitted design gently accentuates those precious baby curves, making your photos absolutely irresistible.
Finishing Touches that Make This Romper Stand Out
One of my favorite things about creating photo prop patterns is adding sweet, thoughtful details. For the Sophia Romper, I added a delicate ribbon tie at the back, giving it a touch of vintage charm and adjustable fit. And don’t forget about the adorable picot edging at the leg openings—it complements the lace yoke beautifully. These small details truly elevate this mohair photo prop romper pattern from sweet to stunning!

Why KnitPicks Aloft is Perfect for Your Mohair Photo Prop Romper Pattern
If you haven’t noticed yet, I’m a huge fan of KnitPicks Aloft (affiliate link). The quality is consistently amazing, making it my go-to choice for any mohair project. It’s wonderfully soft yet strong enough to handle newborn photoshoot wear-and-tear. The colors? Perfection. Whether you’re into soft neutrals or vibrant jewel tones, KnitPicks Aloft (affiliate link) has something special.
This yarn is also incredibly lightweight, perfect for props you want to look soft, fluffy, and photogenic. Trust me—your photographer friends will thank you!
Creating Newborn Photo Props: Pure Knitting Joy
There’s nothing quite like knowing my creations help capture those first precious memories. Creating newborn props like this mohair photo prop romper pattern brings me so much joy. I can just imagine all the adorable little babies that will wear the Sophia Romper—seriously, it warms my heart every single time.
Perfect Pairing: Sophia Romper and Sophia Sleep Cap
If you really want to take your newborn photography props to the next level, pair this mohair photo prop romper pattern with the matching Sophia Sleep Cap. Both patterns feature the luxurious KnitPicks Aloft (affiliate link), and the delicate lace designs complement each other beautifully. Together, they create an utterly dreamy and cohesive look perfect for any photoshoot.
Grab Your Mohair Photo Prop Romper Pattern Below!
I’m so excited to share the Sophia Romper pattern with you! Whether you’re knitting it as a thoughtful gift, building your collection of newborn photography props, or just looking for a beautiful knitting project, this mohair photo prop romper pattern is one you’ll adore making.
Remember: This specific pattern is waiting for you at the bottom of this post! For even more adorable props, don’t forget to explore the other patterns featured on my free photo prop pattern page.
Wrapping Up the Magic of Mohair Lace
Creating this mohair photo prop romper pattern has truly been a joy. KnitPicks Aloft (affiliate link) brought my vision to life, helping me create something timeless, delicate, and absolutely perfect for capturing those fleeting newborn moments. I can’t wait to see all the beautiful photographs this romper will inspire.
Thank you for joining me on this knitting adventure! I hope you love crafting this mohair photo prop romper pattern as much as I loved designing it.
Now, grab your needles and let’s get knitting! Happy stitching!

Materials and Info
Materials: 90-200 yds of lace weight (size 0) mohair yarn (I used KnitPicks aloft), size 7 (4.5mm) straight needles, yarn needle, 2 stitch markers
Gauge: 5sts/in ~GAUGE IS VERY IMPORTANT~
Abbreviation Key:
K – knit
P – purl
yo – yarn over
k2tog – knit 2 together
sl – slip st knitwise
psso – pass slipped stitch over
p2tog – purl 2 together
m1 – make one
ssk – slip, slip, knit
Sizes: newborn (6.5x9ins), 3-6mth (7.5×11.5ins), 6-12mths (8.5x13ins)
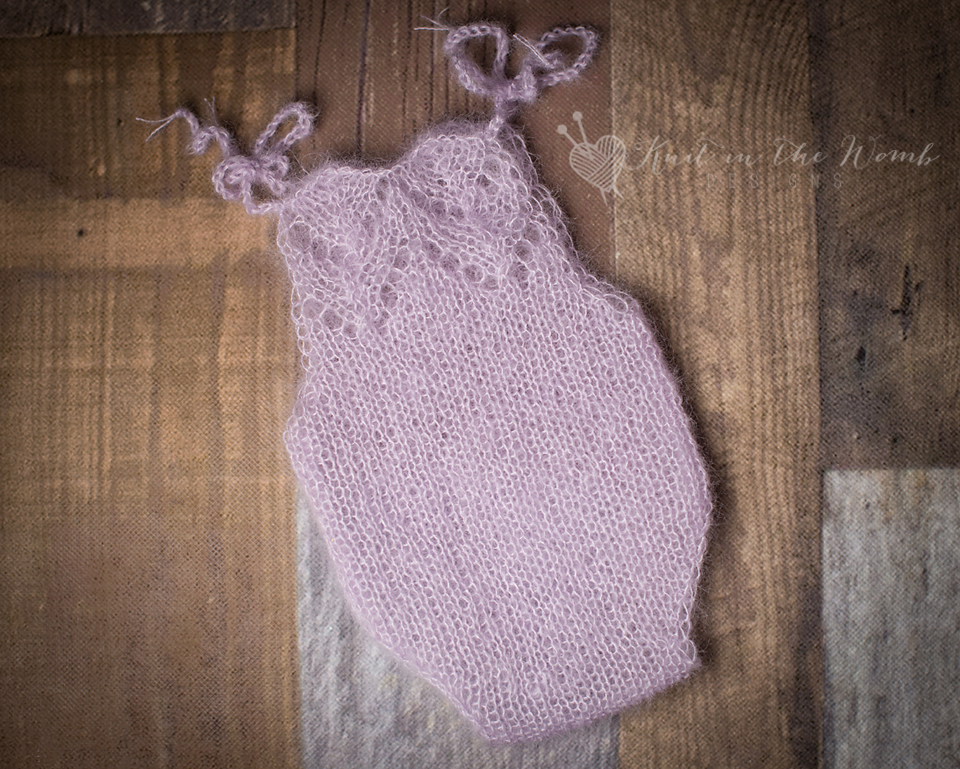
This is what one half will look like when you complete it. You will need 2 of these pieces to make the full romper. The 2 pieces are identical. If you noticed my ties are different than the braided ties I mentioned and would like them as pictured, I used a 3.25mm crochet hook and slip stitched for about 8ins.

Sophia Romper Pattern
NEWBORN
Bib
Cast on 21sts
Row 1 (right side)– k1 [yo, k3, sl1, k2tog, psso, k3, yo, k1] repeat [to] across
Row 2 (wrong side) – purl across
Row 3 – k1[k1, yo, k2, sl1, k2tog, psso, k2, yo, k2] repeat [to] across
Row 4 – purl across
Row 5 – k1 [k2, yo, k1, sl1, k2tog, psso, k1, yo, k3] repeat [to] across
Row 6 – purl across
Row 7 – k1[k3, yo, sl1, k2tog, psso, yo, k4] repeat [to] across
Row 8 – purl across
Work rows 1-8 one more time.
Work in stockinette st until your work measures 2.75ins from the cast on edge ending after completing a wrong side row.
Bottom
Row 1 – k1, m1, k19, m1, k1 (23sts)
Row 2 – purl across
Row 3 – k1, m1, k21, m1, k1 (25sts)
Row 4 – purl across
Row 5 – cast on 3sts, knit across (28sts)
Row 6 – cast on 3sts, purl across (31sts)
Work in stockinette st for 3ins starting with a knit row and ending after completing a purl row. Place 1 marker on each end of the end row.
Decrease rows
Row 1 – k1, ssk, k25, k2tog, k1 (29sts)
Row 2 (and all following wrong side rows) – purl
Row 3 – k1, ssk, k23, k2tog, k1 (27sts)
Row 5 – k1, ssk, k21, k2tog, k1 (25sts)
Row 7 – k1, ssk, k19, k2tog, k1 (23sts)
Row 9 – k1, ssk, k17, k2tog, k1 (21sts)
Row 11 – k1, ssk, k15, k2tog, k1 (19sts)
Row 13 – k1, ssk, k13, k2tog, k1 (17sts)
Work 5 rows in stockinette st starting and ending with a purl row. DO NOT BIND OFF. Leave your stitches on a spare needle or stitch holder. Leaving enough of a tail to Kitchener stitch the crotch together once you have both pieces done.
Sew seams. Weave in ends. Now either cut 3 strand of yarn appx 16ins long. Fold them in half and pull a loop through the front corner of the bib. Pull the ends through this loop and braid.
Repeat on the other side and both ends of the back of the bib. Finish off.
3-6 MONTHS
Bib
Cast on 25sts
Row 1 (right side)– k3 [yo, k3, sl1, k2tog, psso, k3, yo, k1] repeat [to] across to last 2 sts, k2
Row 2 (wrong side) – purl across
Row 3 – k3[k1, yo, k2, sl1, k2tog, psso, k2, yo, k2] repeat [to] across to last 2 sts, k2
Row 4 – purl across
Row 5 – k3 [k2, yo, k1, sl1, k2tog, psso, k1, yo, k3] repeat [to] across to last 2 sts, k2
Row 6 – purl across
Row 7 – k3[k3, yo, sl1, k2tog, psso, yo, k4] repeat [to] across to last 2 sts, k2
Row 8 – purl across
Work rows 1-8 one more time.
Work in stockinette st until your work measures 3ins from the cast on edge ending after completing a wrong side row.
Bottom
Row 1 – k1, m1, k23, m1, k1 (27sts)
Row 2 – purl across
Row 3 – k1, m1, k25, m1, k1 (29sts)
Row 4 – purl across
Row 5 – k1, m1, k27, m1, k1 (31sts)
Row 6 – purl across
Row 7 – cast on 3sts, knit across (34sts)
Row 8 – cast on 3sts, purl across (37sts)
Work in stockinette st for 3.5ins starting with a knit row and ending after completing a purl row. Place 1 marker on each end of the end row.
Decrease rows
Row 1 – k1, ssk, k31, k2tog, k1 (35sts)
Row 2 (and all following wrong side rows) – purl
Row 3 – k1, ssk, k29, k2tog, k1 (33sts)
Row 5 – k1, ssk, k27, k2tog, k1 (31sts)
Row 7 – k1, ssk, k25, k2tog, k1 (29sts)
Row 9 – k1, ssk, k23, k2tog, k1 (27sts)
Row 11 – k1, ssk, k21, k2tog, k1 (25sts)
Row 13 – k1, ssk, k19, k2tog, k1 (23sts)
Row 15 – k1, ssk, k17, k2tog, k1 (21sts)
Row – 17 – k1, ssk, k15, k2tog, k1 (19sts)
Work 6 rows in stockinette st starting with a purl row. DO NOT BIND OFF. Leave your stitches on a spare needle or stitch holder. Leaving enough of a tail to Kitchener stitch the crotch together once you have both pieces done.
Sew seams. Weave in ends. Now either cut 3 strand of yarn appx 16ins long. Fold them in half and pull a loop through the front corner of the bib. Pull the ends through this loop and braid.
Repeat on the other side and both ends of the back of the bib. Finish off.
6-12 MONTHS
Bib
Cast on 31sts
Row 1 (right side) – k1 [yo, k3, sl1, k2tog, psso, k3, yo, k1] repeat [to] across
Row 2 (wrong side) – purl across
Row 3 – k1 [k1, yo, k2, sl1, k2tog, psso, k2, yo, k2] repeat [to] across
Row 4 – purl across
Row 5 – k1 [k2, yo, k1, sl1, k2tog, psso, k1, yo, k3] repeat [to] across
Row 6 – purl across
Row 7 – k1[k3, yo, sl1, k2tog, psso, yo, k4] repeat [to] across
Row 8 – purl across
Work rows 1-8 one more time.
Work in stockinette st until your work measures 3.5ins from the cast on edge ending after completing a wrong side row.
Bottom
Row 1 – k1, m1, k29, m1, k1 (33sts)
Row 2 – purl across
Row 3 – k1, m1, k31, m1, k1 (35sts)
Row 4 – purl across
Row 5 – k1, m1, k33, m1, k1 (37sts)
Row 6 – purl across
Row 7 – cast on 3sts, knit across (40sts)
Row 8 – cast on 3sts, purl across (43sts)
Work in stockinette st for 4ins starting with a knit row and ending after completing a purl row. Place 1 marker on each end of the end row.
Decrease rows
Row 1 – k1, ssk, k37, k2tog, k1 (41sts)
Row 2 (and all following wrong side rows) – purl
Row 3 – k1, ssk, k35, k2tog, k1 (39sts)
Row 5 – k1, ssk, k33, k2tog, k1 (37sts)
Row 7 – k1, ssk, k31, k2tog, k1 (35sts)
Row 9 – k1, ssk, k29, k2tog, k1 (33sts)
Row 11 – k1, ssk, k27, k2tog, k1 (31sts)
Row 13 – k1, ssk, k25, k2tog, k1 (29sts)
Row 15 – k1, ssk, k23, k2tog, k1 (27sts)
Row 17 – k1, ssk, k21, k2tog, k1 (25sts)
Row 19 – k1, ssk, k19, k2tog, k1 (23sts)
Work 7 rows in stockinette st starting and ending with a purl row. DO NOT BIND OFF. Leave your stitches on a spare needle or stitch holder. Leaving enough of a tail to Kitchener stitch the crotch together once you have both pieces done.
Sew seams. Weave in ends. Now either cut 3 strand of yarn appx 16ins long. Fold them in half and pull a loop through the front corner of the bib. Pull the ends through this loop and braid.
Repeat on the other side and both ends of the back of the bib. Finish off.
Sophia Romper PDF
Disclaimer: This page contains affiliate links. If you choose to make a purchase after clicking a link, I may receive a commission at no additional cost to you. Thank you for your support!
Hey people!!!!!
Good mood and good luck to everyone!!!!!