
Find your next favorite free mohair photo prop pattern here! This sweet design awaits you below, but explore even more on my free photo prop pattern page.

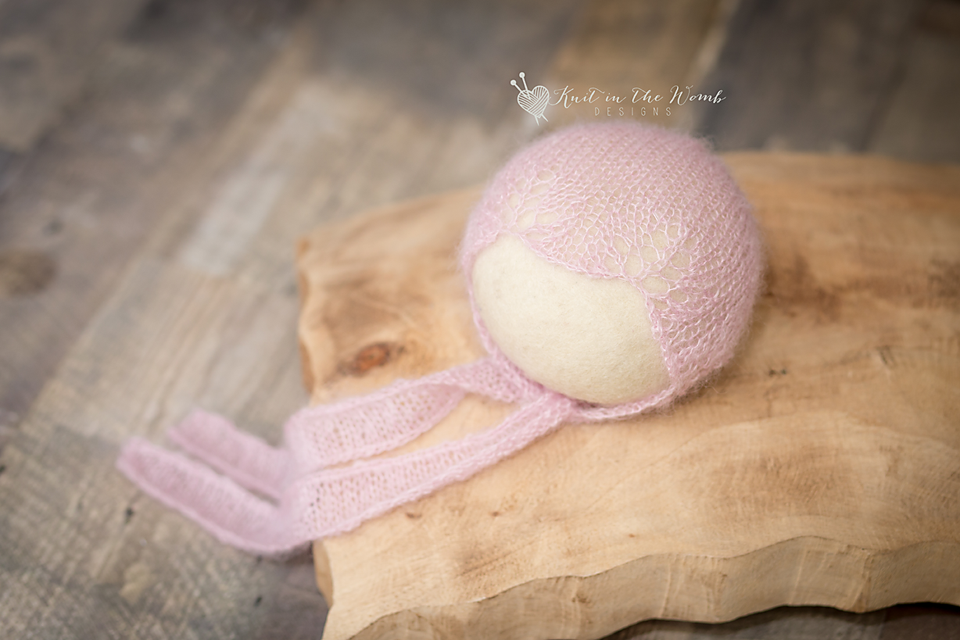
Knitting has always been my happy place. Give me some yarn, a comfy chair, and my needles, and suddenly I’m living my best life. There’s just something incredibly satisfying about turning a humble strand into a stunning keepsake, especially when it’s meant to welcome tiny new arrivals into the world. Today, I’m thrilled to share my newest obsession—a free mohair photo prop pattern that you’ll absolutely adore: The Sparrow Bonnet.
You can grab this charming free mohair photo prop pattern at the bottom of this post, but don’t miss out on the rest of my delightful creations available on the free photo prop pattern page. From sweet bonnets to cozy wraps, it’s a knitter’s paradise!
Why I Created this Free Mohair Photo Prop Pattern
As a mom and passionate knitter, designing patterns that carry meaning is what I live for. Each stitch is an opportunity to create a memory. That’s exactly what inspired the Sparrow Bonnet. This bonnet is all about simplicity and nostalgia—capturing the softness of newborns and the sweetness of new beginnings.
And what’s softer than mohair? Absolutely nothing! It’s dreamy, fuzzy, and unbelievably gentle against a newborn’s delicate skin, making it ideal for photography props. Using KnitPicks Aloft (affiliate link) yarn made this free mohair photo prop pattern even more luxurious. Its ethereal fluff makes every stitch look heavenly!
My Journey Creating the Sparrow Bonnet
Creating this free mohair photo prop pattern wasn’t all smooth sailing—believe me, there were some hilarious knitting fails along the way. Ever had your yarn tangled in your coffee mug? Yep, been there. But hey, knitting bloopers aside, the lace finally came together beautifully.
I spent plenty of cozy afternoons, perched by the window, watching patterns take shape stitch by stitch. KnitPicks Aloft (affiliate link) yarn provided just the right delicate halo effect, enhancing the dreamy quality I envisioned for this free mohair photo prop pattern. The end result? Pure magic in yarn form.

Mohair Magic: What Makes this Yarn Special
Speaking of KnitPicks Aloft (affiliate link)—can we talk about how amazing mohair is for a second? It’s literally like knitting with a fluffy cloud. Yes, it can be a bit fussy at times, but trust me, once you see that finished bonnet, you’ll agree it’s worth every tangled moment.
The airy lace design combined with KnitPicks Aloft (affiliate link) creates a gentle, feather-light bonnet. Photographers and new parents alike adore how it frames sweet little faces without overwhelming them. Plus, who doesn’t love that dreamy soft-focus look? It’s Instagram perfection!
Tips for Knitting Your Sparrow Bonnet
This free mohair photo prop pattern is surprisingly beginner-friendly, making it the perfect project to dive into lace knitting. Even if you’re a lace newbie, don’t be shy! The stitches repeat rhythmically, quickly becoming second nature. Before you know it, you’ll be knitting with your eyes closed—well, almost!
KnitPicks Aloft (affiliate link) yarn adds elegance without complexity. My biggest tip? Go slow at first. Mohair yarn loves gentle hands, so embrace the chill knitting vibes. Remember, knitting is supposed to be relaxing!
Customizing Your Free Mohair Photo Prop Pattern
What I love most about knitting is making each piece unique. While this bonnet looks gorgeous in classic neutrals, experimenting with color is tons of fun. Try KnitPicks Aloft (affiliate link) in blush pink, dusty lavender, or even pale sky blue to give your bonnet a fresh twist.
I personally added a satin ribbon tie to my bonnet, giving it a delicate, vintage charm. Feel free to add beads, tiny pearls, or embroidery—the possibilities are endless! Whatever you choose, your customized Sparrow Bonnet will surely become a cherished keepsake.

Capturing Magical Photos with the Sparrow Bonnet
When it comes to newborn photography, simplicity is key, and this free mohair photo prop pattern is perfect for achieving that clean, soft look photographers crave. Pair your bonnet with neutral backdrops, soft textures, and natural lighting to capture those precious first days beautifully.
I’ve received so many compliments from photographers who adore how this bonnet adds just the right amount of detail without overshadowing the baby. Trust me, every image becomes instantly frame-worthy.
Why I’m Offering This Pattern Free
Sharing is caring, right? Knitting brings me joy, so why not spread that happiness around? Offering this free mohair photo prop pattern allows me to connect with knitters everywhere, inspiring creativity and kindness. Imagine gifting this handmade bonnet to a friend’s new baby or to your favorite local photographer—it’s guaranteed smiles!
Whether you’re just getting started with lace knitting or you’re a seasoned stitcher looking for something special, this pattern is perfect. And remember, the full instructions for this gorgeous free mohair photo prop pattern are waiting at the bottom of this post.
Final Thoughts: Your Knitting Adventure Awaits!
Creating the Sparrow Bonnet was truly a labor of love. From selecting KnitPicks Aloft (affiliate link) yarn to crafting every stitch with care, this bonnet is more than just a photography prop—it’s a tiny treasure made with heart. As you knit, remember you’re not just making something beautiful—you’re creating memories.
So, grab your needles, your favorite cup of tea (careful with the yarn!), and dive into this delightful free mohair photo prop pattern. I promise it’ll become your new knitting obsession.
Happy stitching!
Ready to start your knitting adventure?
Download the Sparrow Bonnet—the sweetest free mohair photo prop pattern—below.
Don’t forget to check out more beautiful designs on my free photo prop pattern page. Enjoy!

Materials and Info
Materials: 80-200 yds of lace weight (size 0) mohair yarn (I used knitpicks aloft), size 7 (4.5mm) straight needles, yarn needle, 2 stitch markers
Gauge: 5sts/in ~GAUGE IS VERY IMPORTANT~
Abbreviation Key:
K – knit
P – purl
k2tog – knit 2 together
yo – yarn over
pm – place marker
ssk – slip, slip, knit slipped sts tog
sm – slip marker
rm – remove marker
Head circumference: nb (13ins). 0-3mths (14ins), 3-6mth (15ins), 6- 12mths (16ins)

Sparrow Bonnet Pattern
NEWBORN
Cast on 171
Row 1 (wrong side) – purl 60, pm, p51, pm. P60
Row 2 – k60, sm, k2, [k2tog, k2tog, yo, k1, yo, k1, yo, k1, yo, ssk, ssk, k1] repeat [to] to last st before marker, k1, sm, k60
Row 3 – purl across
Row 4 – k60, sm, k2, [k2tog, k2tog, yo, k1, yo, k1, yo, k1, yo, ssk, ssk, k1] repeat [to] to last st before marker, k1, sm, k60
Row 5 – purl across
Row 6 – k60, sm, k2, [k2tog, k3, yo, k1, yo, k3, ssk, k1] repeat [to] to last st before marker, k1, sm, k60
Row 7 – purl across
Row 8 – bind off LOOSELY 60, rm, k2, [k2tog, k3, yo, k1, yo, k3, ssk, k1] repeat [to] to last st, k1, rm, bind off LOOSELY remaining 60sts. Cut yarn. Pick up on remaining 51sts with wrong side facing. Stockinette st (starting with a purl row) until work measures appx 3.5ins from cast on edge. End after completing a wrong side row.
DECREASES
Place one stitch marker on either end of the row just completed.
Row 1 – k1 [k2tog, k5] repeat [to] across to last sts, k1(44sts)
Row 2 – purl across
Row 3 – k1 [k2tog, k4] repeat [to] across to last sts, k1 (37sts)
Row 4 – purl across
Row 5 – k1 [k2tog, k3] repeat [to] across to last sts, k1 (30sts)
Row 6 – purl across
Row 7 – k1 [k2tog, k2] repeat [to] across to last sts, k1 (23sts)
Row 8 – purl across
Row 9 – k1 [k2tog, k1] repeat [to] across to last sts, k1 (16sts)
Row 10 – purl across
Row 11 – k1 [k2tog] repeat [to] across to last st, k1 (9sts)
Do not bind off.
Cut yarn leaving appx 12ins and pull through remaining stitches. Using this end, sew the crown together to your stitch markers. (I like to use the mattress stitch since it is nearly invisible). Weave in all ends. Block as necessary.
0-3 MONTHS
Cast on 175
Row 1 (wrong side) – purl 60, pm, p55, pm. P60
Row 2 – k60, sm, k4, [k2tog, k2tog, yo, k1, yo, k1, yo, k1, yo, ssk, ssk, k1] repeat [to] to last 3sts before marker, k3, sm, k60
Row 3 – purl across
Row 4 – k60, sm, k4, [k2tog, k2tog, yo, k1, yo, k1, yo, k1, yo, ssk, ssk, k1] repeat [to] to last 3sts before marker, k3,, sm, k60
Row 5 – purl across
Row 6 – k60, sm, k4, [k2tog, k3, yo, k1, yo, k3, ssk, k1] repeat [to] to last 3sts before marker, k3, sm, k60
Row 7 – purl across
Row 8 – bind off LOOSELY 60, rm, k4, [k2tog, k3, yo, k1, yo, k3, ssk, k1] repeat [to] to last 3sts before marker, k3, rm, bind off LOOSELY remaining 60sts. (55sts)
Cut yarn. Pick up on remaining 55sts with wrong side facing. Stockinette st (starting with a purl row) until work measures appx 4ins from cast on edge. End after completing a wrong side row.
DECREASES
Place one stitch marker on either end of the row just completed.
Row 1 – k1, [k2tog, k4] repeat [to] across (46sts)
Row 2 – purl across
Row 3 – k1, [k2tog, k3] repeat [to] across (37sts)
Row 4 – purl across
Row 5 – k1, [k2tog, k2] repeat [to] across (28sts)
Row 6 – purl across
Row 7 – k1, [k2tog, k1] repeat [to] across (19sts)
Row 8 – purl across
Row 9 – k1 [k2tog] repeat [to] across (10sts)
Do not bind off.
Cut yarn leaving appx 12ins and pull through remaining stitches. Using this end, sew the crown together to your stitch markers. (I like to use the mattress stitch since it is nearly invisible). Weave in all ends. Block as necessary.

3-6 MONTHS
Cast on 183
Row 1 (wrong side) – purl 60, pm, p63, pm. P60
Row 2 – k60, sm, k2, [k2tog, k2tog, yo, k1, yo, k1, yo, k1, yo, ssk, ssk, k1] repeat [to] to last st before marker, k1, sm, k60
Row 3 – purl across
Row 4 – k60, sm, k2, [k2tog, k2tog, yo, k1, yo, k1, yo, k1, yo, ssk, ssk, k1] repeat [to] to last st before marker, k1, sm, k60
Row 5 – purl across
Row 6 – k60, sm, k2, [k2tog, k3, yo, k1, yo, k3, ssk, k1] repeat [to] to last st before marker, k1, sm, k60
Row 7 – purl across
Row 8 – bind off LOOSELY 60, rm, k2, [k2tog, k3, yo, k1, yo, k3, ssk, k1] repeat [to] to last st, k1, rm, bind off LOOSELY remaining 60sts. (63sts)
Cut yarn. Pick up on remaining 63sts with wrong side facing. Stockinette st (starting with a purl row) until work measures appx 4.25ins from cast on edge. End after completing a wrong side row.
DECREASES
Place one stitch marker on either end of the row just completed.
Row 1 – [k2tog, k5] repeat [to] across (54sts)
Row 2 – purl across
Row 3 – [k2tog, k4] repeat [to] across (45sts)
Row 4 – purl across
Row 5 – [k2tog, k3] repeat [to] across (36sts)
Row 6 – purl across
Row 7 – [k2tog, k2] repeat [to] across (27sts)
Row 8 – purl across
Row 9 – [k2tog, k1] repeat [to] across (18sts)
Row 10 – purl across
Row 11 – [k2tog] repeat [to] across (9sts)
Do not bind off.
Cut yarn leaving appx 12ins and pull through remaining stitches. Using this end, sew the crown together to your stitch markers. (I like to use the mattress stitch since it is nearly invisible). Weave in all ends. Block as necessary.
6-12 MONTHS
Cast on 189
Row 1 (wrong side) – purl 60, pm, p69, pm. P60
Row 2 – k60, sm, k5, [k2tog, k2tog, yo, k1, yo, k1, yo, k1, yo, ssk, ssk, k1] repeat [to] to last 4sts before marker, k4, sm, k60
Row 3 – purl across
Row 4 – k60, sm, k5, [k2tog, k2tog, yo, k1, yo, k1, yo, k1, yo, ssk, ssk, k1] repeat [to] to last 4sts before marker, k4, sm, k60
Row 5 – purl across
Row 6 – k60, sm, k5, [k2tog, k3, yo, k1, yo, k3, ssk, k1] repeat [to] to last 4sts before marker, k4, sm, k60
Row 7 – purl across
Row 8 – bind off LOOSELY 60, rm, k5, [k2tog, k3, yo, k1, yo, k3, ssk, k1] repeat [to] to last 4sts before marker, k4, rm, bind off LOOSELY remaining 60sts. (69sts)
Cut yarn. Pick up on remaining 69sts with wrong side facing. Stockinette st (starting with a purl row) until work measures appx 4.5ins from cast on edge. End after completing a wrong side row.
DECREASES
Place one stitch marker on either end of the row just completed.
Row 1 – k1, [k2tog, k15] repeat [to] across (65sts)
Row 2 – purl across
Row 3 – [k2tog, k5] repeat [to] across (56sts)
Row 4 – purl across
Row 5 – [k2tog, k4] repeat [to] across (47sts)
Row 6 – purl across
Row 7 – [k2tog, k3] repeat [to] across (38sts)
Row 8 – purl across
Row 9 – [k2tog, k2] repeat [to] across (29sts)
Row 10 – purl across
Row 11 – [k2tog, k1] repeat [to] across (20sts)
Row 12 – purl across
Row 13 – [k2tog] repeat [to] across (11sts)
Do not bind off.
Cut yarn leaving appx 12ins and pull through remaining stitches. Using this end, sew the crown together to your stitch markers. (I like to use the mattress stitch since it is nearly invisible). Weave in all ends. Block as necessary.
Sparrow Bonnet PDF
Disclaimer: This page contains affiliate links. If you choose to make a purchase after clicking a link, I may receive a commission at no additional cost to you. Thank you for your support!