
Looking for adorable props? Check out my free stuffed bear knitting pattern below, and find even more cuties on the photo prop pattern page!

Hey there, knitting friends! Today, I’m thrilled to share something extra-special with you: my free stuffed bear knitting pattern. Whether you’re a seasoned knitting pro or you’ve just recently fallen head-over-heels with yarn (we’ve all been there!), this sweet little bear is going to melt your heart.
If you’re already excited, great news: THIS particular free stuffed bear knitting pattern is waiting for you at the very bottom of this post. But first, if you love knitting adorable props for newborn photoshoots, don’t miss my photo prop pattern page. You’ll find loads more delightful patterns there!
Now, let’s talk bears, yarn, and everything cuddly.
Why I Love Knitting Handmade Gifts (Especially a Free Stuffed Bear Knitting Pattern!)
In our fast-paced world of store-bought everything, there’s nothing quite like a handcrafted gift. As a knitter, I’ve always believed a handmade toy says, “Hey, someone put real love into making me.” And trust me—new parents absolutely cherish that sentiment.
With every stitch you knit in this free stuffed bear knitting pattern, you’re creating something truly unique. Picture it: someday, that tiny bear you knitted could become a treasured keepsake passed down for generations. How cool is that?
Why Worsted Weight Yarn is My Go-To for a Free Stuffed Bear Knitting Pattern
Let’s talk yarn! For knitting toys, particularly when it comes to my free stuffed bear knitting pattern, worsted weight yarn is my hands-down favorite. Here’s why:
- Durability: Stuffed toys are meant to be loved, cuddled, dragged around, and occasionally drooled on (let’s be honest). Worsted weight yarn stands up to all that wear and tear beautifully.
- Softness: Sure, durability matters, but softness is non-negotiable. Babies have delicate skin, and this yarn strikes the perfect balance: it’s both gentle and sturdy.
- Versatility: Have a specific color or texture in mind? Good news! Worsted weight yarn comes in countless shades and fibers. You’ll have a blast picking the perfect one.
- Ease of Use: This yarn is just plain easy to knit with. It’s neither too thin nor too bulky, making it ideal for creating precise details in your bear.

Using Your Free Stuffed Bear Knitting Pattern as the Perfect Photo Prop
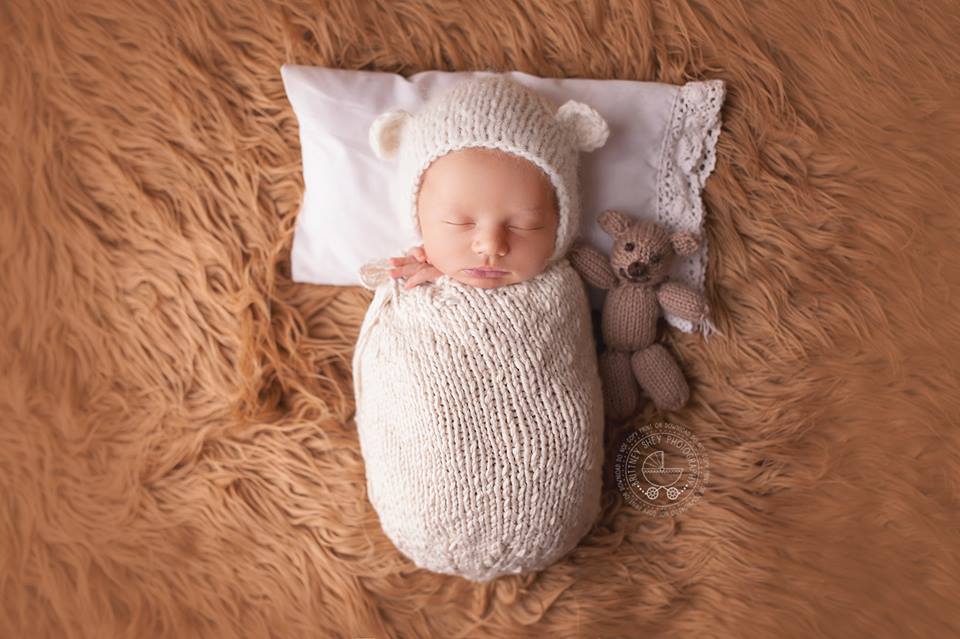
One of my absolute favorite ways to showcase this bear is in newborn photography sessions. If you’re a photographer (or even a proud new momma snapping those sweet baby pics yourself!), here are a few tips for using your knitted bear in photoshoots:
- Keep It Tiny: Remember, newborns are small—your bear should be small enough to comfortably fit into their tiny hands or snuggle sweetly beside them.
- Match the Colors: Pick yarn shades that complement your photo’s theme. I love soft neutrals, pastels, or even classic baby blues and pinks.
- Experiment with Placement: Get creative! Tuck the bear beside the baby, gently place it in their hands, or use it as a charming detail in your photo’s background.
- Prioritize Safety: This is crucial. Always make sure your bear is knitted securely, with no loose threads or embellishments that could pose a risk.
Why a Mini Teddy Bear Makes the Ultimate Baby Gift
While these mini bears make adorable props, they’re also wonderful gifts! Here’s what makes a knitted bear such a cherished present:
- Personalized Touches: When you knit your own bear, you can add personalized details like embroidered initials or a cute little ribbon. It’s truly one-of-a-kind!
- Cuddle Factor: Babies adore soft, cozy things to cuddle, and a knitted bear fits the bill perfectly. It’s guaranteed to become their favorite bedtime buddy!
- Heirloom Quality: Handmade toys like this bear have heirloom potential. Imagine your knitted creation becoming a beloved family keepsake, loved through the generations!
Tips & Tricks for Mastering Your Free Stuffed Bear Knitting Pattern
Ready to jump into your project? Here are my tried-and-true tips to ensure your little bear turns out picture-perfect:
- Select the Right Pattern: There’s plenty out there, but I’ve got your back today with my easy-to-follow free stuffed bear knitting pattern right at the bottom!
- Check Your Gauge: Gauge is essential. Take time to knit a quick swatch to make sure your bear turns out the perfect size.
- Quality Stuffing Counts: For stuffing, I prefer premium polyester fiberfill for that perfect squishy feel. Natural wool roving also works beautifully if you prefer something more organic.
- Details Make the Difference: Spend time carefully embroidering eyes, noses, and mouths—these tiny details give your bear its sweet, lovable personality.
Time to Start Your Mini Teddy Bear Adventure!
Now, the moment you’ve been waiting for—scroll down, grab this free stuffed bear knitting pattern, and start crafting your own cuddly keepsake! And remember, if you enjoyed this project, don’t forget to explore my photo prop pattern page for even more delightful patterns for your knitting adventures.
Happy knitting, friends—I can’t wait to see the beautiful bears you create with this adorable free stuffed bear knitting pattern!

Materials and Info
Materials: Worsted weight yarn, size 4 (3.5mm) double pointed needles, yarn needle, accent color for facial feature
Stitch Key:
co- cast on
bo- bind off
k- knit
kfb – knit front and back
k2tog – knit 2 together
st – stitch
sts – stitches
Note: Some people prefer to stuff the pieces as they go. If you are doing that Some have suggested stuffing before the decreases on each piece. It will make it a little easier to stuff when you have a slightly bigger opening. You may also find it less tedious if you sew the pieces on as you go.

Stuffed Teddy Bear Pattern
Body
CO 11sts leaving a long tail
Round 1 – k around
Round 2 – kfb around (22sts)
Rounds 3-14 – knit around
Round 15 – k2tog around (11sts)
BO leaving a long tail
Legs (make 2)
CO 8sts leaving a long tail
Round 1 – k around
Round 2 – kfb around (16sts)
Rounds 3-17 – k around
Round 18 – k2tog around (8sts)
Do not bind off. Cut yarn, leaving several inches, and pull through remaining sts. Cinch tight and finish off.
Arms (make 2)
CO 6sts leaving a long tail
Round 1 – k around
Round 2 – kfb around (12sts)
Rounds 3-11 – k around
Round 12 – k2tog around (6sts)
Do not bind off. Cut yarn, leaving several inches, and pull through remaining sts. Cinch tight and finish off.
Head
CO 12sts leaving a long tail
Round 1 – k around
Round 2 – kfb around (24sts)
Rounds 3-13 – k around
Round 14 – k2tog around (12sts)
Round 15 – [k2tog, k1] repeat around (8sts)
Round 16 – k2tog around (4sts)
Do not bind off. Cut yarn, leaving several inches, and pull through remaining sts. Cinch tight and finish off.
Ears (make 2)
CO 8sts
Rounds 1-3 – k around
Round 4 – [k2tog] around (4sts)
Do not bind off. Cut yarn, leaving several inches, and pull through remaining sts. Cinch tight and finish off.
Using your accent color make french knots for eyes, satin stitch the nose, and embroider the mouth onto the face as pictured. Stuff each piece (except the ears) firmly. Cinch closed the arms, legs, head and bottom of the body. Sew together all the pieces as pictured with a simple whip stitch. I just “eyeball” the placement of everything. It’s not an exact science.
Stuffed Teddy Bear PDF
Disclaimer: This page contains affiliate links. If you choose to make a purchase after clicking a link, I may receive a commission at no additional cost to you. Thank you for your support!