
Looking for the perfect baby photo prop? This free bear beanie pattern is just what you need! This cuddly hat will add charm to newborn photos, milestone pictures, and everyday wear. You’ll find more adorable patterns like this on my photo prop pattern page, but keep reading—this pattern is at the bottom of the post!

A Bear Beanie That’s Too Cute to Resist
There’s something so fun about knitting baby photo props! Whether it’s tiny bonnets, snuggly wraps, or sweet little hats, handmade items add a warm, personal touch to any photoshoot. This free bear beanie pattern is one of my favorites—it’s simple to make, super soft, and absolutely adorable on newborns.
If you’ve ever scrolled through Pinterest or Instagram looking at newborn photography, you know the power of a good prop. A cozy, well-fitting hat can take a picture from cute to unforgettable! And this free bear beanie pattern? It’s got everything: soft texture, classic design, and those irresistible little bear ears that make everyone go aww.
Why You’ll Love This Free Bear Beanie Pattern
- Perfect for Newborn Photography – This bear beanie is just the right size for tiny heads, making it ideal for capturing those sweet, sleepy newborn moments.
- Easy to Knit – Even if you’re a beginner, this pattern is simple enough to follow while still being fun to make.
- Stretchy and Comfy – Babies grow fast, but this hat has just the right amount of stretch to accommodate different sizes.
- Great Gift Idea – Handmade gifts are the best, and a hand-knit bear beanie is a thoughtful, heartfelt present for baby showers or new parents.
- A Quick Project – If you need a last-minute baby gift or a fast addition to your photo prop stash, this beanie knits up quickly.
The Best Yarn for This Pattern
I originally designed this free bear beanie pattern using Bernat Alpaca Blend, which was a dream to work with—super soft and warm with just the right texture for a newborn’s delicate skin. Sadly, it’s been discontinued, but don’t worry! A great alternative is Premier Anti-Pilling Bamboo Chunky (affiliate link). This yarn has a similar feel and weight, and as a bonus, it’s anti-pilling—perfect for keeping the hat looking fresh even after multiple wears and washes.
Knitting for Baby Photo Props: Why It’s So Rewarding
One of the best things about making photo props like this free bear beanie pattern is knowing they’ll be part of cherished memories. Imagine a tiny newborn snuggled up in this hat, fast asleep in a cozy basket, or a baby sitting up for the first time, flashing a gummy smile with little bear ears perched on their head.
Handmade props add something special to baby photos—something timeless. When I look back at pictures of my own babies, the ones I love the most are the ones where they’re wearing something I made. There’s something so meaningful about knowing that my hands created that little detail in the photo.
Customizing Your Free Bear Beanie Pattern
Want to make this pattern even more unique? Here are a few fun ways to customize it:
- Change the Color – Classic brown gives a true teddy bear look, but soft pastels or even bold colors can be just as cute.
- Add a Bow – A little bow between the ears can make the hat extra sweet for a baby girl.
- Use a Fuzzy Yarn – If you can find a soft, slightly fuzzy yarn, it’ll give the hat an even more plush teddy bear feel.
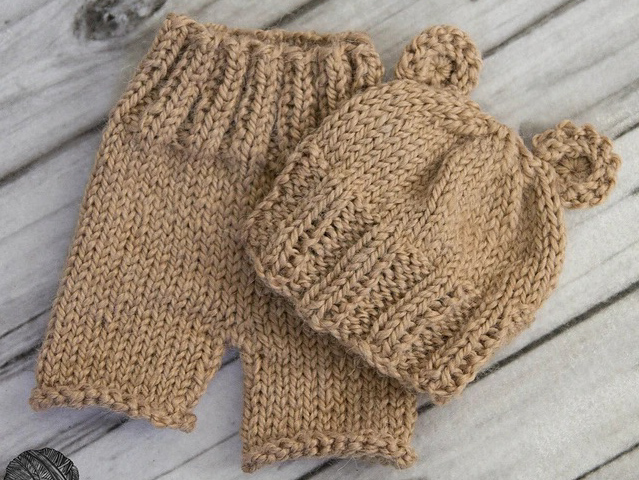
- Make a Matching Set – Pair this hat with a simple knit diaper cover or pants for an adorable photo outfit.
Knitting This Hat for Your Photography Business
If you’re a newborn photographer, having a variety of props on hand is key to creating unique, memorable images. This free bear beanie pattern is a great addition to any prop collection. It’s neutral, gender-friendly, and versatile, making it a go-to piece for a variety of themes and color schemes.
Since it knits up quickly, you can make multiple versions in different colors to match different backdrops or swaddles. And because Premier Anti-Pilling Bamboo Chunky (affiliate link) is durable and easy to wash, you won’t have to worry about it wearing out after a few sessions.
Knitting and Creating Memories
One of the things I love most about knitting is that it’s more than just making things—it’s about creating memories. I can’t tell you how many times I’ve sat with my knitting in hand, chatting with family, watching my kids play, or listening to a good audiobook while working on a project. And when that project becomes something as cute and meaningful as a baby’s first hat, it makes it even more special.
This free bear beanie pattern isn’t just about making an adorable hat—it’s about celebrating the joy of handmade, the sweetness of babyhood, and the timeless charm of knitting for the little ones we love.
More Free Knitting Patterns for Baby Photo Props
If you love knitting baby props, be sure to check out my photo prop pattern page for more patterns! From bonnets to cozy wraps, there are plenty of designs to help you create picture-perfect moments.
And, of course, you’ll find this free bear beanie pattern at the bottom of this post! So grab your needles, choose your yarn (Premier Anti-Pilling Bamboo Chunky (affiliate link) is my top pick!), and get ready to create something truly special.
Happy knitting, and may your stitches be full of love!

Teddy Shorts Set Pattern
Materials: appx 100-240yds bulky weight (size 5) yarn (I used Bernat Alpaca Blend which is discontinued but a great replacement would be Premier Anti-Pilling Bamboo Chunky), size 10 double pointed or circular needles (6mm), stitch markers, yarn needle
Sizes:
Shorts (appx finished waist circumference):
newborn (13.5ins), 0-3mths (14.5ins), (3-6mth (15.75ins), 6-12mths (17ins)
Hat (appx finished head circumference):
newborn (13ins), 0-3mths (14ins), 3-6mths (15ins), 6-12ths (16ins)
Gauge: 3.5sts/in Gauge is very important!!!!!!
Abbreviations:
K – knit
P – purl
YO – yarn over
M1 – make one
k2tog – knit 2 together
Sl1 – slip 1 stitch
Newborn
Hat
Cast on 45sts
Work in a k2p3 ribbing (k2p3 around on each round) for 2ins.
Then work in stockinette st until your work measures 4ins from the cast on edge.
Decrease rounds
Round 1: [k2tog k3] repeat around (36sts)
Round 2: knit around
Round 3: [k2tog k2] repeat around (27sts)
Round 4: [k2tog k1] repeat around (18sts)
Round 5: [k2tog] repeat around (9sts)
Do not bind off. Cut yarn and pull through remain sts.
Ears (make 2)
Cast on 10sts
Work in stockinette st for 4 rows.
Do not bind off. Cut yarn and pull through all sts on your needle. Attach to your hat.
Weave in all ends.
Shorts
Body
Cast on 48sts. Join in the round. Place marker at beginning of round.
Work in a k2p2 ribbing (k2p2 around on each round) for 2ins.
Work in stockinette st until work from cast on edge measures 5ins from cast on edge.
Gusset
Round 1: [place marker m1 k1 m1 place marker (the stitches between these markers are your gusset stitches) k23] repeat once more (52sts)
Round 2: knit around
Cut yarn leaving appx 8-10ins. Slip the last 23sts you worked onto a st holder or scrap piece of yarn. Kitchener st the gusset stitches from the front and back together. (tutorial at the end of pattern)
Legs
Round 1 – knit 23sts, pick up 1st on the gusset (24sts)
Work in stockinette st for appx 2ins from the gusset.
Bind off. I like to use a sewn bind off since it has a lot of stretch but it’s not necessary.
Pick up the 23sts on your stitch holder and repeat from round 1 of legs for the other leg.
Weave in all ends.
0-3mth
Hat
Cast on 48sts
Work in a k2p2 ribbing (k2p2 around on each round) for 2ins.
Then work in stockinette st until your work measures 4.25ins from the cast on edge.
Decrease rounds
Round 1: [k2tog k4] repeat around (40sts)
Round 2: knit around
Round 3: [k2tog k3] repeat around (32sts)
Round 4: [k2tog k2] repeat around (24sts)
Round 5: [k2tog k1] repeat around (16sts)
Round 6: [k2tog] repeat around (8sts)
Do not bind off. Cut yarn and pull through remain sts.
Ears (make 2)
Cast on 10sts
Work in stockinette st for 4 rows.
Do not bind off. Cut yarn and pull through all sts on your needle. Attach to your hat.
Weave in all ends.
Shorts
Body
Cast on 52sts. Join in the round. Place marker at beginning of round.
Work in a k2p2 ribbing (k2p2 around on each round) for 2ins.
Work in stockinette st until work from cast on edge measures 5.5ins from cast on edge.
Gusset
Round 1: [place marker m1 k1 m1 place marker (the stitches between these markers are your gusset stitches) k25] repeat once more (56sts)
Round 2: knit around
Cut yarn leaving appx 8-10ins. Slip the last 25sts you worked onto a st holder or scrap piece of yarn. Kitchener st the gusset stitches from the front and back together. (tutorial at the end of pattern)
Legs
Round 1 – knit 25sts, pick up 1st on the gusset (26sts)
Work in stockinette st for appx 2.5ins from the gusset.
Bind off. I like to use a sewn bind off since it has a lot of stretch but it’s not necessary.
Pick up the 25sts on your stitch holder and repeat from round 1 of legs for the other leg.
Weave in all ends.
3-6mths
Hat
Cast on 52sts
Work in a k2p2 ribbing (k2p2 around on each round) for 2.25ins.
Then work in stockinette st until your work measures 4.5ins from the cast on edge.
Decrease rounds
Round 1: [k2tog k24] repeat around (50sts)
Round 2: [k2tog k3] repeat around (40sts)
Round 3: knit around
Round 4: [k2tog k2] repeat around (30sts)
Round 5: knit around
Round 6: [k2tog k1] repeat around (20sts)
Round 7: [k2tog] repeat around (10sts)
Do not bind off. Cut yarn and pull through remain sts.
Ears (make 2)
Cast on 12sts
Work in stockinette st for 6 rows.
Do not bind off. Cut yarn and pull through all sts on your needle. Attach to your hat.
Weave in all ends.
Shorts
Body
Cast on 56sts. Join in the round. Place marker at beginning of round.
Work in a k2p2 ribbing (k2p2 around on each round) for 2.25ins.
Work in stockinette st until work from cast on edge measures 6.5ins from cast on edge.
Gusset
Round 1: [place marker m1 k1 m1 place marker (the stitches between these markers are your gusset stitches) k27] repeat once more (60sts)
Round 2: knit around
Cut yarn leaving appx 8-10ins. Slip the last 27sts you worked onto a st holder or scrap piece of yarn. Kitchener st the gusset stitches from the front and back together.(tutorial at the end of pattern)
Legs
Round 1 – knit 27sts, pick up 1st on the gusset (28sts)
Work in stockinette st for appx 3ins from the gusset.
Bind off. I like to use a sewn bind off since it has a lot of stretch but it’s not necessary.
Pick up the 27sts on your stitch holder and repeat from round 1 of legs for the other leg.
Weave in all ends.
6-12mths
Hat
Cast on 55sts
Work in a k2p3 ribbing (k2p3 around on each round) for 2.5ins.
Then work in stockinette st until your work measures 5ins from the cast on edge.
Decrease rounds
Round 1: K2tog knit remaining 53sts (54sts)
Round 2: [k2tog k4] repeat around (45sts)
Round 3: knit around
Round 4: [k2tog k3] repeat around (36sts)
Round 5: [k2tog k2] repeat around (27sts)
Round 6: [k2tog k1] repeat around (18sts)
Round 7: [k2tog] repeat around (9sts)
Do not bind off. Cut yarn and pull through remain sts.
Ears (make 2)
Cast on 12sts
Work in stockinette st for 6 rows.
Do not bind off. Cut yarn and pull through all sts on your needle. Attach to your hat.
Weave in all ends.
Shorts
Body
Cast on 60sts. Join in the round. Place marker at beginning of round.
Work in a k2p2 ribbing (k2p2 around on each round) for 2.5ins.
Work in stockinette st until work from cast on edge measures 7.5ins from cast on edge.
Gusset
Round 1: [place marker m1 k1 m1 place marker (the stitches between these markers are your gusset stitches) k29] repeat once more (64sts)
Round 2: knit around
Cut yarn leaving appx 8-10ins. Slip the last 29sts you worked onto a st holder or scrap piece of yarn. Kitchener st the gusset stitches from the front and back together. (tutorial at the end of pattern)
Legs
Round 1 – knit 29sts, pick up 1st on the gusset (30sts)
Work in stockinette st for appx 3.5ins from the gusset.
Bind off. I like to use a sewn bind off since it has a lot of stretch but it’s not necessary.
Pick up the 29sts on your stitch holder and repeat from round 1 of legs for the other leg.
Weave in all ends.
Kitchener Stitch:
Hold the two pieces of knitting parallel to one another with the wrong sides facing. Thread the working yarn with a yarn needle.
*Insert the yarn needle knitwise into the first stitch on the front knitting needle. Draw through the stitch and slip the stitch off of the front needle.
Insert the yarn needle purlwise into the next stitch on the front knitting needle. Draw through the stitch. Leave the stitch on the needle.
Insert the yarn needle purlwise into the first stitch on the back knitting needle. Draw through the stitch and slip the stitch off of the back needle.
Insert the yarn needle knitwise into the next stitch on the back knitting needle. Draw through the stitch. Leave the stitch on the needle.
Repeat these steps beginning at the * until all of your stitches have been grafted together.
Download Teddy Bear Shorts Set PDF

If you love Teddy Shorts Set Pattern be sure to check out all of our other free photo prop patterns here.
Disclaimer: This page contains affiliate links. If you choose to make a purchase after clicking a link, I may receive a commission at no additional cost to you. Thank you for your support!