
Looking for a puff sleeve knitting pattern? Check out the sweater patterns page—THIS adorable Child Puff Sleeve Tee is at the bottom!

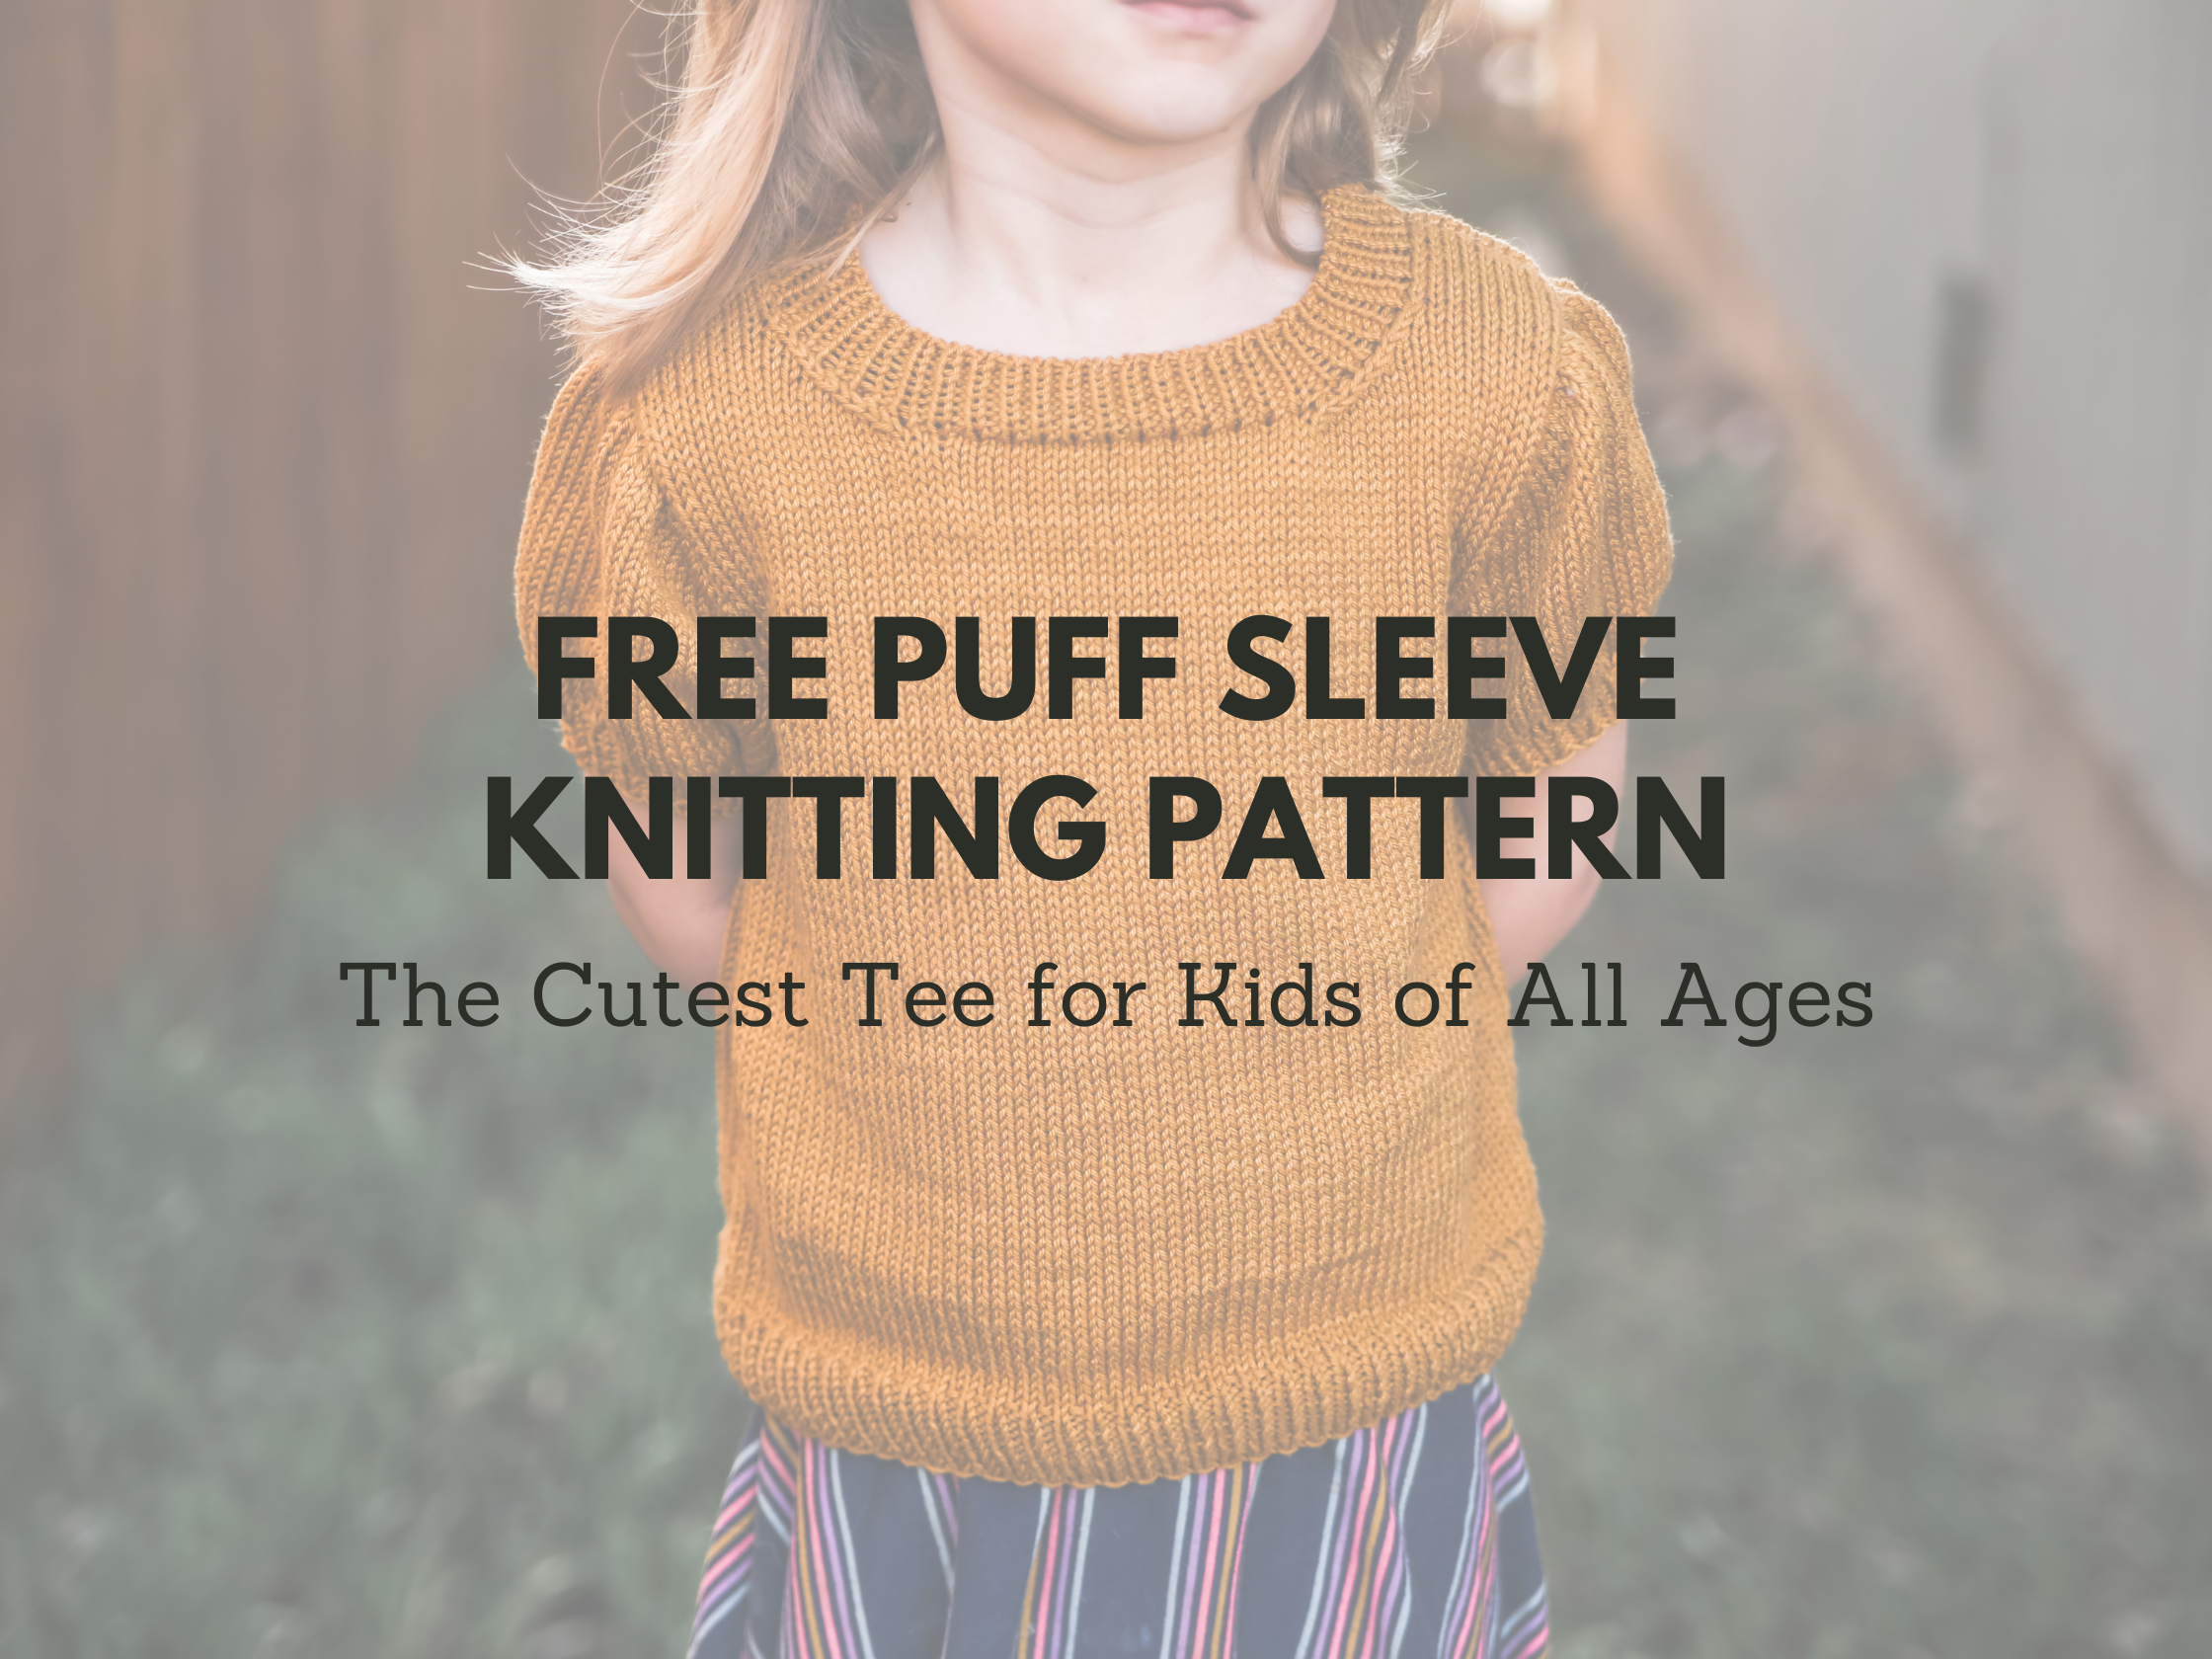
If there’s one thing I love more than knitting for my kids, it’s adding those little extra details that make a pattern feel whimsical and polished. And nothing says charming quite like a well-placed puff sleeve! This blog post is all about one of my absolute favorite designs: the Child Puff Sleeve Tee, a delightful puff sleeve knitting pattern that checks every box for style, comfort, and knit-ability.
From the playful silhouette to the soft and springy KnitPicks Vividie (affiliate link) yarn, this tee is both fun to make and fun to wear. And whether you’re knitting for a tiny 0-3 month baby or a fashion-forward 13-year-old, this puff sleeve knitting pattern has you covered. Literally.

Why I Designed a Puff Sleeve Knitting Pattern
Let’s be real—sometimes sleeves can feel like an afterthought. But with this puff sleeve knitting pattern, the sleeves are the star of the show. I wanted to create something that was youthful and feminine without being fussy. Something that gave a little flair to a classic tee without crossing into costume territory.
Plus, I have a house full of girls who love a good puffed sleeve moment. (Okay, I love it too.)

Construction Details That Make It Special
This puff sleeve knitting pattern is worked flat, bottom up. That means the front and back pieces are knit separately, then seamed together with a neat mattress stitch. I used a size 4 needle for the ribbing and switched to a size 6 for the body. The result is a balanced fabric—structured enough to hold the puff shape but still comfy for everyday wear.
But let’s talk about those sleeves. The magic of this puff sleeve knitting pattern comes from a series of strategic increases and decreases that create volume at the cap without making the arm look boxy. It’s a set-in sleeve design, so you get a tailored fit at the shoulder, with just the right amount of poof.

Sizing for All the Littles (and Not-So-Littles)
When I say this puff sleeve knitting pattern is versatile, I mean it. It comes with instructions for every size from 0–3 months through 13/14 years. Whether you’re knitting for a baby shower or a tween who’s outgrowing everything, there’s a size that fits.
And because the overall shape is a simple, classic tee, this design pairs beautifully with everything from leggings to tutus to high-waisted jeans. One of my girls even wore hers with overalls, and I nearly cried at the cuteness.

Let’s Talk Yarn: KnitPicks Vividie (affiliate link)
For this project, I used KnitPicks Vividie (affiliate link), a worsted-weight yarn that knits up more like a sport weight that’s as vibrant as it is soft. The color saturation is gorgeous, and it gives the puff sleeves just the right amount of bounce. If you’re knitting this tee for spring or early fall, the yarn is breathable but warm—perfect for layering.
I’ve used KnitPicks Vividie (affiliate link) on other projects too, and it holds up well to frequent washing (a must if your kids are anything like mine). It’s a smooth yarn with great stitch definition, so those increases and decreases on the sleeves really shine.

A Quick Rundown of What You’ll Need
Here’s what you’ll need for the Child Puff Sleeve Tee, the adorable puff sleeve knitting pattern featured at the bottom of this post:
- Yarn: KnitPicks Vividie (affiliate link)
- Needles: US 4 for the ribbing, US 6 for the body
- Tools: Yarn needle for seaming, stitch markers for shaping, and a measuring tape
- Skills: Basic knits and purls, increases, decreases, and mattress stitch for seaming
If you’re newer to seaming, I’ve got a tutorial on the mattress stitch that walks you through the whole process. Trust me—it’s easier than it looks and gives a polished, professional finish to your puff sleeve knitting pattern project.

The Joy of a Good Seam
Okay, I know not everyone gets excited about seaming, but hear me out: there’s something so satisfying about seeing all your hard work come together. The mattress stitch gives you this invisible, flat join that’s perfect for garments. On this puff sleeve knitting pattern, it makes the set-in sleeves sit perfectly along the armhole.
It also gives you a little flexibility in the fit. If you find your stitch counts are just a tad off, seaming is more forgiving than knitting in the round. Ask me how I know.

Style It Your Way
This puff sleeve knitting pattern is designed to be worn with a slight amount of positive ease, so it’s comfy without being slouchy. You can make it in a bold color for a statement piece or go neutral for an everyday classic.
Add stripes, a pocket, or even some duplicate stitch embroidery if you’re feeling creative. This is one of those patterns that invites a little personalization. I’ve even seen some knitters turn it into a crop top for older kids by shortening the body. Totally adorable.

Where to Find It (and More)
THIS puff sleeve knitting pattern, the Child Puff Sleeve Tee, is right at the bottom of this post. But if you’re on a roll with sweater knitting, don’t miss the other patterns linked on the sweater pattern page. You’ll find lots of inspiration whether you’re in the mood for raglan shaping, cables, or something ultra-simple.
I designed the Child Puff Sleeve Tee to be a go-to project—quick to knit, easy to customize, and full of that classic handmade charm. If you’ve never knit a puff sleeve knitting pattern before, this is the one to try.

Child Puff Sleeve Tee Pattern
MATERIALS AND INFO
Size: 0-3m, 3-6m (6-12m, 12m) 18m, 24m (3/4y, 5/6y) 7/8y, 9/10y (11/12y, 13/14yrs)
Materials: Approximately 2, 2 (2, 3) 3, 3 (3, 4) 5, 5 (6, 7) balls of KnitPick Vividie 190y/100g (affiliate link) yarn needle, stitch markers
Needle Size: 6(US) 4mm circular needles and dpn, 4(US) 3.5mm circular and dpn
Gauge (tension): 22sts & 32 rows to make 10cm square, using size 6(US) 4mm needles working in stockinette stitch
Chest Measurement: 41, 44 (47, 50), 52, 54 (57, 61) 66, 72 (78, 84) cm or 16, 17.25 (18.5, 19.5) 20.5, 21 (22.5,24) 26, 28.25 (30.75, 33) ins
METHOD
Puff Sleeve Tee is bottom-up set in sleeve pullover in an easy-care yarn. It is worked flat. Created for our 7th child. She wanted something fun and girly for summer.
Abbreviations can be found on the last page.
Note: choose size based on chest measurement for best fit. Measurements above are measurement of the person not sweater measurements.
1X1 RIB PATTERN
Row 1 (right side row) – (k1, p1) across
Row 2 – knit all the knit stitches, purl all the purl stitches.

BACK
Cast on using smaller circular needle: 58, 62 (64, 68) 70, 72 (76, 80) 86, 92 (98, 106) sts. Join in the round.
Work in 1×1 ribbing for 4cms or 1.5ins.
Switch to larger needles.
Work in pattern until piece measures 14, 15 (17.5, 19.5) 21, 22.5 (24, 27) 30, 32 (35, 37.5) cm or 5.5, 6 (7, 7.75) 8.5, 9 (9.5, 10.75) 12, 13 (14, 15) measuring from cast on.
SHAPE BACK ARMHOLES
Cast off 4, 4 (4, 4) 4, 4 (4, 4) 5, 5 (5, 6) stitches at beginning of next 2 rows. 50, 54 (56, 60) 62, 64 (68, 72) 76, 82 (88, 94) sts
Decrease 1 st at each end of following 1, 2 (2, 2) 2, 2 (2, 2) 2, 2 (3, 2) rows. 48, 50 (52, 56) 58, 60 (64, 68) 72, 78 (82, 90) sts
Then decrease 1 st each end of every right-side row 1, 2 (2, 2) 2, 2 (2, 2) 2, 2 (2, 2) times 44, 46 (48, 52) 54, 56 (60, 64) 68, 74 (78, 86) sts
Continue without shaping until work measures 23, 25 (27.5, 30.5) 32.5, 34.5 (37.5, 41) 45, 49 (52.5, 57) cms or 9.25, 10 (11, 12.25) 13, 13.75 (15, 16.5) 18, 19.5 (21, 23) ins
SHAPE BACK SHOULDERS
5/6yrs – 13/14yrs sizes only
Bind off x, x (x, x) x, x (x, 4) 4, 5 (5, 6) sts at beginning of the next 2 rows.
All Sizes
Bind off 0, 0 (4, 4) 5, 5 (5, 4) 4, 5 (5, 6) sts at beginning of row, k10, 10 (6, 7) 7, 7 (8, 6) 7, 7 (8, 8) [10, 10 (7, 8) 8, 8 (9, 7) 8, 8 (9, 9) sts on right needle].
Put remaining sts on stitch holder.
Turn, bind off 3sts, work to end of row.
Turn, bind off remaining 7, 7 (4, 5) 5, 5 (6, 4) 5, 5 (6, 6) sts
With right side facing, rejoin yarn to stitches on hold, bind off 24, 26 (26, 28) 28, 30 (32, 34) 36, 38 (40, 42) knit remaining 10, 10 (11, 12) 13, 13 (14, 13) 12, 13 (14, 16) sts.
Turn, bind off 0, 0 (4, 4) 5, 5 (5, 4) 4, 5 (5, 6) sts work to end of row
Turn, bind off 3sts
Turn, bind off 7, 7 (4, 5) 5, 5 (6, 4) 5, 5 (6, 6) sts
FRONT
Cast on using smaller circular needle: 58, 62 (64, 68) 70, 72 (76, 80) 86, 92 (98, 106) sts. Join in the round.
Work in 1×1 ribbing for 4cms or 1.5ins.
Switch to larger needles.
Work in pattern until piece measures 14, 15 (17.5, 19.5) 21, 22.5 (24, 27) 30, 32 (35, 37.5) cm or 5.5, 6 (7, 7.75) 8.5, 9 (9.5, 10.75) 12, 13 (14, 15) measuring from cast on.
SHAPE FRONT ARMHOLES
Cast off 4, 4 (4, 4) 4, 4 (4, 4) 5, 5 (5, 6) stitches at beginning of next 2 rows. 50, 54 (56, 60) 62, 64 (68, 72) 76, 82 (88, 94) sts
Decrease 1 st at each end of following 1, 2 (2, 2) 2, 2 (2, 2) 2, 2 (3, 2) rows. 48, 50 (52, 56) 58, 60 (64, 68) 72, 78 (82, 90) sts
Then decrease 1 st each end of every right-side row 1, 2 (2, 2) 2, 2 (2, 2) 2, 2 (2, 2) times 44, 46 (48, 52) 54, 56 (60, 64) 68, 74 (78, 86) sts
Continue in Stockinette st until you have worked 18, 19.5 (22.5, 25) 27, 29 (31.5, 35.5) 39, 42.5 (46.5, 50) cms or 7.25, 7.75 (9, 10) 10.75, 11.5 (12.5, 14.25) 15.5, 17 (18.5, 20) ins
LEFT FRONT NECK SHAPING
Work 11, 12 (13, 14) 15, 15 (19, 20) 21, 24 (25, 28) sts, put remaining sts on holder, turn.
Decrease 1 st at neck edge of next 2, 3 (3, 3) 3, 3 (5, 5) 5, 5 (5, 6) rows.
Then decrease 1 st at each end of each right-side row 1, 1 (2, 2) 2, 2 (3, 2) 3, 3 (4, 4) times.
7, 7 (8, 9) 10, 10 (11, 12) 13, 15 (16, 18) sts remain.
Continue without shaping until work measures 23, 25 (27.5, 30.5) 32.5, 34.5 (37.5, 41) 45, 49 (52.5, 57) cms or 9.25, 10 (11, 12.25) 13, 13.75 (15, 16.5) 18, 19.5 (21, 23) ins
LEFT FRONT SHOULDER SHAPING
6-12m – 13/14y Sizes only
Starting on a right-side row, bind off x, x (4, 4) 5, 5 (5, 4) 4, 5 (5, 6) sts, work across remains sts, turn.
Work 1 row with no decreases, turn.
9/10yrs – 13/14yrs sizes only
bind off x, x (x, x) x, x (x, x) x, 5 (5, 6) sts, work across remains sts, turn.
Work 1 row with no decreases, turn.
All sizes
Bind off remaining 7, 7 (4, 5) 5, 5 (6, 4) 5, 5 (6, 6) sts.
RIGHT FRONT NECK SHAPING
Rejoin yarn to work on stitch holder and bind off 22, 22 (22, 24) 24, 26 (22, 24) 26, 26 (28, 28) sts
Work to the end of the row.
Decrease 1 st at neck edge of next 2, 3 (3, 3) 3, 3 (5, 5) 5, 5 (5, 6) rows.
Then decrease 1 st at each end of each right-side row 1, 1 (2, 2) 2, 2 (3, 2) 3, 3 (4, 4) times.
7, 7 (8, 9) 10, 10 (11, 12) 13, 15 (16, 18) sts remain.
Continue without shaping until work measures 23, 25 (27.5, 30.5) 32.5, 34.5 (37.5, 41) 45, 49 (52.5, 57) cms or 9.25, 10 (11, 12.25) 13, 13.75 (15, 16.5) 18, 19.5 (21, 23) ins
RIGHT FRONT SHOULDER SHAPING
6-12m – 13/14y Sizes only
Starting on a wrong-side row, bind off x, x (4, 4) 5, 5 (5, 4) 4, 5 (5, 6) sts, work across remains sts, turn.
Work 1 row with no decreases, turn.
9/10yrs – 13/14yrs sizes only
bind off x, x (x, x) x, x (x, x) x, 5 (5, 6) sts, work across remains sts, turn.
Work 1 row with no decreases, turn.
All sizes
Bind off remaining 7, 7 (4, 5) 5, 5 (6, 4) 5, 5 (6, 6) sts.
SLEEVES (MAKE 2)
With smaller needles, cast on 28, 30 (32, 34) 36, 36 (38, 42) 44, 48 (50, 54) sts.
Work for 2.5cms or 1ins in 1×1 ribbing.
Change to larger needles and begin working in stockinette stitch (knit every right side row, purl every wrong side row).
SLEEVE SHAPING TO UNDERARM
Increase Row – k1, kfb across to last sts, k1
54, 58 (64, 66) 70, 70 (74, 82) 86, 94 (98, 106) sts
Work 5, 5 (7, 9) 11, 11 (13, 17) 17, 19 (21, 23) rows in stockinette st.
SLEEVE HEAD
Bind off 4, 4 (4, 4) 4, 4 (4, 4) 5, 5 (5, 6) sts of beginning of next 2 rows.
Decrease 1 st at each end of next 1, 2 (2, 2) 2, 2 (2, 4) 4, 6 (6, 6) rows.
Then every right-side row 2, 2 (2, 2) 2, 2 (2, 1) 2, 2 (3, 4) times.
Then every other right-side row 0, 1 (0, 1) 1, 1 (1, 1) 2, 2 (2, 2) times.
Then every right-side row 1, 1 (2, 1) 1, 1 (2, 1) 2, 4 (4, 4) times.
Then decrease on the following 3, 2 (4, 4) 6, 6 (7, 11) 5, 9 (9, 9) rows.
Next row – k2tog across (if on a wrong side row p2tog across)
Bind off remaining 16, 17 (18, 18) 19, 19 (19, 21) 22, 20 (20, 22) sts.
NECKBAND
Sew shoulder seams.
Pick up and knit 12, 12 (14, 14) 14, 16 (16, 16) 17, 19 (19, 19) sts down left front, 22, 22 (22, 24) 24, 26 (22, 24) 26, 26 (28, 28) sts across neck,
12, 12 (14, 14) 14, 16 (16, 16) 17, 19 (19, 19) sts up right front,
30, 32 (32, 34) 34, 36 (38, 40) 42, 44 (46, 48) sts around back.
Join in the round. 76, 78 (82, 86) 86, 94 (92, 96) 102, 108 (112, 114) sts
Neck rounds – work in k1p1 ribbing around
Continue repeating rounds until the neck measures 2.5cms or 1 ins.
Bind off in pattern.
FINISHING
Sew remaining seams, weave in all ends and block as desired.

ABBREVIATIONS
K – knit
P – purl
PM – place marker
SM – slip marker
K2tog – knit 2 stitches together
P2tog – purl 2 stitches together
SSK – slip, slip, knit the slipped sts together
M1L – With left needle pick up strand between 2 stitches front to back. Knit through back loop
M1R – With left needle pick up strand between 2 stitches back to front. Knit through front loop
KFB – knit into the front and back of the next sts
Affiliate Disclaimer: This post contains affiliate links. As an affiliate, I may earn from qualifying purchases made through those links—at no extra cost to you. Thanks for supporting my blog and helping me share more free patterns and tutorials!
One Reply to “Free Puff Sleeve Knitting Pattern: The Cutest Tee for Kids of All Ages”
Comments are closed.