
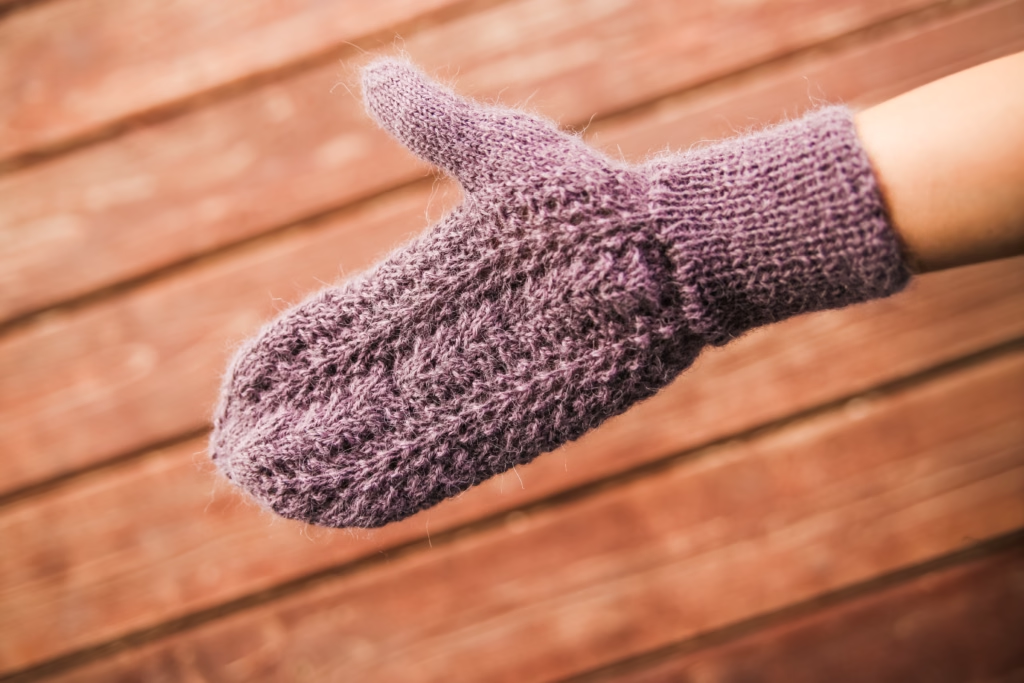
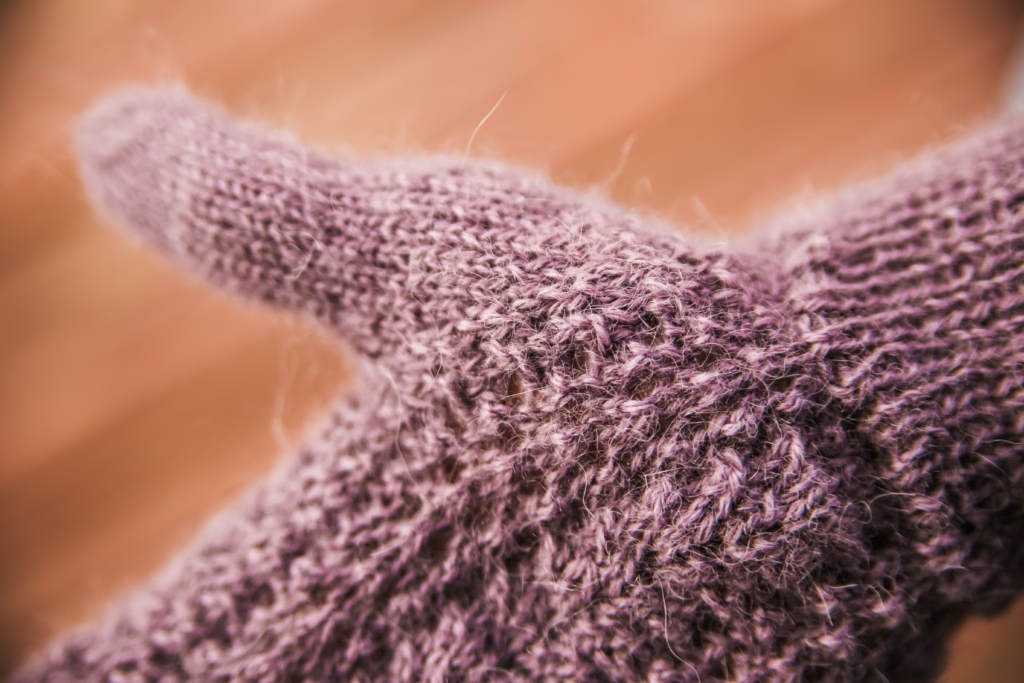
This free lace mitten knitting pattern combines delicate stitch detail with a lightweight fabric for a pretty addition to your cold-weather accessories. The Miriam Mittens are the newest design in my Mitten And Glove Patterns collection, featuring fingering-weight yarn, lace across the hand, and a stockinette thumb.
If you love the look of lace but want something smaller than a shawl on your needles, these mittens give you a chance to enjoy those yarn overs and decreases in a useful little project. The thumb gusset adds shaping where your hand needs room, while the finer yarn keeps the finished mittens from feeling bulky.
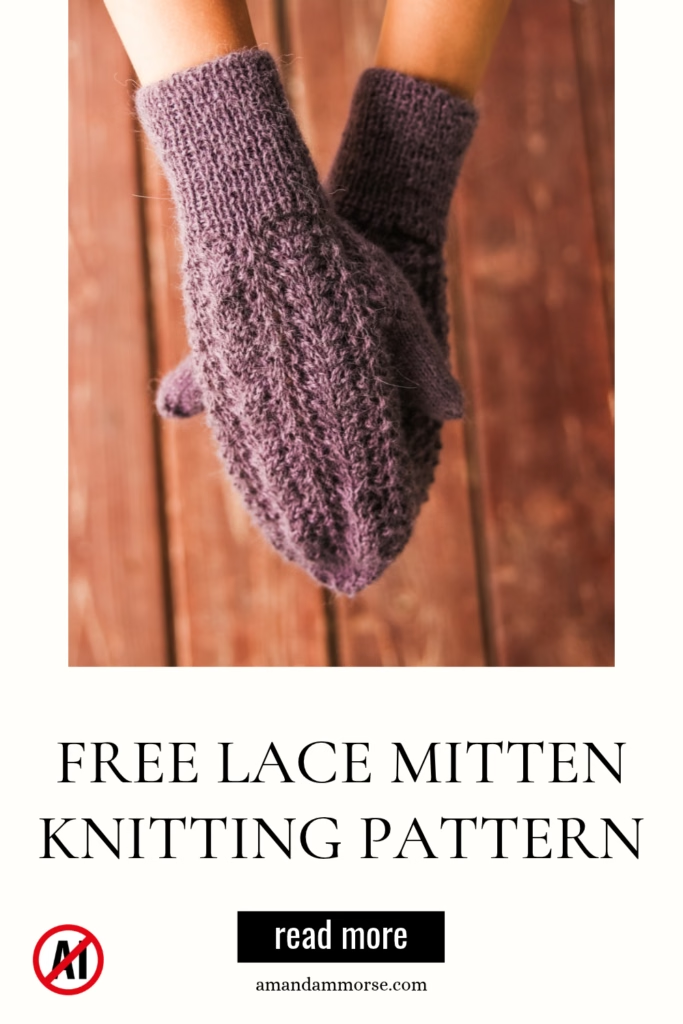
The Miriam lace pattern has already found its way into several of my accessories, and I was ready to give it another place in the collection. There is something especially satisfying about seeing a favorite stitch pattern become a coordinating set!
These mittens carry that same delicate texture across the hand, with a smooth stockinette thumb to balance the lace. They are a lovely option for those chilly days when you want a lighter layer for your hands.
What Materials Do You Need for This Lace Mitten Knitting Pattern?
The Miriam Mittens use fingering-weight yarn, with Hobbii Soft Alpaca or Lana Grossa Meilenweit Alpaca Yarn as options to consider. The fine yarn is part of what gives this design its delicate appearance, allowing the lace detail to stand out without creating a thick mitten.
When choosing your yarn, think about both the finished look and how you plan to wear your mittens. A softly shaded or solid color lets the lace take center stage, while stronger color changes can draw attention away from those little openings and decreases.
For help comparing fibers and choosing yarn for different kinds of handwear, visit my Best Yarn for Mittens and Fingerless Mitts: Warm, Durable Picks for Hand Knits guide. Keep this pattern’s fingering weight and gauge requirements in mind as you browse, since the guide includes yarns for several different mitten styles.
You can also explore my Best Alpaca Yarns guide if you enjoy the soft feel and drape alpaca brings to accessories.
Along with your yarn, gather the needles specified in the pattern, stitch markers, waste yarn or a stitch holder for the thumb, and a yarn needle for finishing. Choose a needle setup that lets you work comfortably around a small circumference.
Take the time to wash and dry your gauge swatch before casting on. Mittens need a more precise fit than something like a scarf, and your finished fabric should feel comfortable around your hand while still showing off the lace.
How Is the Miriam Lace Worked Across the Mittens?
This lace mitten knitting pattern pairs the Miriam stitch pattern across the hand with a stockinette thumb and thumb gusset. That combination gives the mittens plenty of detail while keeping the thumb fabric smooth.
The gusset gradually adds room at the base of the thumb. It is a small part of the mitten, but that shaping makes space for the way your hand widens through this area.
As you work, keep track of the lace repeat separately from the gusset shaping. Stitch markers are helpful here, especially when you need to pay attention to both the decorative stitches and the thumb increases.
Count your stitches regularly, too. A missed yarn over is much easier to catch a round or two later than after you have finished most of the hand!
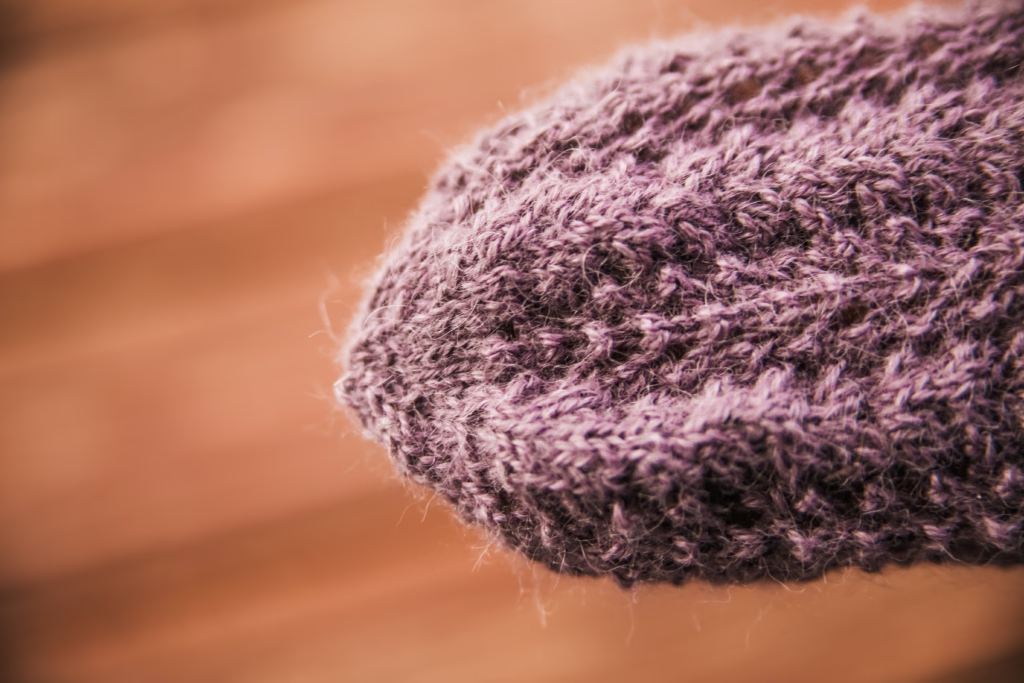
With finer yarn, it helps to slow down slightly when working decreases so every stitch is caught cleanly. You want the lace to look tidy, but you also want your tension to stay relaxed enough that the mitten fits comfortably.
Once the knitting is finished, gently block the mittens according to your yarn’s care instructions. Smooth the lace into shape without stretching it aggressively—the goal is to settle the stitches while preserving the fit.
When Would You Wear Lightweight Lace Mittens?
The Miriam Mittens are a pretty choice when you want covered fingers without the bulk of a heavy pair of mittens. Their fingering-weight construction makes them easy to tuck into a coat pocket and pair with other lightweight accessories.
Because the hand features open lace, they offer lighter coverage than a dense mitten fabric. Think cool-weather outings and a little extra warmth rather than long stretches outside in biting wind.
They also make a thoughtful project for someone who enjoys delicate details in the things they wear. You can keep the look understated with a neutral shade or choose a favorite color that makes the lace easy to see.
What Can You Knit to Match the Miriam Mittens?
If you enjoy making accessories that belong together, there are several ways to build a Miriam set:
- Miriam Cowl — carry the coordinating lace into a lightweight accessory for your neck.
- Miriam Headband — pair your mittens with a smaller project that covers your ears while leaving the top of your head open.
- Miriam Beanie — choose a coordinating lace hat for a little more coverage.
You can make everything in one color for a matching set or choose related shades that work together. A soft neutral for the mittens and a deeper shade for the cowl would be such a pretty combination.
One of my favorite things about a collection like this is that you can build it a piece at a time. Start with the accessory you will wear most, then come back for another when you are ready for more lace knitting.
The Miriam Mittens bring that familiar stitch pattern to a small, detailed project with a practical place in your wardrobe. If fine yarn and pretty stitches are your kind of knitting, this pair deserves a spot in your project basket.
Miriam Mitten Free Pattern
Materials
- Approximately Approximately 180–220 yds / 165–200 m of Hobbii Soft Alpaca (180 yds / 165 m per 50 g), or another fingering-weight yarn, for one pair.
- US 1½ (2.5 mm) needles for ribbing.
- US 2½ (3 mm) needles for the lace hand and stockinette thumb.
- DPNs or circular needles suitable for knitting small circumferences
- Stitch markers
- Stitch holder or waste yarn
- Yarn needle
Gauge (tension)
28 sts and 40 rounds per 4 × 4 in / 10 × 10 cm in stockinette stitch worked in the round, after blocking, using the larger needles.
Finished Measurements
- Calculated hand circumference at stockinette gauge: Approximately 7¾ in / 19.5 cm. The finished lace circumference may differ; measure the blocked sample to confirm.
- Length: Approximately 10 in / 25.5 cm.
One ladies’ size.
Miriam Lace Stitch Pattern
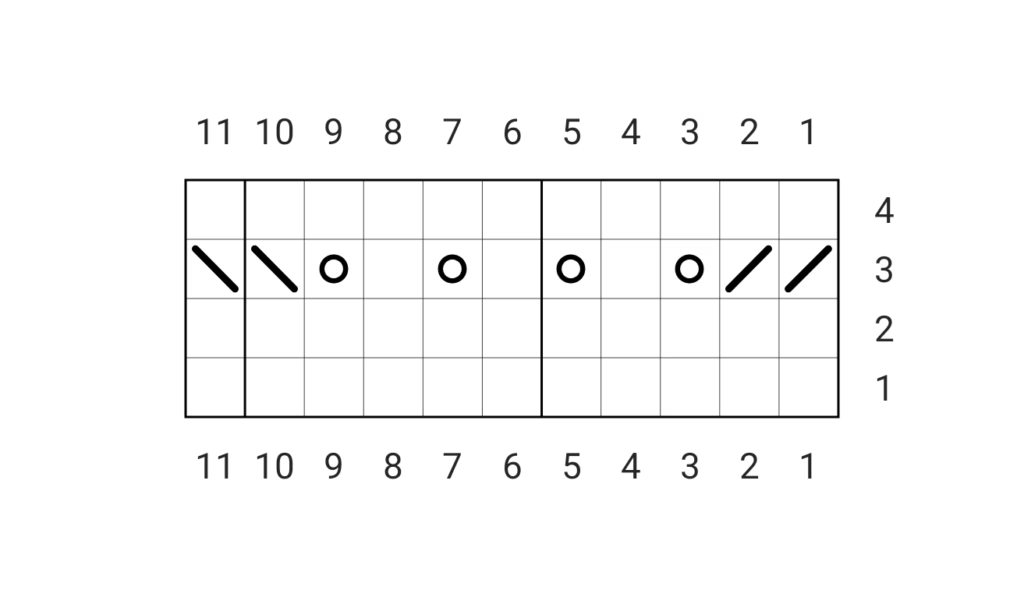
Worked over a multiple of 11 stitches and 4 rounds.
Round 1: Knit around.
Round 2: Knit around.
Round 3: [K2TOG, K2TOG, YO, K1, YO, K1, YO, K1, YO, SSK, SSK] around.
Round 4: Knit around.
Repeat rounds 1–4.
Blank square — knit.
Circle — yarn over.
Forward slash / — k2tog.
Backslash \ — ssk.
The complete 11-column chart is one repeat. Work it 5 times around the hand. The internal heavier lines do not mark separate repeats.
Mitten Instructions (Make 2)
Using smaller needles, cast on 54 sts.
Join in the round, being careful not to twist stitches.
Place marker to mark beginning of round.
Work in K1, P1 ribbing for 3 inches / 7.5 cm.
Switch to larger needles.
Next Round: K27, M1L, K27. (55 sts)
Work Miriam Lace Rounds 1–4 once over all 55 sts, working five repeats around.
Right Mitten — Gusset Set-up Round: K21, kfb, placing the first thumb marker between the two stitches created; kfb, placing the second thumb marker between the two stitches created; k32.
[57 sts: 22 hand sts, 2 thumb sts, 33 hand sts]
Left Mitten — Gusset Set-up Round: K32, kfb, placing the first thumb marker between the two stitches created; kfb, placing the second thumb marker between the two stitches created; k21.
[57 sts: 33 hand sts, 2 thumb sts, 22 hand sts]
This set-up round corresponds to Round 1 of the next Miriam Lace repeat.
Both Mittens: Work Miriam Lace Round 2 across the hand stitches and knit the 2 thumb stitches between the markers.
Thumb Gusset Increases
Continue advancing through Miriam Lace Rounds 1–4 across the 55 hand stitches, knitting all thumb stitches between the markers. The first gusset increase round coincides with Miriam Lace Round 3.
Gusset Round 1 — Increase Round: Work the next Miriam Lace round to the first thumb marker, sm, M1R, knit to the second thumb marker, M1L, sm, continue the same Miriam Lace round to the end. [2 sts increased]
Gusset Rounds 2–3: Work the next Miriam Lace round across the hand stitches and knit all thumb stitches.
Work these 3 gusset rounds a total of 7 times. Do not restart the lace repeat when restarting the gusset-round sequence.
[71 sts: 55 lace hand sts and 16 stockinette thumb sts]
Separate Thumb
Knit to the first thumb marker: 22 sts for the Right Mitten or 33 sts for the Left Mitten. Remove the marker.
Place the next 16 thumb sts on waste yarn or a stitch holder. Remove the second thumb marker.
Knit the remaining 33 sts for the Right Mitten or 22 sts for the Left Mitten, joining the hand together without casting on additional stitches.
[55 hand sts]
Begin the Hand section with Miriam Lace Round 1.
Hand
Work until the mitten measures approximately 8½ in / 21.5 cm from the cast-on edge, ending after Miriam Lace Round 2.
Adjust this length to fit, allowing approximately 1.5 inches / 4 cm for the fingertip decreases.
Fingertip Decreases
Work the fingertip shaping over five repeats around the mitten.
Round 1: [K2TOG, K2TOG, K1, YO, K1, YO, K1, SSK, SSK] around. (45 sts)
Round 2: Knit around.
Round 3: Knit around.
Round 4: Knit around.
Round 5: [K2TOG, K2TOG, YO, K1, YO, SSK, SSK] around. (35 sts)
Round 6: Knit around.
Round 7: Knit around.
Round 8: Knit around.
Round 9: [K2TOG, K3, SSK] around. (25 sts)
Round 10: Knit around.
Round 11: Knit around.
Round 12: Knit around.
Round 13: [K2TOG, K1, SSK] around. (15 sts)
Round 14: Knit around.
Round 15: [K2TOG, K1] around. (10 sts)
Round 16: K2TOG around. (5 sts)
Do not bind off.
Cut yarn, leaving a tail long enough to close the fingertip and weave in securely. Thread the tail through the remaining 5 sts, remove the needles, and pull tight. Secure the yarn on the inside of the mitten.
Thumb
Transfer the 16 held thumb sts to the larger needles. Join yarn and pick up and knit 2 sts at the junction where the hand was joined above the thumb opening.
[18 sts]
Place a beginning-of-round marker and work in the round. Knit until the thumb measures approximately 2 in / 5 cm from the separation point, or to the desired length before shaping. Allow 3 additional rounds for the thumb decreases.
Thumb Decreases
Round 1 – [K1, K2TOG] around. (12 sts)
Round 2 – Knit around.
Round 3 – K2TOG around. (6 sts)
Do not bind off.
Cut yarn, leaving a tail long enough to close the thumb and weave in securely. Thread the tail through the remaining 6 sts, remove the needles, and pull tight. Secure the yarn on the inside.
Finishing
Close any small gaps at the thumb junction using the yarn tail. Weave in all ends.
Gently wet block the mittens, opening the lace without stretching the ribbing excessively. Allow to dry completely.
Make the second mitten using the opposite thumb-gusset setup.
Stitch Key
BOR – Beginning of round
K – Knit
K2TOG — knit 2 stitches together; 1 stitch decreased.
KFB — knit into the front and back of the same stitch; 1 stitch increased.
M1L — lift the strand between stitches from front to back and knit through its back loop; 1 stitch increased.
M1R — lift the strand between stitches from back to front and knit through its front loop; 1 stitch increased.
P – Purl
PM – Place marker
SM – Slip marker
SSK — slip 2 stitches individually knitwise, then knit them together through the back loops; 1 stitch decreased.
ST(S) – Stitch(es)
YO — yarn over; 1 stitch increased.

What color would you choose for your Miriam Mittens—and would you make a matching cowl, headband, or beanie? Tell me in the comments!
This post may contain affiliate links. If you purchase through one of these links, I may earn a small commission at no additional cost to you. Thank you for supporting my free knitting patterns and tutorials!