
Find the sweetest baby knits on my photo prop pattern page! Plus, my favorite free mohair prop bonnet pattern is at the bottom of this post.

There’s something incredibly special about newborn photography. As a mom and knitting designer, I adore creating handmade props that turn precious moments into timeless keepsakes. Today, I’m thrilled to share one of my absolute favorites—the free mohair prop bonnet pattern featuring luxurious KnitPicks Aloft yarn (affiliate link)! If you’re looking for the perfect delicate bonnet to elevate your baby photos, keep reading—this one’s pure knitting joy!
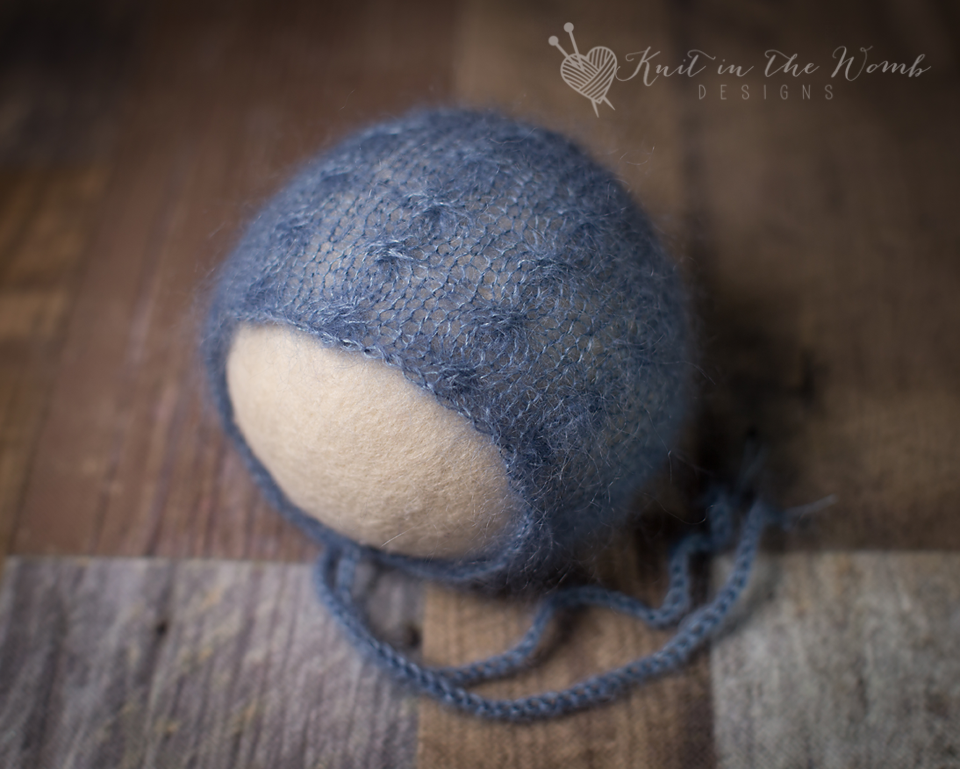
This free mohair prop bonnet pattern (find it at the bottom of this post!) is not just adorable—it’s designed specifically for photographers and parents who crave beautifully textured props. The mohair cable design gives it an elegant, vintage-inspired look, yet remains modern and dreamy.
Ready to dive into the softness? Let’s talk yarn first!
Why I Chose KnitPicks Aloft Yarn for This Free Mohair Prop Bonnet Pattern
When knitting newborn photo props, I always prioritize comfort and elegance. KnitPicks Aloft yarn (affiliate link), a delightful blend of 72% Super Kid Mohair and 28% silk, fits the bill perfectly. Trust me, once you knit with this yarn, you’ll want to use it for every free mohair prop bonnet pattern!
Here’s why I love this yarn so much:
- Incredibly Soft: Mohair is dreamy-soft, ideal for sensitive newborn skin. The added silk creates even more softness—like knitting with fluffy clouds!
- Airy & Lightweight: Aloft yarn (affiliate link) keeps the bonnet cozy without overheating your little bundle of joy during a photo session.
- Gorgeous Sheen: The subtle silk sheen makes this free mohair prop bonnet pattern truly pop in photos.
- Color Choices Galore: From soft pastels to vibrant jewel tones, KnitPicks Aloft yarn (affiliate link) offers endless color possibilities to perfectly match your photo theme.
You can find the yarn for this amazing project right here.
The Sweet Inspiration Behind My Free Mohair Prop Bonnet Pattern
This particular bonnet, which I lovingly call the “Shiloh Bonnet,” was inspired by the quiet beauty found in classic newborn photography. Its name means “peace,” capturing exactly what I aim for when designing these special knits—a peaceful, timeless look that makes every photograph memorable.
Why Cable Knitting Makes This Free Mohair Prop Bonnet Pattern Shine
Cable knitting might look complicated at first, but once you get the hang of it, it’s addictive. For this bonnet, I included a delicate cable design that adds gorgeous texture and visual interest. Here’s why cables are perfect for baby bonnets:
- Timeless Style: Cable patterns are classics that never age—just like your treasured photos.
- Amazing Texture: Raised cable stitches catch the light beautifully, making every picture Instagram-worthy!
- Keeps Its Shape: Cables add structure, ensuring the bonnet looks picture-perfect every single time.
If you’ve never tackled cables before, this free mohair prop bonnet pattern is a fabulous way to start. I promise it’s easier than it looks, especially with a good cable needle and a cozy spot to knit.

What You Need to Knit This Free Mohair Prop Bonnet Pattern
Besides the luxurious KnitPicks Aloft yarn (affiliate link), here’s what else you’ll need for knitting this gorgeous bonnet:
- Circular or double-pointed needles (size details included in the pattern)
- Cable needle
- Stitch markers (these little helpers make knitting cables a breeze!)
- Blocking mats and pins (to perfect the bonnet shape)
Always knit a gauge swatch first to ensure a perfect fit—your adorable photos depend on it!
Knitting Tips for a Stunning Free Mohair Prop Bonnet Pattern
- Swatch First: Seriously, it saves headaches later.
- Take it Slow: If you’re new to cables, don’t rush. A cup of tea, some quiet knitting time, and patience go a long way.
- Blocking Magic: Blocking is essential! It evens out stitches, enhances the beautiful cable design, and gives your bonnet professional polish.
Perfect Photo Session Tips for Your Free Mohair Prop Bonnet Pattern
Once your bonnet is knitted, it’s time for the fun part—capturing stunning newborn photos! Here are my favorite quick tips to help your session go smoothly:
- The Early Bird Wins: Schedule sessions in the first two weeks when newborns are sleepiest and easiest to pose.
- Natural Light is Best: Soft, natural lighting creates magical baby photos—no harsh lights, please!
- Simple Backgrounds: Let your baby and your gorgeous knitted bonnet take center stage. Neutral blankets or minimal props do wonders.
- Patience Pays Off: Newborns have their own schedules. Relax, go with the flow, and enjoy the precious moments—those peaceful expressions make it all worth it.
The Perfect Pairing: Shiloh Romper and Free Mohair Prop Bonnet Pattern
Want a perfect matching set? Check out the adorable Shiloh Romper—a match made in knitting heaven for your free mohair prop bonnet pattern. Both patterns complement each other beautifully, creating photos you’ll cherish forever.
Time to Knit Your Own Free Mohair Prop Bonnet Pattern
Knitting this bonnet is so much more than a crafting project—it’s capturing love in stitches. With soft KnitPicks Aloft yarn (affiliate link), classic cable charm, and timeless style, your newborn photos will be unforgettable.
So, grab your yarn, cozy up with your needles, and let’s knit something truly special. The full free mohair prop bonnet pattern is right below this post, while even more delightful baby props await you on my photo prop pattern page.
Happy knitting and photographing your little bundles of joy—I can’t wait to see your adorable creations!

Materials and Info
Materials: 60-150 yds of lace weight (size 0) mohair yarn (I used knitpicks aloft), size 7 (4.5mm) straight needles, cable needle, yarn needle, 2 stitch markers
Gauge: 5sts/in ~GAUGE IS VERY IMPORTANT~
Abbreviation Key:
K – knit
P – purl
k2tog – knit 2 together
cf4- slip next 2sts onto cable needle, k next 2 sts, k2 sts from cable needle
Head circumference: nb (13ins). 0-3mths (14ins), 3-6mth (15ins), 6- 12mths (16ins)
Shiloh Bonnet Pattern
NEWBORN
Cast on 64sts.
Row 1 (wrong side) – purl across
Row 2 – knit across
Row 3 – purl across
Row 4 – k1 (k2, cf4) repeat (to) across to last 3 sts, k3
Row 5 – purl across
Row 6- knit across
Repeat rows 1-6 across to 3.75ins ending after completing a wrong side (purl) row.
Place stitch markers on either end of the last row worked.
Decreases
Row 1 – k1, k2tog, k to last 3 sts, k2tog, k1 (62sts)
Row 2 – purl across
Row 3 – k1 (k2tog, k4) repeat (to) across to last st, k1 (52sts)
Row 4 – purl across
Row 5 – k1 (k2tog, k3) repeat (to) across to last st, k1 (42sts)
Row 6 – purl across
Row 7– k1 (k2tog, k2) repeat (to) across to last st, k1 (32sts)
Row 8 – purl across
Row 9– k1 (k2tog, k1) repeat (to) across to last st, k1 (22sts)
Row 10 – purl across
Row 11– k1 (k2tog) repeat (to) across to last st, k1 (11sts)
Cut yarn leaving appx 12ins and pull through remaining stitches. Using this end sew the crown together to your stitch markers. (I like to use the mattress stitch since it is nearly invisible).
Cut 6 pieces of yarn approximately 30ins long. Fold 3 in half and pull a loop through the front corner of the bonnet. Pull the ends through this loop. Braid.
Repeat on the other front corner.
0-3 MONTHS
Cast on 70sts.
Row 1 (wrong side) – purl across
Row 2 – knit across
Row 3 – purl across
Row 4 – k1 (k2, cf4) repeat (to) across to last 3 sts, k3
Row 5 – purl across
Row 6- knit across
Repeat rows 1-6 across to 4.25ins ending after completing a wrong side (purl) row.
Place stitch markers on either end of the last row worked.
Decreases
Row 1 – k1, k2tog, k to last 3 sts, k2tog, k1 (68sts)
Row 2 – purl across
Row 3 – k1 (k2tog, k4) repeat (to) across to last st, k1 (57sts)
Row 4 – purl across
Row 5 – k1 (k2tog, k3) repeat (to) across to last st, k1 (46sts)
Row 6 – purl across
Row 7– k1 (k2tog, k2) repeat (to) across to last st, k1 (35sts)
Row 8 – purl across
Row 9– k1 (k2tog, k1) repeat (to) across to last st, k1 (24sts)
Row 10 – purl across
Row 11– k1 (k2tog) repeat (to) across to last st, k1 (13sts)
Cut yarn leaving appx 12ins and pull through remaining stitches. Using this end sew the crown together to your stitch markers. (I like to use the mattress stitch since it is nearly invisible).
Cut 6 pieces of yarn approximately 30ins long. Fold 3 in half and pull a loop through the front corner of the bonnet. Pull the ends through this loop. Braid.
Repeat on the other front corner.

3-6 MONTHS
Cast on 76sts.
Row 1 (wrong side) – purl across
Row 2 – knit across
Row 3 – purl across
Row 4 – k1 (k2, cf4) repeat (to) across to last 3 sts, k3
Row 5 – purl across
Row 6- knit across
Repeat rows 1-6 across to 4.75ins ending after completing a wrong side (purl) row.
Place stitch markers on either end of the last row worked.
Decreases
Row 1 – k1, k2tog, k to last 3 sts, k2tog, k1 (74sts)
Row 2 – purl across
Row 3 – k1 (k2tog, k4) repeat (to) across to last st, k1 (62sts)
Row 4 – purl across
Row 5 – k1 (k2tog, k3) repeat (to) across to last st, k1 (50sts)
Row 6 – purl across
Row 7– k1 (k2tog, k2) repeat (to) across to last st, k1 (38sts)
Row 8 – purl across
Row 9– k1 (k2tog, k1) repeat (to) across to last st, k1 (26sts)
Row 10 – purl across
Row 11– k1 (k2tog) repeat (to) across to last st, k1 (14sts)
Cut yarn leaving appx 12ins and pull through remaining stitches. Using this end sew the crown together to your stitch markers. (I like to use the mattress stitch since it is nearly invisible).
Cut 6 pieces of yarn approximately 30ins long. Fold 3 in half and pull a loop through the front corner of the bonnet. Pull the ends through this loop. Braid.
Repeat on the other front corner.
6-12 MONTHS
Cast on 82sts.
Row 1 (wrong side) – purl across
Row 2 – knit across
Row 3 – purl across
Row 4 – k1 (k2, cf4) repeat (to) across to last 3 sts, k3
Row 5 – purl across
Row 6- knit across
Repeat rows 1-6 across to 5.25ins ending after completing a wrong side (purl) row.
Place stitch markers on either end of the last row worked.
Decreases
Row 1 – k1 (k2tog, k6) repeat (to) across to last st, k1 (72sts)
Row 2 – purl across
Row 3 – k1 (k2tog, k5) repeat (to) across to last st, k1 (62sts)
Row 4 – purl across
Row 5 – k1 (k2tog, k4) repeat (to) across to last st, k1 (52sts)
Row 6 – purl across
Row 7 – k1 (k2tog, k3) repeat (to) across to last st, k1 (42sts)
Row 8 – purl across
Row 9– k1 (k2tog, k2) repeat (to) across to last sts, k1 (32sts)
Row 10 – purl across
Row 11– k1 (k2tog, k1) repeat (to) across to last sts, k1 (22sts)
Row 12 – purl across
Row 13– k1 (k2tog) repeat (to) across to last sts, k1 (12sts)
Cut yarn leaving appx 12ins and pull through remaining stitches. Using this end sew the crown together to your stitch markers. (I like to use the mattress stitch since it is nearly invisible).
Cut 6 pieces of yarn approximately 30ins long. Fold 3 in half and pull a loop through the front corner of the bonnet. Pull the ends through this loop. Braid.
Repeat on the other front corner.
Shiloh Bonnet PDF
Disclaimer: This page contains affiliate links. If you choose to make a purchase after clicking a link, I may receive a commission at no additional cost to you. Thank you for your support!