
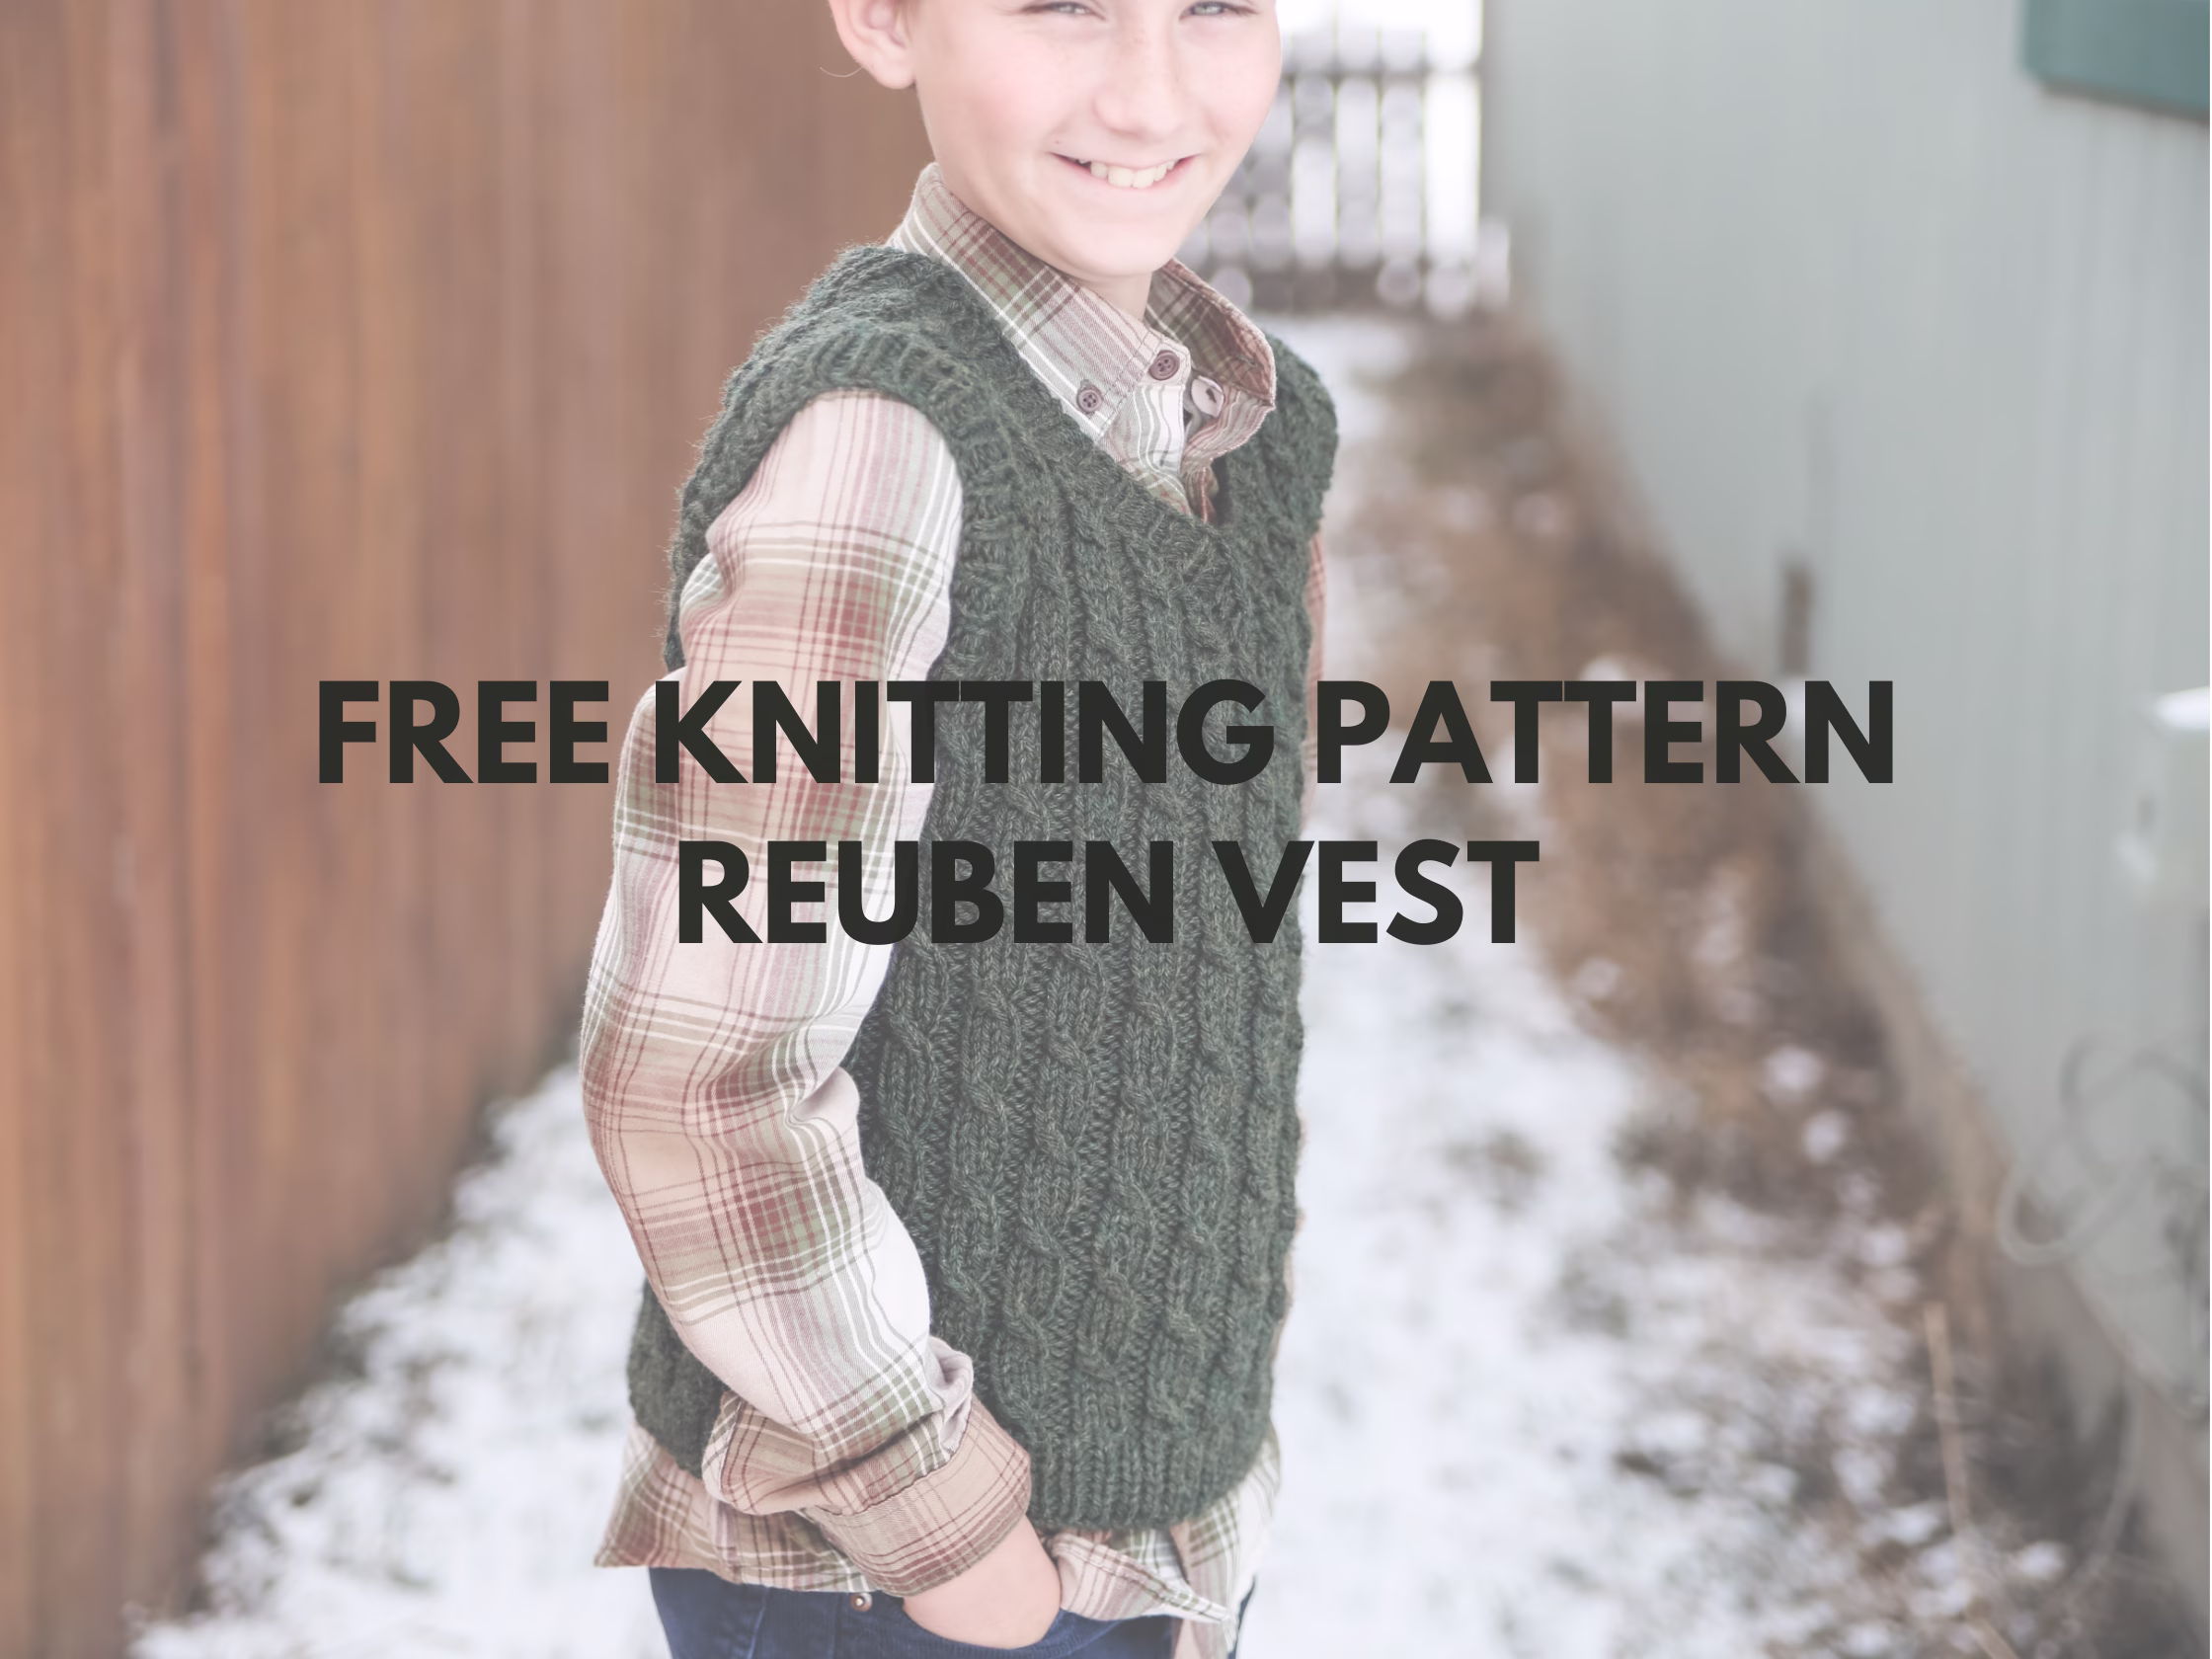
A chunky cable knit vest pattern for boys ages 3–14, knit flat in two pieces using bulky yarn. A quick classic layering piece perfect for everyday wear or special occasions.
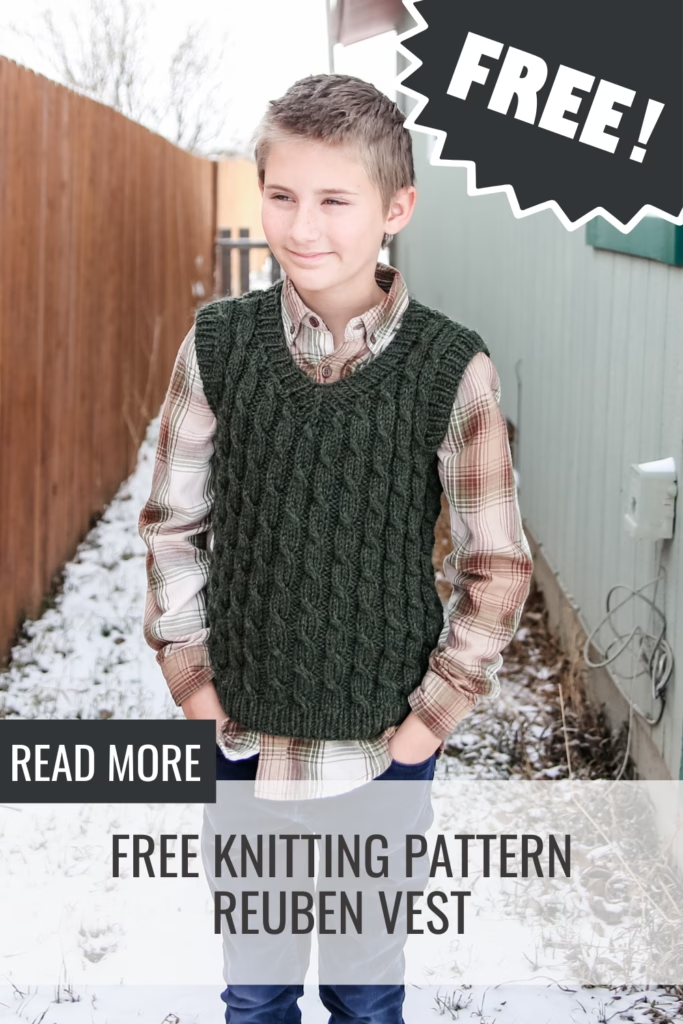
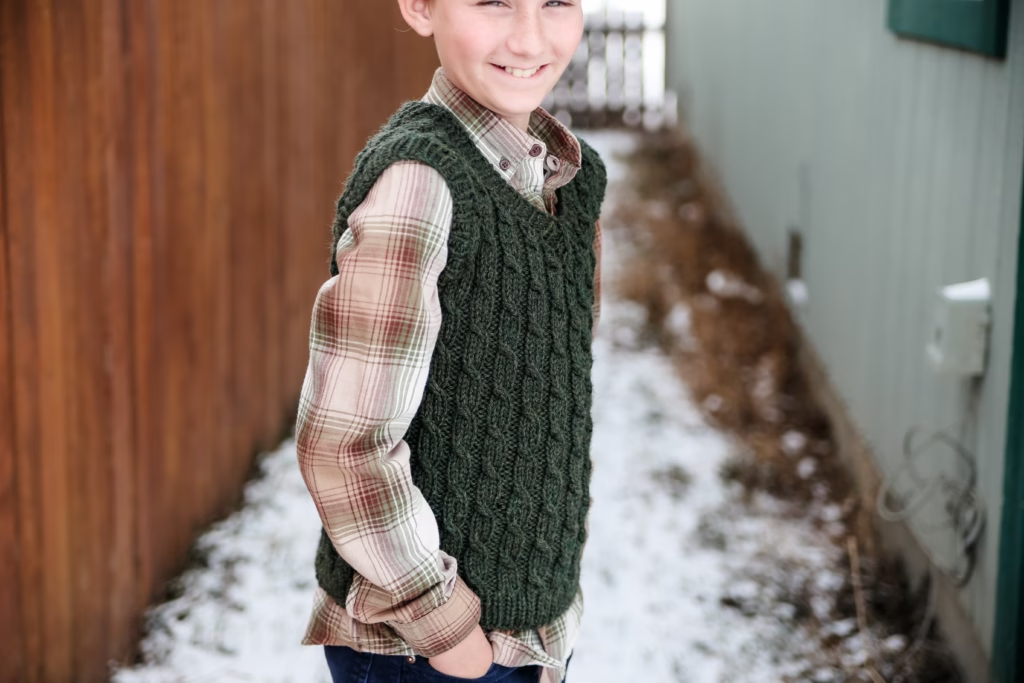
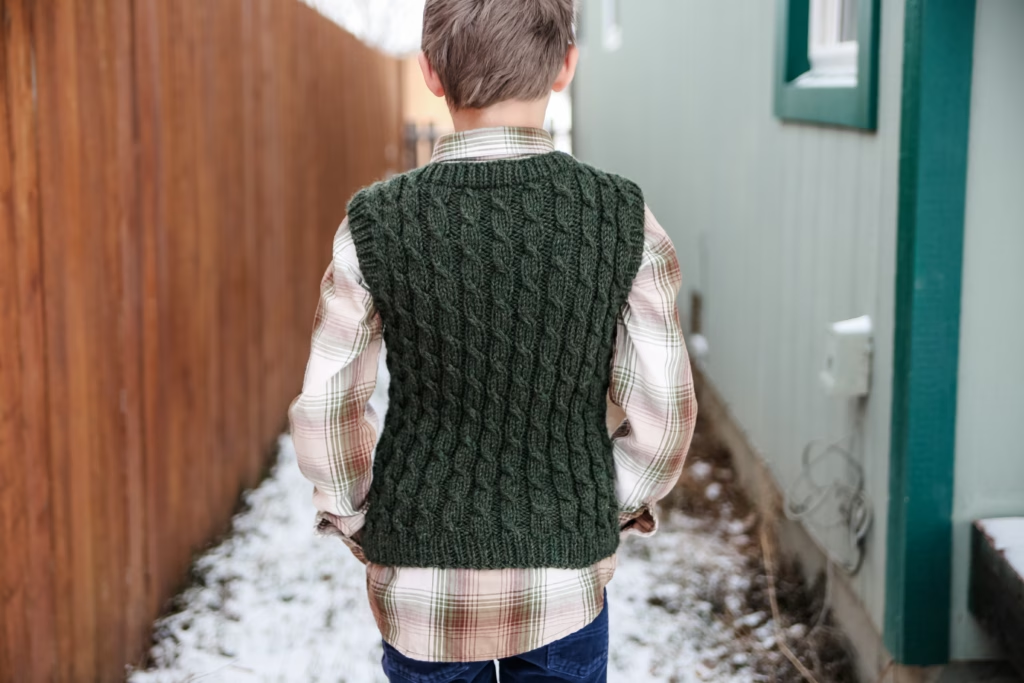
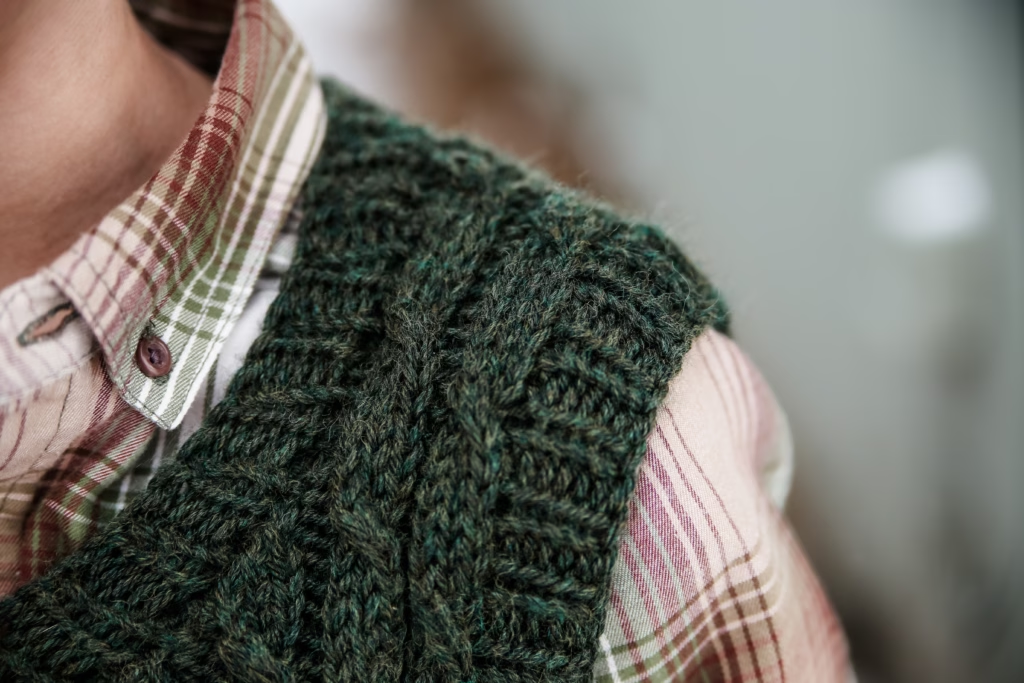
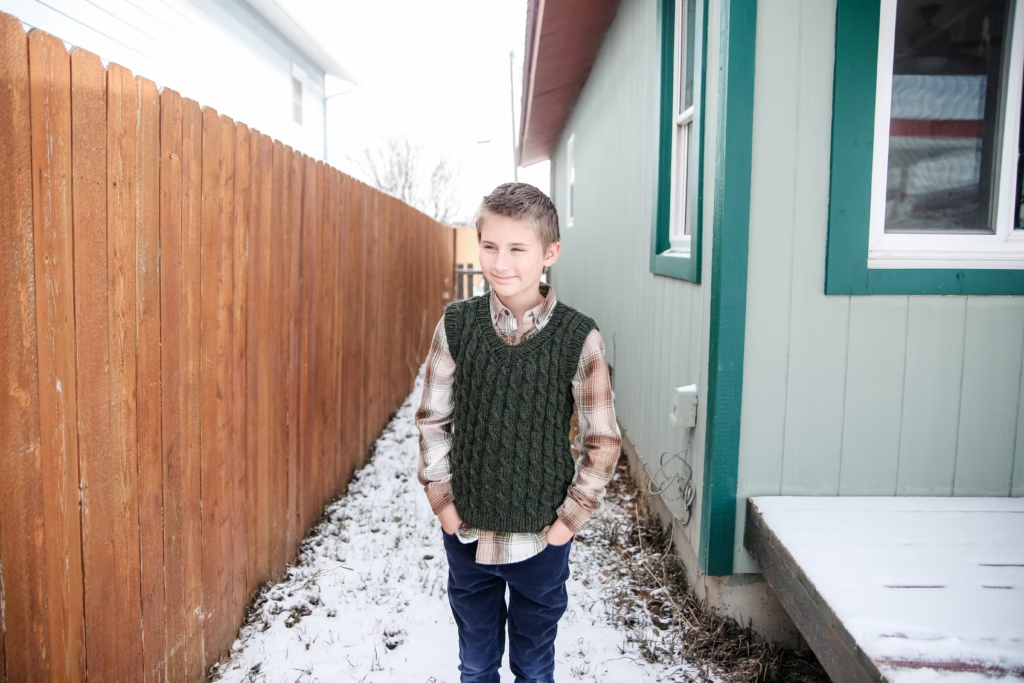
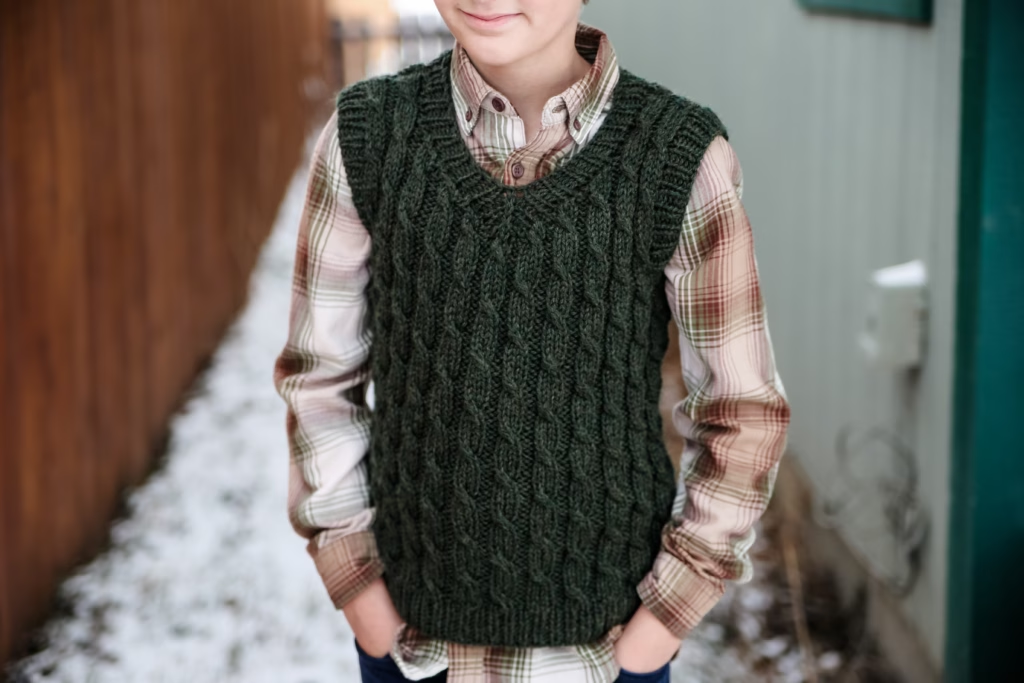
A chunky cable knit vest pattern for boys is a classic wardrobe staple that knitters return to again and again. This pattern is designed for boys ages 3–14 and uses chunky yarn on size 10 needles, which means the fabric grows quickly and the finished vest feels substantial without being heavy. The vest is worked flat in two simple pieces with easy cables that create a timeless look.
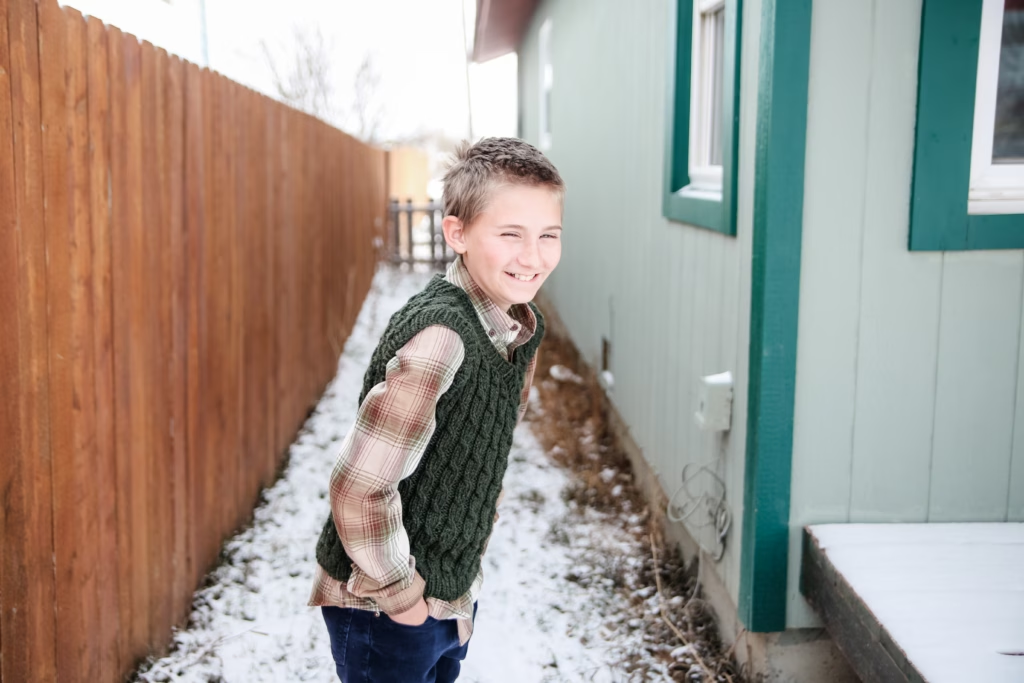
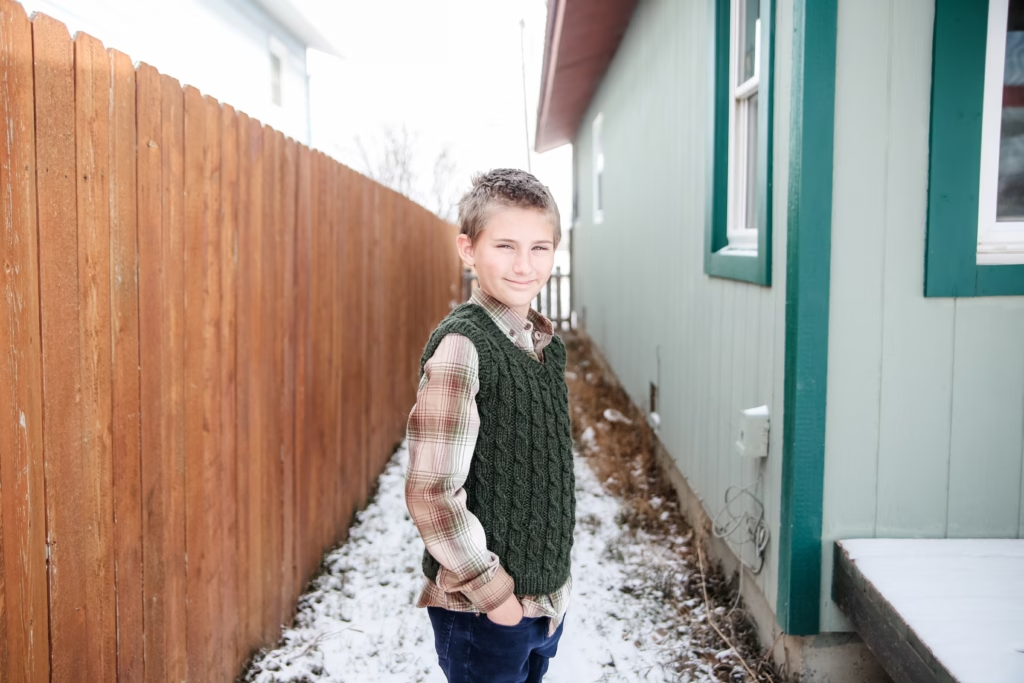
Because this chunky cable knit vest pattern for boys uses thick yarn and simple construction, it’s a great project when you want something satisfying but not complicated. The vest layers beautifully over button-down shirts, plaid flannels, or long sleeve tees, making it perfect for school, church, family photos, or everyday wear.
Why did I design this chunky cable knit vest pattern for boys?
Sometimes you just want a knitting project that feels classic and useful. That was the idea behind this chunky cable knit vest pattern for boys.
I wanted a vest that looked timeless — the kind of piece that works just as well for a family gathering as it does for an ordinary weekday. Cables naturally create that traditional look, but I also wanted them to be simple enough that knitters wouldn’t feel intimidated.
Using chunky yarn makes the whole project move quickly. The fabric grows fast, the cables are easy to see, and before you know it you’re binding off a finished vest.
If you enjoy knitting cables, you might also recognize this same cable motif in my Reuben Socks, which share a similar textured design.
And if you enjoy knitting vests, you can browse the full vest knitting pattern page for more designs as well.
What is the pattern overview?
This chunky cable knit vest pattern for boys is designed to be simple, wearable, and satisfying to knit.
Finished Item
A chunky cabled vest designed for boys ages 3–14 with a classic textured front panel.
Skill Level
Confident beginner to intermediate.
Construction
The vest is worked flat in two pieces:
- Back panel
- Front panel with cables
Once both pieces are finished, they are seamed at the shoulders and sides.
If you enjoy cable textures like this, you might also enjoy the Peter Vest, which uses cables in a vest designed for women.
What materials do I need?
You only need a few supplies for this chunky cable knit vest pattern for boys.
• Berroco Vintage Chunky yarn (affiliate link)
• Size 10 knitting needles (affiliate link)
• Cable needle
• Tapestry needle for finishing
• Stitch markers
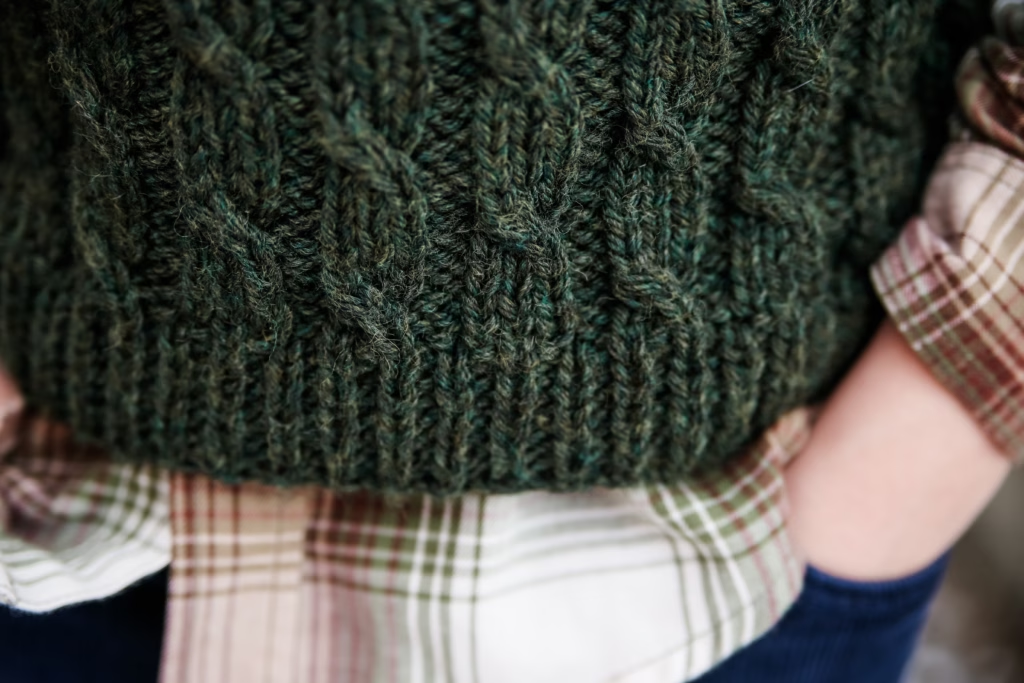
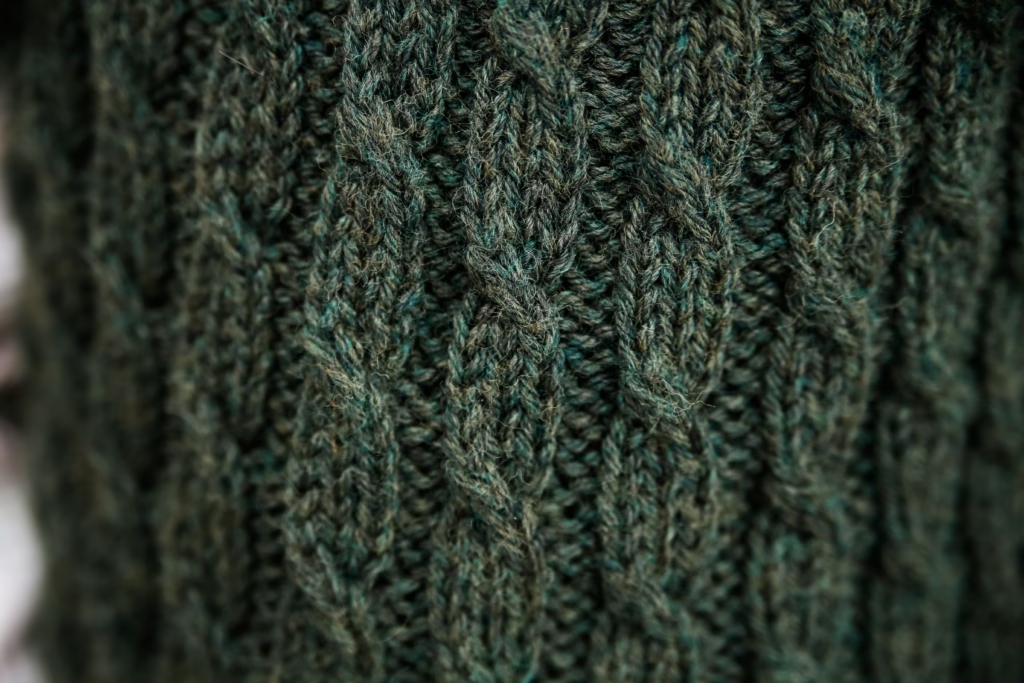
The yarn choice really helps the cables stand out. I especially like using Berroco Vintage Chunky (affiliate link) because it has a smooth structure that makes cable stitches pop clearly.
The size 10 knitting needles (affiliate link) create a thick, comfortable fabric that works perfectly for a vest that will be layered over shirts.
How does the vest fit and what sizes are included?
This chunky cable knit vest pattern for boys is designed with a comfortable, slightly relaxed fit so it can layer easily over shirts.
The pattern includes sizes for:
- Age 3–4
- Age 5–6
- Age 7–8
- Age 9–10
- Age 11–12
- Age 13–14
Because the vest has no sleeves, the fit is forgiving and easy to adjust if needed.
The chunky yarn also adds a little structure, helping the vest hold its shape nicely.
Why was chunky yarn chosen for this pattern?
Chunky yarn was chosen intentionally for this chunky cable knit vest pattern for boys.
First, chunky yarn makes the project fast and satisfying. You can knit several inches in a single sitting, which is encouraging when working on a garment.
Second, the thicker yarn highlights the cable texture beautifully. Even simple cables look bold and defined.
Finally, chunky yarn creates a vest that feels sturdy and warm without being overly heavy.
Berroco Vintage Chunky (affiliate link) is a great choice because it’s durable enough for kids’ clothing while still being soft and comfortable.
What should I know about gauge and substitutions?
Getting gauge right will help ensure the vest fits as intended.
Because this chunky cable knit vest pattern for boys uses thick yarn and cables, gauge matters a bit more than in a basic stockinette project.
If your gauge is too loose, the vest may grow larger than intended. If it’s too tight, the cables may feel compressed.
If you substitute yarn, look for a true chunky weight yarn that works well on size 10 needles (affiliate link).
Good substitutes generally include:
- chunky wool blends
- bulky acrylic blends
- soft wool yarns designed for sweaters
The key is choosing yarn that lets the cables remain visible and defined.
What techniques are used in this pattern?
The techniques used in this chunky cable knit vest pattern for boys are very approachable.
Skills used include:
- knit stitch
- purl stitch
- simple cable crosses
- knitting flat
- seaming
The cables are straightforward and repeat in an easy rhythm, making them manageable even if this is one of your first cable projects.
If you want help learning any of these techniques, my knitting tutorial page walks through many of them step by step.
Because the vest is knit flat rather than in the round, it can feel easier for knitters who prefer traditional garment construction.

When would someone wear this vest?
A chunky cable knit vest pattern for boys creates a garment that works for many occasions.
Some favorite ways to wear it include:
• layered over a plaid shirt for fall photos
• paired with a button-down shirt for church or family gatherings
• worn over a long sleeve tee for everyday warmth
• dressed up for holidays or special events
It also makes a thoughtful handmade gift. Because the vest knits quickly in chunky yarn, it’s a great project when you need something meaningful but manageable.
The classic cable texture also pairs nicely with other cable projects like the Reuben Socks or the Grace Hat, creating a coordinated look.
What questions do knitters often ask about this pattern?
Yes, especially for knitters who already know knit and purl stitches. The cables are simple and repeat consistently, making them easy to learn.
Because the vest uses chunky yarn and size 10 needles, many knitters can finish it in just a few days of relaxed knitting.
You can knit the cables without a cable needle if you’re comfortable doing so, but using a cable needle keeps things simple.
Absolutely. The style is classic and works well for any child. I would just decrease the length a little for girls.
No. This chunky cable knit vest pattern for boys is worked flat in two pieces and then seamed.
Reuben Vest Free Pattern
Size: (3/4y, 5/6y) 7/8y, 9/10y (11/12y, 13/14yrs)
Materials: Approximately (278, 329) 368, 439 (501, 582) yds of Berroco Vintage Chunky 100g/136yds yarn needle, stitch markers
Needle Size: 10(US) 6mm circular needles, 9(US) 5.5mm circular and dpn
Gauge (tension): 16sts & 20 rows to make 10cm square, using size 6(US) 4mm needles working in Reuben Stitch pattern
Chest Measurement: (57, 61) 66, 72 (77.5, 85) cm or (22.5, 24) 26.5, 28.75 (31, 34) ins
METHOD
Reuben Vest is bottom-up set-in sleeve vest in an easy-care yarn. It is worked flat with the collar ribbing being worked in the round. Created for our 5th child, I bought the wrong weight yarn and had just enough for a vest and since it was his favorite color he claimed it. I then found a perfect shirt from goodwill to match the yarn and the perfect winter outfit was made.
Abbreviations can be found on the last page.
Note: choose size based on chest measurement for best fit. Measurements above are measurement of the person not sweater measurements.
1X1 RIB PATTERN
Row 1 (right side row) – (k1, p1) across
Row 2 – knit all the knit stitches, purl all the purl stitches.
REUBEN STITCH PATTERN
Row 1 – [p1, k3, p2, k2, (k1, yo, k1) in the next st, p1] around
Row 2 – [k1, wyif sl3, k2, p2, k3, p1] across
Row 3 – [p1, k3, p2, sl2 onto cable needle and hold in back, k3tog, k2 from cable needle, p1] around
Row 4 – [k1, p3, k1] across
Row 5 – [p1, k2, (k1, yo, k1) in the next st, p2, k3, p1] around
Row 6 – [k1, p3, k2, wyif sl3, k2, p1] across
Row 7 – [p1, sl2 onto cable needle and hold in back, k3tog, k2 from cable needle, p2, k3,p1] around
Row 8 – [k1, p3, k1] across
BACK
Cast on using smaller circular needle: (52, 58) 62, 68 (72, 78) sts. Join in the round.
Work in 1×1 ribbing for 1.5ins or 4cms.
Switch to larger needles.
Work in pattern as follows:
K1, work in Reuben stitch pattern (5, 5) 6, 6 (7, 7) times then work the first 5 sts of Reuben stitch pattern (0, 1) 0, 1 (0, 1) time then p (0, 1) 0, 1 (0, 1), k1 until the piece measures (9.5, 10.5) 11.5, 12.5 (13.5, 14.5) ins or (23.5, 26) 29, 31 (34, 36) cm measuring from cast on, ending after completing a row 4 or 8.
SHAPE BACK ARMHOLES
Cast off (3, 3) 3, 3 (3, 4) stitches at beginning of next 2 rows. (48, 52) 56, 62 (66, 70) sts
Decrease 1 st at each end of following (1, 2) 1, 2 (2, 1) rows. (46, 48) 54, 58 (62, 68) sts
Then decrease 1 st each end of every other row (1, 1) 1, 1 (1, 2) times (44, 46) 52, 56 (60, 64) sts
Continue without shaping until work measures (14.5, 16) 17.5, 19.5 (21, 22.5) ins or (36, 40) 44, 49 (52.5, 56) cms from cast on edge, ending after completing a row 4 or 8.
SHAPE BACK SHOULDERS
Bind off (4, 4) 5, 6 (6, 7) sts at beginning of the next 2 rows.
Knit until there are (6, 7) 8, 8 (9, 9) sts on right needle.
Put remaining sts on stitch holder.
Turn, bind off (2, 2) 2, 2 (2, 2) sts, work to end of row.
Turn, bind off remaining (4, 5) 6, 6 (7, 7) sts
With right side facing, rejoin yarn to stitches on hold, bind off (22, 24) 26, 28 (30, 32) knit remaining (10, 11) 13, 14 (15, 16) sts.
Turn, bind off (4, 4) 5, 6 (6, 7) sts
Turn, bind off (2, 2) 2, 2 (2, 2) sts, work remaining stitches.
Turn, bind off (4, 5) 6, 6 (7, 7) sts
FRONT
Cast on using smaller circular needle: (52, 58) 62, 68 (72, 78) sts. Join in the round.
Work in 1×1 ribbing for 1.5ins or 4cms.
Switch to larger needles.
Work in pattern as follows:
K1, work in Reuben stitch pattern (5, 5) 6, 6 (7, 7) times then work the first 5 sts of Reuben stitch pattern (0, 1) 0, 1 (0, 1) time then p (0, 1) 0, 1 (0, 1), k1 until the piece measures (9.5, 10.5) 11.5, 12.5 (13.5, 14.5) ins or (23.5, 26) 29, 31 (34, 36) cm measuring from cast on, ending after completing a row 4 or 8.
SHAPE FRONT ARMHOLES
Cast off (3, 3) 3, 3 (3, 4) stitches at beginning of next 2 rows. (48, 52) 56, 62 (66, 70) sts
Decrease 1 st at each end of following (1, 2) 1, 2 (2, 1) rows. (46, 48) 54, 58 (62, 68) sts
Then decrease 1 st each end of every other row (1, 1) 1, 1 (1, 2) times (44, 46) 52, 56 (60, 64) sts
Continue without shaping until work measures (11, 12.5) 13.5, 14.5 (16, 17) ins or (27.5, 31) 34, 36 (40, 42.5) cms from cast on edge, ending after completing a row 4 or 8.
LEFT FRONT NECK SHAPING
Work (21, 23) 26, 28 (30, 32) sts, put remaining sts on holder, turn.
Decrease 1 st at neck edge every row for (12, 12) 12, 12 (12, 12) rows.
Then decrease 1 st at each end of every other row (2, 2) 3, 4 (5, 6) times.
(8, 9) 11, 12 (13, 24) sts remain.
Continue without shaping until work measures (14.5, 16) 17.5, 19.5 (21, 22.5) ins or (36, 40) 44, 49 (52.5, 56) cms from cast on edge.
LEFT FRONT SHOULDER SHAPING
Starting on a right-side row, bind off (4, 4) 5, 6 (6, 7) sts, turn.
Bind off remaining (4, 5) 6, 6 (7, 7) sts.
RIGHT FRONT NECK SHAPING
Rejoin yarn to work on stitch holder.
Put 1 sts on stitch holder (I use a closing safety pin style stitch marker for this) Work (21, 23) 26, 28 (30, 32) sts, put remaining sts on holder, turn.
Decrease 1 st at neck edge every row for (12, 12) 12, 12 (12, 12) rows.
Then decrease 1 st at each end of every other row (2, 2) 3, 4 (5, 6) times.
(8, 9) 11, 12 (13, 24) sts remain.
Continue without shaping until work measures (14.5, 16) 17.5, 19.5 (21, 22.5) ins or (36, 40) 44, 49 (52.5, 56) cms from cast on edge.
RIGHT FRONT SHOULDER SHAPING
Starting on a wrong side row, bind off (4, 4) 5, 6 (6, 7) sts, turn.
Bind off remaining (4, 5) 6, 6 (7, 7) sts.
NECKBAND
Sew shoulder seams.
With right-side facing pick up and knit (16, 16) 17, 19 (20, 22) sts down left front,
1 st at center of “v”, pm,
Pick up and knit (16, 16) 17, 19 (20, 22) sts up right front,
Pick up and knit (28, 28) 30, 33 (34, 36) sts around back.
Join in the round. (61, 61) 65, 71 (75, 81) sts
V-Neck rounds – work in k1p1 ribbing to 2 sts before center stitch marker, work vdd, continue in k1p1 around
Continue repeating v-neck rounds until the neck measures 1in or 2.5cms.
Bind off in pattern.
ARMBANDS
With right-side facing, pick up and knit (44, 50) 50, 58 (66, 70) sts.
Work in k1p1 ribbing for 2cms.
Bind off in pattern.
FINISHING
Sew side seams. Weave in all ends and block as desired.
ABBREVIATIONS
K – knit
K2tog -knit 2 stitches together
P – purl
PM – place marker
SL – slip stitch
SSK – slip, slip, knit the slipped sts together
SM – slip marker
VDD – vertical double decrease – slip the next 2 sts together as if to knit, knit the next st, pass over the 2 slipped sts together
WYIF – With yarn in front
YO – yarn over
Reuben Vest PDF Download
What do you think of this chunky cable knit vest pattern for boys?
I always love hearing how a pattern turns out for other knitters.
If you knit this chunky cable knit vest pattern for boys, feel free to share how it went or who you made it for. I’d love to hear about it in the comments.
Affiliate links may be used in this post. This means I may earn a small commission if you purchase through those links at no additional cost to you.