
Discover the lacy prop knit ties bonnet pattern and other photo prop patterns here: Photo Prop Patterns. This pattern is at the bottom of the post!

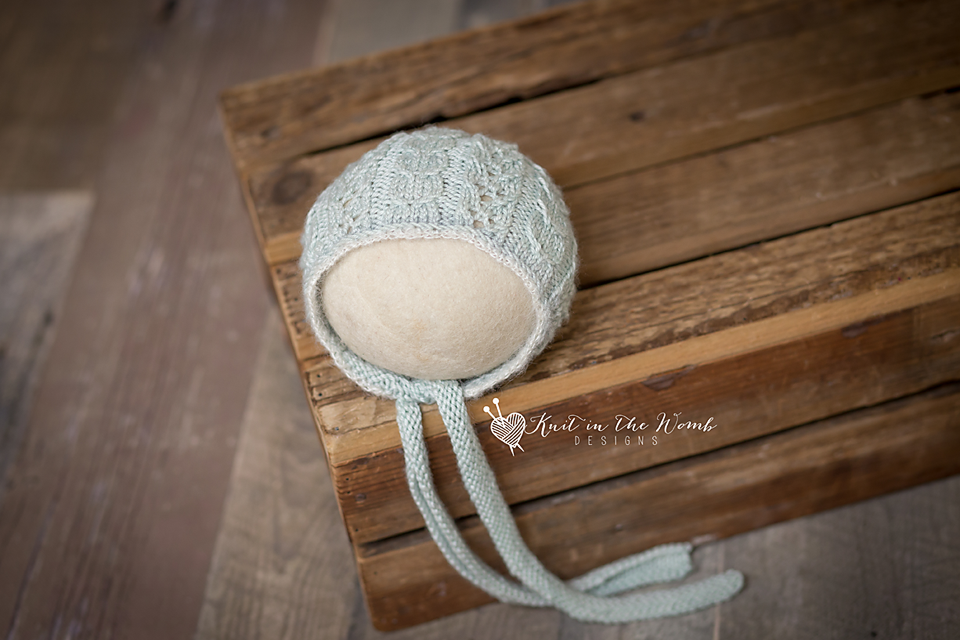
Let’s talk about one of my absolute favorite knitting adventures—a gorgeous lacy prop knit ties bonnet pattern that stole my heart from the first cast-on. When I found the free Abigail Bonnet pattern, I was instantly drawn to the soft mix of cables and lace. The design felt delicate but still had enough texture to really pop in newborn photos. And the best part? I had the perfect yarn waiting in my stash—Madelinetosh Pashmina (affiliate link). I could already picture the dreamy stitches and gentle shimmer that would come from this luxury yarn.
Before we get too far—if you’re looking for more beautiful patterns like this lacy prop knit ties bonnet pattern, you’ll want to browse the rest of my newborn photo prop knitting patterns right here. But this specific pattern is at the bottom of the post, so hang tight!
Why I Chose This Lacy Prop Knit Ties Bonnet Pattern
It wasn’t just the elegance of the design that pulled me in. As a photographer, I’m always looking for knits that photograph beautifully and add that little extra charm to a session. A lacy prop knit ties bonnet pattern like Abigail’s brings softness, texture, and a handmade feel that you just can’t buy in a store. And as a knitter, I loved the chance to mix cables and lace—a combo that always keeps my needles happy.
Madelinetosh Pashmina (affiliate link) was the perfect match for this project. It’s a scrumptious blend of merino wool, silk, and cashmere, and the moment I touched it, I knew it was baby-approved. I picked a soft pastel pink—just enough color to show up in photos, but gentle enough to highlight the stitch work. This yarn has subtle color variations thanks to the hand-dyeing, and every bit of it made my stitches sing. Madelinetosh Pashmina (affiliate link) isn’t just beautiful—it elevates any lacy prop knit ties bonnet pattern to heirloom status.
Kicking Things Off: Provisional Cast-On Adventures
Now, I’ve done my fair share of cast-ons, but this lacy prop knit ties bonnet pattern starts off with a provisional cast-on. Cue the YouTube tutorials and a few practice rounds! Once I had it down, the rhythm of the pattern really took over. The cables and lace came together row by row, and I loved how each stitch felt like a little triumph.
The pattern is well-written and easy to follow, even if lace and cables feel a bit intimidating. I found the combination exciting and a great opportunity to stretch my skills. It’s the kind of knit that keeps you engaged—perfect for a cozy weekend project.
And let me tell you—working those stitches in Madelinetosh Pashmina (affiliate link) was a treat. The yarn glides like butter, and the sheen from the silk catches the light in the most delicious way. I’ve knit plenty of photo prop bonnets, but something about this lacy prop knit ties bonnet pattern just felt extra special from the get-go.

That Lovely Lace (and a Few Frogged Rows)
No lace project is without a little challenge, and I’d be lying if I said I didn’t frog back a few rows more than once. But that’s half the fun, right? I kept a lifeline handy (bless whoever invented those) and just took my time on the trickier sections.
Each time I picked the bonnet back up, it felt more exciting. Watching the cables twist and the lace fan out—there’s just something satisfying about seeing your hard work come to life stitch by stitch. And Madelinetosh Pashmina (affiliate link) made every redo totally worth it. That fiber is forgiving, soft, and so photogenic.
Wrapping It Up
Finishing this lacy prop knit ties bonnet pattern was bittersweet. I grafted the live stitches from the provisional cast-on with the final row—no seams, no fuss, just a clean and polished edge. Then came the blocking. If you’ve never blocked lace before, you’re in for a real treat. It’s like unfolding a secret message! I soaked the bonnet gently, laid it flat, and let it dry into its final form. The cables relaxed, the lace opened up, and the whole piece looked like it belonged in a boutique.
A quick word of caution: this bonnet is for photo props only. Never leave a baby unattended while wearing this or any prop bonnet. Safety first, always.
The Photoshoot Fun
Once the bonnet dried, I couldn’t wait to grab my camera. I set up a cozy photo scene with soft blankets and some natural light streaming in. The delicate cables and lace from the lacy prop knit ties bonnet pattern popped beautifully in every shot. And that sheen from Madelinetosh Pashmina (affiliate link)? Oh my goodness. It practically glowed.
This is one of those projects that photographs even better than you imagined. The stitch definition, the softness—it all worked together so perfectly.

Sharing the Love
I couldn’t keep this lacy prop knit ties bonnet pattern to myself! I posted photos and a few behind-the-scenes moments on my blog and social media. The response was heartwarming. Fellow knitters asked about the pattern, the yarn (yes, it’s Madelinetosh Pashmina—affiliate link), and how challenging it really was. I always tell folks: if you take it slow, use lifelines, and treat yourself to good yarn, you’ll love the process.
In fact, this whole experience reminded me of why I love photo prop knits. The satisfaction of creating something that’s both beautiful and functional (even if just for a quick snap) never gets old. This lacy prop knit ties bonnet pattern gave me all the good feelings.
What’s Next?
I’m already eyeing my next photo prop project. I think this lacy prop knit ties bonnet pattern spoiled me a bit—it’s going to be tough to top that blend of detail and softness! But if you’re on the hunt for more patterns like it, don’t forget to check out my Photo Prop Patterns. There’s a whole collection of cuteness waiting for you, from bunny bonnets to textured caps and beyond.
Ready to Knit?
Whether you’re a seasoned knitter or still getting your sea legs, this lacy prop knit ties bonnet pattern is a joy to make. The mix of lace and cables offers a lovely challenge, and the final result is absolutely photo-shoot ready.
Yarn choice matters, and I can’t recommend Madelinetosh Pashmina (affiliate link) enough for this project. It’s baby-soft, beautifully dyed, and a dream on the needles. Just remember: always supervise baby when using photo props. Safety isn’t optional—it’s essential.
So if your needles are itching and your camera’s waiting, scroll down to find the lacy prop knit ties bonnet pattern below. You’re going to love it.

Materials and Info
MATERIALS: appx 80-160yds of sport (3) yarn (I used madelinetosh pashmina), Size 4 (3.5mm) needles, stitch markers, yarn needle, 3.5mm crochet hook, a few yds of mohair yarn, cable needle
Gauge: appx 6sts/in in stockinette st Gauge is very important! 1 15sts pattern repeat measures 2.75ins
Sizes (appx finished head circumference) : newborn (13ins),sitter(16ins)
Stitch Key
K – knit
p – purl
K2tog – knit 2 stitches together
ssk – slip, slip, knit
Yo – yarn over
sl – slip
Sm – slip marker
cb3 – sl next 2sts unto cable needle, hold in back, knit the next st, knit the 2sts on the cable needle
cf3 – sl next st unto cable needle, hold in front, knit the next 2sts, knit the st on the cable needle
Abigail Bonnet Pattern
Newborn
Cast on 190sts.
Note: your ties are in this cast on. You will bind off the ties on row 8.
Row 1 (wrong side) – purl 60, pm, k2 p6, [k2, p5, k2, p6] repeat [to] 3 more times, k2, pm, purl 60
Row 2 – k60, sm, k2, [k6, p2, k2, yo, ssk, k1, p2] repeat [to] 3 more times, k8, sm, k60
Row 3 – p60, sm, k2, p6, [k2, p5, k2, p6] repeat [to] 3 more times, k2, sm, p60
Row 4 – k60, sm, k2, [k6, p2, k2tog, yo, k1, yo, ssk, p2] repeat [to] 3 more times k8, sm, k60
Row 5 – repeat row 3
Row 6 – k60, sm, k2, [cb3, cf3, p2, k5, p2] repeat [to] 3 times more, cb3, cf3, k2, sm, k60
Row 7 – repeat row 3,
Row 8 – bind off LOOSELY 60sts, remove marker, k2, [k6, p2, k2, yo, ssk, k1, p2] repeat [to] 3 more times, k8, remover marker, bind off LOOSELY 60sts. (70sts)
Cut yarn. Rejoin yarn at remaining sts.
Row 9 – k2, p6, [k2, p5, k2, p6] repeat [to] 3 more times, k2
Row 10 – k2, [k6, p2, k2tog, yo, k1, yo, ssk, p2] repeat [to] 3 more times k8
Row 11 – Repeat row 9
Row 12 – k2, [cb3, cf3, p2, k5, p2] repeat [to] 3 times more, cb3, cf3, k2
Row 13 – repeat row 9
Row 14 – k2, [k6, p2, k2, yo, ssk, k1, p2] repeat [to] 3 more times, k8,
Repeat rows 9-14 until your work measures 3.5ins ending after completing a wrong side row.
Place stitch markers on either end of the last row.
Decrease
Row 1 – k1, k2tog, knit to last 3 sts, k2tog, k1 (68sts)
Row 2 – purl across
Row 3 – k1, [k2tog, k4] repeat [to] to last st, k1 (57sts)
Row 4 – purl across
Row 5 – k1, [k2tog, k3] repeat [to] to last st, k1 (46sts)
Row 6 – purl across
Row 7 – k1, [k2tog, k2] repeat [to] to last st, k1 (35sts)
Row 8 – purl across
Row 9 – k1, [k2tog, k1] repeat [to] to last st, k1 (24sts)
Row 10 – purl across
Row 11 – k1, [k2tog] repeat [to] to last st, k1 (13sts)
Cut yarn leaving appx 12ins and pull through remaining stitches. Using this end sew the crown together to your stitch markers. (I like to use the mattress stitch since it is nearly invisible).
Using your crochet hook and your mohair – 2sc in the first edge st after your ties, [skip 1, 2sc in next st] repeat [to] across to the opposite tie.
Sitter
Cast on 205sts.
Note: your ties are in this cast on. You will bind off the ties on row 8.
Row 1 (wrong side) – purl 60, pm, k2 p6, [k2, p5, k2, p6] repeat [to] 4 more times, k2, pm, purl 60
Row 2 – k60, sm, k2, [k6, p2, k2, yo, ssk, k1, p2] repeat [to] 4 more times, k8, sm, k60
Row 3 – p60, sm, k2, p6, [k2, p5, k2, p6] repeat [to] 4 more times, k2, sm, p60
Row 4 – k60, sm, k2, [k6, p2, k2tog, yo, k1, yo, ssk, p2] repeat [to] 4 more times k8, sm, k60
Row 5 – repeat row 3
Row 6 – k60, sm, k2, [cb3, cf3, p2, k5, p2] repeat [to] 4 times more, cb3, cf3, k2, sm, k60
Row 7 – repeat row 3,
Row 8 – bind off LOOSELY 60sts, remove marker, k2, [k6, p2, k2, yo, ssk, k1, p2] repeat [to] 4 more times, k8, remover marker, bind off LOOSELY 60sts. (85sts)
Cut yarn. Rejoin yarn at remaining sts.
Row 9 – k2, p6, [k2, p5, k2, p6] repeat [to] 4 more times, k2
Row 10 – k2, [k6, p2, k2tog, yo, k1, yo, ssk, p2] repeat [to] 4 more times k8
Row 11 – Repeat row 9
Row 12 – k2, [cb3, cf3, p2, k5, p2] repeat [to] 4 times more, cb3, cf3, k2
Row 13 – repeat row 9
Row 14 – k2, [k6, p2, k2, yo, ssk, k1, p2] repeat [to] 4 more times, k8,
Repeat rows 9-14 until your work measures 4.5ins ending after completing a wrong side row.
Place stitch markers on either end of the last row.
Decrease
Row 1- k1, [k2tog, k5] repeat [to] across (73sts)
Row 2 – purl across
Row 3 – k1, [k2tog, k4] repeat [to] across (61sts)
Row 4 – purl across
Row 5 – k1, [k2tog, k3] repeat [to] across (49sts)
Row 6 – purl across
Row 7 – k1 [k2tog, k2] repeat [to] across (37sts)
Row 8 – purl across
Row 9 – k1, [k2tog, k1] repeat [to] across (25sts)
Row 10 – purl across
Row 11 – k1 [k2tog] repeat [to] across (13sts)
Cut yarn leaving appx 12ins and pull through remaining stitches. Using this end sew the crown together to your stitch markers. (I like to use the mattress stitch since it is nearly invisible).
Using your crochet hook and your mohair – 2sc in the first edge st after your ties, [skip 1, 2sc in next st] repeat [to] across to the opposite tie.
Abigail Bonnet PDF

Disclaimer: This page contains affiliate links. If you choose to make a purchase after clicking a link, I may receive a commission at no additional cost to you. Thank you for your support!