
Discover the angora bear bonnet pattern at the bottom of this post! Find more adorable photo prop patterns here.

Knitting has always been a way for me to unwind and create something beautiful and meaningful. One of my favorite projects to make is newborn photo props, and today, I’m excited to share my journey in creating the Angora Bear Bonnet. This adorable bonnet is not only a perfect accessory for capturing precious newborn moments but also a delightful project that combines simplicity and charm.

The Inspiration Behind the Angora Bear Bonnet
The idea for the Angora Bear Bonnet came to me when I was looking for a unique and cute photo prop for a friend’s newborn photoshoot. I wanted something that was soft, cozy, and had a bit of character. The image of a tiny bear cub came to mind, and I knew that an angora yarn would give the bonnet the perfect fluffiness and warmth.
Angora yarn, with its luxurious softness, is a dream to work with. It’s made from the fur of angora rabbits and is known for its halo-like fluff and gentle touch. However, angora yarn can be quite expensive, which led me to explore more affordable alternatives that would still provide a similar look and feel.

Choosing the Yarn
For the Angora Bear Bonnet, I initially used worsted angora yarn. The texture and softness were exactly what I envisioned, but I knew that not everyone would want to invest in such a costly yarn for a single project. So, I sought out more budget-friendly options that wouldn’t compromise on quality.
Two excellent alternatives I found are KnitPicks Wonderfluff and Hobbii Fluffy Day yarn. Both of these yarns offer the fluffiness and warmth needed for the bonnet while being much more affordable. KnitPicks Wonderfluff is a blend of baby alpaca, merino wool, and nylon, giving it a soft and airy feel. Hobbii Fluffy Day yarn, on the other hand, is a polyester blend that mimics the look of angora with its delightful fluff.

The Knitting Process
Creating the Angora Bear Bonnet was a joy from start to finish. I started by selecting my yarn and knitting needles, opting for a size that would create a dense yet soft fabric. The pattern itself is quite simple, making it an excellent project for knitters of all levels.
The bonnet begins with a ribbed band, which provides a snug and comfortable fit around the baby’s head. Once the band is complete, the main body of the bonnet is knit in a soft stockinette stitch, allowing the yarn’s texture to shine. The real fun begins when it’s time to create the bear ears. These little ears are knit separately and then sewn onto the bonnet, giving it that adorable bear cub look.
As I knit, I couldn’t help but imagine how sweet a newborn would look in this bonnet. The fluffy texture of the yarn added a whimsical touch, and the bear ears were the perfect finishing detail. The project was coming together beautifully, and I was thrilled with the results.

Tips for Knitting the Angora Bear Bonnet
- Choose Your Yarn Wisely: While worsted angora yarn creates a luxurious finish, KnitPicks Wonderfluff and Hobbii Fluffy Day yarns are excellent budget-friendly options. They provide the same cozy and fluffy texture without breaking the bank.
- Gauge is Important: Make sure to check your gauge before starting the project. This ensures that your bonnet will be the correct size and fit snugly on a newborn’s head.
- Take Your Time with the Ears: The bear ears are what make this bonnet so special. Take your time when knitting and attaching them to ensure they are evenly placed and securely fastened.
- Finish with Care: When weaving in the ends, make sure to do so carefully to avoid any loose threads that could be uncomfortable for the baby.

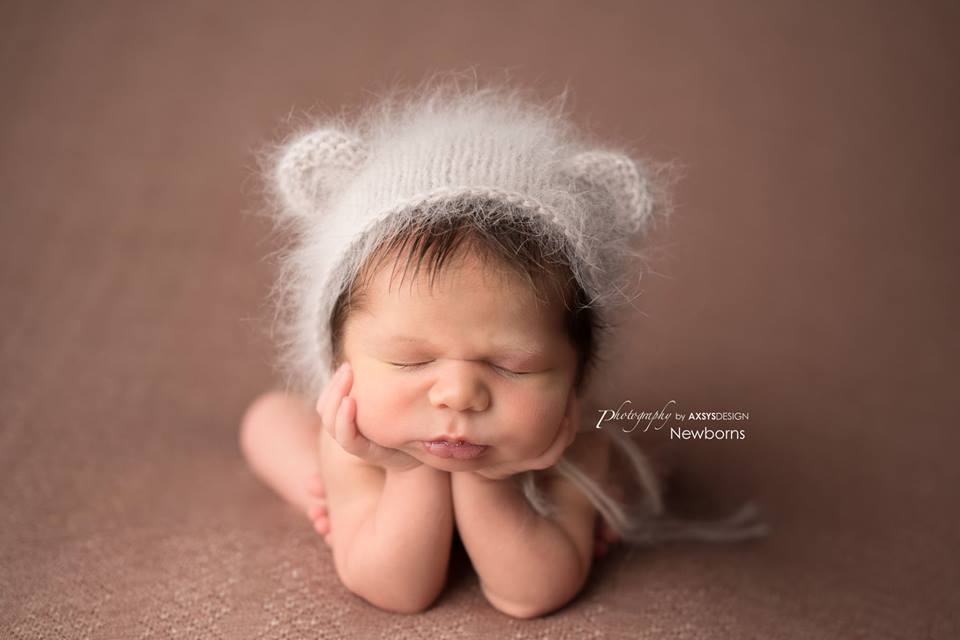
Capturing the Perfect Newborn Photo
Once the Angora Bear Bonnet was complete, I couldn’t wait to see it in action. I arranged a photoshoot with my friend’s newborn, and the results were absolutely heartwarming. The bonnet added a touch of whimsy and warmth to the photos, highlighting the baby’s sweet and innocent features.
The soft, fluffy texture of the yarn complemented the delicate features of the newborn, creating a picture-perfect moment. The bear ears added a playful touch, making the baby look like a tiny, cuddly bear cub. It was everything I had hoped for and more.

Sharing the Love
After seeing the beautiful photos, I knew I had to share this pattern with other knitters. The Angora Bear Bonnet is a wonderful project for anyone looking to create a special and memorable photo prop for newborns. It’s simple enough for beginners yet charming enough to delight even experienced knitters.
I’ve included detailed instructions and tips in the pattern to help fellow knitters create their own versions of the bonnet. Whether you choose to use angora yarn, KnitPicks Wonderfluff, or Hobbii Fluffy Day yarn, I’m confident that you’ll love the results.

Conclusion
Knitting the Angora Bear Bonnet was a delightful and rewarding experience. It combined my love for knitting with my passion for creating beautiful and meaningful items. The finished bonnet is not only a charming photo prop but also a testament to the joy and creativity that knitting brings.
I hope that by sharing my journey, I can inspire others to pick up their needles and create something special. Whether you’re knitting for a friend’s newborn, your own baby, or as a gift, the Angora Bear Bonnet is sure to bring smiles and warmth. So, gather your yarn, choose your favorite needles, and start knitting your own cozy bear bonnet today!

Materials and Info
Materials: appx 35-90yd worsted weight yarn (I used belangor angora, KnitPicks Wonderfluff, and Hobbii Fluffy Day), size 8 (5mm) straight needles or (size needed to obtain gauge), yarn needle
Gauge: appx 4sts/inch Gauge is very important!
Sizes (appx finished head circumference) : newborn (13ins), 0-3mths (14 ins), 3-6mths (15ins), 6-12mths (16ins), 1-3yrs (17ins)
Stitch Key
K – knit
p – purl
K2tog – knit 2 stitches together
P2tog – purl 2 stitches together

Angora Bear Bonnet Pattern
NEWBORN
BONNET
Cast on 44sts.
Work in stockinette stitch for appx 3.5ins ending after completing a wrong side (purl) row. Place stitch markers at either end of your last row.
DECREASES
Row 1 – k1 (k2tog, k4) repeat (to) to last st, k1 (37sts)
Row 2 – purl across
Row 3 – knit across
Row 4 – purl across
Row 5 – k1 (k2tog, k3) repeat (to) to last st, k1 (30sts)
Row 6 – purl across
Row 7 – k1 (k2tog, k2) repeat (to) to last st, k1 (23sts)
Row 8 – purl across
Row 9 – k1 (k2tog, k1) repeat (to) to last st, k1 (16sts)
Row 10 – p1 (p2tog) repeat (to) to last st, p1 (9sts)
Do not bind off. Cut yarn leaving appx -10ins. Pull yarn through remaining stitches and cinch the back tight. Using this end sew the crown together to your stitch markers. (I like to use the mattress stitch since it is nearly invisible). Cut 2 pieces of yarn approximately 24ins long. Fold them in half and pull a loop through the front corner of the hood. Pull the ends through this loop. These are your ties.
EARS (make 2)
Cast on 12sts leaving a tail appx 8ins long to sew the ears onto the bonnet.
Work in stockinette stitch for 6 rows.
Do not bind off. Pull yarn through remaining stitches and back tightly forming a semicircle. Sew your completed ears on where you think they look best.
0-3 MONTHS
BONNET
Cast on 48sts.
Work in stockinette stitch for appx 4ins ending after completing a wrong side (purl) row. Place stitch markers at either end of your last row.
DECREASES
Row 1 – (k2tog, k4) repeat (to) across (40sts)
Row 2 – purl across
Row 3 – knit across
Row 4 – purl across
Row 5 – (k2tog, k3) repeat (to) across (32sts)
Row 6 – purl across
Row 7 – (k2tog, k2) repeat (to) across (24sts)
Row 8 – purl across
Row 9 – (k2tog, k1) repeat (to) across (16sts)
Row 10 – (p2tog) repeat (to) across (8sts)
Do not bind off. Cut yarn leaving appx -10ins. Pull yarn through remaining stitches and cinch the back tight. Using this end sew the crown together to your stitch markers. (I like to use the mattress stitch since it is nearly invisible). Cut 2 pieces of yarn approximately 24ins long. Fold them in half and pull a loop through the front corner of the hood. Pull the ends through this loop. These are your ties.
EARS (make 2)
Cast on 12sts leaving a tail appx 8ins long to sew the ears onto the bonnet.
Work in stockinette stitch for 6 rows.
Do not bind off. Pull yarn through remaining stitches and back tightly forming a semicircle. Sew your completed ears on where you think they look best.
3-6 MONTHS
BONNET
Cast on 51sts.
Work in stockinette stitch for appx 4.5ins ending after completing a wrong side (purl) row. Place stitch markers at either end of your last row.
DECREASES
Row 1 – k1 (k2tog, k5) repeat (to) to last st, k1 (44sts)
Row 2 – purl across
Row 3 – k1 (k2tog, k4) repeat (to) to last st, k1 (37sts)
Row 4 – purl across
Row 5 – k1 (k2tog, k3) repeat (to) to last st, k1 (30sts)
Row 6 – purl across
Row 7 – k1 (k2tog, k2) repeat (to) to last st, k1 (23sts)
Row 8 – purl across
Row 9 – k1 (k2tog, k1) repeat (to) to last st, k1 (16sts)
Row 10 – p1 (p2tog) repeat (to) to last st, p1 (9sts)
Do not bind off. Cut yarn leaving appx -10ins. Pull yarn through remaining stitches and cinch the back tight. Using this end sew the crown together to your stitch markers. (I like to use the mattress stitch since it is nearly invisible). Cut 2 pieces of yarn approximately 24ins long. Fold them in half and pull a loop through the front corner of the hood. Pull the ends through this loop. These are your ties.
EARS (make 2)
Cast on 12sts leaving a tail appx 8ins long to sew the ears onto the bonnet.
Work in stockinette stitch for 6 rows.
Do not bind off. Pull yarn through remaining stitches and back tightly forming a semicircle. Sew your completed ears on where you think they look best.
6-12 MONTHS
BONNET
Cast on 56sts.
Work in stockinette stitch for appx 5ins ending after completing a wrong side (purl) row. Place stitch markers at either end of your last row.
DECREASES
Row 1 – k1 (k2tog, k4) repeat (to) to last st, k1 (47sts)
Row 2 – purl across
Row 3 – knit across
Row 4 – purl across
Row 5 – k1 (k2tog, k3) repeat (to) to last st, k1 (38sts)
Row 6 – purl across
Row 7 – k1 (k2tog, k2) repeat (to) to last st, k1 (29sts)
Row 8 – purl across
Row 9 – k1 (k2tog, k1) repeat (to) to last st, k1 (20sts)
Row 10 – p1 (p2tog) repeat (to) to last st, p1 (11sts)
Do not bind off. Cut yarn leaving appx -10ins. Pull yarn through remaining stitches and cinch the back tight. Using this end sew the crown together to your stitch markers. (I like to use the mattress stitch since it is nearly invisible). Cut 2 pieces of yarn approximately 24ins long. Fold them in half and pull a loop through the front corner of the hood. Pull the ends through this loop. These are your ties.
EARS (make 2)
Cast on 12sts leaving a tail appx 8ins long to sew the ears onto the bonnet.
Work in stockinette stitch for 6 rows.
Do not bind off. Pull yarn through remaining stitches and back tightly forming a semicircle. Sew your completed ears on where you think they look best.
1-3 YEARS
BONNET
Cast on 62sts.
Work in stockinette stitch for appx 5.5ins ending after completing a wrong side (purl) row. Place stitch markers at either end of your last row.
DECREASES
Row 1 – k1 (k2tog, k4) repeat (to) to last st, k1 (52sts)
Row 2 – purl across
Row 3 – knit across
Row 4 – purl across
Row 5 – k1 (k2tog, k3) repeat (to) to last st, k1 (42sts)
Row 6 – purl across
Row 7 – k1 (k2tog, k2) repeat (to) to last st, k1 (32sts)
Row 8 – purl across
Row 9 – k1 (k2tog, k1) repeat (to) to last st, k1 (22sts)
Row 10 – p1 (p2tog) repeat (to) to last st, p1 (12sts)
Do not bind off. Cut yarn leaving appx -10ins. Pull yarn through remaining stitches and cinch the back tight. Using this end sew the crown together to your stitch markers. (I like to use the mattress stitch since it is nearly invisible). Cut 2 pieces of yarn approximately 24ins long. Fold them in half and pull a loop through the front corner of the hood. Pull the ends through this loop. These are your ties.
EARS (make 2)
Cast on 12sts leaving a tail appx 8ins long to sew the ears onto the bonnet.
Work in stockinette stitch for 6 rows.
Do not bind off. Pull yarn through remaining stitches and back tightly forming a semicircle. Sew your completed ears on where you think they look best.

Angora Bear Bonnet PDF

Comments are closed.