
Discover more lace mohair bonnet patterns on the photo prop pattern page! This one’s at the bottom, but the rest are featured at the link.

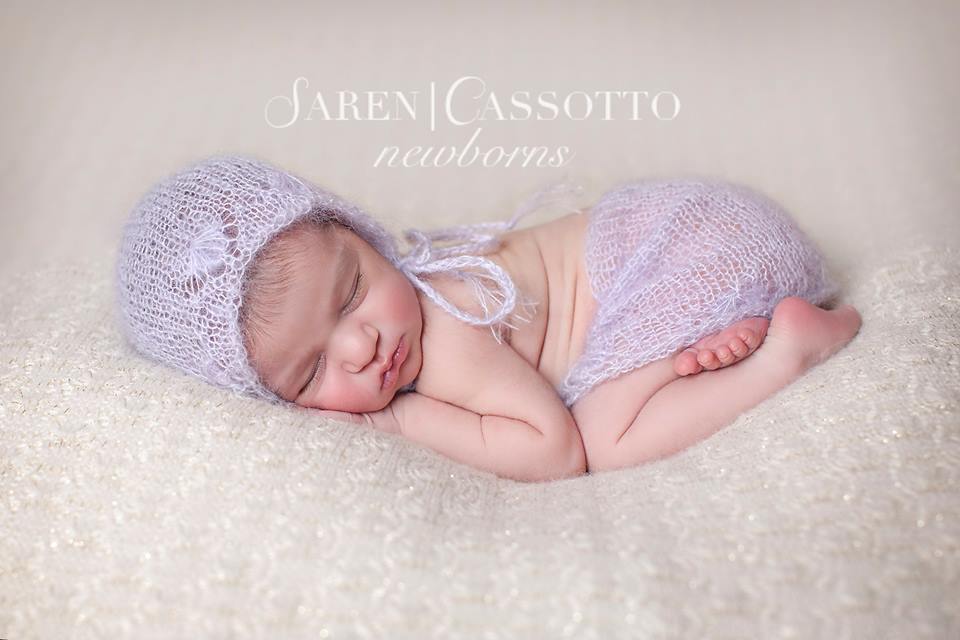
I don’t know about you, but when it comes to knitting for newborns, I want every stitch to feel like a soft hug. That’s exactly how it felt working on the Esther Bonnet and Skirt Set. This lace mohair bonnet pattern has completely won my heart, and I’m so excited to share the details with you.
If you’re here hunting for dreamy photo prop patterns, you can find all of them on my photo prop pattern page—this particular lace mohair bonnet pattern is tucked right at the bottom of this post.
Why I Fell in Love with This Lace Mohair Bonnet Pattern
There’s something so special about mixing vintage charm with modern softness. That’s what the Esther Set does best. The lace mohair bonnet pattern features a delicate fanned edge that feels like something plucked out of a baby heirloom chest—and the matching skirt? Pure sweetness.
I wanted a design that would feel elegant without being too fussy. This one hits the mark with the softness and halo of KnitPicks Aloft (affiliate link), paired with graceful details that really shine in photos.
Hunting Down the Perfect Yarn
Let’s talk yarn for a sec. Because the star of this lace mohair bonnet pattern really is the yarn. I wanted something soft, light, a little bit fancy… but still practical for baby skin. Enter KnitPicks Aloft (affiliate link). This mohair-silk blend is buttery soft, and the sheen adds just enough glam to keep things interesting.
It’s got that signature halo you get from mohair, which means it photographs like a dream. I went with a soft pastel for this set, and the color made everything feel even more delicate.
Honestly, every time I pick up KnitPicks Aloft (affiliate link), I fall in love with it all over again. It drapes beautifully, holds lace well, and just elevates the entire look of a bonnet.

Stitching the Bonnet: Where the Magic Happens
The lace mohair bonnet pattern starts with the fanned edge, and let me tell you—it’s the kind of detail that instantly makes you slow down and enjoy the process. It uses a simple combo of increases and decreases that gives you that wavy edge without a bunch of fuss.
As I worked through each row, I kept picturing a snoozing newborn in a basket, wrapped in soft knits. The Aloft yarn (affiliate link) gives such a gentle, floaty texture, which is exactly what I wanted for this lace mohair bonnet pattern. It’s sweet, soft, and light as a whisper.
Pairing It with the Skirt: The Cutest Add-On
Once the bonnet was off the needles, I knew it needed a little something extra. So, I designed a coordinating skirt with the same fanned edging for the hem. The waistband has a stretchy rib for a snug-but-gentle fit.
The lace mohair bonnet pattern may be the star of the show, but the skirt? It brings the whole set together. I love how the KnitPicks Aloft yarn (affiliate link) flows into that flared shape. It feels almost weightless—perfect for newborn comfort and ideal for styling in photos.
Watching the skirt take shape was almost as fun as knitting the bonnet. It grows quickly and has just enough shaping to make it feel special without being complicated.
Behind the Lens: Photographing the Esther Set
Once both pieces were ready, it was time to bring this lace mohair bonnet pattern to life with a photo shoot. As a photographer, this part is always the icing on the cake for me.
I set up a soft neutral backdrop, added in some chunky knits for layering, and popped the Esther set on our tiny model. I still can’t get over how well the bonnet framed that little face. The fanned edge stood out beautifully, and the skirt added just the right amount of fluff and grace.
KnitPicks Aloft (affiliate link) looked stunning under natural light—its sheen picked up every little detail of the stitch pattern. I love that this lace mohair bonnet pattern doesn’t just look beautiful in real life—it photographs like a dream, too.

Tips for Your Own Lace Mohair Bonnet Pattern Success
Thinking of making your own Esther Bonnet and Skirt Set? Here are a few quick tips that helped me get the best result with this lace mohair bonnet pattern:
- Use quality mohair yarn. KnitPicks Aloft (affiliate link) is my favorite for a reason—it’s soft, luxurious, and easy to work with.
- Don’t skip blocking. The fan edge on the lace mohair bonnet pattern really opens up and comes to life after a good block.
- Be gentle. Mohair can fuzz if you rip it out too much, so work carefully and keep your hands moisturized for smooth knitting.
- Take your time. The lace pattern is simple but elegant. Don’t rush it—enjoy the stitches as they bloom into the finished design.
- Pair it with a skirt! Even if you’re just here for the lace mohair bonnet pattern, I highly recommend knitting the skirt too. It completes the look.
A Project That’s Equal Parts Practical and Pretty
What I love most about this lace mohair bonnet pattern is that it’s not just cute—it’s practical. It fits well, stays on during photos, and adds a soft halo of texture to any newborn shoot. The softness of KnitPicks Aloft (affiliate link) means baby stays comfy, and that’s always priority number one.
I’ve knit a lot of bonnets over the years, but this one has definitely earned a top spot in my heart (and my pattern library).
Final Thoughts
Creating this lace mohair bonnet pattern was such a satisfying process—from picking the yarn, to sketching out the shape, to photographing the finished result. It’s projects like this that remind me why I love knitting newborn photo props in the first place.
The Esther Bonnet and Skirt Set is proof that sometimes, the simplest touches—like a fanned lace edge and soft yarn—make the biggest impact.
If you’re ready to cast on something special, the full lace mohair bonnet pattern is waiting for you at the bottom of this post. And don’t forget—if you want more sweet knits like this, head to the photo prop pattern page to browse all the goodies.
Let me know in the comments if you knit it—I’d love to hear how your Esther Set turns out!

Materials and Info
Materials: 1 skein of Knit Picks Aloft (lace weight – 0), size 7 (4.5mm) straight and dpn, yarn needle
Gauge: 9.5sts per 2ins ~GAUGE IS VERY IMPORTANT~
Stitch Key:
K – knit P – purl
yo – yarn over k2tog – knit 2 together
ssk – slip slip knit (slip sts purlwise) sl – slip st knitwise
psso – pass slipped stitch over ptog – purl together
rt – right
Head circumference: nb (13ins). 0-3mths (14ins), 3-6mth (15ins), 6-12mths (16ins)

Esther Bonnet and Skirt Pattern
Newborn Bonnet
Cast on 53sts
Row 1&2 – knit
Row 3 – purl
Row 4 – k1 (k3, k2tog, yo, k1, yo, ssk, k2) repeat across to last 2 sts, k2
Row 5 – purl
Row 6 – k1 (k2, k2tog, yo, k3, yo, ssk, k1) repeat across to last 2 sts, k2
Row 7 – purl
Row 8 – k1 (k1, k2tog, yo, k5, yo, ssk) repeat across to last 2 sts, k2
Row 9 – purl
Row 10 – knit
Row 11 – purl
Row 12 – k1 (k6, make 1 long loop in each of the 6 holes created by the yo [insert the rt hand needles into the 1st hole of the 4th row, yarn around needle and draw up a loop which stays on the needle, repeat into each of the 5 remaining holes], k4) repeat to last 2 sts, k2
Row 13 – p2 (p4, ptog the 6 loops made in row 12 and the next st, p5) to last st, k1
Continue by working in stockinette st until your work measures 4ins from the cast on edge ending after completing a right side row.
You will now start working in the round. Switch to dpn here.
Round 1 – (k2tog, k9) 4 times, k2tog, k7 (48sts)
Round 2 – (k2tog, k4) repeat around (40sts)
Round 3 – knit
Round 4 – (k2tog, k3) repeat around (32sts)
Round 5 – knit
Round 6 – (k2tog, k2) repeat around (24sts)
Round 7 – knit
Round 8 – (k2tog, k1) repeat around (16sts)
Do not bind off. Cut yarn and pull through remaining stitches. Cut 6 pieces of yarn approximately 30ins long. Fold 3 of them in half and pull a loop through the front corner of the hood. Pull the ends through this loop and braid. Repeat on the opposite side.
Newborn Skirt
Cast on 70sts and join in the round.
Round 1 – purl
Rounds 2&3 – knit
Round 4 – (k3, k2tog, yo, k1, yo, ssk, k2) repeat around
Round 5 – knit
Round 6 – (k2, k2tog, yo, k3, yo, ssk, k1) repeat around
Round 7 – knit
Round 8 – (k1, k2tog, yo, k5, yo, ssk)
Rounds 9-11 – knit
Round 12 – (k6, make 1 long loop in each of the 6 holes created by the yo [insert the rt hand needles into the 1st hole of the 4th row, yarn around needle and draw up a loop which stays on the needle, repeat into each of the 5 remaining holes], k4) repeat to last 2 sts, k2
Round 13 – (k5, sl1, ktog the 6 loops made in row 12, psso, k4) repeat around.
Continue by working in stockinette st (knit all sts on every round) until your work measures 5.5ins from the cast on edge ending after completing a right side row.
Decrease round – (k2tog, k15, k2tog, k16) repeat (66sts)
Work in a k1,p1 ribbing for 1in.
Bind off using a stretch bind off (I like a sewn bind off). Weave in ends
0-3mth Bonnet
Cast on 57sts
Row 1&2 – knit
Row 3 – purl
Row 4 – k3 (k3, k2tog, yo, k1, yo, ssk, k2) repeat across to last 4 sts, k4
Row 5 – purl
Row 6 – k3 (k2, k2tog, yo, k3, yo, ssk, k1) repeat across to last 4 sts, k4
Row 7 – purl
Row 8 – k3 (k1, k2tog, yo, k5, yo, ssk) repeat across to last 4 sts, k4
Row 9 – purl
Row 10 – knit
Row 11 – purl
Row 12 – k3 (k6, make 1 long loop in each of the 6 holes created by the yo [insert the rt hand needles into the 1st hole of the 4th row, yarn around needle and draw up a loop which stays on the needle, repeat into each of the 5 remaining holes], k4) repeat to last 4 sts, k4
Row 13 – p4 (p4, ptog the 6 loops made in row 12 and the next st, p5) to last 3sts, k3
Continue by working in stockinette st until your work measures 4.5ins from the cast on edge ending after completing a right side row.
You will now start working in the round. Switch to dpn here.
Round 1 – (k2tog, k17) repeat around (54sts)
Round 2 – (k2tog, k4) repeat around (45sts)
Round 3 – knit
Round 4 – (k2tog, k3) repeat around (36sts)
Round 5 – knit
Round 6 – (k2tog, k2) repeat around (27sts)
Round 7 – knit
Round 8 – (k2tog, k1) repeat around (18sts)
Do not bind off. Cut yarn and pull through remaining stitches. Cut 6 pieces of yarn approximately 30ins long. Fold 3 of them in half and pull a loop through the front corner of the hood. Pull the ends through this loop and braid. Repeat on the opposite side.
0-3mth Skirt
Cast on 70sts and join in the round.
Round 1 – purl
Rounds 2&3 – knit
Round 4 – (k3, k2tog, yo, k1, yo, ssk, k2) repeat around
Round 5 – knit
Round 6 – (k2, k2tog, yo, k3, yo, ssk, k1) repeat around
Round 7 – knit
Round 8 – (k1, k2tog, yo, k5, yo, ssk)
Rounds 9-11 – knit
Round 12 – (k6, make 1 long loop in each of the 6 holes created by the yo [insert the rt hand needles into the 1st hole of the 4th row, yarn around needle and draw up a loop which stays on the needle, repeat into each of the 5 remaining holes], k4) repeat to last 2 sts, k2
Round 13 – (k5, sl1, ktog the 6 loops made in row 12, psso, k4) repeat around.
Continue by working in stockinette st (knit all sts on every round) until your work measures 6ins from the cast on edge ending after completing a right side row.
Work in a k1,p1 ribbing for 1in.
Bind off using a stretch bind off (I like a sewn bind off). Weave in ends
3-6mth Bonnet
Cast on 63sts
Row 1&2 – knit
Row 3 – purl
Row 4 – k1 (k3, k2tog, yo, k1, yo, ssk, k2) repeat across to last 2 sts, k2
Row 5 – purl
Row 6 – k1 (k2, k2tog, yo, k3, yo, ssk, k1) repeat across to last 2 sts, k2
Row 7 – purl
Row 8 – k1 (k1, k2tog, yo, k5, yo, ssk) repeat across to last 2 sts, k2
Row 9 – purl
Row 10 – knit
Row 11 – purl
Row 12 – k1 (k6, make 1 long loop in each of the 6 holes created by the yo [insert the rt hand needles into the 1st hole of the 4th row, yarn around needle and draw up a loop which stays on the needle, repeat into each of the 5 remaining holes], k4) repeat to last 2 sts, k2
Row 13 – p2 (p4, ptog the 6 loops made in row 12 and the next st, p5) to last st, k1
Continue by working in stockinette st until your work measures 5ins from the cast on edge ending after completing a right side row.
You will now start working in the round. Switch to dpn here.
Round 1 – (k2tog, k19) repeat around (60sts)
Round 2 – (k2tog, k4) repeat around (50sts)
Round 3 – knit
Round 4 – (k2tog, k3) repeat around (40sts)
Round 5 – knit
Round 6 – (k2tog, k2) repeat around (30sts)
Round 7 – knit
Round 8 – (k2tog, k1) repeat around (20sts)
Do not bind off. Cut yarn and pull through remaining stitches. Cut 6 pieces of yarn approximately 30ins long. Fold 3 of them in half and pull a loop through the front corner of the hood. Pull the ends through this loop and braid. Repeat on the opposite side.
6-12mth Bonnet
Cast on 67sts
Row 1&2 – knit
Row 3 – purl
Row 4 – k3 (k3, k2tog, yo, k1, yo, ssk, k2) repeat across to last 4 sts, k4
Row 5 – purl
Row 6 – k3 (k2, k2tog, yo, k3, yo, ssk, k1) repeat across to last 4 sts, k4
Row 7 – purl
Row 8 – k3 (k1, k2tog, yo, k5, yo, ssk) repeat across to last 4 sts, k4
Row 9 – purl
Row 10 – knit
Row 11 – purl
Row 12 – k3 (k6, make 1 long loop in each of the 6 holes created by the yo [insert the rt hand needles into the 1st hole of the 4th row, yarn around needle and draw up a loop which stays on the needle, repeat into each of the 5 remaining holes], k4) repeat to last 4 sts, k4
Row 13 – p4 (p4, ptog the 6 loops made in row 12 and the next st, p5) to last 3sts, k3
Continue by working in stockinette st until your work measures 5.5ins from the cast on edge ending after completing a right side row.
You will now start working in the round. Switch to dpn here.
Round 1 – (k2tog, k8) 6 times, k2tog, k5 (60sts)
Round 2 – (k2tog, k4) repeat around (50sts)
Round 3 – knit
Round 4 – (k2tog, k3) repeat around (40sts)
Round 5 – knit
Round 6 – (k2tog, k2) repeat around (30sts)
Round 7 – knit
Round 8 – (k2tog, k1) repeat around (20sts)
Do not bind off. Cut yarn and pull through remaining stitches. Cut 6 pieces of yarn approximately 30ins long. Fold 3 of them in half and pull a loop through the front corner of the hood. Pull the ends through this loop and braid. Repeat on the opposite side.
Esther Bonnet and Skirt Set PDF
Disclaimer: This page contains affiliate links. If you choose to make a purchase after clicking a link, I may receive a commission at no additional cost to you. Thank you for your support!