
Discover this evergreen hat pattern and more on my free hat pattern page! THIS pattern is at the bottom.

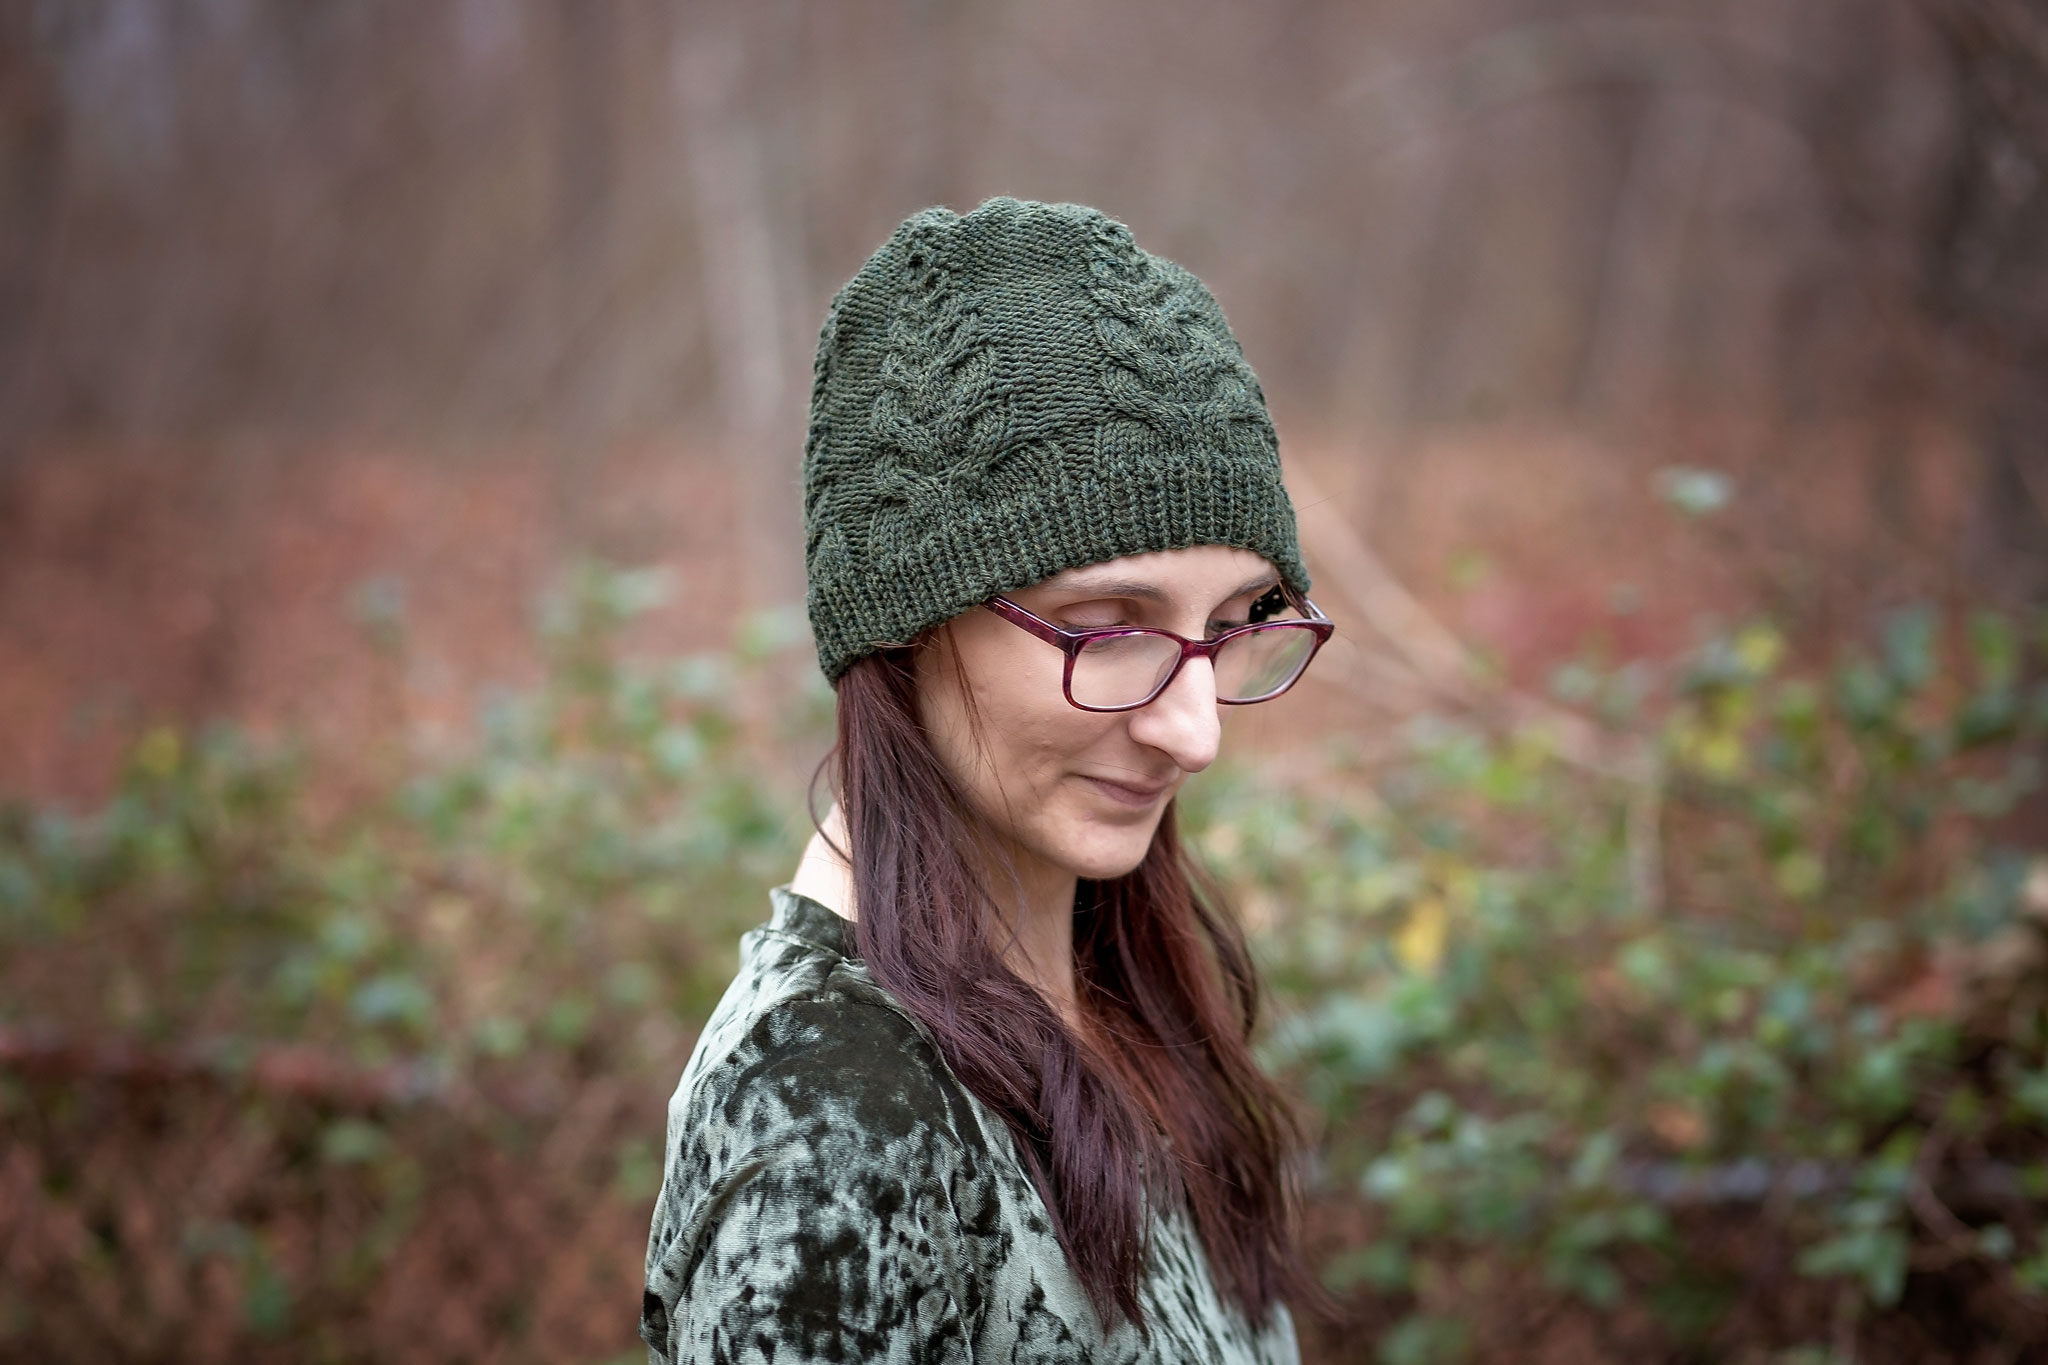
There’s something magical about creating a piece of knitwear that not only keeps you warm but also tells a story through its design. The Evergreen Hat, a free knitting pattern featuring a stunning cable tree motif, is one such creation. Knit in the reliable and versatile Cascade 220 Superwash (affiliate link)yarn, this beanie has become one of my favorite projects, combining beauty and functionality in one cozy package.
The Inspiration Behind the Evergreen Hat
I’ve always been drawn to nature-inspired patterns. There’s a timeless charm to them that resonates deeply with me. The Evergreen Hat captures this essence perfectly. The cable tree motif symbolizes strength and endurance, characteristics often attributed to evergreen trees. As I knit each stitch, I imagine the sturdy tree standing tall in the forest, its branches laden with snow in the winter, yet ever resilient.
Why Cascade 220?
Choosing the right yarn for a project is crucial, and for the Evergreen Hat, Cascade 220 Superwash (affiliate link) is an excellent choice. Made from 100% Peruvian Highland wool, Cascade 220 Superwash (affiliate link) offers a perfect balance of softness, warmth, and durability. Its worsted weight makes it ideal for showcasing the intricate cable tree motif, allowing the pattern to stand out beautifully.
Cascade 220 Superwash (affiliate link)also comes in an extensive range of colors, giving knitters the freedom to choose a hue that best suits their style or the recipient’s preferences. For my Evergreen Hat, I opted for a rich forest green, echoing the natural theme of the design. The yarn’s stitch definition is superb, making each cable pop against the smooth background of the hat.
The Joy of Knitting Cables
Cables can seem intimidating at first, but they are incredibly rewarding to knit. The cable tree motif on the Evergreen Hat may look complex, but it’s quite manageable once you get the hang of it. If you’re new to cables, this pattern is a fantastic way to challenge yourself and expand your knitting skills.
One of the aspects I love most about knitting cables is watching the pattern emerge row by row. There’s a sense of accomplishment as the twisted stitches form the branches and trunk of the tree. It’s like watching a picture come to life, stitch by stitch.

The Knitting Process
The Evergreen Hat begins with a simple ribbed brim, providing a snug fit that keeps the hat securely in place. The ribbing flows seamlessly into the main body of the hat, where the real magic happens. As you transition from the brim to the body, the cable tree motif starts to take shape.
I remember the first time I saw the tree motif forming – it was thrilling! The pattern is charted, which makes it easier to follow, especially if you’re a visual learner like me. Each section of the chart corresponds to a specific part of the tree, and as you knit, you can see the tree growing with each row.
Knitting the cable tree requires some focus, but it’s also a meditative process. I often find myself lost in the rhythm of the stitches, enjoying the tactile sensation of the yarn moving through my fingers. It’s a wonderful way to unwind after a long day, and the satisfaction of seeing the completed motif is worth every moment of concentration.
Personal Touches
One of the joys of knitting is the ability to add personal touches to your projects. While the Evergreen Hat pattern is beautiful as written, there’s always room for a bit of customization. I decided to add a small pom-pom to the top of my hat, using the same Cascade 220 Superwash (affiliate link) yarn. The pom-pom adds a playful element to the design, and it’s a great way to use up any leftover yarn.
Another modification I made was adjusting the length of the hat. I prefer a slightly slouchy beanie, so I added a few extra rows before starting the crown decreases. This small change made the hat perfect for my style, and it’s a reminder that knitting patterns are just a starting point – you can always tweak them to make a piece truly your own.
Gifting the Evergreen Hat
Handmade gifts are always special, and the Evergreen Hat makes a wonderful present. Whether it’s for a birthday, holiday, or just because, giving someone a hand-knit hat shows that you’ve put thought, time, and love into their gift. I’ve knit several Evergreen Hats for friends and family, and they’ve all been well-received.
One of my favorite memories is gifting an Evergreen Hat to my sister. She loves hiking and spending time outdoors, so the tree motif was a perfect match for her. Seeing her face light up when she unwrapped the hat was priceless. She wears it on her nature walks, and it always brings a smile to my face knowing that something I made keeps her warm on her adventures.
Final Thoughts
The Evergreen Hat is more than just a beanie; it’s a piece of wearable art that captures the beauty and resilience of nature. Knitting this hat has been a deeply satisfying experience, from choosing the perfect yarn to seeing the tree motif come to life. Cascade 220 Superwash (affiliate link) exceptional qualities make it an ideal yarn for this project, and the pattern itself is a delightful blend of challenge and reward.
If you’re looking for a new knitting project that’s both meaningful and enjoyable, I highly recommend the Evergreen Hat. It’s a perfect way to practice your cable skills, create a beautiful accessory, and perhaps even share a bit of handmade warmth with someone special. Happy knitting!

Materials and Info
Yarn – 1skein Cascade 220 Superwash (affiliate link) (100g 220yd)
Gauge – 20x28sts per 4x4in or 10x10cm
Needles – 7 (4.5mm) circular and/or dpn
Other –yarn needle, cable needle, optional – fur pompom
Sizes – (newborn, baby), (toddler, child), (small adult, large adult)
Head Measurement – (30-35, 35-40), (40-45, 45-50), (50-55, 55-60)cms or (12-14, 14-16), (16-18, 18-20), (20-22, 22-24)ins
ABBREVIATIONS
k – knit
P – purl
sl – slip stitch
st – stitch
yo – yarn over
p2tog – purl the next to sts together
cb7 – sl next 4sts onto cable needle and hold in back, k3, k4sts from cable needle
cf7 – sl next 3sts onto cable needle and hold in front, k4, k3sts from cable needle
cb6 – sl next 3sts onto cable needle and hold in back, k3, k3sts from cable needle
cf6 – sl next 3sts onto cable needle and hold in front, k3, k3sts from cable needle
cb5 – sl next 3sts onto cable needle and hold in back, k2, k3sts from cable needle
cf5 – sl next 2sts onto cable needle and hold in front, k3, k2sts from cable needle
cb4 – sl next 2sts onto cable needle and hold in back, k2, k2sts from cable needle
cf4 – sl next 2sts onto cable needle and hold in front, k2, k2sts from cable needle
cb3 – sl next 2sts onto cable needle and hold in back, k1, k2sts from cable needle
cf3 – sl next 1sts onto cable needle and hold in front, k2, k1sts from cable needle
cb2 – sl next 1st onto cable needle and hold in back, k1, k1st from cable needle
cf2 – sl next 1sts onto cable needle and hold in front, k1, k1sts from cable needle
tb2 – sl next 1st onto cable needle and hold in back, k1, p1 from cable needle
tf2 – sl next 1st onto cable needle and hold in front, p1, k1 from cable needle

Evergreen Hat Pattern
NEWBORN
Cast on 65 using your favorite stretchy cast on.
Join in the round.
Work in [k1, p1] ribbing for 1in (2.5cms).
Rounds 1-5 – [k12, p1] around
Round 6 – [p1, cb5, cf5, p2] around
Rounds 7-10 – [p1, k10, p2] around
Round 11 – [p2, cb4, cf4, p3] around
Rounds 12-14 – [p2, k8, p3] around
Round 15 – [p3, cb3, cf3, p4] around
Rounds 16-17 – [p3, k6, p4] around
Round 18 – [p4, cb2, cf2, p5] around
Rounds 19-20 – [p4, k4, p5] around
Round 21- [p4, tf2, tb2, p5] around
Round 22 – purl around
Repeat round 22 until your work measures 4ins (10cms).
Switch to dpn when necessary.
DECREASES
Round 1 – p2tog, p63 (64sts)
Round 2 – [p2tog, p2] around (48sts)
Round 3 – purl around
Round 4 – [p2tog, p1] around (32sts)
Round 5 – purl around
Round 6 – [p2tog] around (16sts)
Round 7 – purl around
Round 8 – [p2tog] around to last st, p1 (8sts)
Do not bind off. Cut yarn leaving appx -10ins. Pull yarn through remaining stitches and cinch the top tight. Weave in ends. Block as desired.
BABY
Cast on 75 using your favorite stretchy cast on.
Join in the round.
Work in [k1, p1] ribbing for 1in (2.5cms).
Rounds 1-6 – [k14, p1] around
Round 7 – [p1, cb6, cf6, p2] around
Rounds 8-12 – [p1, k12, p2] around
Round 13 – [p2, cb5, cf5, p3] around
Rounds 14-17 – [p2, k10, p3] around
Round 18 – [p3, cb4, cf4, p4] around
Rounds 19-21 – [p3, k8, p4] around
Round 22 – [p4, cb3, cf3, p5] around
Rounds 23-24 – [p4, k6, p5] around
Round 25 – [p5, cb2, cf2, p6] around
Rounds 26-27 – [p5, k4, p6] around
Round 28 – [p5, tf2, tb2, p6] around
Round 29 – purl around
Repeat round 29 until your work measures 5ins (12.5cms).
Switch to dpn when necessary.
DECREASES
Round 1 – [p2tog, p23] around (72sts)
Round 2 – [p2tog, p2] around (54sts)
Round 3 – purl around
Round 4 – [p2tog, p1] around (36sts)
Round 5 – purl around
Round 6 – [p2tog] around (18sts)
Round 7 – purl around
Round 8 – [p2tog] around to last st, p1 (9sts)
Do not bind off. Cut yarn leaving appx -10ins. Pull yarn through remaining stitches and cinch the top tight. Weave in ends. Block as desired.
TODDLER
Cast on 80 using your favorite stretchy cast on.
Join in the round.
Work in [k1, p1] ribbing for 1in (2.5cms).
Rounds 1-6 – [p1, k14, p1] around
Round 7 – [p2, cb6, cf6, p2] around
Rounds 8-12 – [p2, k12, p2] around
Round 13 – [p3, cb5, cf5, p3] around
Rounds 14-17 – [p3, k10, p3] around
Round 18 – [p4, cb4, cf4, p4] around
Rounds 19-21 – [p4, k8, p4] around
Round 22 – [p5, cb3, cf3, p5] around
Rounds 23-24 – [p5, k6, p5] around
Round 25 – [p6, cb2, cf2, p6] around
Rounds 26-27 – [p6, k4, p6] around
Round 28- [p6, tf2, tb2, p6] around
Round 29 – purl around
Repeat round 29 until your work measures 6ins (15cms).
Switch to dpn when necessary.
DECREASES
Round 1 – [p2tog, p2] around (60sts)
Round 2 – purl around
Round 3 – [p2tog, p1] around (40sts)
Round 4 – purl around
Round 5 – [p2tog] around (20sts)
Round 6 – purl around
Round 7 – [p2tog] around to last st, p1 (10sts)
Round 8 – [p2tog] around to last st, p1 (5sts)
Do not bind off. Cut yarn leaving appx -10ins. Pull yarn through remaining stitches and cinch the top tight. Weave in ends. Block as desired.
CHILD
Cast on 90 using your favorite stretchy cast on.
Join in the round.
Work in [k1, p1] ribbing for 1.25ins (3cms).
Rounds 1-7 – [p1, k16, p1] around
Round 8 – [p2, cb7, cf7, p2] around
Rounds 9-14 – [p2, k14, p2] around
Round 15 – [p3, cb6, cf6, p3] around
Rounds 16-21 – [p3, k12, p3] around
Round 22 – [p4, cb5, cf5, p4] around
Rounds 23-26 – [p4, k10, p4] around
Round 27 – [p5, cb4, cf4, p5] around
Rounds 28-30 – [p5, k8, p5] around
Round 31 – [p6, cb3, cf3, p6] around
Rounds 32-33 – [p6, k6, p6] around
Round 34 – [p7, cb2, cf2, p7] around
Rounds 35-36 – [p7, k4, p7] around
Round 37- [p7, tf2, tb2, p7] around
Round 38 – purl around
Repeat round 38 until your work measures 7ins (17.5cms).
Switch to dpn when necessary.
DECREASES
Round 1 – [p2tog, p43] around (88sts)
Round 2 – [p2tog, p2] around (66sts)
Round 3 – purl around
Round 4 – [p2tog, p1] around (44sts)
Round 5 – purl around
Round 6 – [p2tog] around (22sts)
Round 7 – purl around
Round 8 – [p2tog] around (11sts)
Round 9 – [p2tog] around to last st, p1 (6sts)
Do not bind off. Cut yarn leaving appx -10ins. Pull yarn through remaining stitches and cinch the top tight. Weave in ends. Block as desired.
SMALL ADULT
Cast on 108 using your favorite stretchy cast on.
Join in the round.
Work in [k1, p1] ribbing for 1.25ins (3cms).
Rounds 1-7 – [p1, k16, p1] around
Round 8 – [p2, cb7, cf7, p2] around
Rounds 9-14 – [p2, k14, p2] around
Round 15 – [p3, cb6, cf6, p3] around
Rounds 16-21 – [p3, k12, p3] around
Round 22 – [p4, cb5, cf5, p4] around
Rounds 23-26 – [p4, k10, p4] around
Round 27 – [p5, cb4, cf4, p5] around
Rounds 28-30 – [p5, k8, p5] around
Round 31 – [p6, cb3, cf3, p6] around
Rounds 32-33 – [p6, k6, p6] around
Round 34 – [p7, cb2, cf2, p7] around
Rounds 35-36 – [p7, k4, p7] around
Round 37- [p7, tf2, tb2, p7] around
Round 38 – purl around
Repeat round 38 until your work measures 8ins (20cms).
Switch to dpn when necessary.
DECREASES
Round 1 – [p2tog, p2] around (81sts)
Round 2 – purl around
Round 3 – [p2tog, p1] around (54sts)
Round 4 – purl around
Round 5 – [p2tog] around (27sts)
Round 6 – purl around
Round 7 – [p2tog] around to last st, p1 (14sts)
Round 8 – [p2tog] around 7sts)
Do not bind off. Cut yarn leaving appx -10ins. Pull yarn through remaining stitches and cinch the top tight. Weave in ends. Block as desired.
LARGE ADULT
Cast on 126 using your favorite stretchy cast on.
Join in the round.
Work in [k1, p1] ribbing for 1.25ins (3cms).
Rounds 1-7 – [p1, k16, p1] around
Round 8 – [p2, cb7, cf7, p2] around
Rounds 9-14 – [p2, k14, p2] around
Round 15 – [p3, cb6, cf6, p3] around
Rounds 16-21 – [p3, k12, p3] around
Round 22 – [p4, cb5, cf5, p4] around
Rounds 23-26 – [p4, k10, p4] around
Round 27 – [p5, cb4, cf4, p5] around
Rounds 28-30 – [p5, k8, p5] around
Round 31 – [p6, cb3, cf3, p6] around
Rounds 32-33 – [p6, k6, p6] around
Round 34 – [p7, cb2, cf2, p7] around
Rounds 35-36 – [p7, k4, p7] around
Round 37- [p7, tf2, tb2, p7] around
Round 38 – purl around
Repeat round 38 until your work measures 9ins (22.5cms).
Switch to dpn when necessary.
DECREASES
Round 1 – [p2tog, p61] around (124sts)
Round 2 – [p2tog, p2] around (93sts)
Round 3 – purl around
Round 4 – [p2tog, p1] around (62sts)
Round 5 – purl around
Round 6 – [p2tog] around (31sts)
Round 7 – purl around
Round 8 – [p2tog] around to last st, p1 (16sts)
Round 9 – [p2tog] around (8sts)
Do not bind off. Cut yarn leaving appx -10ins. Pull yarn through remaining stitches and cinch the top tight. Weave in ends. Block as desired.

Evergreen Hat PDF

Disclaimer: This page contains affiliate links. If you choose to make a purchase after clicking a link, I may receive a commission at no additional cost to you. Thank you for your support!