
Looking for the perfect newborn photo prop? Check out my photo prop patterns for more cozy free baby bonnet knitting pattern inspiration!

A Bonnet Full of Hope
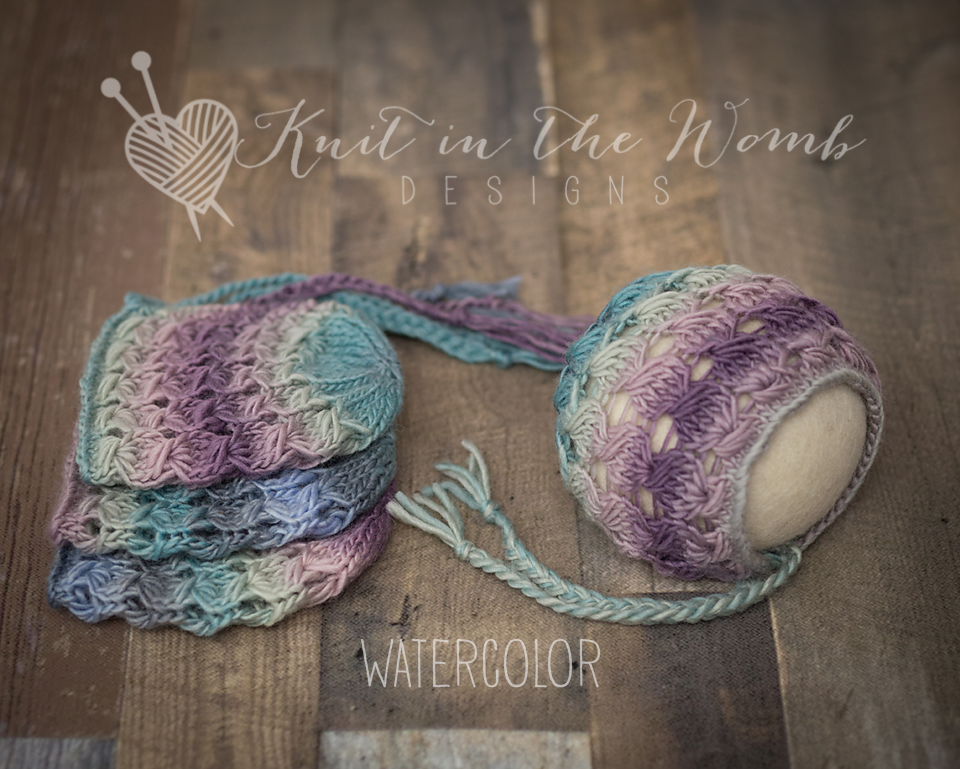
When I set out to design the Hope Bonnet, I wanted something that felt both intricate and approachable. This free baby bonnet knitting pattern features a faux cable stitch that creates a beautifully textured look without the need for cable needles. Knit in the soft and colorful KnitPicks Chroma Worsted (affiliate link), it’s the perfect accessory for those precious newborn photo shoots.
In this post, I’ll walk you through the inspiration behind the pattern, what you’ll need to get started, and some tips to help you along the way. Let’s dive in!

The Inspiration Behind the Hope Bonnet
The Hope Bonnet was born out of my love for classic designs with a modern twist. I wanted to create a free baby bonnet knitting pattern that could become a staple for both new moms and photographers. The faux cable stitch pattern gives the bonnet a touch of sophistication, while the worsted weight yarn ensures it’s cozy and warm.
KnitPicks Chroma Worsted (affiliate link) was my top choice for this project. Its subtle color transitions add depth and interest to the design, making each bonnet unique. The soft texture is gentle on delicate newborn skin, perfect for those precious first photos.

What You’ll Need
To knit the Hope Bonnet, you’ll need:
- Yarn: 1 skein of KnitPicks Chroma Worsted (affiliate links)
- Needles: US size 6 (4mm) and 8 (5mm) circular or straight needles (affiliate links)
- Stitch markers
- Tapestry needle
I always recommend using stitch markers to keep track of the faux cable repeats. If you’re new to this type of stitch, don’t worry—it’s easier than it looks!

The Faux Cable Stitch: Simple Yet Stunning
One of my favorite parts of the Hope Bonnet is its faux cable stitch. Unlike traditional cables, which require a cable needle and a bit more finesse, this stitch pattern uses simple knit and purl combinations to create a similar effect. It’s perfect for knitters who want that classic cable look without the extra effort.
I first experimented with this stitch when working on another project, and I immediately knew it would be perfect for a free baby bonnet knitting pattern. The texture adds visual interest without overwhelming the overall design, allowing the soft gradients of KnitPicks Chroma Worsted (affiliate link) to shine.

Tips for Knitting the Hope Bonnet
Here are a few tips to help you get the best results:
- Check your gauge: Since this is a fitted piece, gauge is crucial. Use your US size 6 and 8 needles (affiliate link) to knit a swatch and make adjustments as needed.
- Block your bonnet: Blocking helps even out the faux cable stitch and gives the bonnet a polished, professional look. Use blocking mats and pins for the best results.
- Customize your ties: The pattern includes instructions for i-cord ties, but you can also use ribbons or braided yarn for a personal touch.

Why I Love This Pattern for Photo Props
As a mom and knitter, I know how special those early days with a newborn are. That’s why I designed this free baby bonnet knitting pattern to be both functional and beautiful. The Hope Bonnet keeps little ones cozy while adding an extra touch of charm to their first photos.
Photographers will love how the bonnet frames a baby’s face, highlighting their delicate features. The faux cable stitch adds texture and depth, making the photos even more captivating.

Reader Feedback: Your Creations Inspire Me!
One of the best parts of sharing my patterns is seeing how you bring them to life. I’ve received so many lovely photos of the Hope Bonnet in different colors of KnitPicks Chroma Worsted (affiliate links), and it’s amazing to see how each version has its own unique character.
Some readers have even adapted the pattern to fit larger sizes, which is such a great idea! If you’ve made the Hope Bonnet, I’d love to see your creations. Tag me on Instagram or share your photos in the comments section of the blog.

Get the Free Baby Bonnet Knitting Pattern
Ready to cast on your own Hope Bonnet? You can download the pattern for free on my blog. This free baby bonnet knitting pattern includes detailed instructions, helpful tips, and a stitch chart for the faux cable design.
Whether you’re knitting for your own little one, gifting a special handmade item, or adding to your photo prop collection, the Hope Bonnet is a project that’s sure to bring joy.

Hope in Every Stitch
Knitting the Hope Bonnet has been a journey of creativity and love. I hope you enjoy making it as much as I did designing it. With its intricate faux cable stitch, cozy worsted weight yarn, and timeless design, this free baby bonnet knitting pattern is sure to become a favorite.
Thank you for joining me on this knitting adventure. Don’t forget to check out my other photo prop patterns for more inspiration. Happy knitting!
This post contains affiliate links. If you click through and make a purchase, I may earn a small commission at no extra cost to you. Thank you for supporting my blog!

Materials and Info
Materials: 60-150yds worsted weight yarn (I used knitpicks chroma), size 6 (4mm) needles and size 8 (5mm) straight needles and dpn, yarn needle
Gauge: 4sts/in stockenette 1 pattern repeat/in – GAUGE IS VERY IMPORTANT! SWATCH FIRST!
Sizes (head circumference): newborn (13ins), 0-3mths (14ins), 3-6mths (15ins), 6-12mths (16ins), toddler (17ins)
Stitch Key
K – knit
p- purl
k2tog – knit two together
W2 – wrap yarn around your needle twice
yo – yarn over
P5togm5 – p next 5 sts together but don’t slide them off your needles, yo, purl together the same 5 sts on your needle, yo, p together the same 5 stitches on your needle. Slide them off your needle

Hope Bonnet Pattern
NEWBORN
With smaller needles, cast on 54sts.
Row 1 – k2, purl 50, k2
Switch to larger needles.
Row 2 – k2, k50 using a w2 for each st (meaning when you knit your stitch wrap your yarn around the needle 2 times instead of once), k2
Row 3 – k2 (sl5 purlwise only using the first wrap of the w2 – dropping the second, drawing up long loops, place them on the working needle, p5togm5) to last 2 sts, k2
Row 4 – knit across
Row 5 – k2, p50, k2
Repeat rows 2-5 until your work measures 4ins from cast on edge being sure to end after working a row 4.
Now switch to dpn and join in the round.
Decreases
Round 1 – [k2tog, k4] repeat [to] around (45sts)
Round 2 – knit around
Round 3 – [k2tog, k3] repeat [to] around (36sts)
Round 4 – knit around
Round 5 – [k2tog, k2] repeat [to] around (27sts)
Round 6 – knit around
Round 7 – [k2tog, k1] repeat [to] around (18sts)
Round 8 – [k2tog] repeat [to] around (9sts)
Do NOT bind off. Cut yarn and pull through the remaining sts. Weave in ends. Cut 6 strands of yarn appx 30ins long. Fold 3 in half and pull a loop through the front corner of the hood. Pull the ends through this loop and braid. Repeat on the other side.
0-3 MONTHS
With smaller needles, cast on 59sts.
Row 1 – k2, purl 55, k2
Switch to larger needles.
Row 2 – k2, k55 using a w2 for each st (meaning when you knit your stitch wrap your yarn around the needle 2 times instead of once), k2
Row 3 – k2 (sl5 purlwise only using the first wrap of the w2 – dropping the second, drawing up long loops, place them on the working needle, p5togm5) to last 2 sts, k2
Row 4 – knit across
Row 5 – k2, p55, k2
Repeat rows 2-5 until your work measures 4.5ins from cast on edge being sure to end after working a row 4.
Now switch to dpn and join in the round.
Decreases
Round 1 – [k2tog, k10] repeat [to] 4 times, k2tog, k9 (54sts)
Round 2 – [k2tog, k4] repeat [to] around (45sts)
Round 3 – knit around
Round 4 – [k2tog, k3] repeat [to] around (36sts)
Round 5 – knit around
Round 6 – [k2tog, k2] repeat [to] around (27sts)
Round 7 – knit around
Round 8 – [k2tog, k1] repeat [to] around (18sts)
Round 9 – [k2tog] repeat [to] around (9sts)
Do NOT bind off. Cut yarn and pull through the remaining sts. Weave in ends. Cut 6 strands of yarn appx 30ins long. Fold 3 in half and pull a loop through the front corner of the hood. Pull the ends through this loop and braid. Repeat on the other side.

3-6 MONTHS
With smaller needles, cast on 64sts.
Row 1 – k2, purl 60, k2
Switch to larger needles.
Row 2 – k2, k60 using a w2 for each st (meaning when you knit your stitch wrap your yarn around the needle 2 times instead of once), k2
Row 3 – k2 (sl5 purlwise only using the first wrap of the w2 – dropping the second, drawing up long loops, place them on the working needle, p5togm5) to last 2 sts, k2
Row 4 – knit across
Row 5 – k2, p60, k2
Repeat rows 2-5 until your work measures 5ins from cast on edge being sure to end after working a row 4.
Now switch to dpn and join in the round.
Decreases
Round 1 – [k2tog, k14] repeat [to] 4 times (60sts)
Round 2 – [k2tog, k4] repeat [to] around (50sts)
Round 3 – knit around
Round 4 – [k2tog, k3] repeat [to] around (40sts)
Round 5 – knit around
Round 6 – [k2tog, k2] repeat [to] around (30sts)
Round 7 – knit around
Round 8 – [k2tog, k1] repeat [to] around (20sts)
Round 9 – [k2tog] repeat [to] around (10sts)
Do NOT bind off. Cut yarn and pull through the remaining sts. Weave in ends. Cut 6 strands of yarn appx 30ins long. Fold 3 in half and pull a loop through the front corner of the hood. Pull the ends through this loop and braid. Repeat on the other side.
6-12 MONTHS
With smaller needles, cast on 69sts.
Row 1 – k2, purl 65, k2
Switch to larger needles.
Row 2 – k2, k65 using a w2 for each st (meaning when you knit your stitch wrap your yarn around the needle 2 times instead of once), k2
Row 3 – k2 (sl5 purlwise only using the first wrap of the w2 – dropping the second, drawing up long loops, place them on the working needle, p5togm5) to last 2 sts, k2
Row 4 – knit across
Row 5 – k2, p65, k2
Repeat rows 2-5 until your work measures 5.5ins from cast on edge being sure to end after working a row 4.
Now switch to dpn and join in the round.
Decreases
Round 1 – [k2tog, k21] repeat [to] 3 times (66sts)
Round 2 – knit around
Round 3 – [k2tog, k4] repeat [to] around (55sts)
Round 4 – knit around
Round 5 – [k2tog, k3] repeat [to] around (44sts)
Round 6 – knit around
Round 7 – [k2tog, k2] repeat [to] around (33sts)
Round 8 – knit around
Round 9 – [k2tog, k1] repeat [to] around (22sts)
Round 10 – [k2tog] repeat [to] around 11sts)
Do NOT bind off. Cut yarn and pull through the remaining sts. Weave in ends. Cut 6 strands of yarn appx 30ins long. Fold 3 in half and pull a loop through the front corner of the hood. Pull the ends through this loop and braid. Repeat on the other side.

TODDLER
With smaller needles, cast on 76sts.
Row 1 – k3, purl 70, k3
Switch to larger needles.
Row 2 – k3, k70 using a w2 for each st (meaning when you knit your stitch wrap your yarn around the needle 2 times instead of once), k3
Row 3 – k3 (sl5 purlwise only using the first wrap of the w2 – dropping the second, drawing up long loops, place them on the working needle, p5togm5) to last 2 sts, k3
Row 4 – knit across
Row 5 – k3, p70, k3
Repeat rows 2-5 until your work measures 6ins from cast on edge being sure to end after working a row 4.
Now switch to dpn and join in the round.
Decreases
Round 1 – [k2tog, k11] repeat [to] 5 times, k2tog, k9 (70sts)
Round 2 – [k2tog, k5] repeat [to] around (60sts)
Round 3 – knit around
Round 4 – [k2tog, k4] repeat [to] around (50sts)
Round 5 – knit around
Round 6 – [k2tog, k3] repeat [to] around (40sts)
Round 7 – knit around
Round 8 – [k2tog, k2] repeat [to] around (30sts)
Round 9 – knit around
Round 10 – [k2tog, k1] repeat [to] around (20sts)
Round 11 – [k2tog] repeat [to] around (10sts)
Do NOT bind off. Cut yarn and pull through the remaining sts. Weave in ends. Cut 6 strands of yarn appx 30ins long. Fold 3 in half and pull a loop through the front corner of the hood. Pull the ends through this loop and braid. Repeat on the other side.