
Discover the angora knit bonnet pattern at the bottom of this post and find even more adorable photo prop patterns on this page!

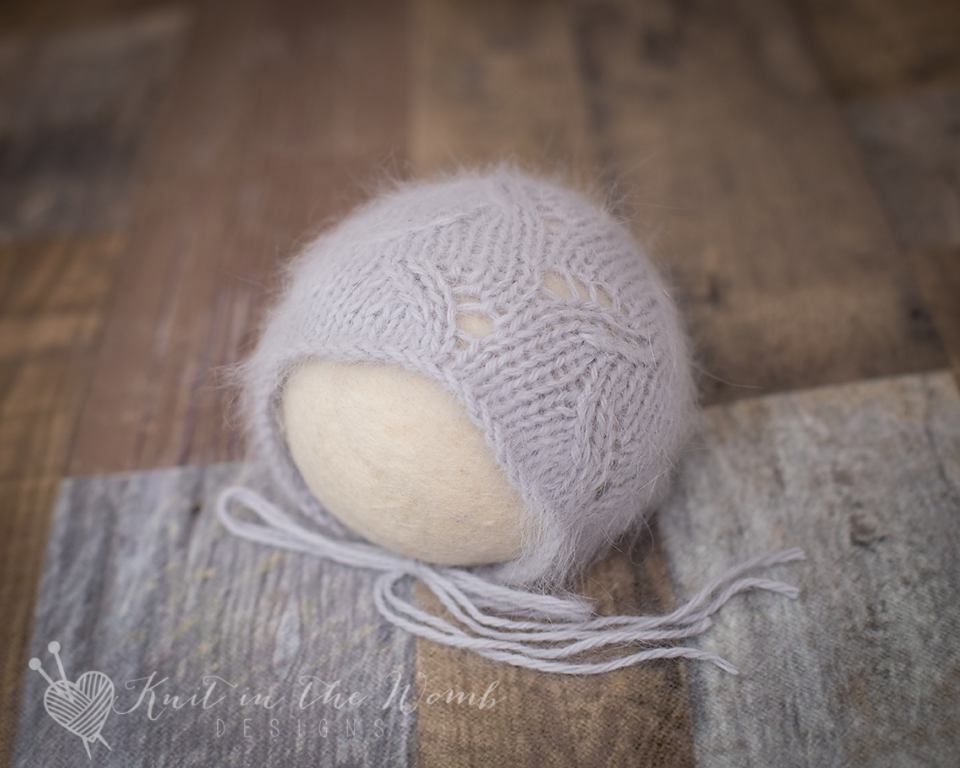
There’s just something special about casting on for a newborn project. Tiny stitches, soft yarn, and a design that will become part of a sweet memory—that’s my kind of knitting. Lately, I’ve been loving an angora knit bonnet pattern that I think you’ll adore just as much. This one features a large, flowy lace stitch that looks like gentle river rapids—seriously, it’s dreamy.
I call it the Jordan Bonnet, and let me tell you: if you’re into delicate texture, fluffy yarn, and patterns that knit up like a breath of fresh air, you’re going to want to add this to your queue. The angora knit bonnet pattern is right at the bottom of this post—but don’t miss the full selection of newborn photo prop patterns here!
Why I Fell in Love with This Angora Knit Bonnet Pattern
The moment I saw the way the lace stitch in this angora knit bonnet pattern opened up with blocking, I was hooked. It looks like rippling water—soft, flowing, and full of motion. I wanted something beautiful for newborn photo shoots, and this design hit the sweet spot between intricate and cozy.
Knitting it felt like a little retreat from the busy day. You know that rhythmic peace you get from lace repeats? That’s this pattern in a nutshell. I could almost hear a stream babbling in the background (which might’ve just been my kids arguing over snacks, but still… the vibe was there).

Yarn Talk: Belangor Angora vs. KnitPicks Wonderfluff (affiliate link)
Let’s chat yarns. The original angora knit bonnet pattern uses Belangor Angora, and oh my word, it’s luxurious. That gentle halo? That cloudlike softness? It’s perfect for a baby’s delicate head. This yarn glides through your fingers and makes every stitch feel like a treat. The finished bonnet has that light, airy feel that only angora can really give you.
But if you’re looking for something a little more budget-friendly, I’ve got your back! KnitPicks Wonderfluff (affiliate link) is a wonderful alternative. It’s got that soft, fluffy halo thanks to a blend of baby alpaca, merino wool, and nylon. It still showcases the lace in the angora knit bonnet pattern beautifully, and it’s much easier on the wallet. So if you’re knitting for a client or just want to make a few of these, Wonderfluff (affiliate link) is a fantastic option.
What Makes the Stitch So Beautiful?
The star of this angora knit bonnet pattern is the large lacy stitch. It reminds me of watching water roll gently over river rocks. There’s a motion to it, a softness. But don’t let the look fool you—it’s not complicated to knit! Even if you’re newer to lace, this one won’t leave you scratching your head. It’s soothing and repetitive, but interesting enough that you won’t get bored.
Each row kind of flows into the next, and before you know it, you’ve got this elegant, wavy texture that just blooms with a good block. Honestly, this stitch alone could carry a whole blanket design… but I’m happy it’s here in this sweet angora knit bonnet pattern.

My Go-To Tips for Knitting the Jordan Bonnet
Here are a few little gems I picked up while knitting this angora knit bonnet pattern:
- Gauge matters – Especially in lace. Grab those needles, knit up a swatch, and make sure things are lining up. If you’re using Belangor Angora or KnitPicks Wonderfluff (affiliate link), take the time to see how it blooms after blocking.
- Lifelines save sanity – If lace makes you a little nervous, try threading a lifeline every 10 rows or so. It makes fixing mistakes way less stressful.
- Don’t skip blocking – I know, I know. You’re ready to snap pics of your finished bonnet. But give it a soak and a gentle block. That’s when the lace truly opens up and turns this bonnet into a work of art.
- Soft yarn is key – You want something with that gentle fluff. Belangor Angora gives that dreamy, soft finish. KnitPicks Wonderfluff (affiliate link) gives you almost the same effect for less.
Why I Keep Reaching for This Angora Knit Bonnet Pattern
This bonnet quickly became one of those “knit it again and again” patterns for me. Not just because it’s pretty (though let’s be honest—it’s gorgeous), but because it feels meaningful. There’s something lovely about knowing your work will become part of a newborn’s very first photos. This angora knit bonnet pattern isn’t just a project; it’s a keepsake in the making.
And let’s be real—having a pattern that works well with both high-end and affordable yarn is just practical. I’ve used Belangor Angora when I want to spoil a mama with something special. But when I need to make several or want something washable and durable, I grab KnitPicks Wonderfluff (affiliate link) without hesitation.
Final Thoughts and Where to Find the Pattern
Knitting the Jordan Bonnet was one of those projects that made me pause and say, “Wow, I made this.” I think every knitter deserves that moment. If you’ve been looking for an angora knit bonnet pattern that balances elegance, texture, and practicality, this is the one. It’s soothing to knit, beautiful to gift, and timeless in photos.
And yes, THIS is the angora knit bonnet pattern you’ve been reading about—it’s right at the bottom of this post! But if you’re on the hunt for more newborn photo prop patterns (and I always am), you’ll want to check out the full collection here.
Whether you use the luxurious Belangor Angora or the more budget-friendly KnitPicks Wonderfluff (affiliate link), I hope you enjoy every stitch. Happy knitting, friend!

Materials and Info
Materials: appx 35-90yd worsted weight yarn (I used belangor angora or KnitPicks Wonderfluff (affiliate link)), size 8 (5mm) straight needles or (size needed to obtain gauge), yarn needle, 2 stitch markers
Gauge: appx 4sts/inch Gauge is very important!
Sizes (appx finished head circumference) : newborn (13ins), 0-3mths (14 ins), 3-6mths (15ins), 6-12mths (16ins), 1-3yrs (17ins)
Stitch Key
K – knit
p – purl
yo- yarn over
K2tog – knit 2 stitches together
P2tog – purl 2 stitches together
Ssk – slip next stitch knitwise, slip next stitch knitwise, knit the slipped stitches together
P2togtbl – purl 2 together through back loop

Jordan Bonnet Pattern
NEWBORN
Cast on 44
Row 1 – purl across
Row 2 – knit across
Row 3 – purl across
Row 4 – k6[k2tog, k1, yo, k6] repeat [to] across to last 2sts, k2
Row 5 – p3[p6, yo, p1, p2tog] repeat across [to] last 5sts, p5
Row 6 – k4[k2tog, k1, yo, k6] repeat [to] across to last 4sts, k4
Row 7 – p5[p6, yo,p1, p2tog] repeat across [to] last 3sts, p3
Row 8 – knit across
Row 9 – purl across
Row 10 – k3[k6, yo, k1, ssk] repeat [to] across to last 5sts, k5
Row 11 – p4[p2togtbl, p1, yo, p6] repeat across [to] last 4sts, p4
Row 12 – k5[k6, yo, k1, ssk] repeat [to] across to last 3sts, k3
Row 13 – p2[p2togtbl, p1, yo, p6] repeat across [to] last 6sts, p6
Repeat rows 2-13 until your work measures appx 3.5ins after completing a wrong side (purl) row. Place markers on either end of the last row worked.
DECREASES
Row 1 – k1 (k2tog, k4) repeat (to) to last st, k1 (37sts)
Row 2 – purl across
Row 3 – knit across
Row 4 – purl across
Row 5 – k1 (k2tog, k3) repeat (to) to last st, k1 (30sts)
Row 6 – purl across
Row 7 – k1 (k2tog, k2) repeat (to) to last st, k1 (23sts)
Row 8 – purl across
Row 9 – k1 (k2tog, k1) repeat (to) to last st, k1 (16sts)
Row 10 – p1 (p2tog) repeat (to) to last st, p1 (9sts)
Do not bind off. Cut yarn leaving appx -10ins. Pull yarn through remaining stitches and cinch the back tight. Using this end sew the crown together to your stitch markers. (I like to use the mattress stitch since it is nearly invisible). Cut 2 pieces of yarn approximately 24ins long. Fold them in half and pull a loop through the front corner of the hood. Pull the ends through this loop. These are your ties.
0-3MTH
Cast on 48
Row 1 – purl across
Row 2 – knit across
Row 3 – purl across
Row 4 – k8[k2tog, k1, yo, k6] repeat [to] across to last 4sts, k4
Row 5 – p5[p6, yo, p1, p2tog] repeat across [to] last 7sts, p7
Row 6 – k6[k2tog, k1, yo, k6] repeat [to] across to last 6sts, k6
Row 7 – p7[p6, yo,p1, p2tog] repeat across [to] last 5sts, p5
Row 8 – knit across
Row 9 – purl across
Row 10 – k5[k6, yo, k1, ssk] repeat [to] across to last 7sts, k7
Row 11 – p6[p2togtbl, p1, yo, p6] repeat across [to] last 6sts, p6
Row 12 – k7[k6, yo, k1, ssk] repeat [to] across to last 5sts, k5
Row 13 – p4[p2togtbl, p1, yo, p6] repeat across [to] last 8sts, p8
Repeat rows 2-13 until your work measures appx 4ins after completing a wrong side (purl) row. Place markers on either end of the last row worked.
DECREASES
Row 1 – (k2tog, k4) repeat (to) across (40sts)
Row 2 – purl across
Row 3 – knit across
Row 4 – purl across
Row 5 – (k2tog, k3) repeat (to) across (32sts)
Row 6 – purl across
Row 7 – (k2tog, k2) repeat (to) across (24sts)
Row 8 – purl across
Row 9 – (k2tog, k1) repeat (to) across (16sts)
Row 10 – (p2tog) repeat (to) across (8sts)
Do not bind off. Cut yarn leaving appx -10ins. Pull yarn through remaining stitches and cinch the back tight. Using this end sew the crown together to your stitch markers. (I like to use the mattress stitch since it is nearly invisible). Cut 2 pieces of yarn approximately 24ins long. Fold them in half and pull a loop through the front corner of the hood. Pull the ends through this loop. These are your ties.
3-6MTH
Cast on 52
Row 1 – purl across
Row 2 – knit across
Row 3 – purl across
Row 4 – k5[k2tog, k1, yo, k6] repeat [to] across to last 2st, k2
Row 5 – p3[p6, yo, p1, p2tog] repeat across [to] last 4sts, p4
Row 6 – k3[k2tog, k1, yo, k6] repeat [to] across to last 4sts, k4
Row 7 – p5[p6, yo,p1, p2tog] repeat across [to] last 2sts, p2
Row 8 – knit across
Row 9 – purl across
Row 10 – k2[k6, yo, k1, ssk] repeat [to] across to last 5sts, k5
Row 11 – p4[p2togtbl, p1, yo, p6] repeat across [to] last 3sts, p3
Row 12 – k4[k6, yo, k1, ssk] repeat [to] across to last 3sts, k3
Row 13 – p2[p2togtbl, p1, yo, p6] repeat across [to] last 5sts, p5
Repeat rows 2-13 until your work measures appx 4.5ins finishing after completing a right side (knit) row. Place markers on either end of the last row worked.
DECREASES
Row 1 – p49, p2tog, p1 (51sts)
Row 2 – k1 (k2tog, k5) repeat (to) to last st, k1 (44sts)
Row 3 – purl across
Row 4 – k1 (k2tog, k4) repeat (to) to last st, k1 (37sts)
Row 5 – purl across
Row 6 – k1 (k2tog, k3) repeat (to) to last st, k1 (30sts)
Row 7 – purl across
Row 8 – k1 (k2tog, k2) repeat (to) to last st, k1 (23sts)
Row 9 – purl across
Row 10 – k1 (k2tog, k1) repeat (to) to last st, k1 (16sts)
Row 11 – p1 (p2tog) repeat (to) to last st, p1 (9sts)
Do not bind off. Cut yarn leaving appx -10ins. Pull yarn through remaining stitches and cinch the back tight. Using this end sew the crown together to your stitch markers. (I like to use the mattress stitch since it is nearly invisible). Cut 2 pieces of yarn approximately 24ins long. Fold them in half and pull a loop through the front corner of the hood. Pull the ends through this loop. These are your ties.
6-12MTH
Cast on 56.
Row 1 – purl across
Row 2 – knit across
Row 3 – purl across
Row 4 – k7[k2tog, k1, yo, k6] repeat [to] across to last 4sts, k4
Row 5 – p5[p6, yo, p1, p2tog] repeat across [to] last 6sts, p6
Row 6 – k5[k2tog, k1, yo, k6] repeat [to] across to last 6sts, k6
Row 7 – p7[p6, yo,p1, p2tog] repeat across [to] last 4sts, p4
Row 8 – knit across
Row 9 – purl across
Row 10 – k4[k6, yo, k1, ssk] repeat [to] across to last 7sts, k7
Row 11 – p6[p2togtbl, p1, yo, p6] repeat across [to] last 5sts, p5
Row 12 – k6[k6, yo, k1, ssk] repeat [to] across to last 5sts, k5
Row 13 – p4[p2togtbl, p1, yo, p6] repeat across [to] last 7sts, p7
Repeat rows 2-13 until your work measures appx 5ins after completing a wrong side (purl) row. Place markers on either end of the last row worked.
DECREASES
Row 1 – k1 (k2tog, k4) repeat (to) to last st, k1 (47sts)
Row 2 – purl across
Row 3 – knit across
Row 4 – purl across
Row 5 – k1 (k2tog, k3) repeat (to) to last st, k1 (38sts)
Row 6 – purl across
Row 7 – k1 (k2tog, k2) repeat (to) to last st, k1 (29sts)
Row 8 – purl across
Row 9 – k1 (k2tog, k1) repeat (to) to last st, k1 (20sts)
Row 10 – p1 (p2tog) repeat (to) to last st, p1 (11sts)
Do not bind off. Cut yarn leaving appx -10ins. Pull yarn through remaining stitches and cinch the back tight. Using this end sew the crown together to your stitch markers. (I like to use the mattress stitch since it is nearly invisible). Cut 2 pieces of yarn approximately 24ins long. Fold them in half and pull a loop through the front corner of the hood. Pull the ends through this loop. These are your ties.
TODDLER
Cast on 62.
Row 1 – purl across
Row 2 – knit across
Row 3 – purl across
Row 4 – k6[k2tog, k1, yo, k6] repeat [to] across to last 2sts, k2
Row 5 – p3[p6, yo, p1, p2tog] repeat across [to] last 5sts, p5
Row 6 – k4[k2tog, k1, yo, k6] repeat [to] across to last 4sts, k4
Row 7 – p5[p6, yo,p1, p2tog] repeat across [to] last 3sts, p3
Row 8 – knit across
Row 9 – purl across
Row 10 – k3[k6, yo, k1, ssk] repeat [to] across to last 5sts, k5
Row 11 – p4[p2togtbl, p1, yo, p6] repeat across [to] last 4sts, p4
Row 12 – k5[k6, yo, k1, ssk] repeat [to] across to last 3sts, k3
Row 13 – p2[p2togtbl, p1, yo, p6] repeat across [to] last 6sts, p6
Repeat rows 2-13 until your work measures appx 5.5ins after completing a wrong side (purl) row. Place markers on either end of the last row worked.
DECREASES
Row 1 – k1 (k2tog, k4) repeat (to) to last st, k1 (52sts)
Row 2 – purl across
Row 3 – knit across
Row 4 – purl across
Row 5 – k1 (k2tog, k3) repeat (to) to last st, k1 (42sts)
Row 6 – purl across
Row 7 – k1 (k2tog, k2) repeat (to) to last st, k1 (32sts)
Row 8 – purl across
Row 9 – k1 (k2tog, k1) repeat (to) to last st, k1 (22sts)
Row 10 – p1 (p2tog) repeat (to) to last st, p1 (12sts)
Do not bind off. Cut yarn leaving appx -10ins. Pull yarn through remaining stitches and cinch the back tight. Using this end sew the crown together to your stitch markers. (I like to use the mattress stitch since it is nearly invisible). Cut 2 pieces of yarn approximately 24ins long. Fold them in half and pull a loop through the front corner of the hood. Pull the ends through this loop. These are your ties.

Jordan Bonnet PDF

Disclaimer: This page contains affiliate links. If you choose to make a purchase after clicking a link, I may receive a commission at no additional cost to you. Thank you for your support!