
Knit a cozy classic with this textured knit cable beanie pattern! Find the rest of my hat patterns here—this one’s at the bottom of the post.

When it comes to a knit cable beanie pattern, I’ve tried a lot over the years. But when I first knit the Lewis Beanie, something just clicked. This one checked all the boxes—it’s got gorgeous cables, thoughtful decreases, and just the right amount of challenge to make it extra satisfying. If you’re looking for a free knit cable beanie pattern that’s elegant but still wearable, you’re in for a treat. And yes, you’ll find the full pattern at the bottom of this post, but you can browse my full collection of hat patterns right here.
Let me walk you through why this one’s become a repeat favorite in my house (and my gift bin!).
Falling in Love with a Cable Beanie
I don’t know what it is, but there’s just something about a good cable. Twisting stitches to create texture—it never gets old! The Lewis Beanie is the kind of knit cable beanie pattern that makes you fall in love with cabling all over again. It’s like sculpting with yarn.
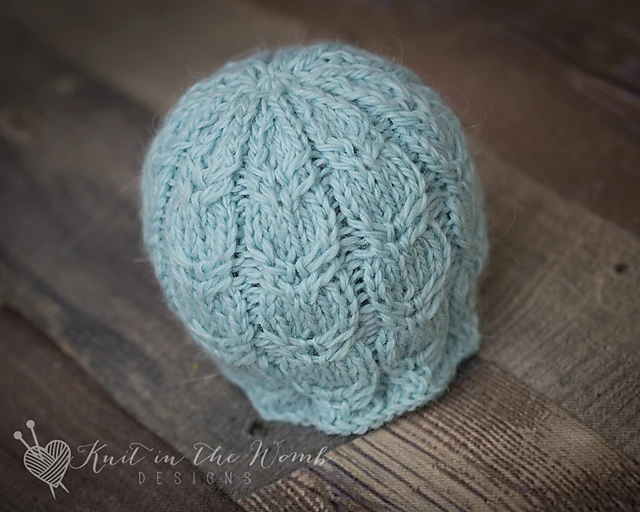
This beanie starts with a ribless brim, which gives it a clean, polished look around the face. Then it launches right into a rhythmic cable pattern that’s both relaxing and engaging. It’s one of those “just one more row” kind of patterns. You know the ones.
Whether you’ve cabled a hundred times or are trying it for the first time, this knit cable beanie pattern will walk that sweet spot of not-too-hard, not-too-boring. Just the way I like it.
The Best Part? Those Decreases.
Listen, not every cable hat has a pretty crown. But this one? Chef’s kiss. The decreases are so thoughtfully designed that the cable pattern flows seamlessly all the way to the top. You know that satisfying moment when the crown closes up and everything just aligns perfectly? This pattern delivers that.
I’ve knit a few cable beanies where the top looks like a bit of a scramble—definitely not the case here. This knit cable beanie pattern finishes off beautifully, with the cables gracefully converging for a neat, elegant crown. Honestly, it’s one of my favorite features of the whole project.
Let’s Talk Yarn (and the Perfect Substitute)
Now, the original yarn for this knit cable beanie pattern was a seasonal yarn from KnitPicks, which—of course—is now discontinued. Why does this always happen to the good ones?
Thankfully, I found an awesome substitute: Hobbii Fluffy Day (affiliate link). It has that same soft bounce and cozy feel. The stitch definition is lovely—your cables will pop just like they’re supposed to. It’s warm, soft, and comes in a variety of colors so you can really make this knit cable beanie pattern your own.
Whenever I mention yarn in my posts, I always get asked for substitutions, so take this one as my tried-and-true pick: Hobbii Fluffy Day (affiliate link). I’ve knit more than one Lewis Beanie in it, and it’s never disappointed.
And just in case you missed it, I used Hobbii Fluffy Day (affiliate link). 😉
Why I Keep Coming Back to This Knit Cable Beanie Pattern
Honestly, there’s just something special about finishing this project. Every time I cast on a new Lewis Beanie, I know I’m in for a satisfying knit. It’s relaxing, rewarding, and just the right amount of skill-building. You get that cozy feeling of accomplishment when it’s done—and then the joy of wearing (or gifting) it!
It’s also just really pretty. This knit cable beanie pattern has that classic, textured look that never goes out of style. Whether I’m pairing it with a wool coat or tossing it on for a quick grocery run, it looks good every time.
The Joy of Gifting Handknits
One of my favorite things about this knit cable beanie pattern is how well it works as a gift. Everyone loves it. I’ve made this hat for friends, family, neighbors—basically anyone who’s ever complimented one of mine. It’s timeless, gender-neutral, and looks way more complicated than it actually is (always a win).
There’s something special about handing someone a cozy beanie you made yourself. I like to tuck in a little handmade tag and a note about the yarn—especially if it’s Hobbii Fluffy Day (affiliate link), which is surprisingly affordable for how nice it feels!
Community + Cables = Magic (The Knitting Kind)
Okay, I know I said I don’t like magical words, so let’s rephrase that: this knit cable beanie pattern is a knitter’s dream come true. I’ve loved seeing how others interpret it—especially in knitting groups online. Some knit it with super tonal yarns, others go bold and bright. No matter how it’s done, the cables always shine.
If you do make this knit cable beanie pattern, share it! I’d love to see your version. Tag me on Instagram, drop a pic in the comments, or post in your favorite knitting group. Seeing all the variations is part of the fun.
A Few Quick Notes Before You Cast On
Here’s the quick info rundown for the Lewis Beanie knit cable beanie pattern:
- Construction: Worked bottom-up in the round
- Skills needed: Cables (of course!), decreasing, and knitting in the round
- Yarn: Hobbii Fluffy Day (affiliate link) is a fantastic substitute for the original
- Needles: Whatever size gets you gauge, usually US 8 for worsted weight
This knit cable beanie pattern includes written instructions that walk you through every step, so don’t worry if you’ve never done cables or crown shaping like this before.
Why You Should Knit This Beanie (Like, Now)
If you’re like me and love a pattern that balances beauty with brain-teasing fun, this knit cable beanie pattern is calling your name. It’s become a bit of a tradition for me to cast on one every fall, and sometimes another right after. There’s just something addictive about watching those cables twist into place.
So grab your yarn—I recommend Hobbii Fluffy Day (affiliate link) again, in case you missed it—your needles, and your favorite cup of something warm. You’re going to love knitting this.
Want More? I’ve Got a Whole Hat Pattern Collection!
If you’re on the hunt for even more cozy toppers after you finish this one, you can find the full list of free hat patterns right here. The Lewis Beanie knit cable beanie pattern is at the bottom of this post, but that page is where all the other hat goodness lives.
Now scroll on down to grab the full Lewis Beanie knit cable beanie pattern and cast on something fabulous. Happy knitting, friend!

Materials and Info
Materials – appx 60-125yds worsted weight (size 4) yarn (the orginal yarn is discontinued but I like to use Hobbii Fluffy day (affiliate link) as a replacement, size 8 (5mm) dpn or circular needles, yarn needle, cable needle
Gauge: appx 4sts/inch in stockinette stitch Gauge is very important!
Sizes (appx finished head circumference) : newborn (13ins), baby (14.5ins), toddler (16ins), child (17.5ins), teen (19ins), adult (20.5 ins)
Stitch Key:
K – knit p – purl
ssk – slip, slip knit k2tog – knit 2 together sl – slip st
C3L – cable 3 left – sl next st to cable ndl, hold in front, k2, k1 from cable ndl
C3R – cable 3 right – sl next 2sts to cable ndl, hold in back, k1, k2 from cable ndl
Lewis Beanie Pattern
Newborn
Cast on 63sts
Round 1 – [k6, p1] repeat [to] around
Round 2 – repeat round 1
Round 3 – [k2, with yarn back sl2, k2, p1] repeat [to] around
Round 4 – [C3R, C3L, p1] repeat [to] around
Round 5 – repeat round 3
Round 6 – repeat round 4
Round 7 – repeat round 1
Round 8 – repeat round 2
Repeat these 8 rounds until your work measures 4 ins from cast on edge
Decreases:
Round 1 – [ssk, k2, k2tog, p1] repeat [to] around (45sts)
Round 2 – [k4, p1] repeat [to] around
Round 3 – [ssk, k2tog, p1] repeat [to] around (27sts)
Round 4 – [k2,p1] repeat [to] around
Round 5 – [k2tog, p1] repeat [to] around (18sts)
Round 6 – [k2tog] repeat [to] around (9sts)
Do not bind off. Cut yarn leaving appx 6-8ins. Pull tail through remaining sts.
Weave in ends.
Baby
Cast on 70sts
Round 1 – [k6, p1] repeat [to] around
Round 2 – repeat round 1
Round 3 – [k2, with yarn back sl2, k2, p1] repeat [to] around
Round 4 – [C3R, C3L, p1] repeat [to] around
Round 5 – repeat round 3
Round 6 – repeat round 4
Round 7 – repeat round 1
Round 8 – repeat round 2
Repeat these 8 rounds until your work measures 5 ins from cast on edge.
Decreases:
Round 1 – [ssk, k2, k2tog, p1] repeat [to] around (50sts)
Round 2 – [k4, p1] repeat [to] around
Round 3 – [ssk, k2tog, p1] repeat [to] around (30sts)
Round 4 – [k2,p1] repeat [to] around
Round 5 – [k2tog, p1] repeat [to] around (20sts)
Round 6 – [k2tog] repeat [to] around (10sts)
Do not bind off. Cut yarn leaving appx 6-8ins. Pull tail through remaining sts.
Weave in ends.
Toddler
Cast on 77sts
Round 1 – [k6, p1] repeat [to] around
Round 2 – repeat round 1
Round 3 – [k2, with yarn back sl2, k2, p1] repeat [to] around
Round 4 – [C3R, C3L, p1] repeat [to] around
Round 5 – repeat round 3
Round 6 – repeat round 4
Round 7 – repeat round 1
Round 8 – repeat round 2
Repeat these 8 rounds until your work measures 6 ins from cast on edge.
Decreases:
Round 1 – [ssk, k2, k2tog, p1] repeat [to] around (55sts)
Round 2 – [k4, p1] repeat [to] around
Round 3 – [ssk, k2tog, p1] repeat [to] around (33sts)
Round 4 – [k2,p1] repeat [to] around
Round 5 – [k2tog, p1] repeat [to] around (22sts)
Round 6 – [k2tog] repeat [to] around (11sts)
Do not bind off. Cut yarn leaving appx 6-8ins. Pull tail through remaining sts.
Weave in ends.
Child
Cast on 84sts
Round 1 – [k6, p1] repeat [to] around
Round 2 – repeat round 1
Round 3 – [k2, with yarn back sl2, k2, p1] repeat [to] around
Round 4 – [C3R, C3L, p1] repeat [to] around
Round 5 – repeat round 3
Round 6 – repeat round 4
Round 7 – repeat round 1
Round 8 – repeat round 2
Repeat these 8 rounds until your work measures 7ins from cast on edge.
Decreases:
Round 1 – [ssk, k2, k2tog, p1] repeat [to] around (60sts)
Round 2 – [k4, p1] repeat [to] around
Round 3 – [ssk, k2tog, p1] repeat [to] around (36sts)
Round 4 – [k2,p1] repeat [to] around
Round 5 – [k2tog, p1] repeat [to] around (24sts)
Round 6 – [k2tog] repeat [to] around (12sts)
Do not bind off. Cut yarn leaving appx 6-8ins. Pull tail through remaining sts.
Weave in ends.
Teen
Cast on 91sts
Round 1 – [k6, p1] repeat [to] around
Round 2 – repeat round 1
Round 3 – [k2, with yarn back sl2, k2, p1] repeat [to] around
Round 4 – [C3R, C3L, p1] repeat [to] around
Round 5 – repeat round 3
Round 6 – repeat round 4
Round 7 – repeat round 1
Round 8 – repeat round 2
Repeat these 8 rounds until your work measures 8ins from cast on edge.
Decreases:
Round 1 – [ssk, k2, k2tog, p1] repeat [to] around (65sts)
Round 2 – [k4, p1] repeat [to] around
Round 3 – [ssk, k2tog, p1] repeat [to] around (39sts)
Round 4 – [k2,p1] repeat [to] around
Round 5 – [k2tog, p1] repeat [to] around (26sts)
Round 6 – [k2tog] repeat [to] around (13sts)
Do not bind off. Cut yarn leaving appx 6-8ins. Pull tail through remaining sts.
Weave in ends.
Adult
Cast on 98sts
Round 1 – [k6, p1] repeat [to] around
Round 2 – repeat round 1
Round 3 – [k2, with yarn back sl2, k2, p1] repeat [to] around
Round 4 – [C3R, C3L, p1] repeat [to] around
Round 5 – repeat round 3
Round 6 – repeat round 4
Round 7 – repeat round 1
Round 8 – repeat round 2
Repeat these 8 rounds until your work measures 9ins from cast on edge.
Decreases:
Round 1 – [ssk, k2, k2tog, p1] repeat [to] around (70sts)
Round 2 – [k4, p1] repeat [to] around
Round 3 – [ssk, k2tog, p1] repeat [to] around (42sts)
Round 4 – [k2,p1] repeat [to] around
Round 5 – [k2tog, p1] repeat [to] around (28sts)
Round 6 – [k2tog] repeat [to] around (14sts)
Do not bind off. Cut yarn leaving appx 6-8ins. Pull tail through remaining sts.
Weave in ends.
Lewis Beanie PDF
Disclaimer: This page contains affiliate links. If you choose to make a purchase after clicking a link, I may receive a commission at no additional cost to you. Thank you for your support!