
Purr-fect for photo shoots! The Lil Kitty Hat free knitting pattern is at the bottom—find more photo prop patterns on my prop pattern page!

As a knitter and a photographer, there’s nothing I love more than creating adorable props for newborn photo shoots. Today, I want to share a special project that’s close to my heart: the Lil Kitty Hat. This free knitting pattern has become a favorite of mine, not only because of its undeniable cuteness but also because of the joy it brings when I see it worn by precious little ones. While the original yarn I used has been discontinued, I’ve found that Hobbii Fluffy Day is a fantastic replacement, ensuring that this project remains accessible and delightful for everyone.
The Inspiration Behind the Lil Kitty Hat
Newborn photography has a magical quality that captures the innocence and wonder of new life. I remember the first time I knit a hat for a newborn shoot; the experience was incredibly fulfilling. The idea for the Lil Kitty Hat came to me when I was brainstorming unique and whimsical props that could add a touch of fun to my photos. Cats are universally loved, and the idea of tiny, soft kitty ears on a newborn was just too irresistible to pass up.
Choosing the Right Yarn
Originally, I used a yarn that is no longer available, but after some experimentation, I discovered that Hobbii Fluffy Day is a perfect substitute. This yarn is incredibly soft, which is essential for newborn projects. It’s also lightweight, making it comfortable for babies to wear without any discomfort. The texture of Hobbii Fluffy Day gives the hat a gentle, fluffy appearance that enhances the overall cuteness of the design.
Knitting the Lil Kitty Hat
The Lil Kitty Hat is worked in the round, which ensures a seamless finish that’s both comfortable for the baby and aesthetically pleasing. I always recommend using circular needles for this project, as they make it easier to manage the stitches and maintain an even tension throughout the knitting process.
Starting Off
I begin by casting on the required number of stitches, making sure to join them in the round carefully to avoid twisting. This is a crucial step, as a twisted join can ruin the entire look of the hat. Once the stitches are joined, the knitting process becomes quite meditative, allowing me to focus on each stitch and row.
The Body of the Hat
The body of the hat is straightforward and involves a simple stockinette stitch. This stitch pattern is ideal for showcasing the softness and fluffiness of the yarn. As I knit, I can already imagine the hat taking shape and the way it will look on a newborn’s tiny head. The rhythm of knitting in the round is soothing, and before I know it, the body of the hat is complete.
Closing the Hat
One of the most satisfying parts of this project is closing the hat using the Kitchener stitch. This technique creates a seamless closure at the top, which is not only comfortable for the baby but also gives the hat a polished, professional look. I take my time with this step, ensuring that each stitch is perfect and that the hat will have a smooth, even finish.
Adding the Kitty Ears
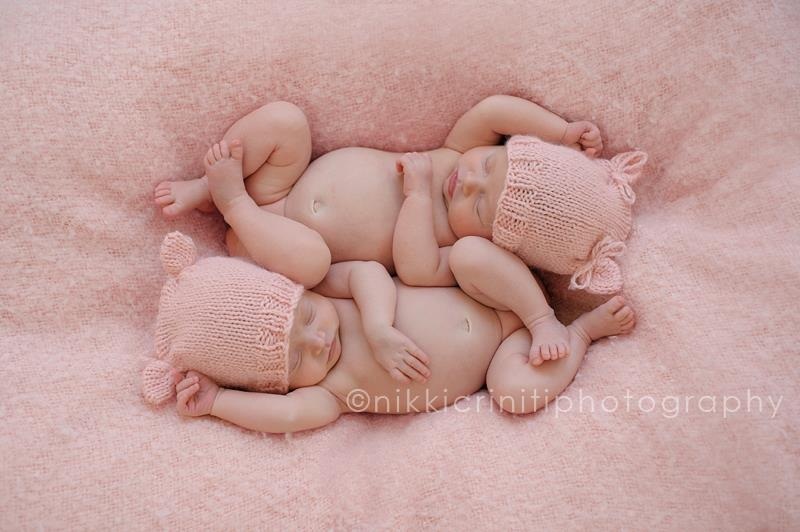
The final touch is what truly makes this hat special: the kitty ears. Instead of knitting separate pieces, I create the ears by tying a piece of yarn on the top corners of the hat into a bow. This method is simple yet effective, giving the hat its distinctive feline appearance. The bows can be adjusted to create ears of different sizes, allowing for some customization depending on the look you want to achieve.
The Joy of Seeing the Finished Product
Every time I finish a Lil Kitty Hat, I can’t help but feel a sense of accomplishment and joy. The hat is not only adorable but also represents hours of careful work and creativity. Seeing the hat worn by a newborn during a photo shoot is incredibly rewarding. The soft, fluffy texture of the yarn combined with the playful kitty ears makes for a perfect prop that adds a touch of whimsy to any photo.
Sharing the Love
One of the best parts of being a knitter is sharing my creations with others. I’ve gifted the Lil Kitty Hat to friends and family members with newborns, and the reactions are always heartwarming. There’s something special about giving a handmade gift, especially one that can be cherished and remembered through photographs.
Encouraging Others to Knit
I always encourage fellow knitters to try their hand at making the Lil Kitty Hat. It’s a fun project that’s suitable for knitters of all skill levels. The pattern is simple enough for beginners to follow, yet it offers enough interest for more experienced knitters. Plus, the end result is a charming hat that’s sure to bring smiles to everyone who sees it.
Final Thoughts
Knitting the Lil Kitty Hat has become one of my favorite projects. The combination of a seamless design, the perfect yarn, and the adorable kitty ears makes it a standout piece in my collection of newborn photo props. Hobbii Fluffy Day has proven to be an excellent replacement for the discontinued yarn, ensuring that this project remains as delightful as ever.
Whether you’re a seasoned knitter or just starting out, I hope you’ll give the Lil Kitty Hat a try. It’s a wonderful way to create something special for the little ones in your life and to add a touch of handmade charm to your newborn photography. Happy knitting!

Materials and Info
Materials: worsted weight yarn (I used Lana Gatto Class) appx 60-120yds, size 7 (4.5mm) double pointed needles or circular for magic loop method, yarn needle
Gauge: 4sts = 1in ~Gauge is important! Be sure you check before you start~
Sizes (appx finished head circumference): sm preemie (10ins), md preemie (11ins), lg preemie (12ins), newborn (13ins), 0-3mth (14ins), 3-6mths (15ins), 6-12mths (16ins), toddler (17ins), child (18ins)
Kitchener Stitch: Hold the two pieces of knitting parallel to one another with the wrong sides facing. Thread the working yarn with a yarn needle. *Insert the yarn needle knitwise into the first stitch on the front knitting needle. Draw through the stitch and slip the stitch off of the front needle. Insert the yarn needle purlwise into the next stitch on the front knitting needle. Draw through the stitch. Leave the stitch on the needle. Insert the yarn needle purlwise into the first stitch on the back knitting needle. Draw through the stitch and slip the stitch off of the back needle. Insert the yarn needle knitwise into the next stitch on the back knitting needle. Draw through the stitch. Leave the stitch on the needle. Repeat these steps beginning at the * until all of your stitches have been grafted together.
Lil Kitty Hat Pattern
Small Preemie
Cast on 40 sts and join in the round.
Rounds 1-6 – k2 p2 around
Work in stockinette stitch until your work measures 3.5ins from the cast on edge.
Divide your stitches onto 2 needles. Cut yarn leaving appx 3 times the length of your work laying flat. Work kitchner stitch. Finish off.
Cut 2 pieces of yarn (one for each ear) appx 8-10ins and tie a bow around the top corners to form the ears. I like to use a needle to weave the yarn through the corner of the hat to be sure the bow doesn’t slip off but it’s not necessary.
Medium Preemie
Cast on 44 sts and join in the round.
Rounds 1-6 – k2 p2 around
Work in stockinette stitch until your work measures 4ins from the cast on edge.
Divide your stitches onto 2 needles. Cut yarn leaving appx 3 times the length of your work laying flat. Work kitchner stitch. Finish off.
Cut 2 pieces of yarn (one for each ear) appx 8-10ins and tie a bow around the top corners to form the ears. I like to use a needle to weave the yarn through the corner of the hat to be sure the bow doesn’t slip off but it’s not necessary.
Large Preemie
Cast on 48 sts and join in the round.
Rounds 1-6 – k2 p2 around
Work in stockinette stitch until your work measures 4.5ins from the cast on edge.
Divide your stitches onto 2 needles. Cut yarn leaving appx 3 times the length of your work laying flat. Work kitchener stitch. Finish off.
Cut 2 pieces of yarn (one for each ear) appx 8-10ins and tie a bow around the top corners to form the ears. I like to use a needle to weave the yarn through the corner of the hat to be sure the bow doesn’t slip off but it’s not necessary.
Newborn
Cast on 52 sts and join in the round.
Rounds 1-6 – k2 p2 around
Work in stockinette stitch until your work measures 5ins from the cast on edge.
Divide your stitches onto 2 needles. Cut yarn leaving appx 3 times the length of your work laying flat. Work kitchener stitch. Finish off.
Cut 2 pieces of yarn (one for each ear) appx 8-10ins and tie a bow around the top corners to form the ears. I like to use a needle to weave the yarn through the corner of the hat to be sure the bow doesn’t slip off but it’s not necessary.
0-3mths
Cast on 56 sts and join in the round.
Rounds 1-6 – k2 p2 around
Work in stockinette stitch until your work measures 5.5ins from the cast on edge.
Divide your stitches onto 2 needles. Cut yarn leaving appx 3 times the length of your work laying flat. Work kitchener stitch. Finish off.
Cut 2 pieces of yarn (one for each ear) appx 8-10ins and tie a bow around the top corners to form the ears. I like to use a needle to weave the yarn through the corner of the hat to be sure the bow doesn’t slip off but it’s not necessary.
3-6mths
Cast on 60 sts and join in the round.
Rounds 1-7 – k2 p2 around
Work in stockinette stitch until your work measures 6ins from the cast on edge.
Divide your stitches onto 2 needles. Cut yarn leaving appx 3 times the length of your work laying flat. Work kitchener stitch. Finish off.
Cut 2 pieces of yarn (one for each ear) appx 8-10ins and tie a bow around the top corners to form the ears. I like to use a needle to weave the yarn through the corner of the hat to be sure the bow doesn’t slip off but it’s not necessary.
6-12mths
Cast on 64 sts and join in the round.
Rounds 1-7 – k2 p2 around
Work in stockinette stitch until your work measures 6.5ins from the cast on edge.
Divide your stitches onto 2 needles. Cut yarn leaving appx 3 times the length of your work laying flat. Work kitchener stitch. Finish off.
Cut 2 pieces of yarn (one for each ear) appx 8-10ins and tie a bow around the top corners to form the ears. I like to use a needle to weave the yarn through the corner of the hat to be sure the bow doesn’t slip off but it’s not necessary.
Toddler
Cast on 68 sts and join in the round.
Rounds 1-8 – k2 p2 around
Work in stockinette stitch until your work measures 7ins from the cast on edge.
Divide your stitches onto 2 needles. Cut yarn leaving appx 3 times the length of your work laying flat. Work kitchener stitch. Finish off.
Cut 2 pieces of yarn (one for each ear) appx 8-10ins and tie a bow around the top corners to form the ears. I like to use a needle to weave the yarn through the corner of the hat to be sure the bow doesn’t slip off but it’s not necessary.
Child
Cast on 72 sts and join in the round.
Rounds 1-8 – k2 p2 around
Work in stockinette stitch until your work measures 7.5ins from the cast on edge.
Divide your stitches onto 2 needles. Cut yarn leaving appx 3 times the length of your work laying flat. Work kitchener stitch. Finish off.
Cut 2 pieces of yarn (one for each ear) appx 8-10ins and tie a bow around the top corners to form the ears. I like to use a needle to weave the yarn through the corner of the hat to be sure the bow doesn’t slip off but it’s not necessary.
Lil Kitty Hat PDF
Disclaimer: This page contains affiliate links. If you choose to make a purchase after clicking a link, I may receive a commission at no additional cost to you. Thank you for your support!