
Discover this photography prop bonnet pattern and more on my photo prop pattern page—THIS one’s at the bottom of the post!

I’m so excited to share a brand new photography prop bonnet pattern that just might become your go-to for newborn photo shoots. It’s soft, elegant, and oh-so-satisfying to knit. And the best part? You’ll find the pattern at the very bottom of this post—but I’ve also got loads more free designs over on my photo prop pattern page, so make sure you check those out too.
Let’s dive into the story behind this precious prairie-style bonnet, why I love it so much, and how you can knit it with ease!
Why I Designed This Photography Prop Bonnet Pattern
There’s something about prairie bonnets that just pulls at my heartstrings. Maybe it’s the sweet old-fashioned charm or the way they frame a newborn’s tiny face so gently. This photography prop bonnet pattern was born out of my love for timeless pieces that don’t overpower the baby wearing them.
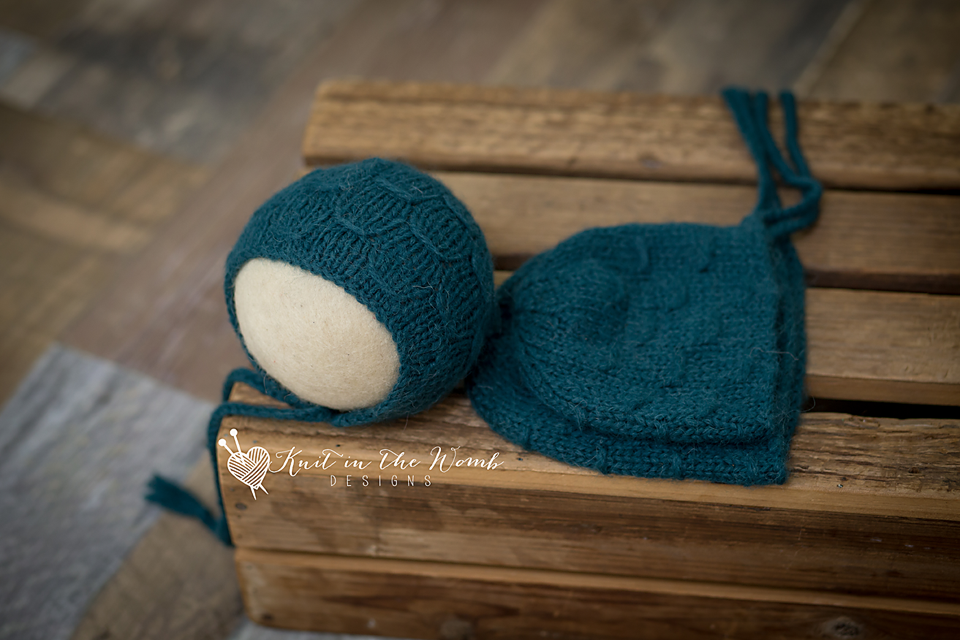
When I’m designing a photo prop, I always think about the photographer’s goal—highlighting the baby, not the outfit. This bonnet uses a subtle stitch that almost looks like cables (without the hassle), which gives it a textured, handcrafted look without stealing the spotlight.

Simple to Knit, Stunning in Photos
Okay, here’s one of my favorite things about this photography prop bonnet pattern: it’s deceptively simple. We’re talking about a straight-needle, knit-flat project—no circulars, no shaping acrobatics. If you can knit and purl, you can make this.
I knit mine in KnitPicks Reverie (affiliate link), which is a worsted-weight yarn that’s dreamy soft thanks to a blend of baby alpaca and acrylic. That combo gives you a cozy fabric with a touch of drape—perfect for wrapping up those precious newborn heads.
If you’ve never used KnitPicks Reverie (affiliate link) before, let me just say… you’re in for a treat. It’s one of those yarns that makes even simple stitches look fancy. Plus, it’s gentle on baby skin and knits up quickly, so you can whip out a few bonnets in no time.
What You’ll Need
Here’s the quick supply rundown for this photography prop bonnet pattern:
- Straight needles – I used size 8 (5mm), but gauge isn’t too fussy here.
- Worsted weight yarn – I used KnitPicks Reverie (affiliate link), which I highly recommend if you want that soft and lofty texture.
- Optional crochet lace trim – For an extra touch of sweetness, you can add lace around the edge. You’ll need a 3.5mm crochet hook and either lace-weight yarn or size 10 crochet thread.
I added the lace trim to mine, and let me tell you—it was the cherry on top!

Let’s Talk About That Lace Trim
If you’ve got basic crochet skills (or are willing to watch a quick tutorial), adding a lace border takes this photography prop bonnet pattern to another level. I chose a dainty little pattern that adds just enough elegance without being too much.
The trim is worked separately and sewn on afterward, so you have flexibility to skip it or swap in your own favorite border. It’s a sweet little bonus detail that doesn’t complicate the knit.
A Relaxing, Rewarding Knit
This photography prop bonnet pattern is one of those projects you can curl up with on the couch, tea in hand, and just enjoy the rhythm of the stitches. It’s quick enough to finish in a couple of evenings, but interesting enough to keep your attention.
I especially love how the almost-cabled stitch pattern gives the bonnet a bit of structure without making it stiff. Combined with KnitPicks Reverie (affiliate link), the result is lightweight but warm—ideal for those early newborn photo sessions where you want to keep baby cozy but not sweaty.
Picture Perfect
If you’re a photographer, parent, or gift knitter, you know how important the right photo prop can be. The bonnet shouldn’t be the star of the show—but it should make the baby look even more darling. And that’s exactly what this photography prop bonnet pattern does.
It frames the baby’s face, brings out those sweet little features, and gives the whole photo a vintage, timeless look. I’ve seen it used in both indoor studio setups and dreamy outdoor scenes, and it just works every time.

Why Reverie? Because It’s That Good
Quick yarn love note: KnitPicks Reverie (affiliate link) is a gem for baby knits. It’s got that alpaca warmth without the itch, and the bit of acrylic helps it hold its shape (and survive gentle washing). I keep a few skeins on hand at all times because it’s just that versatile.
If you’re looking to make a bonnet that feels luxurious without breaking the bank, KnitPicks Reverie (affiliate link) checks all the boxes.
A Perfect Fit for Your Photo Prop Collection
Whether you’re new to knitting photo props or already have a stash of bonnets, bloomers, and booties, this photography prop bonnet pattern deserves a spot in your collection. It’s a crowd-pleaser, a keepsake-maker, and a joy to knit.
The construction is straightforward, the details are just right, and it looks way more complex than it actually is. Win, win, win.
Ready to Knit Yours?
You’ll find the photography prop bonnet pattern down at the bottom of this post, but if you’re hunting for even more options, I’ve got you covered. Head over to my photo prop pattern page for a full lineup of my favorite free designs—think everything from bunny ears to lacy wraps.
Final Thoughts
Creating this photography prop bonnet pattern was such a joy. I love designing knits that feel classic and beautiful but are also simple enough to be accessible to newer knitters. And I especially love when those knits find their way into precious family photos that’ll be treasured for years.
If you make this bonnet, I’d love to see your finished piece! Tag me on social or leave a comment—I always enjoy seeing your beautiful work.
Happy knitting, friend. May your yarn be soft, your stitches be even, and your photo props be adorable.

Materials and Info
Materials: appx 40-120yd worsted weight yarn (I used knitpicks reverie (affiliate link)), size 8 (5mm) straight needles or (size needed to obtain gauge), yarn needle, 2 stitch markers
OPTION MATERIALS: size 10 crochet thread, small crochet hook (like a d or 00)
Gauge: appx 4sts/inch Gauge is very important!
Sizes (appx finished head circumference) : newborn (13ins), 0-3mths (14 ins), 3-6mths (15ins), 6-12mths (16ins), 1-3yrs (17ins)
Stitch Key
K – knit
p – purl
P2tog – purl 2 stitches together
K2tog – knit 2 stitches together
slwk4 – slip the next 4 sts, wrap yarn around these 4 sts from back to front LOOSELY, slip the sts back to the left needle, knit the 4 sts

Prairie Bonnet Pattern
NEWBORN
Cast on 46sts.
Row 1 (wrong side) – purl across
Row 2 – knit across
Row 3 – purl across
Row 4 – k3 [slwk4, k4] repeat [to] across to last 3sts, knit 3
Row 5 – purl across
Row 6 – knit across
Row 7 – purl across
Row 8 – k3 [k4, slwk4] repeat [to] across to last 3 sts, knit 3
Repeat rows 1-8 until your work measures appx 3.5ins finishing after completing a wrong side row.
DECREASES
Row 1 – k1, k2tog, k40, k2tog, k1 (44sts)
Place stitch markers on either end of row.
Row 2 – purl across
Row 3 – k1 [k2tog, k5] repeat [to] across to last st, k1 (38sts)
Row 4 – Purl across
Row 5 – k1 [k2tog, k4] repeat [to] across to last st, k1 (32sts)
Row 6 – purl across
Row 7 – k1 [k2tog, k3] repeat [to] across to last st, k1 (26sts)
Row 8 – purl across
Row 9 – k1 [k2tog, k2] repeat [to] across to last st, k1 (20sts)
Row 10 – purl across
Row 11 – k1 [k2tog, k1] repeat [to] across to last st, k1 (14sts)
Row 12 – p1 [p2tog] repeat [to] across to last st, p1 (8sts)
Do not bind off. Cut yarn leaving appx -10ins. Pull yarn through remaining stitches and cinch the back tight. Using this end sew the crown together to your stitch markers. (I like to use the mattress stitch since it is nearly invisible). Cut 2 pieces of yarn approximately 24ins long. Fold them in half and pull a loop through the front corner of the hood. Pull the ends through this loop. These are your ties.
If you want to add a feminine touch to the bonnet you can always add a cute little crochet edge like the picture at the end of the pattern. I used sized 10 crochet thread, a crochet hook (something small like a d or 00). My edge was a ([double crochet, chain 1, double crochet] in next stitch, skip 2 sts) across.
0-3 MONTHS
Cast on 50sts.
Row 1 (wrong side) – purl across
Row 2 – knit across
Row 3 – purl across
Row 4 – k3 [slwk4, k4] repeat [to] across to last 7sts, slwk4, knit 3
Row 5 – purl across
Row 6 – knit across
Row 7 – purl across
Row 8 – k3 [k4, slwk4] repeat [to] across to last 7 sts, knit 7
Repeat rows 1-8 until your work measures appx 4.25ins finishing after completing a wrong side row.
DECREASES
Row 1 – k1 [k2tog, k5] repeat [to] across (43sts)
Place stitch markers on either end of row.
Row 2 – Purl across
Row 3 – k1 [k2tog, k4] repeat [to] across (36sts)
Row 4 – purl across
Row 5 – k1 [k2tog, k3] repeat [to] across (29sts)
Row 6 – purl across
Row 7 – k1 [k2tog, k2] repeat [to] across (22sts)
Row 8 – purl across
Row 9 – k1 [k2tog, k1] repeat [to] across (15sts)
Row 10 – [p2tog] repeat [to] across to last st, p1 (8sts)
Do not bind off. Cut yarn leaving appx -10ins. Pull yarn through remaining stitches and cinch the back tight. Using this end sew the crown together to your stitch markers. (I like to use the mattress stitch since it is nearly invisible). Cut 2 pieces of yarn approximately 24ins long. Fold them in half and pull a loop through the front corner of the hood. Pull the ends through this loop. These are your ties.
If you want to add a feminine touch to the bonnet you can always add a cute little crochet edge like the picture at the end of the pattern. I used sized 10 crochet thread, a crochet hook (something small like a d or 00). My edge was a ([double crochet, chain 1, double crochet] in next stitch, skip 2 sts) across.
3-6 MONTH
Cast on 54sts.
Row 1 (wrong side) – purl across
Row 2 – knit across
Row 3 – purl across
Row 4 – k3 [slwk4, k4] repeat [to] across to last 3sts, knit 3
Row 5 – purl across
Row 6 – knit across
Row 7 – purl across
Row 8 – k3 [k4, slwk4] repeat [to] across to last 3 sts, knit 3
Repeat rows 1-8 until your work measures appx 4.5ins finishing after completing a wrong side row.
DECREASES
Row 1 – [k2tog, k16] repeat [to] across (51sts)
Place stitch markers on either end of row.
Row 2 – purl across
Row 3 – k1 [k2tog, k5] repeat [to] across to last st, k1 (44sts)
Row 4 – Purl across
Row 5 – k1 [k2tog, k4] repeat [to] across to last st, k1 (37sts)
Row 6 – purl across
Row 7 – k1 [k2tog, k3] repeat [to] across to last st, k1 (30sts)
Row 8 – purl across
Row 9 – k1 [k2tog, k2] repeat [to] across to last st, k1 (23sts)
Row 10 – purl across
Row 11 – k1 [k2tog, k1] repeat [to] across to last st, k1 (16sts)
Row 12 – p1 [p2tog] repeat [to] across to last st, p1 (9sts)
Do not bind off. Cut yarn leaving appx -10ins. Pull yarn through remaining stitches and cinch the back tight. Using this end sew the crown together to your stitch markers. (I like to use the mattress stitch since it is nearly invisible). Cut 2 pieces of yarn approximately 24ins long. Fold them in half and pull a loop through the front corner of the hood. Pull the ends through this loop. These are your ties.
If you want to add a feminine touch to the bonnet you can always add a cute little crochet edge like the picture at the end of the pattern. I used sized 10 crochet thread, a crochet hook (something small like a d or 00). My edge was a ([double crochet, chain 1, double crochet] in next stitch, skip 2 sts) across.
6-12 MONTHS
Cast on 58sts.
Row 1 (wrong side) – purl across
Row 2 – knit across
Row 3 – purl across
Row 4 – k3 [slwk4, k4] repeat [to] across to last 7sts, slwk4, knit 3
Row 5 – purl across
Row 6 – knit across
Row 7 – purl across
Row 8 – k3 [k4, slwk4] repeat [to] across to last 7 sts, knit 7
Repeat rows 1-8 until your work measures appx 5ins finishing after completing a wrong side row.
DECREASES
Row 1 – k1 [k2tog, k5] repeat [to] across (50sts)
Place stitch markers on either end of row.
Row 2 – Purl across
Row 3 – k1 [k2tog, k4] repeat [to] across to last st, k1 (42sts)
Row 4 – purl across
Row 5 – k1 [k2tog, k3] repeat [to] across to last st, k1 (34sts)
Row 6 – purl across
Row 7 – k1 [k2tog, k2] repeat [to] across to last st, k1 (26sts)
Row 8 – purl across
Row 9 – k1 [k2tog, k1] repeat [to] across to last st, k1 (18sts)
Row 10 – purl across
Row 11 – k1, [k2tog] repeat [to] across to last st, k1 (10sts)
Do not bind off. Cut yarn leaving appx -10ins. Pull yarn through remaining stitches and cinch the back tight. Using this end sew the crown together to your stitch markers. (I like to use the mattress stitch since it is nearly invisible). Cut 2 pieces of yarn approximately 24ins long. Fold them in half and pull a loop through the front corner of the hood. Pull the ends through this loop. These are your ties.
If you want to add a feminine touch to the bonnet you can always add a cute little crochet edge like the picture at the end of the pattern. I used sized 10 crochet thread, a crochet hook (something small like a d or 00). My edge was a ([double crochet, chain 1, double crochet] in next stitch, skip 2 sts) across.
1-3 YEARS (TODDLER)
Cast on 62sts.
Row 1 (wrong side) – purl across
Row 2 – knit across
Row 3 – purl across
Row 4 – k3 [slwk4, k4] repeat [to] across to last 3sts, knit 3
Row 5 – purl across
Row 6 – knit across
Row 7 – purl across
Row 8 – k3 [k4, slwk4] repeat [to] across to last 3 sts, knit 3
Repeat rows 1-8 until your work measures appx 5.5ins finishing after completing a wrong side row.
DECREASES
Row 1 – k1 [k2tog, k13] repeat [to] across to last st, k1 (58sts)
Place stitch markers on either end of row.
Row 2 – purl across
Row 3 – k1 [k2tog, k5] repeat [to] across to last st, k1 (50sts)
Row 4 – Purl across
Row 5 – k1 [k2tog, k4] repeat [to] across to last st, k1 (42sts)
Row 6 – purl across
Row 7 – k1 [k2tog, k3] repeat [to] across to last st, k1 (34sts)
Row 8 – purl across
Row 9 – k1 [k2tog, k2] repeat [to] across to last st, k1 (26sts)
Row 10 – purl across
Row 11 – k1 [k2tog, k1] repeat [to] across to last st, k1 (18sts)
Row 12 – purl across
Row 13 – k1 [k2tog] repeat [to] across to last st, k1 (10sts)
Do not bind off. Cut yarn leaving appx -10ins. Pull yarn through remaining stitches and cinch the back tight. Using this end sew the crown together to your stitch markers. (I like to use the mattress stitch since it is nearly invisible). Cut 2 pieces of yarn approximately 24ins long. Fold them in half and pull a loop through the front corner of the hood. Pull the ends through this loop. These are your ties.
If you want to add a feminine touch to the bonnet you can always add a cute little crochet edge like the picture at the end of the pattern. I used sized 10 crochet thread, a crochet hook (something small like a d or 00). My edge was a ([double crochet, chain 1, double crochet] in next stitch, skip 2 sts) across.
Prairie Bonnet PDF

Disclaimer: This page contains affiliate links. If you choose to make a purchase after clicking a link, I may receive a commission at no additional cost to you. Thank you for your support!