
Discover your next favorite free mohair prop pattern! Find even more gorgeous photo props here, but THIS pattern is waiting below!

When I first knit up across this free mohair prop pattern, I was hooked. As a knitter who absolutely loves crafting sweet little things for newborn photo shoots, I knew the Shiloh Romper was exactly what my prop collection needed. From its delicate lace detailing to its dreamy mohair halo, this pattern screamed elegance, simplicity, and photo-session perfection. I couldn’t wait to dive right in!
Choosing the Perfect Yarn for a Free Mohair Prop Pattern
One of the most important steps for knitting any newborn photography prop is choosing the right yarn. For this delightful romper, the pattern recommends using KnitPicks Aloft (affiliate link)—a luxurious blend of 72% Super Kid Mohair and 28% Silk. Let me tell you, KnitPicks Aloft (affiliate link) is a total dream to work with. Its softness and subtle fuzziness create a gentle halo around the finished piece, making this free mohair prop pattern ideal for capturing those adorable newborn moments.
I opted for soft, neutral shades that complement all skin tones, adding an extra touch of class and versatility for photographers. The rich colors and subtle sheen of KnitPicks Aloft (affiliate link) elevate the romper, ensuring it photographs beautifully every time.

Getting Started With My Free Mohair Prop Pattern
With my yarn in hand, needles at the ready, and my excitement bubbling over, I cast on for this adorable romper. Lace knitting might seem intimidating at first, but trust me, it’s worth every stitch. Watching intricate designs slowly take shape from yarn overs and decreases feels like knitting magic in action.
Right from the first stitch, I knew this free mohair prop pattern was going to be special. The pattern’s instructions were clear, easy to follow, and thoroughly enjoyable. Before I knew it, the delicate lace panel was unfolding beautifully on my needles.
Mastering the Lace Details of this Free Mohair Prop Pattern
The lace panel on the Shiloh Romper is undoubtedly its show-stopping feature. Yes, it required my undivided attention, but boy, was it rewarding! The lace panel creates an elegant focal point that photographers (and new parents!) absolutely adore.
Pro tip: stitch markers quickly became my best knitting buddies. They made tracking lace repeats super easy and saved me from a few knitting mishaps along the way. Regular stitch counts also kept everything neat and tidy, because let’s be honest—lace knitting is not the place you want surprise stitch counts!

Adding the Finishing Touches
Once I completed the lace section, the rest of the romper practically flew off my needles. The clever shaping techniques outlined in this free mohair prop pattern ensured the romper fit snugly, just perfect for those tiny newborn models.
I especially loved the thoughtful details, like the charming cable neckline—small touches that make all the difference. After binding off the final stitch, it was time for blocking. Blocking is a lace knitter’s best friend. I gave the romper a gentle soak, then pinned it out to shape, revealing the lace pattern in all its glory. The transformation was stunning.
Photographing This Gorgeous Free Mohair Prop Pattern
Of course, knitting a free mohair prop pattern is just half the fun. Seeing your creation used in a newborn photo shoot takes satisfaction to the next level! A photographer friend of mine jumped at the chance to use the Shiloh Romper in a session, and the results were magical.
The KnitPicks Aloft (affiliate link) yarn created such a dreamy, airy effect against the newborn’s delicate skin, making every photo look effortlessly timeless. The romper’s blush pink hue perfectly complemented the baby, and my photographer friend was absolutely thrilled. Honestly, so was I—I couldn’t have imagined a more beautiful result!

Reflecting on My Experience With This Free Mohair Prop Pattern
Knitting the Shiloh Romper reminded me exactly why I fell in love with knitting to begin with. The combination of luxurious KnitPicks Aloft (affiliate link) yarn and this beautifully designed free mohair prop pattern was pure knitting joy.
There’s nothing quite like transforming a simple skein of yarn into a cherished keepsake that photographers and parents can treasure forever. This romper isn’t just a prop—it’s a beautiful handmade memory!
Inspiration for More Mohair Prop Patterns
The success of this adorable romper has inspired me to explore even more lace and mohair projects. Trust me—once you’ve knit your first free mohair prop pattern, it’s hard to stop. The soft, elegant look of mohair lace is simply unbeatable, especially for newborn photo props.
I’m already eyeing up patterns for bonnets, blankets, and yes, even more rompers. KnitPicks Aloft (affiliate link) is officially my go-to yarn for these delicate projects, and I can’t wait to dive into another gorgeous piece soon!
Final Thoughts on My Favorite Free Mohair Prop Pattern
If you’re looking for a fun, rewarding, and undeniably beautiful knitting project, look no further than this Shiloh Romper pattern. Pairing it with KnitPicks Aloft (affiliate link) yarn turns it into the ultimate free mohair prop pattern, perfect for capturing newborn babies in all their delicate glory.
This romper is more than just another knitting project—it’s an opportunity to create something truly meaningful. I promise, every stitch will feel worth it when you see your finished prop being cherished during photo sessions.
Ready to create your own magic with this free mohair prop pattern? Grab your needles, some gorgeous KnitPicks Aloft (affiliate link) yarn, and get knitting—you won’t regret a single stitch!
Happy knitting!

Materials and Info
Materials: 100-300yds of lace weight (size 0) yarn, size 7 (4.5mm) straight needles, 4 stitch markers, yarn needle, crochet hook (I use a 3.5mm) for ties (or if you don’t know how to crochet chain st you can always just braid the ties), cable needle
Sizes: newborn (6.5x9ins), 3-6mth (7.5×10.5ins), 6-12mths (8.5x12ins)
Gauge – 5sts/ins in stockinette Gauge is very important!!!!
Stitch Key:
K – knit
P – Purl
M1 – make one
yo – yarn over
ssk – slip slip knit
k2tog – knit 2 together
sl – slip st – stitch
psso – pass slip stitch over
cf4 – cable front 4 – slide the next 2sts onto your cable needle and hold in front, knit the next 2sts, knit the 2sts on your cable needle

Shiloh Romper Pattern
NEWBORN
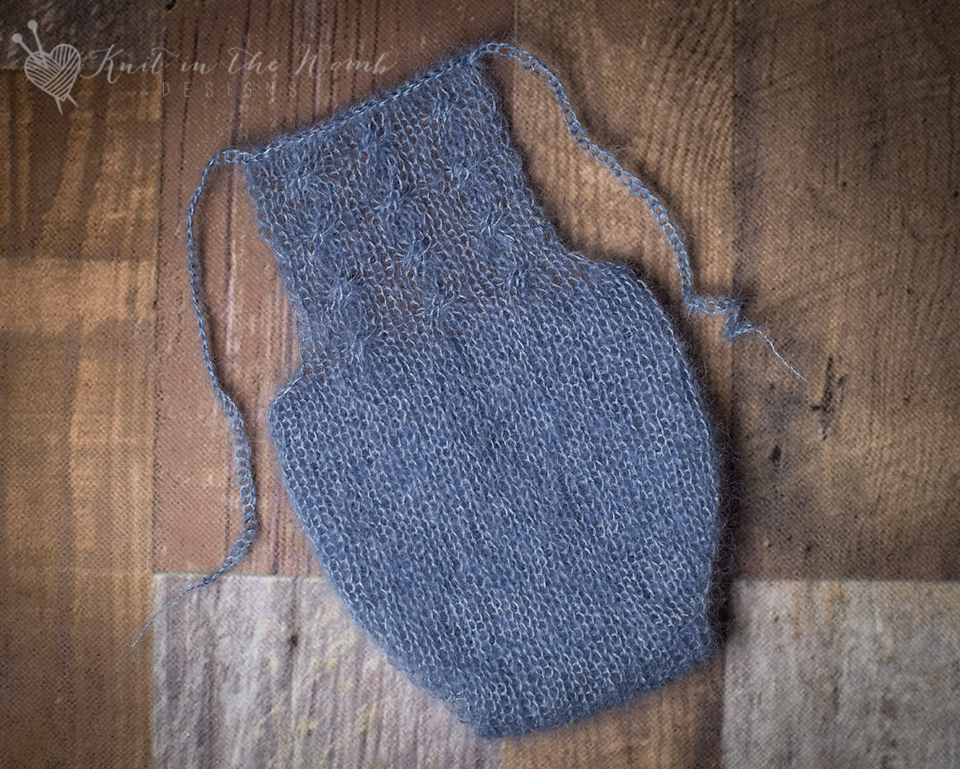
For a picture of how your work will look when complete before seams are sewn see the end of the pattern.
Bottom
Cast on 32 sts.
Work in stockinette st for 3ins starting with a knit row and ending after completing a purl row. Place 1 marker on each end of the end row.
Decrease rows
Row 1 – k1, ssk, k26, k2tog, k1 (30sts)
Row 2 (and all following wrong side rows) – purl
Row 3 – k1, ssk, k24, k2tog, k1 (28sts)
Row 5 – k1, ssk, k22, k2tog, k1 (26sts)
Row 7 – k1, ssk, k20, k2tog, k1 (24sts)
Row 9 – k1, ssk, k18, k2tog, k1 (22sts)
Row 11 – k1, ssk, k16, k2tog, k1 (20sts)
Row 13 – k1, ssk, k14, k2tog, k1 (18sts)
Work 11 rows in stockinette st starting and ending with a purl row.
Increase rows
Row 25 – k1, m1, k16, m1, k1 (20sts)
Row 26 (and all following wrong side rows) – purl
Row 27 – k1, m1, k18, m1, k1 (22sts)
Row 29 – k1, m1, k20, m1, k1 (24sts)
Row 31 – k1, m1, k22, m1, k1 (26sts)
Row 33 – k1, m1, k24, m1, k1 (28sts)
Row 35 – k1, m1, k26, m1, k1 (30sts)
Row 37 – k1, m1, k28, m1, k1 (32sts)
Place 1 marker on each end of the end row.
Work in stockinette st for 3ins starting with a purl row and ending after completing a purl
row. Do not bind off.
Bib
Row 1 – Bind off 5sts, knit across (27sts)
Row 2 – Bind off 5sts, purl across (22sts)
Row 3 – k1 (k2, cf4) Repeat (to) across to last 3sts, k3
Row 4-8 – work in stockinette stitch (beginning with a purl row)
Repeat rows 3-8 until your work measures 3.5ins ending after completing a purl row.
Bind off. Sew side seams. Weave in ends. Now either cut 3 strand of yarn appx 30ins long. Fold them in half and pull a loop through the front corner of the bib. Pull the ends through this loop and braid. Repeat on the other side. OR using your crochet hook, chain st for appx 9- 10 ins then chain st across the top of the bib then chain st a further 9-10ins. Finish off.
3-6 MONTHS
For a picture of how your work will look when complete before seams are sewn see the end of the
pattern.
Bottom
Cast on 38 sts.
Work in stockinette st for 3.5ins starting with a knit row and ending after completing a purl row. Place 1 marker on each end of the end row.
Decrease rows
Row 1 – k1, ssk, k32, k2tog, k1 (36sts)
Row 2 (and all following wrong side rows) – purl
Row 3 – k1, ssk, k30, k2tog, k1 (34sts)
Row 5 – k1, ssk, k28, k2tog, k1 (32sts)
Row 7 – k1, ssk, k26, k2tog, k1 (30sts)
Row 9 – k1, ssk, k24, k2tog, k1 (28sts)
Row 11 – k1, ssk, k22, k2tog, k1 (26sts)
Row 13 – k1, ssk, k20, k2tog, k1 (24sts)
Row 15 – k1, ssk, k18, k2tog, k1 (22sts)
Row – 17 – k1, ssk, k16, k2tog, k1 (20sts)
Work 13 rows in stockinette st starting and ending with a purl row.
Increase rows
Row 31 – k1, m1, k18, m1, k1 (22sts)
Row 33 – k1, m1, k20, m1, k1 (24sts)
Row 35 – k1, m1, k22, m1, k1 (26sts)
Row 37 – k1, m1, k24, m1, k1 (28sts)
Row 39 – k1, m1, k26, m1, k1 (30sts)
Row 41 – k1, m1, k28, m1, k1 (32sts)
Row 43 – k1, m1, k30, m1, k1 (34sts)
Row 45 – k1, m1, k32, m1, k1 (36sts)
Row 47 – k1, m1, k34, m1, k1 (38sts)
Place 1 marker on each end of the end row.
Work in stockinette st for 3.5ins starting with a purl row and ending after completing a purl row. Do not bind off.
Bib
Row 1 – Bind off 6sts, knit across (32sts)
Row 2 – Bind off 6sts, purl across (26sts)
Row 3 – (k2, cf4) Repeat (to) across to last 2sts, k2
Row 4-8 – work in stockinette stitch (beginning with a purl row)
Repeat rows 3-8 until your work measures 4ins ending after completing a purl row.
Bind off. Sew side seams. Weave in ends. Now either cut 3 strand of yarn appx 30ins long. Fold them in half and pull a loop through the front corner of the bib. Pull the ends through this loop and braid. Repeat on the other side. OR using your crochet hook, chain st for appx 9- 10 ins then chain st across the top of the bib then chain st a further 9-10ins. Finish off.
SITTER (APPX 6-12MTHS)
For a picture of how your work will look when complete before seams are sewn see the end of the pattern.
Bottom
Cast on 42 sts.
Work in stockinette st for 4ins starting with a knit row and ending after completing a purl row. Place 1 marker on each end of the end row.
Decrease rows
Row 1 – k1, ssk, k36, k2tog, k1 (40sts)
Row 2 (and all following wrong side rows) – purl
Row 3 – k1, ssk, k34, k2tog, k1 (38sts)
Row 5 – k1, ssk, k32, k2tog, k1 (36sts)
Row 7 – k1, ssk, k30, k2tog, k1 (34sts)
Row 9 – k1, ssk, k28, k2tog, k1 (32sts)
Row 11 – k1, ssk, k26, k2tog, k1 (30sts)
Row 13 – k1, ssk, k24, k2tog, k1 (28sts)
Row 15 – k1, ssk, k22, k2tog, k1 (26sts)
Row 17 – k1, ssk, k20, k2tog, k1 (24sts)
Row 19 – k1, ssk, k18, k2tog, k1 (22sts)
Work 15 rows in stockinette st starting and ending with a purl row.
Increase rows
Row 35 – k1, m1, k20, m1, k1 (24sts)
Row 37 – k1, m1, k22, m1, k1 (26sts)
Row 39 – k1, m1, k24, m1, k1 (28sts)
Row 41 – k1, m1, k26, m1, k1 (30sts)
Row 43 – k1, m1, k28, m1, k1 (32sts)
Row 45 – k1, m1, k30, m1, k1 (34sts)
Row 47 – k1, m1, k32, m1, k1 (36sts)
Row 49 – k1, m1, k34, m1, k1 (38sts)
Row 51 – k1, m1, k36, m1, k1 (40sts)
Row 53 – k1, m1, k38, m1, k1 (42sts)
Place 1 marker on each end of the end row.
Work in stockinette st for 4ins starting with a purl row and ending after completing a purl
row. Do not bind off.
Bib
Row 1 – Bind off 7sts, knit across (35sts)
Row 2 – Bind off 7sts, purl across (28sts)
Row 3 – k1(k2, cf4) Repeat (to) across to last 3sts, k3
Row 4-8 – work in stockinette stitch (beginning with a purl row)
Repeat rows 3-8 until your work measures 4.5ins ending after completing a purl row.
Bind off. Sew side seams. Weave in ends. Now either cut 3 strand of yarn appx 30ins long. Fold them in half and pull a loop through the front corner of the bib. Pull the ends through this loop and braid. Repeat on the other side. OR using your crochet hook, chain st for appx 9- 10 ins then chain st across the top of the bib then chain st a further 9-10ins. Finish off.
This is an example of how my knitted mohair rompers look upon completing all knitting but before sewing the seams. The pictured example is the Coral Romper but the construction is the same. The piece is knit in one piece. You will mattress stitch the sides together from your cast on edge/bind off before the bib to the markers.

Shiloh Romper PDF
Disclaimer: This page contains affiliate links. If you choose to make a purchase after clicking a link, I may receive a commission at no additional cost to you. Thank you for your support!
Comments are closed.