
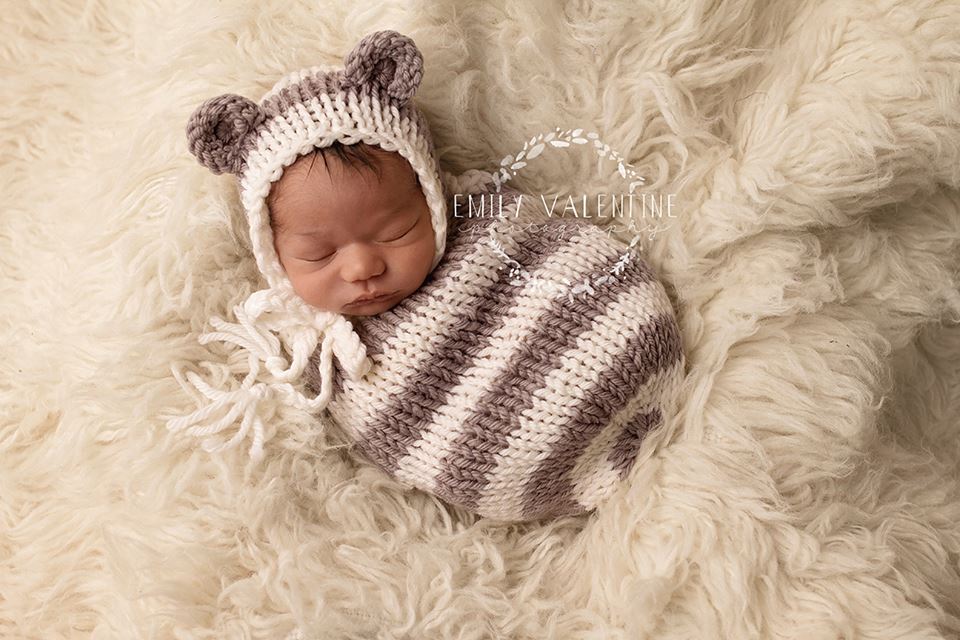
Looking for the perfect photo prop for newborn photography? A free bear bonnet pattern is just what you need! These adorable bonnets turn any little one into a snuggly bear cub, making them a must-have for professional photographers and parents alike. Check out my collection of free photo prop knitting patterns here—and don’t worry, this free bear bonnet pattern is right at the bottom of this post!

Why Every Newborn Needs a Bear Bonnet
Knitting isn’t just a craft; it’s how I turn love and memories into stitches. And when it comes to newborn photo props, nothing tugs at the heartstrings quite like a free bear bonnet pattern. There’s just something so sweet about a tiny baby wrapped up in a soft blanket, wearing a snug little bonnet with bear ears. Instant cuteness overload!
I remember the first time I knit a bear bonnet—it was for a close friend’s newborn shoot. As soon as I saw that squishy little face peeking out from the bonnet, I knew this was going to be one of my favorite newborn patterns. There’s something timeless about it, a little piece of childhood nostalgia wrapped up in a cozy handmade knit.
The Magic of Handmade Baby Bonnets
A hand-knit bear bonnet isn’t just about warmth; it’s about capturing memories. Every stitch carries love, care, and a little bit of joy. And let’s be honest, baby knits are some of the most rewarding projects—quick, adorable, and always appreciated.
When I make a free bear bonnet pattern, I think about the tiny head it will keep warm, the baby yawns it will witness, and the photos that will live on for years. Handmade pieces like this become cherished keepsakes, tucked away in baby boxes or even passed down to younger siblings.
Choosing the Perfect Yarn for Your Bear Bonnet
Let’s talk yarn—because if you want the best free bear bonnet pattern, you need the right materials. For me, bulky weight yarn is the way to go. It knits up quickly, adds a plush texture, and gives that extra bit of warmth perfect for newborns.
That’s why I chose KnitPicks Brava Bulky (affiliate link). It’s soft, washable (a must for anything baby-related!), and super affordable. Plus, it has just the right amount of stretch for a snug yet comfy fit.
I always lean toward classic bear colors like soft browns, warm tans, or cozy grays. But if you love a pop of color, go for it! A pastel pink or baby blue bear bonnet would be just as adorable.
Knitting the Perfect Free Bear Bonnet Pattern
Knitting a free bear bonnet pattern is an absolute joy. The shaping is simple, making it an approachable project even if you’re newer to knitting. You’ll start with a basic bonnet shape, add some ribbing for stretch, and then comes the best part—the ears!
Bear ears make this bonnet extra special. They add that playful, whimsical touch that transforms a simple bonnet into something extraordinary. I like to double-layer the ears so they stand up nicely, but if you prefer floppy ears, just use a single layer of fabric.
And let’s not forget about finishing touches! A cute tie under the chin or a soft ribbon bow can make your bear bonnet even sweeter.

Why This Free Bear Bonnet Pattern Stands Out
There are plenty of free baby bonnet knitting patterns out there, but a bear bonnet? That’s next-level cuteness. Whether you’re knitting one for a newborn photoshoot, a baby shower gift, or just to add to your collection of handmade baby knits, this is a pattern that will never go out of style.
And if you’re anything like me, once you knit one, you’ll want to make a whole bunch in different colors. It’s addictive!
The Ultimate Photo Prop for Newborns
One of the biggest reasons I love this free bear bonnet pattern is its versatility. It works for all kinds of newborn photography themes—woodland, vintage, cozy at-home sessions, you name it.
Imagine a tiny baby curled up in a basket, their little head framed by soft bear ears. Or a sleepy newborn wrapped in a matching swaddle, looking like the snuggliest cub in the world. Whether you’re a photographer or a parent, this free bear bonnet pattern is a game-changer.
Want more free knitting patterns for photo props? I’ve got a whole collection here featuring swaddle sacks, bonnets, and more adorable knits!
A Handmade Treasure for Every Baby
In a world filled with fast fashion and mass-produced baby items, a hand-knit bear bonnet is a breath of fresh air. It’s made with love, meant to last, and carries sentimental value that no store-bought hat can match.
I can’t tell you how many moms have messaged me years later saying they still have the bonnet I knit for their little one. Some have even saved it for their next baby or passed it down to cousins. That’s the power of a handmade knit—it becomes a treasured keepsake.
So whether you’re knitting this free bear bonnet pattern for a gift, a photography session, or your own little one, know that you’re creating something truly special.
Get the Free Bear Bonnet Pattern Below!
Ready to get knitting? You can find this free bear bonnet pattern at the bottom of this post! And if you’re looking for even more adorable newborn photo prop patterns, check out my full collection here.
Happy knitting, and may your stitches always be filled with warmth and love!

Teddy Bonnet Pattern
Materials: appx 50-90yd of bulky weight yarn (KnitPicks Brava Bulky), size 11 (8mm) straight and dpn needles, yarn needle
Gauge: appx 2.75sts/inch – ~gauge is very important~
Stitch Key:
st – stitch
co – cast on
k – knit
k2tog – knit 2 together
yo – yarn over
Head circumference: nb (13ins). 0-3mths (14ins), 3-6mth (15ins), 6-12mths (16ins)
NEWBORN
CO 28sts.
Work in stockinette st for approximately 4ins ending after working a right side row.
(if you want to do striped as in the model photo than work 4 rows of each color throughout, switching without cutting yarn)
You will now start working in the round and need to switch to your dpn
Decreases
Round 1 – [k2tog, k2] around (21sts)
Round 2 – knit around
Round 3 – [k2tog, k1] around (14sts)
Round 4 – [k2tog] around (7sts)
Do not bind off. Cut yarn and pull through all remaining sts. Cinch tightly closed and tie off. Cut 3 pieces of yarn appx 30ins long. Fold them in half and pull a loop through the front corner of the hood. Pull the ends through this loop and secure. Now braid loosely to desired length. Clip ends. Repeat on the other side.
Ears (make 2)
CO 10sts
Work in stockinette sts for 6 rows.
Do not bind off. Cut yarn and pull through all remaining sts. Cinch tightly closed and tie off. Sew onto bonnet. (photo tutorial at the end of pattern)
0-3MTH
CO 30sts.
Work in stockinette st for approximately 4.5ins ending after working a right side row.
(if you want to do striped as in the model photo than work 4 rows of each color throughout, switching without cutting yarn)
You will now start working in the round and need to switch to your dpn
Decreases
Round 1 – [k2tog, k3] around (24sts)
Round 2 – knit around
Round 3 – [k2tog, k2] around (18sts)
Round 4 – [k2tog, k1] around (12sts)
Do not bind off. Cut yarn and pull through all remaining sts. Cinch tightly closed and tie off. Cut 3 pieces of yarn appx 30ins long. Fold them in half and pull a loop through the front corner of the hood. Pull the ends through this loop and secure. Now braid loosely to desired length. Clip ends. Repeat on the other side.
Ears (make 2)
CO 10sts
Work in stockinette sts for 6 rows.
Do not bind off. Cut yarn and pull through all remaining sts. Cinch tightly closed and tie off. Sew onto bonnet. (photo tutorial at the end of pattern)
3-6MTH
CO 33sts.
Work in stockinette st for approximately 5ins ending after working a right side row.
(if you want to do striped as in the model photo than work 4 rows of each color throughout, switching without cutting yarn)
You will now start working in the round and need to switch to your dpn
Decreases
Round 1 – [k2tog, k9] around (30sts)
Round 2 – [k2tog, k3] around (24sts)
Round 3 – [k2tog, k2] around (18sts)
Round 4 – [k2tog, k1] around (12sts)
Do not bind off. Cut yarn and pull through all remaining sts. Cinch tightly closed and tie off. Cut 3 pieces of yarn appx 30ins long. Fold them in half and pull a loop through the front corner of the hood. Pull the ends through this loop and secure. Now braid loosely to desired length. Clip ends. Repeat on the other side.
Ears (make 2)
CO 10sts
Work in stockinette sts for 6 rows.
Do not bind off. Cut yarn and pull through all remaining sts. Cinch tightly closed and tie off. Sew onto bonnet. (photo tutorial at the end of pattern)
6-12MTHS
CO 35sts.
Work in stockinette st for approximately 5.5ins ending after working a right side row.
(if you want to do striped as in the model photo than work 4 rows of each color throughout, switching without cutting yarn)
You will now start working in the round and need to switch to your dpn
Decreases
Round 1 – [k2tog, k3] around (28sts)
Round 2 – knit around
Round 3 – [k2tog, k2] around (21sts)
Round 4 – [k2tog, k1] around (14sts)
Round 5 – [k2tog] around (7sts)
Do not bind off. Cut yarn and pull through all remaining sts. Cinch tightly closed and tie off. Cut 3 pieces of yarn appx 30ins long. Fold them in half and pull a loop through the front corner of the hood. Pull the ends through this loop and secure. Now braid loosely to desired length. Clip ends. Repeat on the other side.
Ears (make 2)
CO 12sts
Work in stockinette sts for 8 rows.
Do not bind off. Cut yarn and pull through all remaining sts. Cinch tightly closed and tie off. Sew onto bonnet. (photo tutorial at the end of pattern)
Teddy Ear Tutorial

Download Teddy Bear Bonnet PDF

Disclaimer: This page contains affiliate links. If you choose to make a purchase after clicking a link, I may receive a commission at no additional cost to you. Thank you for your support!
Comments are closed.