
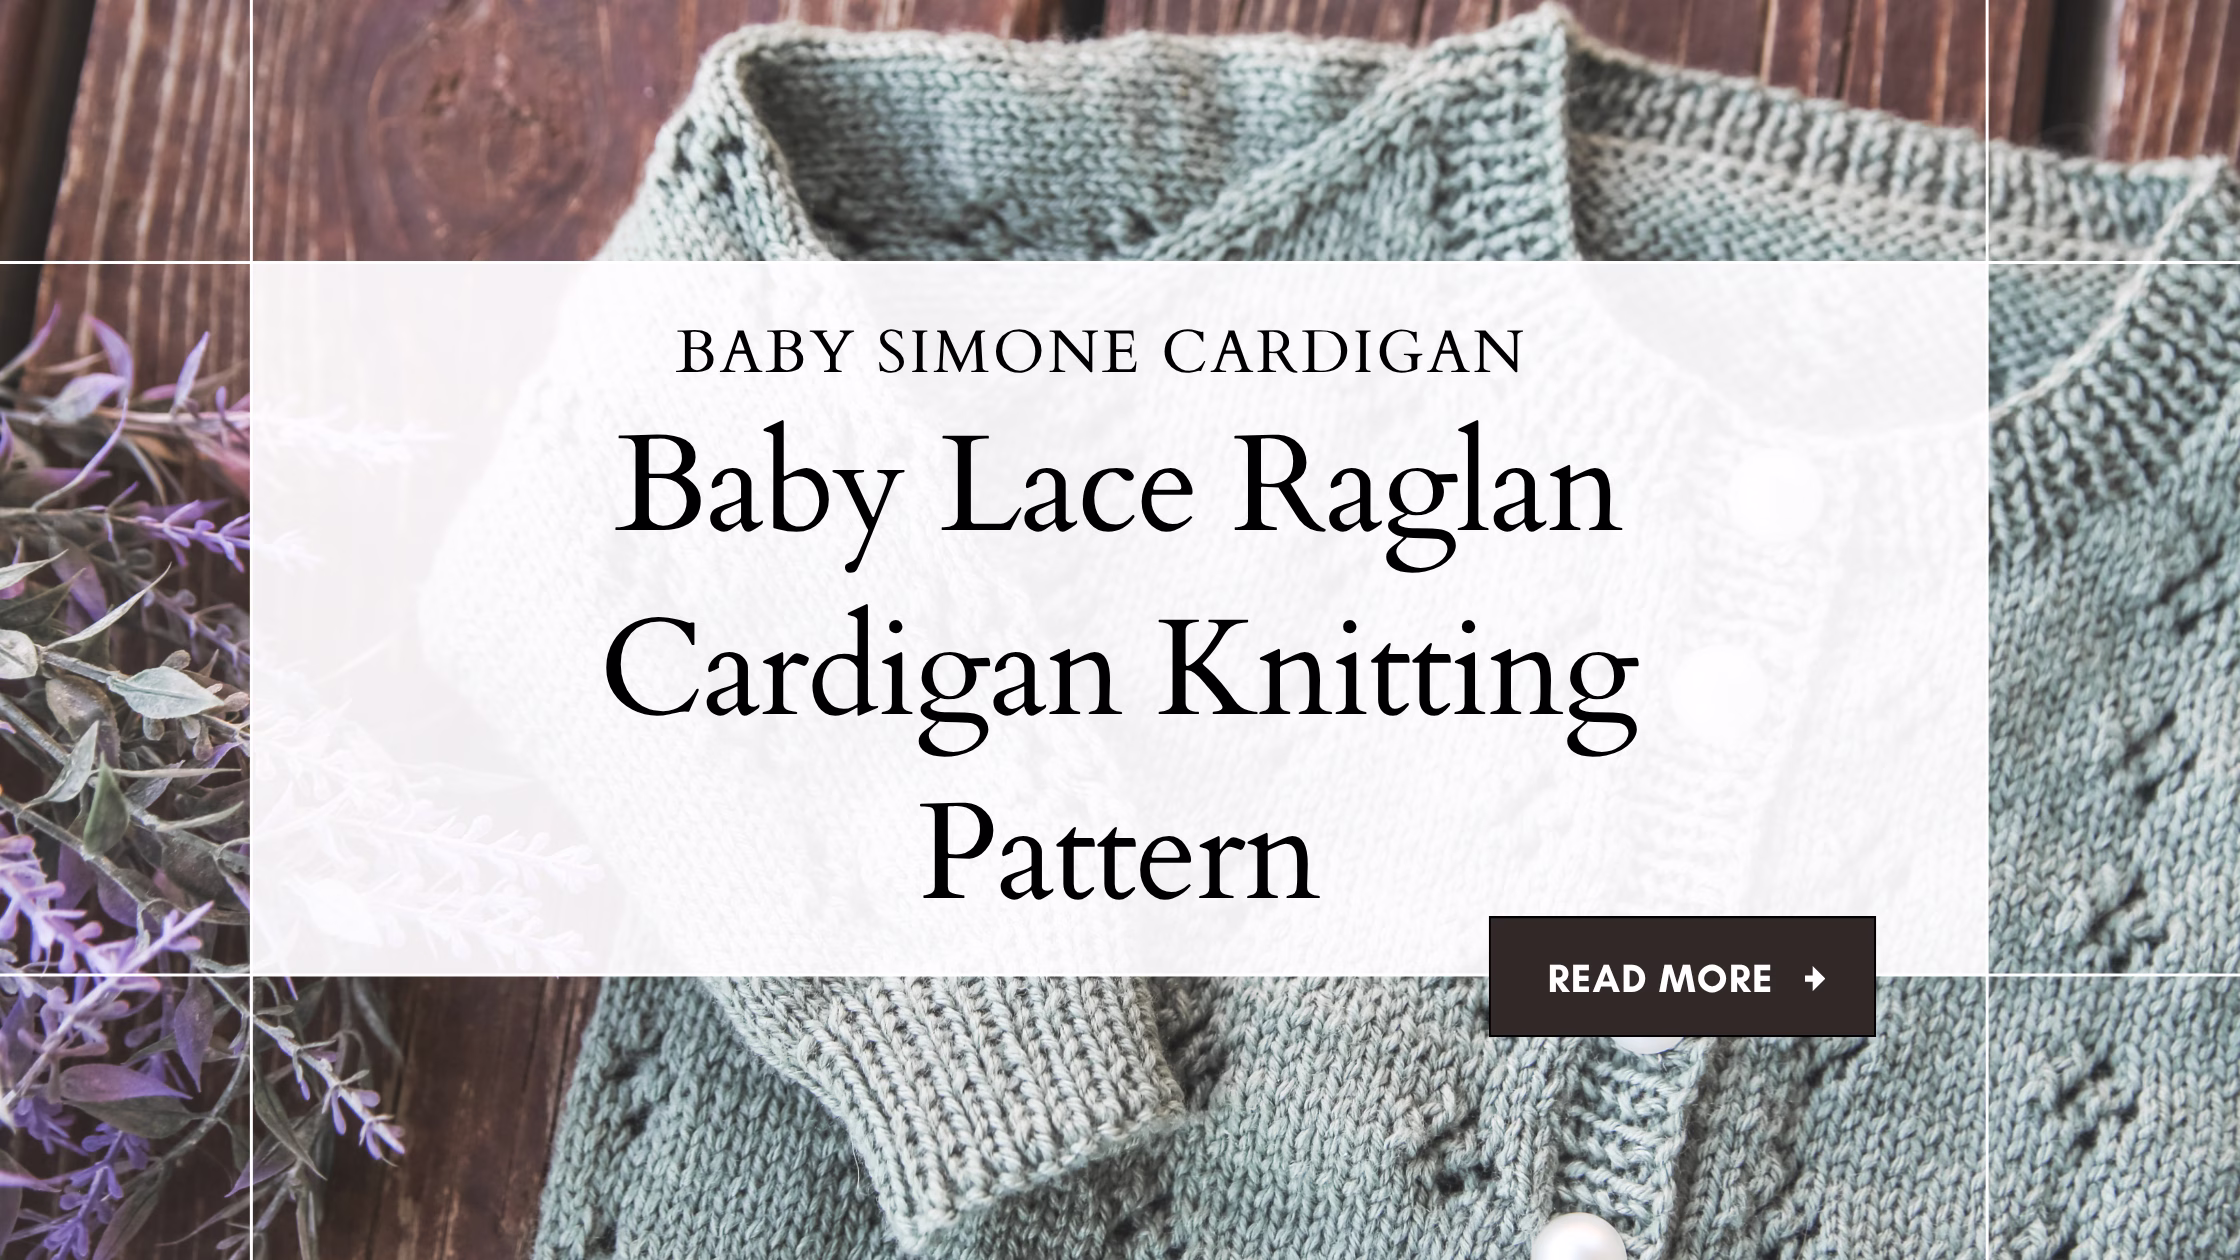
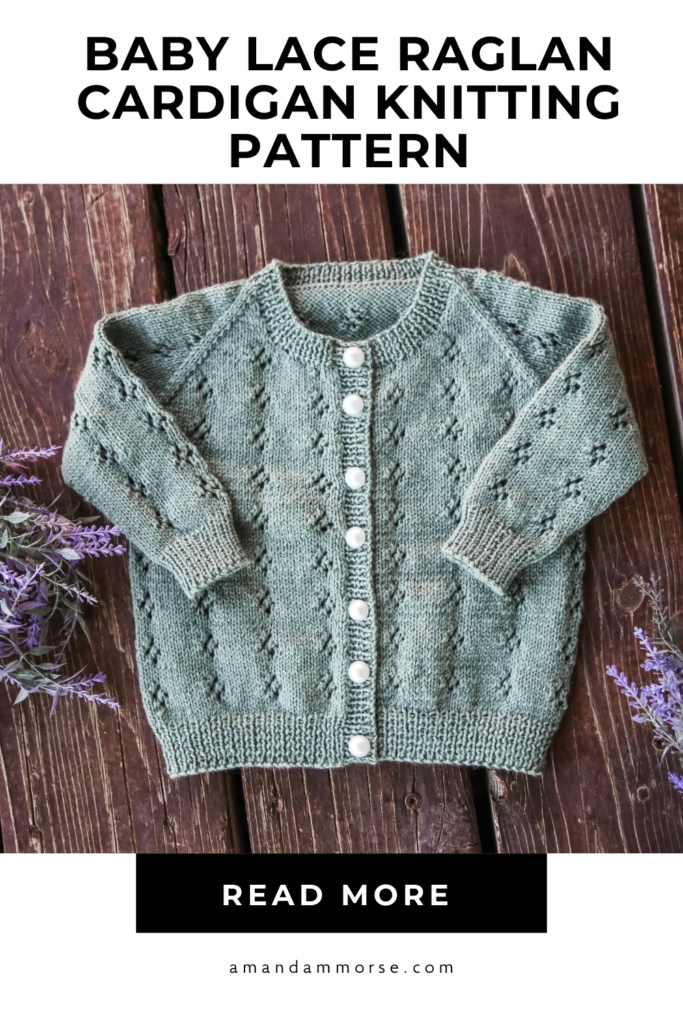
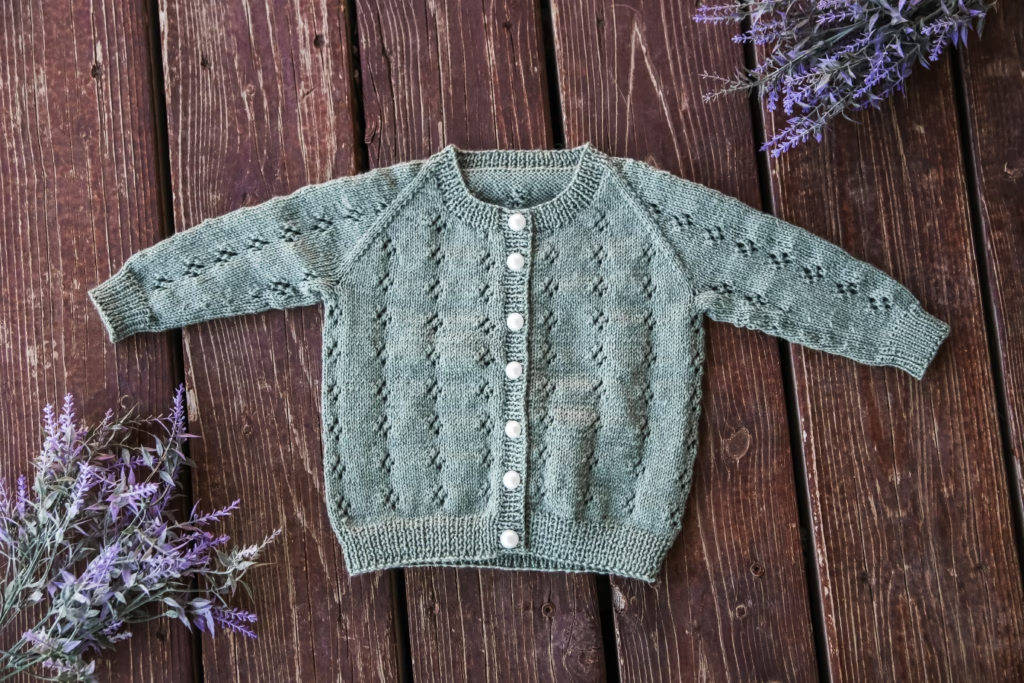
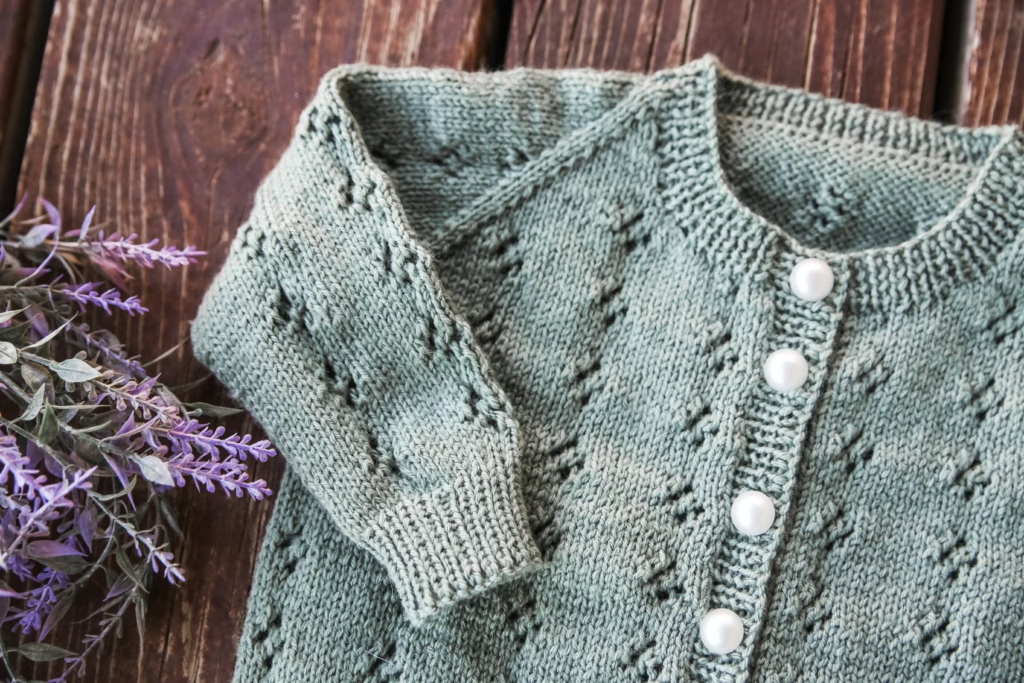
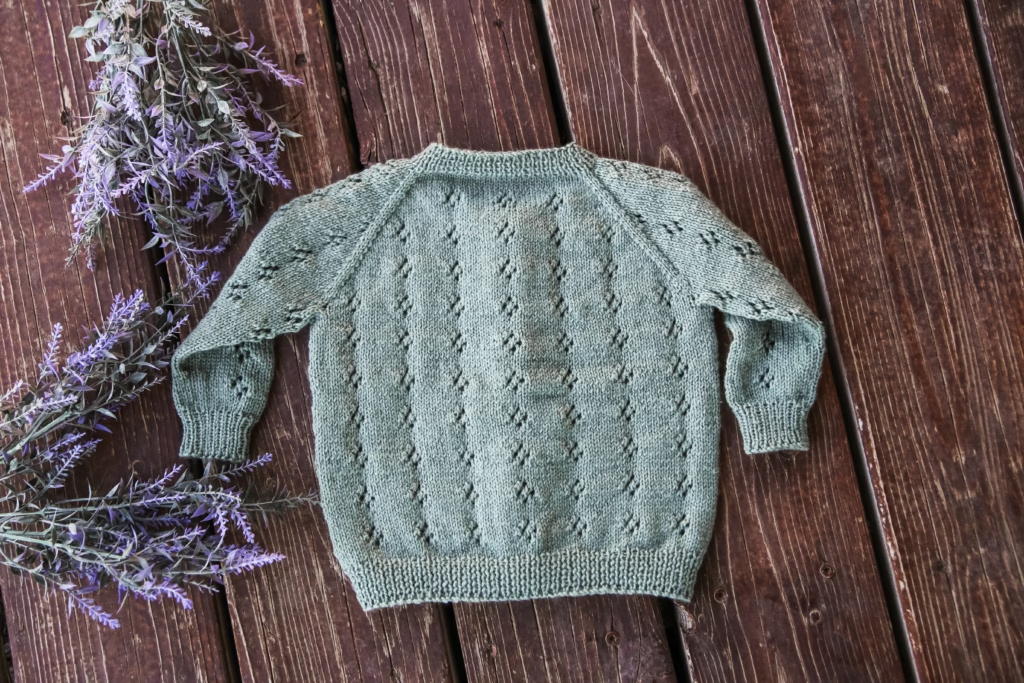
This baby lace raglan cardigan knitting pattern is a sweet little free sweater knitting pattern with tiny lace diamond lines, a classic crew neck, and a button-front design that works beautifully for everyday baby knits. If you have been looking for a lightweight baby cardigan that feels pretty without being too fussy, the Baby Simone Cardigan is a lovely project to add to your list. This baby lace raglan cardigan knitting pattern is worked from the top down with raglan shaping, which makes it a great choice if you enjoy seeing the sweater grow as you knit. The lace detail adds just enough interest while still keeping the cardigan practical for babies.
The Baby Simone Cardigan is designed for sizes 0-3 months through 24 months, so it is a helpful pattern whether you are knitting for a brand-new baby or a busy little toddler. I love baby cardigans with buttons because they are easy to layer, easy to wear, and easy to take on and off when babies are wiggly.
The tiny lines of lace diamonds give this cardigan a soft, delicate look without making the whole project feel complicated. It is still a wearable baby sweater, but the little lace details make it feel special enough for gifts, photos, church, or everyday outfits that need one more handmade layer.
What Materials Do You Need for This Baby Lace Raglan Cardigan Knitting Pattern?
This baby lace raglan cardigan knitting pattern uses KnitPicks Mighty Stitch Fingering, which is a nice choice when you want a baby sweater that is lightweight but still easy-care. Fingering weight yarn keeps the cardigan from feeling too bulky on tiny babies, and it helps the lace diamond lines show up clearly across the fabric.
For this pattern, you will use size 1 and size 2 knitting needles. The smaller needle is helpful for the ribbing, while the larger needle is used for the main body of the cardigan. That needle size change helps keep the edges neat without making the whole sweater too tight.
Because this is a button-front baby cardigan, you will also need buttons that fit the buttonholes in the pattern. I like choosing simple buttons for baby sweaters because they let the lace design stand out without competing with the stitch pattern.
KnitPicks Mighty Stitch Fingering is also a practical yarn option if you are knitting for babies because it has softness, stitch definition, and easy care all in one yarn. For a baby cardigan knitting pattern, that matters because baby clothes usually need to be washed more than once and still come out looking nice.
This is one of those patterns where the yarn and stitch details work together really well. The lace diamonds are small enough to be sweet and subtle, but clear enough that they add texture and interest all the way down the cardigan.
How Is This Baby Lace Raglan Cardigan Knitting Pattern Made?
This baby lace raglan cardigan knitting pattern is worked from the top down using raglan shaping. That means you begin at the neckline and increase as you work down through the yoke, creating the shape of the shoulders and body as you go.
Top-down baby cardigan knitting patterns are so helpful because they make the construction feel easier to understand. Instead of knitting separate pieces and wondering how everything will come together later, you can see the cardigan taking shape right on your needles.
The crew neck gives the Baby Simone Cardigan a simple, classic fit, and the button band makes it easy to use for layering. The tiny lace diamond lines run down the cardigan and add a pretty detail without turning the sweater into an overly complicated lace project.
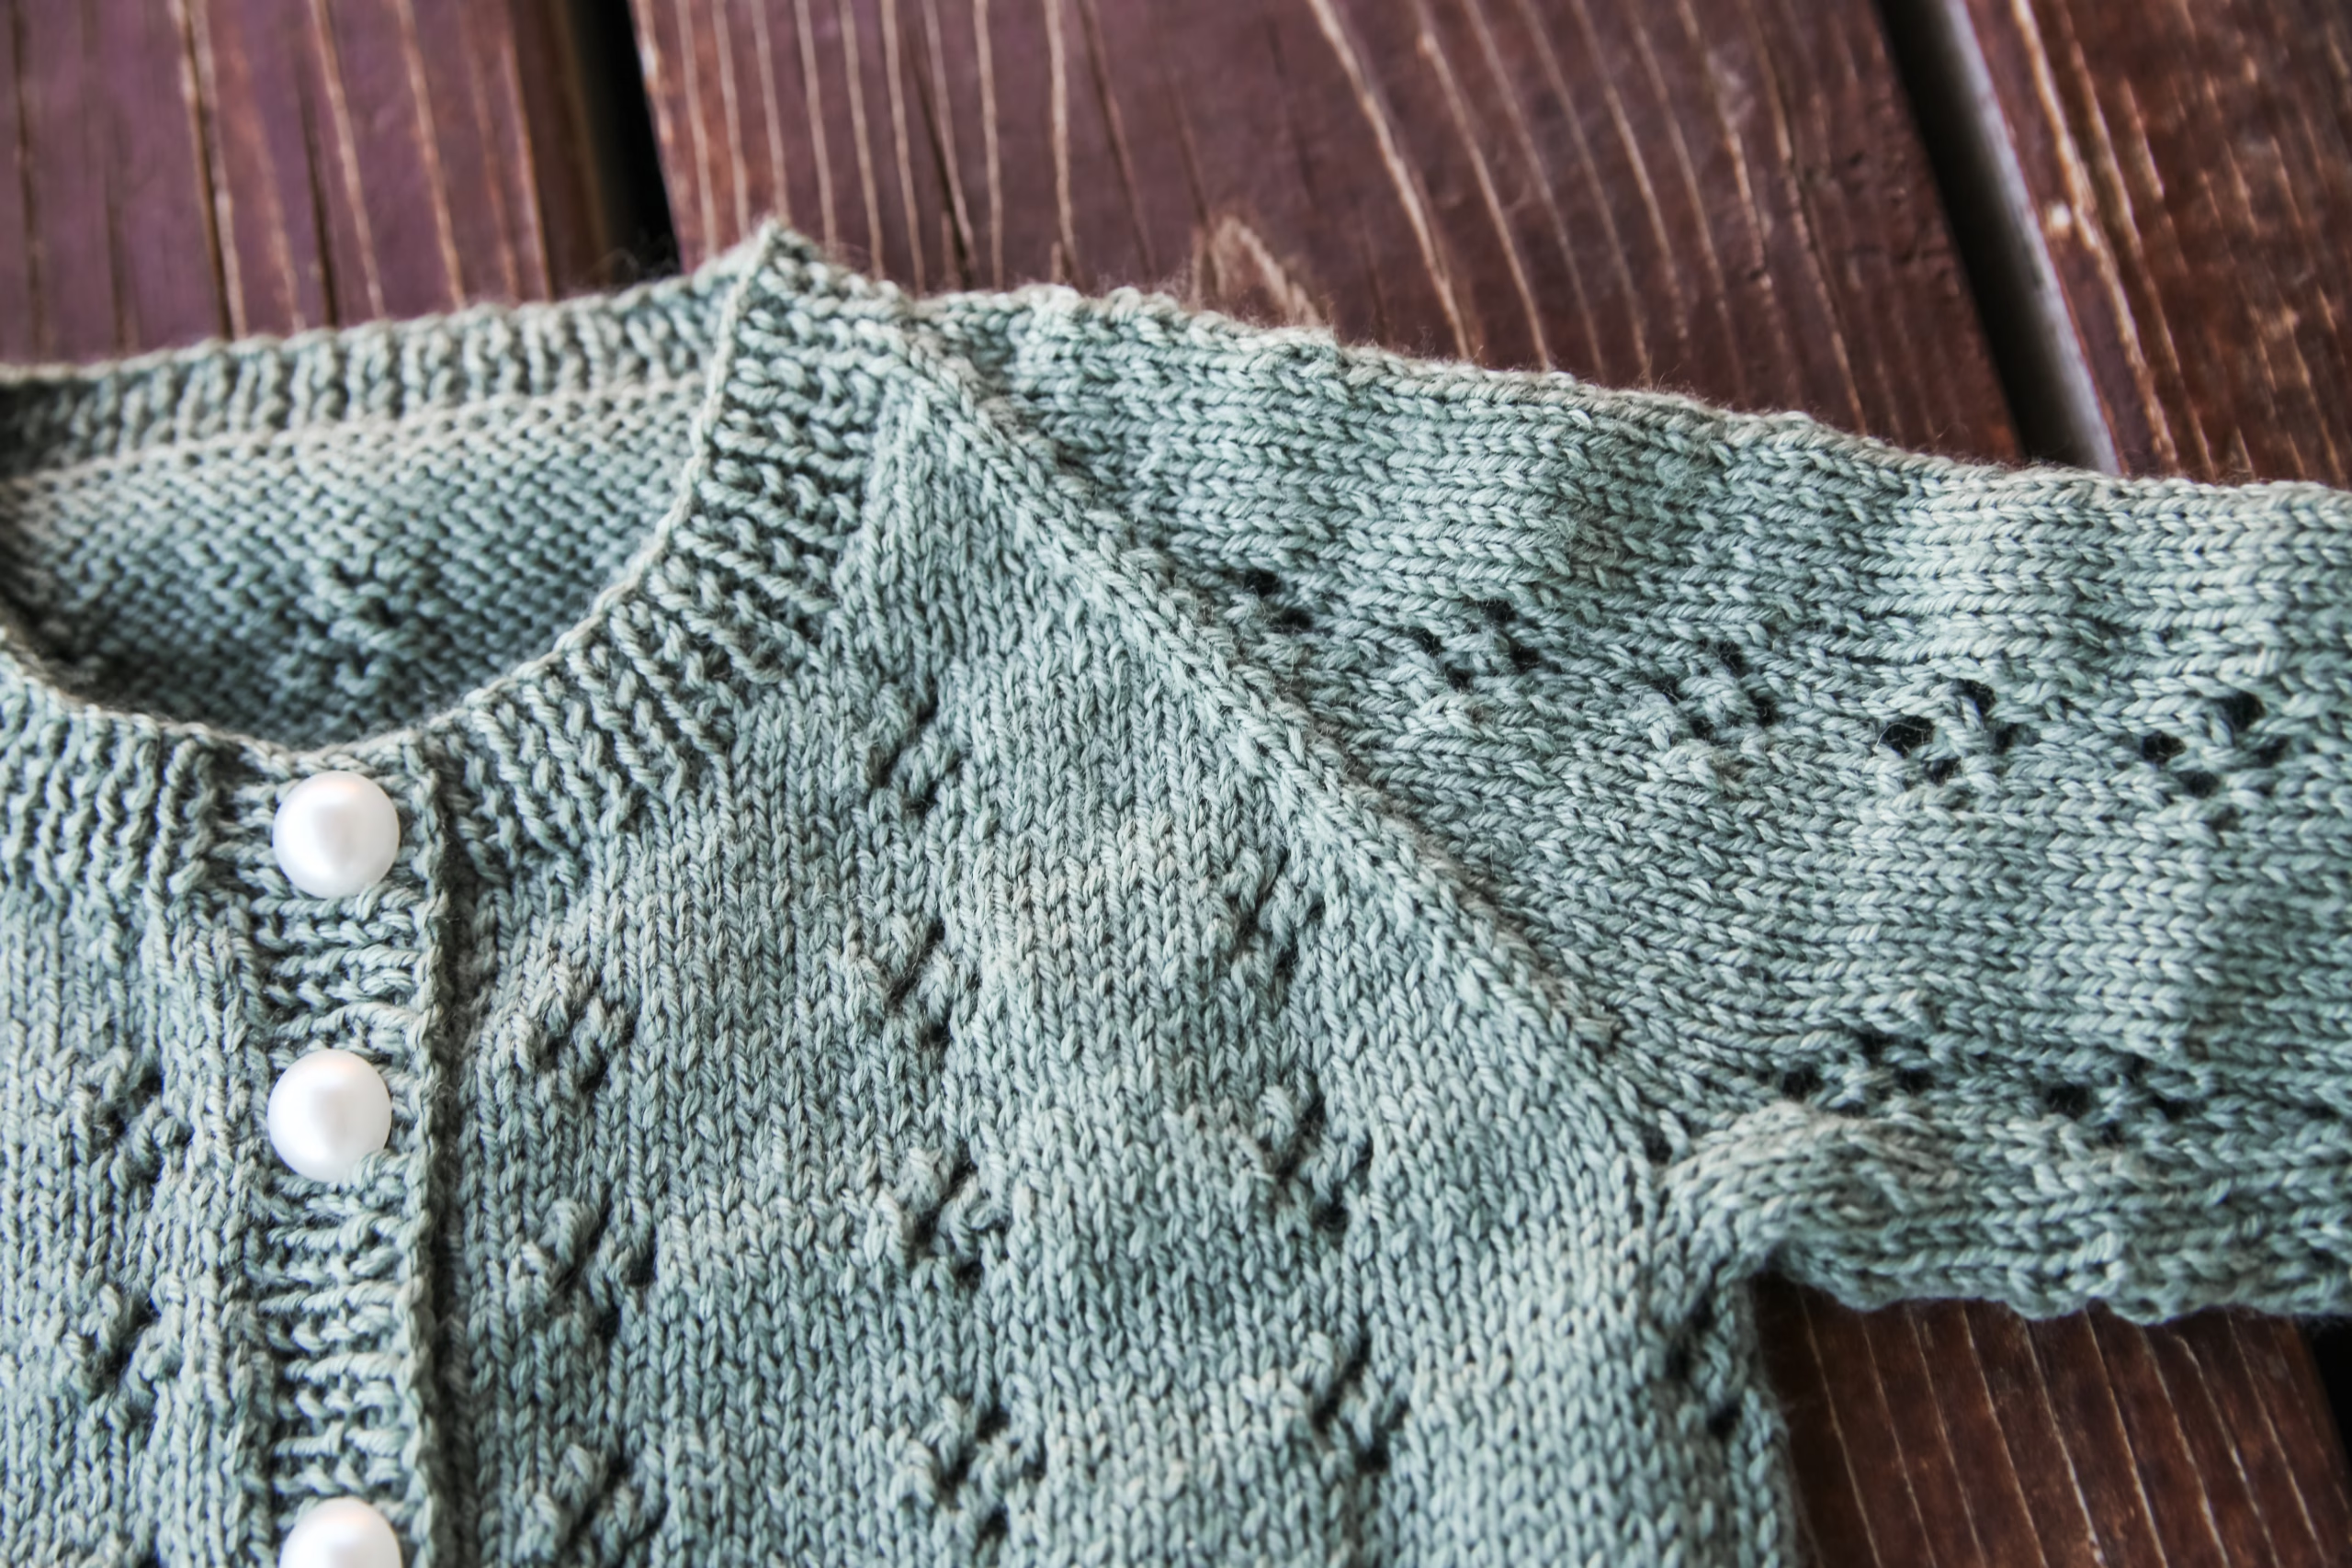
If you are newer to lace, this is a nice way to practice because the lace is used in a small repeating detail instead of taking over the entire cardigan. You still get the fun of yarn overs and decreases, but the overall sweater construction stays familiar and manageable.
This baby lace cardigan pattern is also a great project if you enjoy knitting baby gifts that feel thoughtful and useful. The shape is classic, the buttons are practical, and the lace detail gives it that little bit of extra charm.
What Other Baby Cardigan Knitting Patterns Should You Try?
If you love this baby lace raglan cardigan knitting pattern, you may also enjoy these free baby cardigan knitting patterns:
• Baby Damask Cardigan
• Baby John Hooded Cardigan
• Baby Wheat Cardigan
The Baby Damask Cardigan is a great choice if you love texture and stitch detail in baby sweaters. The Baby John Hooded Cardigan is a practical option when you want something a little more casual, and the Baby Wheat Cardigan is perfect if you enjoy simple, classic baby knits.
Baby cardigans are some of my favorite projects to knit because they are small enough to finish without feeling like a huge commitment, but they still make such useful finished pieces. Whether you are knitting for your own baby, a grandbaby, a baby shower gift, or a new little one at church, a handmade cardigan is always such a sweet project.
The Baby Simone Cardigan fits right into that category because it is useful, pretty, and detailed without being overwhelming. The combination of raglan shaping, fingering weight yarn, buttons, and tiny lace diamonds makes this baby lace raglan cardigan knitting pattern a fun project to cast on when you want something special but still wearable.
Baby Simone Cardigan Free Pattern
Size: 0-3m, 3-6m (6-12m, 12m) 18m, 24m
Materials: 344, 400 (471, 545) 613, 671 yds of KnitPicks Mighty Stitch Fingering 437yds/ 100g, 3/8in buttons, yarn needle, stitch markers
Needle Size: 1(US) 2.5mm & 2(US) 3mm straight and dpn
Gauge (tension): 28sts & 40 rows to make 10cm square, using size 2(US) 3mm needles
Chest Measurement: 41, 44 (47, 50) 52, 54 cm or 16.5, 17.5 (18.75, 20) 21, 21ins
METHOD
This pattern is for a top down raglan with 10cm of ease.
- Simone Stitch Chart Pattern
Row Instructions
Row 1 – knit across
Row 2 – purl across
Row 3 – knit across
Row 4 – purl across
Row 5 – k4, yo, k2tog, k4
Row 6 – purl across
Row 7 – k3, yo, k2tog, yo, k2tog, k3
Row 8 – purl across
Row 9 – k4, yo, k2tog, k4
Row 10 – purl across
In the round instructions
Row 1 – knit across
Row 2 – knit across
Row 3 – knit across
Row 4 – knit across
Row 5 – k4, yo, k2tog, k4
Row 6 – knit across
Row 7 – k3, yo, k2tog, yo, k2tog, k3
Row 8 – knit across
Row 9 – k4, yo, k2tog, k4
Row 10 – knit across - Neck
Cast on 48, 50 (50, 52) 54, 54 sts using the larger circular needles
Set-up Row:
With wrong side facing, p2, 2 (2, 2) 2,2, pm, p6, 6 (6, 6) 6, 6, pm, p32, 34 (34, 36) 38, 38, pm, 6, 6 (6, 6) 6, 6, pm, p2, 2 (2, 2) 2, 2
RAGLAN SHAPING AND NECK SHAPING ARE WORKED AT THE SAME TIME!
Please look at notes at the end of the pattern for help centering the stitch pattern - RAGLAN SHAPING
Row 1 – Work in charted stitch pattern to 1st before marker, m1r, k1, sm, k1, m1l, work in charted stitch pattern to 1 st before marker, m1r, k1, sm, k1, m1l, work in charted stitch pattern to 1 st before marker, m1r, k1, sm, k1, m1l, work in charted stitch pattern to 1 st before marker, m1r, k1, sm, k1, m1l, work in charted stitch pattern across to end of row [8sts increased]
Row 2 – purl across, slipping markers as you get to them
Work rows 1 and 2 for a total of 13, 14 (16, 17) 17, 18 times
Row 1 – Work in charted stitch pattern to 1st before marker, m1r, k1, sm, k1, m1l, work in charted stitch pattern to 1 st before marker, m1r, k1, sm, k1, m1l, work in charted stitch pattern to 1 st before marker, m1r, k1, sm, k1, m1l, work in charted stitch pattern to 1 st before marker, m1r, k1, sm, k1, m1l, work in charted stitch pattern across to end of row [8sts increased]
Row 2 – Purl across, slipping markers as you get to them
Row 3 – work across in established charted stitch pattern, slipping markers as you get to them
Row 4 – Purl across, slipping markers as you get to them
Work rows 1-4 for a total of 2, 2 (2, 2) 3, 3 times - NECK SHAPING
Start front neck shaping after working 4, 6 (6, 5) 9, 9 rows after the set-up row.
Increase 1 st at each end of every 4th row 1 time
Increase 1 sts at each end of every other row 1time
Increase 1 sts at each end of every row 3, 3 (3, 4) 4, 4 times
Then cast on 8, 9 (9, 9) 10, 10 sts at each end of the next row
This should give a total of 13, 14 (14, 15) 16, 16 sts per side added to the neck. - STITCH COUNT CHECK
After working raglan and neck increases you should have:
194, 206 (222, 234) 246, 254 sts total
Left front/right front – 30, 32 (34, 36) 38, 39 sts each side
Back – 62, 66 (70, 74) 78, 80 sts
Sleeves – 36, 38 (42, 44) 46, 48 sts each sleeve - DIVIDE FOR SLEEVES
Work in established charted stitch pattern for 30, 32 (34, 36) 38, 39 sts, rm, place 36, 38 (42, 44) 46, 48 sleeve sts on holder, cast on 4, 10 (6, 7) 13, 11 sts, rm, work in established charted stitch pattern across the back 62, 66 (70, 74) 78, 80 sts, rm, place 36, 38 (42, 44) 46, 48 sleeve sts on holder, cast on 4, 10 (6, 7) 13, 11 sts, rm, Work in established charted stitch pattern for 30, 32 (34, 36) 38, 39 sts
[130, 150 (150, 160) 180, 180 sts]
Work in established charted stitch pattern for a total of 4.5, 5 (6, 7) 7.5, 8 ins or 11, 12.5 (15, 17.5) 18.5, 20 cms measured from cast on sts at underarm.
Switching to smaller sized circular needles, work in 1×1 ribbing (k1,p1) 1, 1 (1, 1) 1, 1 (1. 1) in or 2.5, 2.5 (2.5, 2.5) 2.5, 2.5 (2.5, 2.5) cms
Bind off in pattern. - SLEEVES (MAKE 2)
With larger sized dpn (or long circular for magic loop) pick up and k3, 4 (4, 4) 5, 4 sts, work in established charted stitch pattern the 36, 38 (42, 44) 46, 48 sleeve sts on hold, pick up and knit 3, 4 (4, 4) 5, 4 sts, join in the round.
[42, 46 (50, 52) 56, 56 sts]
Place bor marker.
Work without shaping in established charted stitch pattern for .5, .75 (.75, 1) 1, 1 ins or 1, 2 (2, 2.5) 2.5, 2.5 cms
Now decrease 1 st at each end of every 8th round 0, 0 (0, 0) 1, 4 times
Then decrease 1 st at each end of every 6th round 1, 5 (5, 6) 6, 4 times
Then decrease 1 st at each end of every 4th round 5, 0 (2, 2) 2, 0 times
[30, 36 (36, 36) 38, 40 sts]
Work without shaping in established charted stitch pattern until the sleeve measures 3.5, 4 (5, 6) 6.5, 7 ins or 9, 10 (12.5, 15) 16, 17.5 cms from where you picked up the sleeve sts.
Switching to smaller sized dpn, work in work in 1×1 ribbing (k1,p1) for 1, 1 (1, 1) 1, 1 (1. 1) in or 2.5, 2.5 (2.5, 2.5) 2.5, 2.5 (2.5, 2.5) cms - NECK
With right side facing and smaller needles pick up and knit
8, 9 (9, 9) 10, 10 sts along the right front cast on edge
4, 5 (5, 5) 7, 7 sts up right front of neck
6, 6 (6, 6) 6, 6 sts from right sleeve
32, 34 (34, 36) 38, 38 sts from back neck
6, 6 (6, 6) 6, 6 sts from left sleeve
4, 5 (5, 5) 7, 7 sts down left front neck
8, 9 (9, 9) 10, 10 sts along left front neck cast on edge
[76, 82 (82, 84) 94, 94 sts]
Work 1.5, 1.5 (1.5, 2) 2, 2 cms or .5, .5 (.5, .75) .75, .75 ins of (k1, p1) rib.
Bind off all sts in pattern. - FRONT RIB EDGES
LEFT FRONT EDGE
Pick up and knit 66, 67 (73, 79) 85, 97 sts along the edge with the smaller sized circular needles.
Work 7, 7 (7, 9) 9, 9 rows of rib (k1, p1).
Bind off in established rib pattern.
RIGHT FRONT EDGE
Pick up and knit 61, 67 (73, 79) 85, 97 sts along the edge with the smaller sized circular needles.
Work 3, 3 (3, 4) 4, 4 rows in k1p1 ribbing
Buttonhole row: Work 2 sts in established rib pattern, k2tog yo, *work 7, 8 (9, 10) 11, 13 sts in established rib pattern, work k2tog, yarn over*, repeat from * to * to the last 3 sts, work 3 sts in rib.
Work 3, 3 (3, 4) 4, 4 rows in k1p1 ribbing
Bind off in established rib pattern. - FINISHING
Sew the sleeves on, side seams and sleeve seams. I prefer to use the mattress stitch because it almost appears seamless. Weave in all ends. Sew the buttons on along the left front edge across from the buttonholes
- Centering the stitch pattern
For sleeves:
Center the chart by on the 3rd raglan increase after the m1r, k3, yo, k2tog, yo, k3, then do the m1l
For back:
center the chart on starting on the 3rd raglan inc after m1r, k1, 2 (2, 3) 4, 4 work chart 3 times, k1, 2 (2, 3) 4, 4, m1l
For front:
Start working the chart once all neck stitches have been cast on then center the stitch on the open edges that the button band will be picked up on. - ABBREVIATIONS
BOR – beginning of round
K – knit
K2tog -knit 2 stitches together
M1L – Insert the left needle under the strand that runs between two stitches from front to back, then knit this strand through the back loop
M1R – Insert the left needle under the strand that runs between two stitches from back to front, then knit this strand
P – purl
PM – place marker
RM – remove marker
SM – slip marker
YO – yarn over
I would love to hear what color you would choose for your Baby Simone Cardigan. Are you going soft and classic, bright and cheerful, or something neutral that can be passed down? Leave a comment and let me know!
This post may contain affiliate links. If you make a purchase through one of my links, I may earn a small commission at no extra cost to you.
Hello! I am having such trouble understanding the centering of the chart on the sleeves and body. I find that I have more stitches to one side than the other. Then, my m1l increase takes over my m1r increase for the next section of the cardigan. Also, I am confused by the two row 1s listed in the raglan shaping portion. When would I complete the rows 1-4 twice? Any advice would be great, thanks!
So on the 3rd set of raglan increase (this will be on the 6th row you are currently working) you will start working the charted stitch pattern for the sleeve. you should have 10 stitches for your sleeve when you start this row, after the increase you will have 12. you will k1, m1, k3, yo, k2tog, k3, m1, k1. This totals 12sts.
The raglan increases are separated by section. there is a top section that is a 2 row repeat. There is a sentence there of how many to do depending on size after – Work rows 1 and 2 for a total of 13, 14 (16, 17) 17, 18 times – this is there under the 2 row repeat. Under the 4 row repeat there is another sentence just like that – Work rows 1-4 for a total of 2, 2 (2, 2) 3, 3 times
I am also having an issue centering the front of the work. By row 15, I’m still adding 1 stitch per side instead of casting on 9 stitches. How should I center the chart there? Or should I be casting in nine stitches when I begin centering the chart in the front of the cardigan? Thanks again!
You’ll want to begin centering the chart based on the front edge after casting the rest of the neck.