
This free easy baby cardigan pattern is a sweet and simple project that also fits right in with your collection of free sweater knitting patterns.
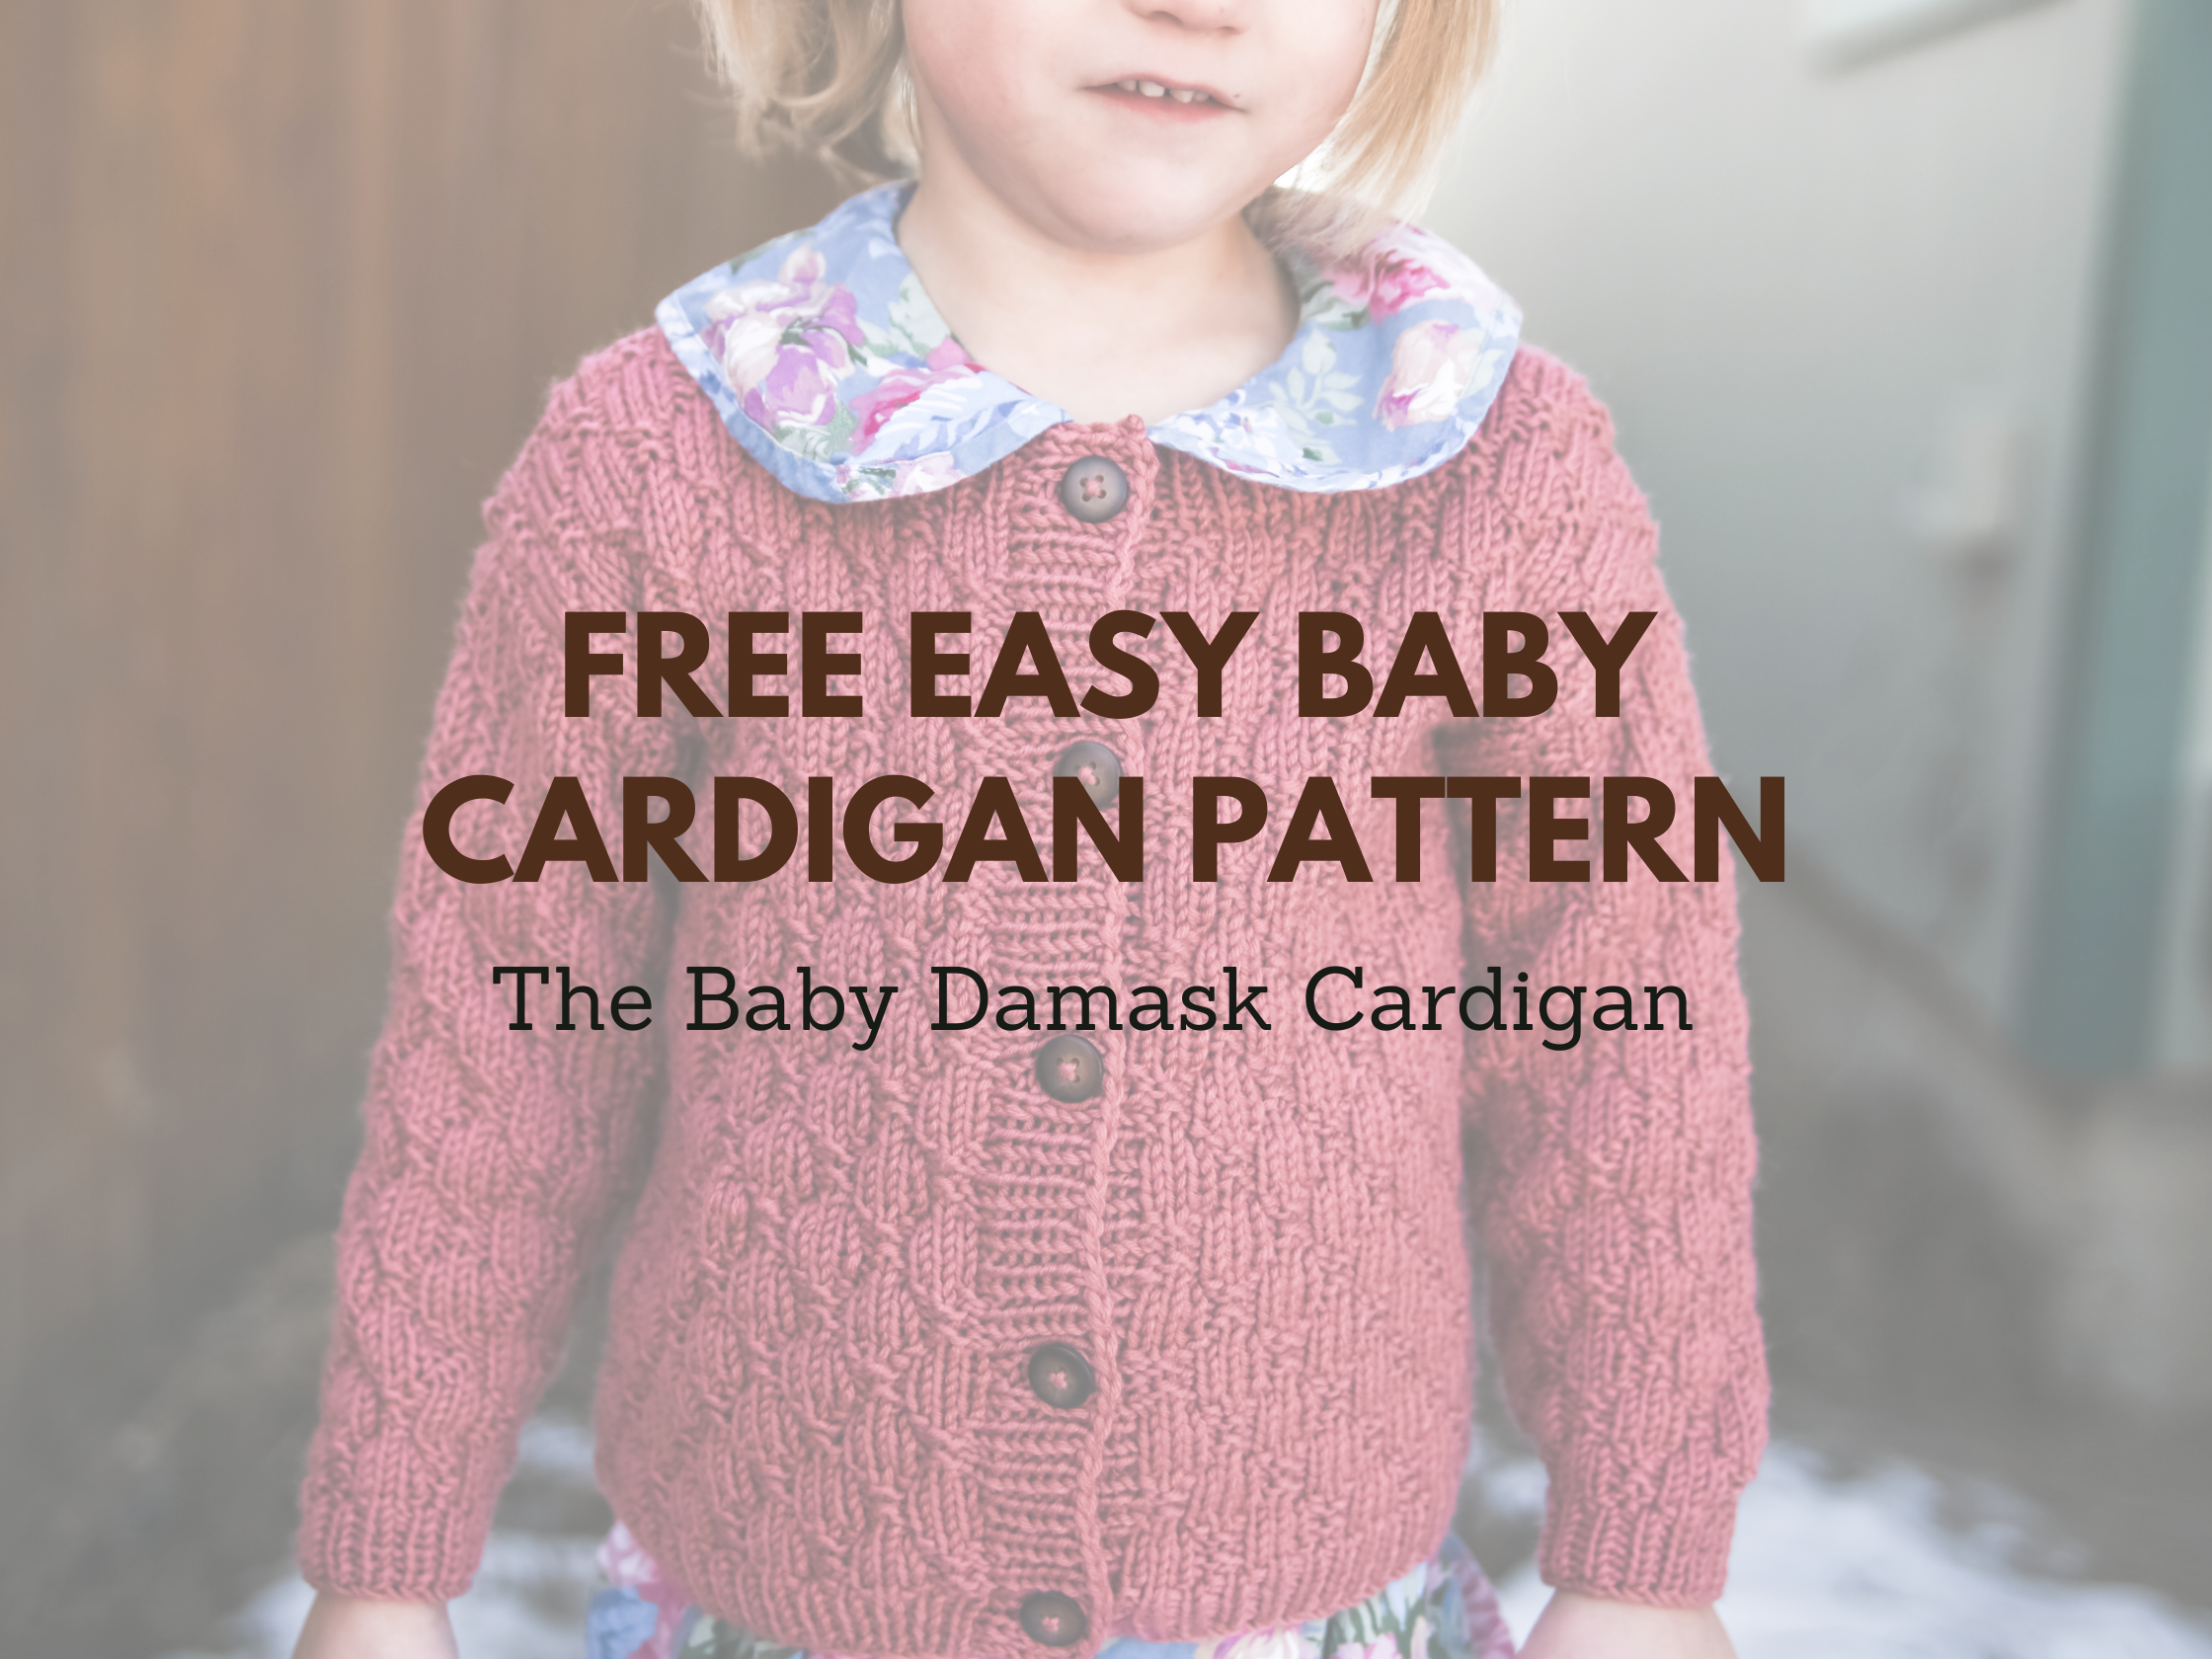
If you’ve ever wanted a classic baby cardigan that looks polished but doesn’t feel overwhelming to knit, this is exactly what you’ve been looking for. The Baby Damask Cardigan is worked flat and sewn together, making it approachable and easy to manage, even if you’re still getting comfortable with garment construction. With its timeless drop sleeve shape, crew neck, and all-over textured stitch that resembles damask wallpaper, it’s the kind of piece that looks far more complicated than it actually is.
One of the biggest struggles with baby garments is finding something that looks special without requiring complicated shaping or techniques. This free easy baby cardigan pattern solves that by keeping the construction simple while letting the texture do all the work. With sizes from newborn through 24 months, you can knit this again and again as your little one grows.

If you’ve been searching for a go-to baby sweater that feels classic, wearable, and gift-worthy, this one checks every box. It’s simple enough to enjoy knitting, but detailed enough to feel like a finished piece you’re proud of.
This is one of those patterns that works just as well for everyday wear as it does for special photos or gifting. Once you knit one, you’ll already be planning your next.
What materials do you need for this free easy baby cardigan pattern?
For this free easy baby cardigan pattern, I kept the materials simple and easy to find, because the goal here is a stress-free project from start to finish. I used Premier Anti-Pilling Everyday Worsted, which is one of my favorite budget-friendly yarns for baby knits. It’s soft, durable, and holds texture beautifully.
You’ll also need size 6 (4.25 mm) straight needles and size 7 (4.5 mm) straight needles to get the right gauge and drape. Other essentials include stitch markers, a yarn needle for seaming, and blocking mats to finish your cardigan neatly and help that textured pattern really shine.
I always recommend not skipping the blocking step for this one. It really helps open up the stitch pattern and gives your finished cardigan that clean, structured look.

Taking a little extra time with your materials and finishing steps makes a big difference in how professional your final piece looks. It’s worth it every single time.
How is this free easy baby cardigan pattern constructed?
This free easy baby cardigan pattern is worked flat in pieces and then sewn together, which makes it feel much more manageable than knitting everything in one piece. The drop sleeve construction keeps the shaping simple, and the crew neck gives it that classic, everyday look.
The textured stitch pattern is created using simple knits and purls, so once you get into the rhythm, it’s actually very relaxing to work on. I like to think of it as a great “watch something and knit” project once you’ve established the pattern.
A helpful tip is to keep your pieces organized as you go and use stitch markers to track repeats if needed. It makes seaming and assembly go so much smoother in the end.

Once everything is sewn together and blocked, you’ll really see that damask-inspired texture come to life. It’s one of those moments where all the simple steps add up to something that looks incredibly detailed.
Looking for more baby cardigan knitting patterns?
If you love this free easy baby cardigan pattern, here are a few more patterns you might enjoy working through next:
• youth damask cardigan
• baby wheat cardigan
• baby john hooded cardigan
• baby granite sweater
• baby micheal sweater
These all have their own unique textures and constructions, but they share that same approachable style that makes them fun to knit and easy to wear.
Having a few go-to baby sweater patterns on hand is honestly one of the best things, especially when you need a quick gift or want something relaxing to cast on.

Each of these patterns builds on similar skills, so the more you knit, the easier they all become. It’s a great way to grow your confidence without feeling overwhelmed.
Baby Damask Cardigan Pattern
Size: 0-3m, 3-6m (6-12m, 12m) 18m, 24m
Materials: Approximately 1, 2 (2, 2) 2, 3 skeins of Premier Yarns Anti-Pilling
Everyday Worsted (189y/100g), 4, 4 (5, 5) 5, 5 – 1/2in buttons, yarn needle,
stitch markers
Needle Size: 6(US) 4mm & 7(US) 4.5mm straight
Gauge (tension): 20sts & 24 rows to make 10cm square, using size 7(US)
3mm needles
Chest Measurement: 41, 44 (47, 50) 52, 54 cms
16, 17.25 (18.5, 19.5) 20.5, 21.25 ins
METHOD
This pattern is for a drop sleeve style that is worked flat from the bottom
up with 10cm of ease. If you are a left-handed knitter there are notations
to help you throughout.
DAMASK STITCH PATTERN
Row 1 – [k3, p1, k1, p1] across
Row 2 – [k3, p3] around
Row 3 – repeat round 1
Row 4 – repeat round 2
Row 5 – repeat round 1
Row 6 – [p3, k1, p1, k1] around
Row 7 – [p3, k3] around
Row 8 – repeat round 6
Row 9 – repeat round 7
Row 10 – repeat round 6
BACK
Cast on 56, 56 (62, 62) 62, 68 sts using the smaller circular needles
Work 2, 2 (2, 2.5) 2.5, 2.5 cms or .75, .75 (.75, 1) 1 1 ins of (k1, p1) rib.
Switch to larger size circular needles.
Work as follows: k1 (salvage stitch) work in damask stitch pattern across to last
stitch, k1 (salvage stitch) until your work measures 14, 15.5 (17.5, 19.5) 21, 22.5
cm or 5.5, 6 (7, 7.5) 8.25, 8.5) ins measured from the cast-on edge. Place markers
on each end of the row to mark armhole.
Continue working in pattern until work measures 22.5, 24.5 (27, 30) 32cm, 34 cms
or 8.75, 10 (10.5, 11.75) 12.5, 13.5 ins from cast on edge ending after completing a
wrong side row.
SHOULDERS
(12m, 18m 24m only)
Bind off x, x (x, 5) 5, 6 sts at the beginning of the next 2 rows.
(all sizes)
Bind off 0, 0 (0, 5) 5, 6 sts at the beginning of the next row, work until 17, 17 (19,
8) 8, 9 sts are on the needle put remaining sts on a stitch holder or spare yarn
Turn and bind off 3, 3 (3, 3) 3, 3 sts, work to the end of the row.
Turn and bind off remaining 14, 14 (16, 5) 5, 6 sts
With right side facing, rejoin yarn to the sts on the stitch holder/spare yarn, bind
off 22, 22 (24, 26) 26, 26 sts, work remaining sts.
Bind off 0, 0 (0, 5) 5, 6 sts, work to the end of the row.
Turn and bind off 3, 3 (3, 3) 3, 3 sts, work to the end of the row.
Turn and bind off remaining 14, 14 16, 5) 5, 6 sts
LEFT FRONT (if you knit left-handed this is your right front)
Cast on 26, 26 (29, 29) 29, 32 sts using smaller needle
Work 2, 2 (2, 2.5) 2.5, 2.5 cms or .75, .75 (.75, 1) 1 1 ins of (k1, p1) rib.
Switch to larger size circular needles.
Work as follows: k1 (salvage stitch) work in damask stitch pattern across to last
stitch, k1 (salvage stitch) until your work measures 14, 15.5 (17.5, 19.5) 21, 22.5
cm or 5.5, 6 (7, 7.5) 8.25, 8.5) ins measured from the cast-on edge. Place marker
on sleeve end of the row to mark armhole.
Continue working in pattern until work measures 17.5, 19.5 (22.5, 25) 27cm, 29
cms or 7, 7.5 (8.75, 9.75) 10.5, 11.5) ins from cast on edge ending after completing
a right side row.
NECK
Next row – Bind off 8, 8 (9, 9) 9,9 sts, work to end of row
[18, 18 (20, 20) 20, 23 sts]
Decrease 1 sts at the neck edge of the next 2, 2 (2, 3) 3, 3 rows.
[16, 16 (18, 17) 17, 20 sts]
Decrease 1 sts at neck edge every other row 2, 2 (2, 2) 2, 2 times
[14, 14 (16, 15) 15, 18 sts]
Continue in pattern until work measures 22.5, 24.5 (27, 30) 32, 34 cms or 8.75, 10
(10.5, 11.75) 12.5, 13.5 ins from cast on edge, ending after completing a wrong
side row
SHOULDERS
(12m, 18m, 24m only)
Bind off x, x (x, 5) 5, 6 sts, work to end of row
Work the next row without shaping
Bind off x, x (x, 5) 5, 6 sts, work to end of row
Work the next row without shaping
(all sizes)
Bind off remaining 14, 14 (16, 5) 5, 6 sts
RIGHT FRONT (if you knit left-handed this is your left front)
Cast on 26, 26 (29, 29) 29, 32 sts using smaller needle
Work 2, 2 (2, 2.5) 2.5, 2.5 cms or .75, .75 (.75, 1) 1 1 ins of (k1, p1) rib.
Switch to larger size circular needles.
Work as follows: k1 (salvage stitch) work in damask stitch pattern across to last
stitch, k1 (salvage stitch) until your work measures 14, 15.5 (17.5, 19.5) 21, 22.5
cm or 5.5, 6 (7, 7.5) 8.25, 8.5) ins measured from the cast-on edge. Place marker
on sleeve end of the row to mark armhole.
Continue working in pattern until work measures 17.5, 19.5 (22.5, 25) 27cm, 29
cms or 7, 7.5 (8.75, 9.75) 10.5, 11.5) ins from cast on edge, ending after
completing a wrong side row.
NECK
Next row – Bind off 8, 8 (9, 9) 9,9 sts, work to end of row
[18, 18 (20, 20) 20, 23 sts]
Decrease 1 sts at the neck edge of the next 2, 2 (2, 3) 3, 3 rows.
[16, 16 (18, 17) 17, 20 sts]
Decrease 1 sts at neck edge every other row 2, 2 (2, 2) 2, 2 times
[14, 14 (16, 15) 15, 18 sts]
Continue in pattern until work measures 22.5, 24.5 (27, 30) 32, 34 cms or 8.75, 10
(10.5, 11.75) 12.5, 13.5 ins from cast on edge ending after completing a right side
row.
SHOULDERS
(12m, 18m, 24m only)
Bind off x, x (x, 5) 5, 6 sts, work to end of row
Work the next row without shaping
Bind off x, x (x, 5) 5, 6 sts, work to end of row
Work the next row without shaping
(all sizes)
Bind off remaining 14, 14 (16, 5) 5, 6 sts
SLEEVES (MAKE 2)
Cast on now 26, 26 (26, 32) 32, 32 sts on smaller circular/straight needles.
Work 2, 2 (2, 2.5) 2.5, 2.5 cms or .75, .75 (.75, 1) 1 1 ins of (k1, p1) rib.
Switch to larger size circular needles
Work as follows: k1 (salvage stitch) work in damask stitch pattern across to last
stitch, k1 (salvage stitch)
Work 3 more rows in damask pattern.
Next row: inc 1 sts on each end every right side row 5, 7 (7, 3) 3, 4 times,
then every 4th row 1, 1 (2, 5) 6, 6 times.
[38, 42 (44, 48) 50, 52 sts]
Continue working in lace pattern until work measures 11.5, 13.5 (15.5, 17.5) 19,
20.5 cms or 4.5, 5.25 (6, 7) 7.5, 8 ins from cast on edge. Bind of all stitches.
NECK
Join both shoulder seams, using yarn on a tapestry/yarn needle.
With right side facing and smaller needles pick up and knit 9, 9 (10, 10) 10, 10 sts
along right from bind off edge,
9, 9 (9, 11) 11, 11 sts up right front of neck,
28, 28 (30, 32) 32, 32 sts from back neck,
9, 9 (9, 11) 11, 11 sts up left front and side of neck,
9, 9 (10, 10) 10, 10 sts along left from bind off edge.
[64, 64 (68, 74) 74, 74 sts]
Work 1.5, 1.5 (1.5, 2) 2, 2 cms or .5, .5 (.5, .75) .75,.75 ins of (k1, p1) rib.
Bind off all sts in pattern.
FRONT RIB EDGES
LEFT FRONT EDGE
Pick up and knit 37, 40 (47, 51) 55, 59 sts along the edge with the smaller sized
circular needles.
Work 6, 6 (6, 6) 6, 6 rows of rib (k1, p1).
Bind off in established rib pattern.
RIGHT FRONT EDGE
Pick up and knit 37, 40 (47, 51) 55, 59 sts along the edge with the smaller sized
circular needles.
Work 2, 2 (2, 2) 2, 2 rows in k1p1 ribbing
Buttonhole row: Work 2 sts in established rib pattern, k2tog yo, work 8, 9 (8, 9) 10, 11 sts in established rib pattern, work k2tog, yarn over, repeat from * to * to
the last 3 sts, work 3 sts in rib.
Work 3, 3 (3, 3) 3, 3 rows in k1p1 ribbing
Bind off in established rib pattern.
FINISHING
Sew the sleeves on, side seams and sleeve seams. I prefer to use the mattress
stitch because it almost appears seamless. Weave in all ends. Sew the buttons on
along the left front edge across from the buttonholes
ABBREVIATIONS
K – knit
P – purl
PM – place marker
SM – slip marker
K2tog -knit 2 stitches together
YO – yarn over
SSK – slip, slip, knit the slipped sts together
M1R – Insert the left needle under the strand that runs between two stitches from
back to front, then knit this strand
M1L – Insert the left needle under the strand that runs between two stitches from
front to back, then knit this strand through the back loop

If you make this free easy baby cardigan pattern, I would love to hear how it turned out for you. Leave a comment and tell me what size you made or what yarn you used—I always enjoy seeing your variations and ideas!
This post may contain affiliate links, which means I may earn a small commission at no extra cost to you. Thank you for supporting my work!
Comments are closed.