
Looking for a free lace cardigan pattern to add to your handmade wardrobe? The Adult Wheat Cardigan is finally here, and I couldn’t be more excited! If you loved the Baby Wheat Cardigan and Youth Wheat Cardigan, you’re going to adore this grown-up version made just for you!

A Lace Cardigan That’s Worth the Effort
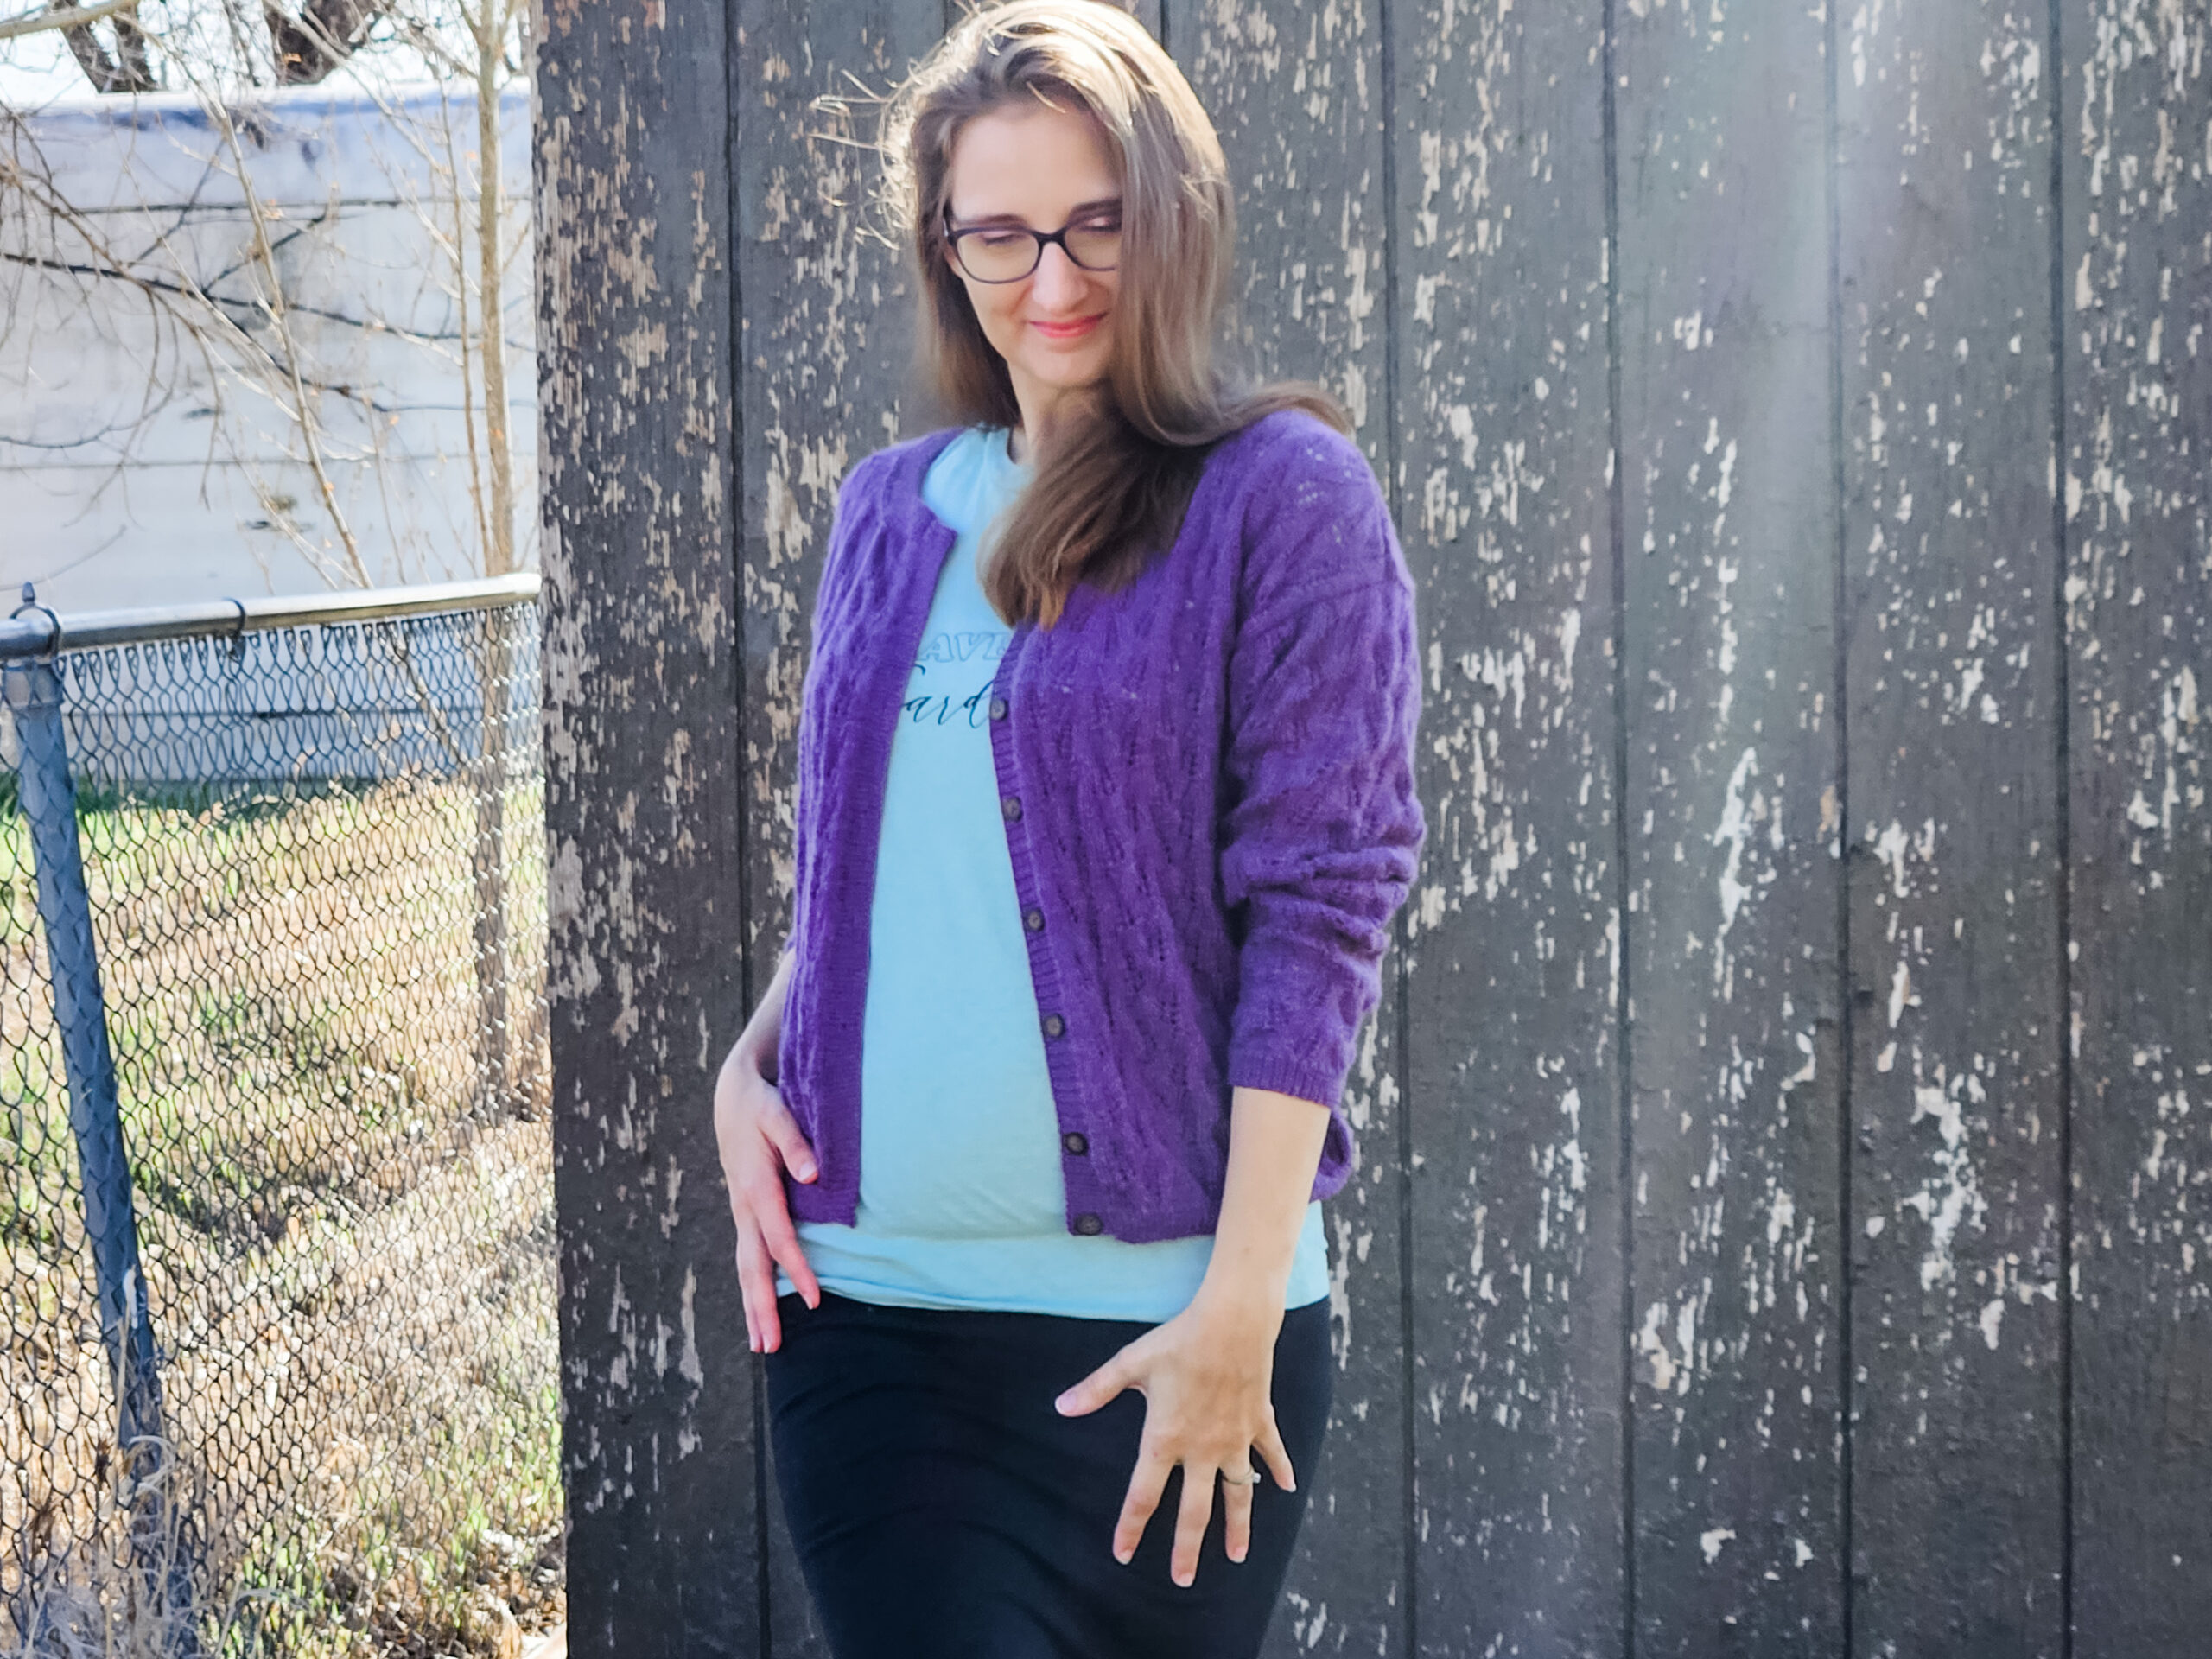
I won’t sugarcoat it—this is a fingering weight cardigan, which means it’s a labor of love. But trust me, it’s so worth it! The delicate lace pattern is simple but elegant, and the lightweight fabric drapes beautifully. There’s something incredibly satisfying about knitting up a garment that you know you’ll wear over and over again.
The Adult Wheat Cardigan is designed with all the same details that made the original Wheat Cardigans so beloved:
- A classic crew neck
- A button-up front for versatility
- A slightly oversized fit for cozy comfort
- Soft and luxurious yarn that feels amazing against the skin
If you’ve been searching for the perfect free lace cardigan pattern, this one checks all the boxes!
Choosing the Perfect Yarn
For this project, I used KnitPicks Capretta (affiliate link), and let me tell you—it’s dreamy! This yarn is a fingering weight blend of merino wool, cashmere, and nylon, making it incredibly soft with just the right amount of stretch and durability. If you want a cardigan that feels luxurious and stands the test of time, KnitPicks Capretta (affiliate link) is a fantastic choice.
Of course, you can substitute with any fingering weight yarn you love, but I highly recommend giving KnitPicks Capretta (affiliate link) a try. The stitch definition is beautiful, and the lace pattern really pops with this yarn.
What to Expect from This Free Lace Cardigan Pattern
This free lace cardigan pattern is designed for intermediate knitters, but don’t let that intimidate you! If you’ve mastered basic lace stitches like yarn overs and simple decreases, you can totally tackle this project. The lace pattern is repetitive and easy to memorize, so once you get into the rhythm, it’s smooth sailing.
A few things to keep in mind:
- Patience is key – Fingering weight yarn takes longer to knit up, but the results are worth it.
- Swatch first – I know, I know—swatching isn’t the most exciting part of knitting. But with a fitted cardigan, getting gauge is essential!
- Blocking is magic – Lace patterns don’t fully shine until you block them. When you finish, give your cardigan a nice soak and gently stretch it into shape.
Styling Your Handmade Lace Cardigan
One of the best things about this free lace cardigan pattern is how versatile the finished piece is! Here are a few ways I love to style mine:
- Over a sundress for a romantic, feminine look
- With jeans and a tank top for an effortless casual outfit
- Layered over a fitted turtleneck when the weather cools down
- Paired with a skirt for a cozy but polished vibe
No matter how you style it, this cardigan adds a touch of handmade charm to any outfit!
Start Knitting Your Free Lace Cardigan Pattern Today!
If you’ve been searching for a free lace cardigan pattern that’s stylish, practical, and fun to knit, the Adult Wheat Cardigan is calling your name! Grab your needles, pick up some KnitPicks Capretta (affiliate link), and get started today. You’re going to love having this beautiful lace cardigan in your wardrobe!


Materials and Info
Size: xs, s (m, l) xl, 2x (3x, 4x)
Materials: Approximately 8, 8 (9, 9) 10, 10 (12, 13) balls of KnitPick Capretta (230y/50g), 13, 13 (13, 13) 13, 14 (14, 14) 3/8in buttons, yarn needle, stitch markers
Needle Size: 1(US) 2.5mm & 2(US) 3mm straight and dpn
Gauge (tension): 32sts & 40 rows to make 10cm square, using size 2(US) 3mm needles
Chest Measurement: 74, 78 (82, 90) 98, 107 (119, 131) cm
METHOD
This pattern is for a drop sleeve style that is worked flat from the bottom up with 10cm of ease.

Row 1 – k5, k2tog, k3, yo, k1, yo, ssk, k1
Row 2 – purl across
Row 3 – k4, k2tog, k4, yo, k1, yo, ssk, k1
Row 4 – purl across
Row 5 – k3, k2tog, k5, yo, k1, yo, ssk, k1
Row 6 – purl across
Row 7 – k2, k2tog, k6, yo, k1, yo, ssk, k1
Row 8 – purl across
Row 9 – k1, k2tog, yo, k1, yo, k3, ssk, k4
Row 10 – purl across
Row 11 – k2, k2tog, yo, k1, yo, k4, ssk, k3
Row 12 – purl across
Row 13 – k2, k2tog, yo, k1, yo, k5, ssk, k2
Row 14 – purl across
Row 15 – k2, k2tog, yo, k1, yo, k6, ssk, k1
Row 16 – purl across
Note: when increasing or decreasing be sure there is a dec for every inc

Adult Wheat Cardigan Pattern
BACK
Cast on 142, 144 (156, 162) 170, 190 (212, 226) sts using the smaller circular needles
Work 2.5 cms of (k1, p1) rib.
Switch to larger size circular needles.
Start your lace pattern as follows:
knit 1, 2 (1, 4) 1, 4 (1, 1) sts, work in lace pattern until you have 1, 2 (1, 4) 1, 4 (1, 1) sts remaining, knit across.
Work in lace pattern until your work measures 35, 35 (35, 35) 35, 35 (35, 35) cm OR desired length (underarm to bottom) measured from the cast-on edge. Place markers on each end of the row to mark armhole.
Continue working in pattern until work measures 53.5, 54 (54.5, 55) 56, 57 (58, 58.5) cms from cast on edge ending after completing a wrong side row. (If you added or subtracted length for a customized cast on-underarm measurement, be sure to add or subtract the difference from 35cm to this number. Example: you knit 37cms to underarm, so add 2cms to this measurement)
SHOULDERS
Bind off 12, 12 (14, 15) 15, 18 (21, 23) sts at the beginning of the next 2 rows.
Bind off 12, 12 (14, 15) 15, 18 (21, 23) sts at the beginning of the next row, work 19, 19 (20, 20) 22, 25 (27, 28) sts put remaining sts on a stitch holder or spare yarn.
Turn and bind off 5 sts, work to the end of the row.
Turn and bind off remaining 14, 14 (15, 15) 17, 20 (22, 23) sts
With right side facing, rejoin yarn to the sts on the stitch holder/spare yarn, bind off 56, 58 (60, 62) 66, 68 (74, 78) sts, work remaining 31, 31 (34, 35) 37, 43 (48, 51) sts.
Bind off 12, 12 (14, 15) 15, 18 (21, 23) sts, work to the end of the row.
Turn and bind off 5 sts, work to the end of the row.
Turn and bind off remaining 14, 14 (15, 15) 17, 20 (22, 23) sts
LEFT FRONT
Cast on 70, 70 (76, 79) 84, 93 (104, 111) sts using smaller needle.
Work 2.5 cms of (k1, p1) rib.
Switch to larger size circular needles.
Start your lace pattern as follows:
knit 0, 0 (3, 4) 0, 4 (3, 0) sts, work in lace pattern until you have 0, 0 (3, 5) 0, 5 (3, 1) sts remaining, knit across.
Work in lace pattern until your work measures 35, 35 (35, 35) 35, 35 (35, 35) cm OR same measurement as length to sleeve marker on back, measured from the cast-on edge. Place marker on sleeve end of the row to mark armhole.
Continue working in pattern until work measures 47, 47.5 (47.5, 48) 48.5 49 (49, 49.5) cms from cast on edge ending after completing a right-side row. (If you added or subtracted length for a customized cast on-underarm measurement, be sure to add or subtract the difference from 35cm to this number. Example: you knit 37cms to underarm, so add 2cms to this measurement)
NECK
Next row – Bind off 18, 18 (19, 20) 22, 21 (23, 24) work to end of row [52, 52 ( 57, 59) 62, 72 (81, 87) sts]
Decrease 1 st at the neck edge of the next 8, 8 (8, 8) 9, 9 (10, 10) rows. [44, 44 (49, 51) 53, 63 (71, 77) sts]
Decrease 1 st at neck edge every other row 4, 4 (4, 4) 4, 5 (5, 5) times [40, 40 (45, 47) 49, 58 (66, 72) sts]
Decrease 1 st at neck edge every 4th row 2, 2 (2, 2) 2, 2 (2, 3) times [38, 38 (43, 45) 47, 56 (64, 69) sts]
Continue in pattern until work measures 53.5, 54 (54.5, 55) 56, 57 (58, 58.5) cms OR the same as the back (from cast on edge to right before shoulder shaping begins), ending after completing a wrong side row.
SHOULDERS
Bind off 12, 12 (14, 15) 15, 18 (21, 23) sts, work to end of row.
Work the next row without shaping.
Bind off 12, 12 (14, 15) 15, 18 (21, 23) sts, work to end of row.
Work the next row without shaping.
Bind off remaining 14, 14 (15, 15) 17, 20 (22, 23) sts
RIGHT FRONT
Cast on 70, 70 (76, 79) 84, 93 (104, 111) sts using smaller needle.
Work 2.5 cms of (k1, p1) rib.
Switch to larger size circular needles.
Start your lace pattern as follows:
knit 0, 0 (3, 5) 0, 5 (3, 1 sts, work in lace pattern until you have 0, 0 (3, 4) 0, 4 (3, 0) sts remaining, knit across.
Work in lace pattern until your work measures 35, 35 (35, 35) 35, 35 (35, 35) cm OR same measurement as length to sleeve marker, measured from the cast-on edge. Place marker on sleeve end of the row to mark armhole.
Continue working in pattern until work measures 47, 47.5 (47.5, 48) 48.5, 49 (49, 49.5) cms from cast on edge, ending after completing a wrong side row. (If you added or subtracted length for a customized cast on-underarm measurement, be sure to add or subtract the difference from 35cm to this number. Example: you knit 37cms to underarm, so add 2cms to this measurement)
NECK
Next row – Bind off 18, 18 (19, 20) 22, 21 (23, 24) work to end of row [52, 52 (57, 59) 62, 72 (81,87) sts]
Decrease 1 st at the neck edge of the next 8, 8 (8, 8) 9, 9 (10, 10) rows. [44, 44 (49, 51) 53, 63 (71, 77) sts]
Decrease 1 st at neck edge every other row 4, 4 (4, 4) 4, 5 (5, 5) times [40, 40 (45, 47) 49, 58 (66, 72) sts]
Decrease 1 st at neck edge every 4th row 2, 2 (2, 2) 2, 2 (2, 3) times [38, 38 (43, 45) 47, 56 (64, 69) sts]
Continue in pattern until work measures 53.5, 54 (54.5, 55) 56, 57 (58, 58.5) cms from cast on edge, ending after completing a right-side row.
SHOULDERS
Bind off 12, 12 (14, 15) 15, 18 (21, 23) sts, work to end of row.
Work the next row without shaping.
Bind off 12, 12 (14, 15) 15, 18 (21, 23) sts, work to end of row.
Work the next row without shaping.
Bind off remaining 14, 14 (15, 15) 17, 20 (22, 23) sts.
SLEEVES (MAKE 2)
Cast on now 72, 72 (72, 72) 72, 72 (86, 86) sts on smaller circular/straight needles.
Work 2.5 cms of (k1, p1) rib.
Switch to larger size circular needles
Start the lace pattern as follows:
Knit 1, work lace pattern to last st, knit across
Work 3 more rows in lace pattern.
Next row: inc 1 sts on each end of the next row, then every 4th row 12, 16 (19, 23) 30, 38 (25, 36) times, then every 6th row 15, 14 (11, 9) 5, 0 (9, 2) times. 128, 130 (134, 138) 144, 150 (156, 164) sts]
Continue working in lace pattern until work measures 43, 43.5 (44, 45) 46, 46.5 (47, 47.5) cms from cast on edge. Bind of all stitches.
NECK
Join both shoulder seams, using yarn on a tapestry/yarn needle.
With right side facing and smaller needles pick up and knit 18, 18 (19, 20) 22, 21 (23, 24) sts along right from bind off edge, 27, 27 (27, 28) 29, 30 (32, 35) sts up right front of neck, 66, 68 (70, 72) 76, 78 (84, 88) sts from back neck, 27, 27 (27, 28) 29, 30 (32, 35) sts up left front and side of neck, 18, 18 (19, 20) 22, 21 (23, 24) sts along left from bind off edge. [156, 158 (162, 168) 178, 180 (194, 206) sts]
Work 2.5 cms of (k1, p1) rib.
Bind off all sts in pattern.
FRONT RIB EDGES
LEFT FRONT EDGE
Pick up and knit 163, 163 (167, 169) 169, 176 (176, 176) sts along the edge with the smaller sized circular needles.
Work 9 rows of rib (k1, p1).
Bind off in established rib pattern.
RIGHT FRONT EDGE
Pick up and knit 163, 163 (167, 169) 169, 176 (176, 176) sts along the edge with the smaller sized circular needles.
Work 4 rows in k1p1 ribbing.
Buttonhole row: Work 2, 2 (4, 5) 5, 2 (2, 2) sts in established rib pattern, k2tog yo, *work 11 sts in established rib pattern, work k2tog, yarn over*, repeat from * to * to the last 3, 3 (5, 6) 6, 3 (3, 3) sts, work 3, 3 (5, 6) 6, 3 (3, 3) sts in rib.
Work 4 rows in k1p1 ribbing.
Bind off in established rib pattern.
FINISHING
Sew the sleeves on, side seams and sleeve seams. I prefer to use the mattress stitch because it almost appears seamless. Weave in all ends. Sew the buttons on along the left front edge across from the buttonholes.

Abbreviations
K – knit
P – purl
PM – place marker
SM – slip marker
K2tog -knit 2 stitches together
YO – yarn over
SSK – slip, slip, knit the slipped sts together
M1R – Insert the left needle under the strand that runs between two stitches from back to front, then knit this strand
M1L – Insert the left needle under the strand that runs between two stitches from front to back, then knit this strand through the back loop
Download Adult Wheat Cardigan PDF

Disclaimer: This page contains affiliate links. If you choose to make a purchase after clicking a link, I may receive a commission at no additional cost to you. Thank you for your support!