
A free knitting pattern for a traditional bonnet and pixie bonnet designed as photography props, knit in heavy worsted weight yarn.

This free knitting pattern includes instructions for a traditional bonnet and pixie bonnet designed for photography prop use, making it a practical option for newborn and baby photo sessions. The bonnets are knit flat using heavy worsted weight yarn, creating a structured fabric that holds its shape well for styling and posing. An all-over broken 1×1 rib adds gentle texture while keeping the knitting simple and repetitive, making it easy to follow without complicated techniques. The flat construction allows for straightforward finishing and consistent sizing, which is especially helpful when creating matching props or working on a deadline. The finished bonnets provide a classic, timeless look that photographs beautifully while remaining comfortable and secure for short wear during sessions.
I’m always looking for excuses to knit tiny, squishy things—especially when they double as keepsakes for newborns. Today I’ve got something extra special to share with you: a free ribbed bonnet pattern that actually includes two styles—the classic Broken Rib Bonnet and the playful Pixie Bonnet. Both are beginner-friendly and photo-prop ready. And best of all? They’re free!
You’ll find this free ribbed bonnet pattern at the bottom of the post, and if you’re looking for even more baby photo prop patterns, I’ve got a full collection you can browse right here.

Why I Love This Free Ribbed Bonnet Pattern
There’s just something so satisfying about knitting for babies. Maybe it’s the fact that their heads are tiny, or maybe it’s knowing that you’re creating something functional and adorable at the same time. Either way, I’m a little obsessed.
This free ribbed bonnet pattern is a favorite of mine for a few reasons:
- It’s timeless.
- It’s textural without being complicated.
- It works for both girls and boys.
- And did I mention it’s free?
The Broken Rib Bonnet and the Pixie Bonnet both use the same broken rib texture, so if you love the stitch pattern, you can mix things up with the shape without needing to learn a whole new technique. Win!

The Classic Look: Broken Rib Bonnet
Let’s start with the more traditional of the two—the Broken Rib Bonnet. This version of the free ribbed bonnet pattern hugs the baby’s head in all the right ways and features a rounded back that gently frames those sweet cheeks.
The stitch pattern is a joy to knit. It’s rhythmic, relaxing, and creates such a pretty texture. And while it looks fancy, it’s really just a little variation on basic ribbing. If you’ve got knits and purls in your toolbox, you’re good to go.

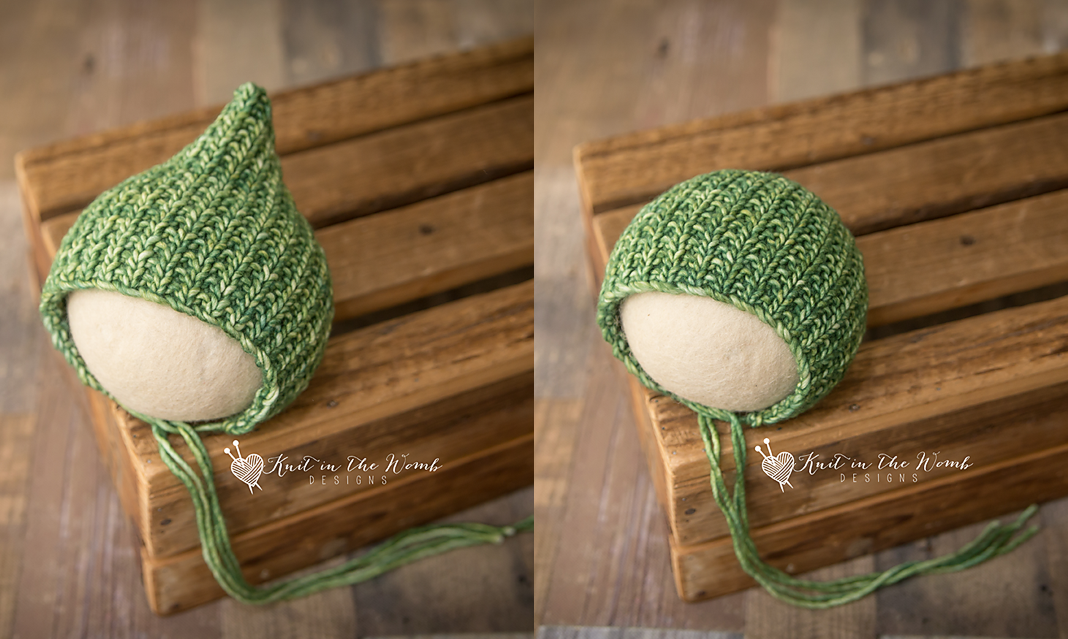
The Whimsical Option: Pixie Bonnet
Now, if you want to add a bit of personality to your project, the Pixie Bonnet version of the free ribbed bonnet pattern is a dream. The pointed crown gives it that quirky “woodland fairy” vibe without being over the top.
I originally designed this one as a variation for a friend’s baby shower gift, and I ended up falling in love with the shape. It’s perfect for themed photo shoots—or just for fun. And even though it’s a little more whimsical, it’s still got that classic broken rib texture tying it back to its more traditional sibling.

Yarn Love: KnitPicks Muse Aran (affiliate link)
Let’s talk yarn. Because when you’re knitting for babies, the yarn really matters.
I used KnitPicks Muse Aran (affiliate link) for both versions of this free ribbed bonnet pattern. It’s soft, stretchy, and strong—basically everything I look for when knitting something that’s going to be tugged on, drooled on, and loved hard. The colors are beautiful too. I’ve used both bold hues and soft neutrals, and the texture shows up beautifully either way.
If you’ve never worked with Muse Aran (affiliate link) before, trust me—it’s worth a try. Especially if you’re knitting gifts. It holds up well and feels extra luxurious.

Knitting Memories
The first time I knit the Broken Rib Bonnet, I was very pregnant with my third baby and nesting like crazy. I wanted something simple and sweet for her newborn photos, and this free ribbed bonnet pattern delivered. I made a few extras “just in case,” and those ended up going to friends whose babies were born around the same time.
The Pixie Bonnet came a little later when I wanted something a little different but didn’t want to reinvent the wheel. I kept the stitch pattern I loved and tweaked the shaping, and voila—Pixie Bonnet magic!

My Top Tips for the Best Results
If you’re planning to knit this free ribbed bonnet pattern, here are a few of my go-to tips:
- Swatch First: I know, I know… it’s a bonnet, not a sweater. But swatching ensures your sizing stays on point.
- Stick with the recommended needles for Muse Aran (affiliate link): It helps you get the perfect squishy-but-structured fabric.
- Relax your tension: That broken rib really pops when you keep things light and even.
- Color matters: Whether you’re going bold or soft, choose a color of Muse Aran (affiliate link) that fits your style or the shoot.
- Block it!: A little light blocking goes a long way in smoothing the shape and making that texture stand out.
- I-Cord ties: My go-to for all my bonnets. They’re neat, stretchy, and they stay tied!

Handmade Gifts With Heart
There’s something extra sweet about giving a bonnet you knit yourself. This free ribbed bonnet pattern makes the perfect baby shower gift or handmade keepsake. Add a tag with care instructions and the yarn info (Muse Aran—affiliate link), and you’ve got a heartfelt gift that’ll be treasured for years.
Every stitch holds a bit of love, and that really does come through when a new mama opens a box and finds a bonnet that was made just for her baby.

Why You’ll Keep Coming Back to This Free Ribbed Bonnet Pattern
Whether you knit the Broken Rib Bonnet, the Pixie Bonnet, or both, I have a feeling you’ll be returning to this free ribbed bonnet pattern again and again. It’s just that kind of project—simple enough to knit in an evening, sweet enough to use in every newborn photo shoot, and timeless enough to never go out of style.
This free ribbed bonnet pattern has become one of my go-to designs for last-minute baby gifts, special keepsakes, and everything in between.
Grab the Pattern!
Ready to cast on? This free ribbed bonnet pattern is at the bottom of this post! And don’t forget—you can find all my newborn photo prop patterns right here. There’s a whole library waiting for you with everything from bonnets and beanies to skirts, shorts, and rompers.
Happy knitting, friend! I hope this free ribbed bonnet pattern brings you just as much joy as it has brought me over the years.

Materials and Info
Materials: appx 45-145yd worsted weight yarn each (I used knitpicks muse), size 8 (5mm) straight needles or (size needed to obtain gauge) and dpn needles, yarn needle
Gauge: appx 4.5sts/inch Gauge is very important!
Sizes (appx finished head circumference) [appx finished measurement laid flat]: newborn (13ins) [5x5ins], 0-3mths (14 ins) [5.5×5.5ins], 3-6mths (15ins) [6x6ins], 6-12mths (16ins) [6.5×6.5ins], 1-3yrs (17ins) [7x7ins]
Stitch Key
K – knit
p – purl
K2tog – knit 2 stitches together

Broken Rib Bonnet Pattern
Newborn
Cast on 45 (I use long tail cast on)
Row 1 (wrong side) – p1 [k1, p1] repeat [to] across
Row 2 – knit across
Repeat rows 1 and 2 until your work measures appx 3.5ins from cast on edge. Finish after completing a row 2.
You will now start working in the round. Place all your stitches evenly distributed on 3 dpn needles and join in the round.
DECREASES
Round 1 – [k2tog, k13] repeat [to] around (42sts)
Round 2 – knit around
Round 3 – [k2tog, k4] repeat [to] around (35sts)
Round 4 – knit around
Round 5 – [k2tog, k3] repeat [to] around (28sts)
Round 6 – knit around
Round 7 – [k2tog, k2] repeat [to] around (21sts)
Round 8 – knit around
Round 9 – [k2tog, k1] repeat [to] around (14sts)
Round 10 – knit around
Round 11 – [k2tog] repeat [to] around (7sts)
Do not bind off. Cut yarn leaving appx -10ins. Pull yarn through remaining stitches and cinch the back tight. Weave in ends. Cut 2 pieces of yarn approximately 28ins long. Fold them in half and pull a loop through the front corner of the hood. Pull the ends through this loop. These are your ties.

0-3 Month
Cast on 49 (I use long tail cast on)
Row 1 (wrong side) – p1 [k1, p1] repeat [to] across
Row 2 – knit across
Repeat rows 1 and 2 until your work measures appx 4ins from cast on edge. Finish after completing a row 2.
You will now start working in the round. Place all your stitches evenly distributed on 3 dpn needles and join in the round.
DECREASES
Round 1 – [k2tog, k5] repeat [to] around (42sts)
Round 2 – knit around
Round 3 – [k2tog, k4] repeat [to] around (35sts)
Round 4 – knit around
Round 5 – [k2tog, k3] repeat [to] around (28sts)
Round 6 – knit around
Round 7 – [k2tog, k2] repeat [to] around (21sts)
Round 8 – knit around
Round 9 – [k2tog, k1] repeat [to] around (14sts)
Round 10 – knit around
Round 11 – [k2tog] repeat [to] around (7sts)
Do not bind off. Cut yarn leaving appx -10ins. Pull yarn through remaining stitches and cinch the back tight. Weave in ends. Cut 2 pieces of yarn approximately 28ins long. Fold them in half and pull a loop through the front corner of the hood. Pull the ends through this loop. These are your ties.

3-6 Month
Cast on 55 (I use long tail cast on)
Row 1 (wrong side) – p1 [k1, p1] repeat [to] across
Row 2 – knit across
Repeat rows 1 and 2 until your work measures appx 4.5ins from cast on edge. Finish after completing a row 2.
You will now start working in the round. Place all your stitches evenly distributed on 3 dpn needles and join in the round.
DECREASES
Round 1 – k2tog, knit around (54sts)
Round 2 – knit around
Round 3 – [k2tog, k4] repeat [to] around (45sts)
Round 4 – knit around
Round 5 – [k2tog, k3] repeat [to] around (36sts)
Round 6 – knit around
Round 7 – [k2tog, k2] repeat [to] around (27sts)
Round 8 – knit around
Round 9 – [k2tog, k1] repeat [to] around (18sts)
Round 10 – knit around
Round 11 – [k2tog] repeat [to] around (9sts)
Do not bind off. Cut yarn leaving appx -10ins. Pull yarn through remaining stitches and cinch the back tight. Weave in ends. Cut 2 pieces of yarn approximately 28ins long. Fold them in half and pull a loop through the front corner of the hood. Pull the ends through this loop. These are your ties.

6-12 Month
Cast on 59 (I use long tail cast on)
Row 1 (wrong side) – p1 [k1, p1] repeat [to] across
Row 2 – knit across
Repeat rows 1 and 2 until your work measures appx 5ins from cast on edge. Finish after completing a row 2.
You will now start working in the round. Place all your stitches evenly distributed on 3 dpn needles and join in the round.
DECREASES
Round 1 – k2tog,18, k2tog, k18, k2tog, k17 (56sts)
Round 2 – knit around
Round 3 – [k2tog, k5] repeat [to] around (48sts)
Round 4 – knit around
Round 5 – [k2tog, k4] repeat [to] around (40sts)
Round 6 – knit around
Round 7 – [k2tog, k3] repeat [to] around (32sts)
Round 8 – knit around
Round 9 – [k2tog, k2] repeat [to] around (24sts)
Round 10 – knit around
Round 11 – [k2tog, k1] repeat [to] around (16sts)
Round 12 – knit around
Round 13 – [k2tog] repeat [to] around (8sts)
Do not bind off. Cut yarn leaving appx -10ins. Pull yarn through remaining stitches and cinch the back tight. Weave in ends. Cut 2 pieces of yarn approximately 28ins long. Fold them in half and pull a loop through the front corner of the hood. Pull the ends through this loop. These are your ties.

1-3yrs
Cast on 65 (I use long tail cast on)
Row 1 (wrong side) – p1 [k1, p1] repeat [to] across
Row 2 – knit across
Repeat rows 1 and 2 until your work measures appx 5.5ins from cast on edge. Finish after completing a row 2.
You will now start working in the round. Place all your stitches evenly distributed on 3 dpn needles and join in the round.
DECREASES
Round 1 – k2tog,30, k2tog, k31 (63sts)
Round 2 – knit around
Round 3 – [k2tog, k5] repeat [to] around (54sts)
Round 4 – knit around
Round 5 – [k2tog, k4] repeat [to] around (45sts)
Round 6 – knit around
Round 7 – [k2tog, k3] repeat [to] around (36sts)
Round 8 – knit around
Round 9 – [k2tog, k2] repeat [to] around (27sts)
Round 10 – knit around
Round 11 – [k2tog, k1] repeat [to] around (18sts)
Round 12 – knit around
Round 13 – [k2tog] repeat [to] around (9sts)
Do not bind off. Cut yarn leaving appx -10ins. Pull yarn through remaining stitches and cinch the back tight. Weave in ends. Cut 2 pieces of yarn approximately 28ins long. Fold them in half and pull a loop through the front corner of the hood. Pull the ends through this loop. These are your ties.
Broken Rib Pixie
Newborn
Cast on 45 (I use long tail cast on)
Row 1 (wrong side) – p1 [k1, p1] repeat [to] across
Row 2 – knit across
Repeat rows 1 and 2 until your work measures appx 6ins from cast on edge.
Finish after completing a row 1.
Three needle bind off. Cut yarn. Weave in ends. Cut 2 pieces of yarn approximately 28ins long. Fold them in half and pull a loop through the front corner of the hood. Pull the ends through this loop. These are your ties.

0-3 Month
Cast on 49 (I use long tail cast on)
Row 1 (wrong side) – p1 [k1, p1] repeat [to] across
Row 2 – knit across
Repeat rows 1 and 2 until your work measures appx 6ins from cast on edge.
Finish after completing a row 1.
Three needle bind off. Cut yarn. Weave in ends. Cut 2 pieces of yarn approximately 28ins long. Fold them in half and pull a loop through the front corner of the hood. Pull the ends through this loop. These are your ties.

3-6 Months
Cast on 55 (I use long tail cast on)
Row 1 (wrong side) – p1 [k1, p1] repeat [to] across
Row 2 – knit across
Repeat rows 1 and 2 until your work measures appx 6ins from cast on edge.
Finish after completing a row 1.
Three needle bind off. Cut yarn. Weave in ends. Cut 2 pieces of yarn approximately 28ins long. Fold them in half and pull a loop through the front corner of the hood. Pull the ends through this loop. These are your ties.

6-12 Months
Cast on 59 (I use long tail cast on)
Row 1 (wrong side) – p1 [k1, p1] repeat [to] across
Row 2 – knit across
Repeat rows 1 and 2 until your work measures appx 6.5ins from cast on edge.
Finish after completing a row 1.
Three needle bind off. Cut yarn. Weave in ends. Cut 2 pieces of yarn approximately 28ins long. Fold them in half and pull a loop through the front corner of the hood. Pull the ends through this loop. These are your ties.

1-3 Years
Cast on 65 (I use long tail cast on)
Row 1 (wrong side) – p1 [k1, p1] repeat [to] across
Row 2 – knit across
Repeat rows 1 and 2 until your work measures appx 7ins from cast on edge.
Finish after completing a row 1.
Three needle bind off. Cut yarn. Weave in ends. Cut 2 pieces of yarn approximately 28ins long. Fold them in half and pull a loop through the front corner of the hood. Pull the ends through this loop. These are your ties.

Broken Rib Bonnet and Pixie PDFs
Disclaimer: This page contains affiliate links. If you choose to make a purchase after clicking a link, I may receive a commission at no additional cost to you. Thank you for your support!