
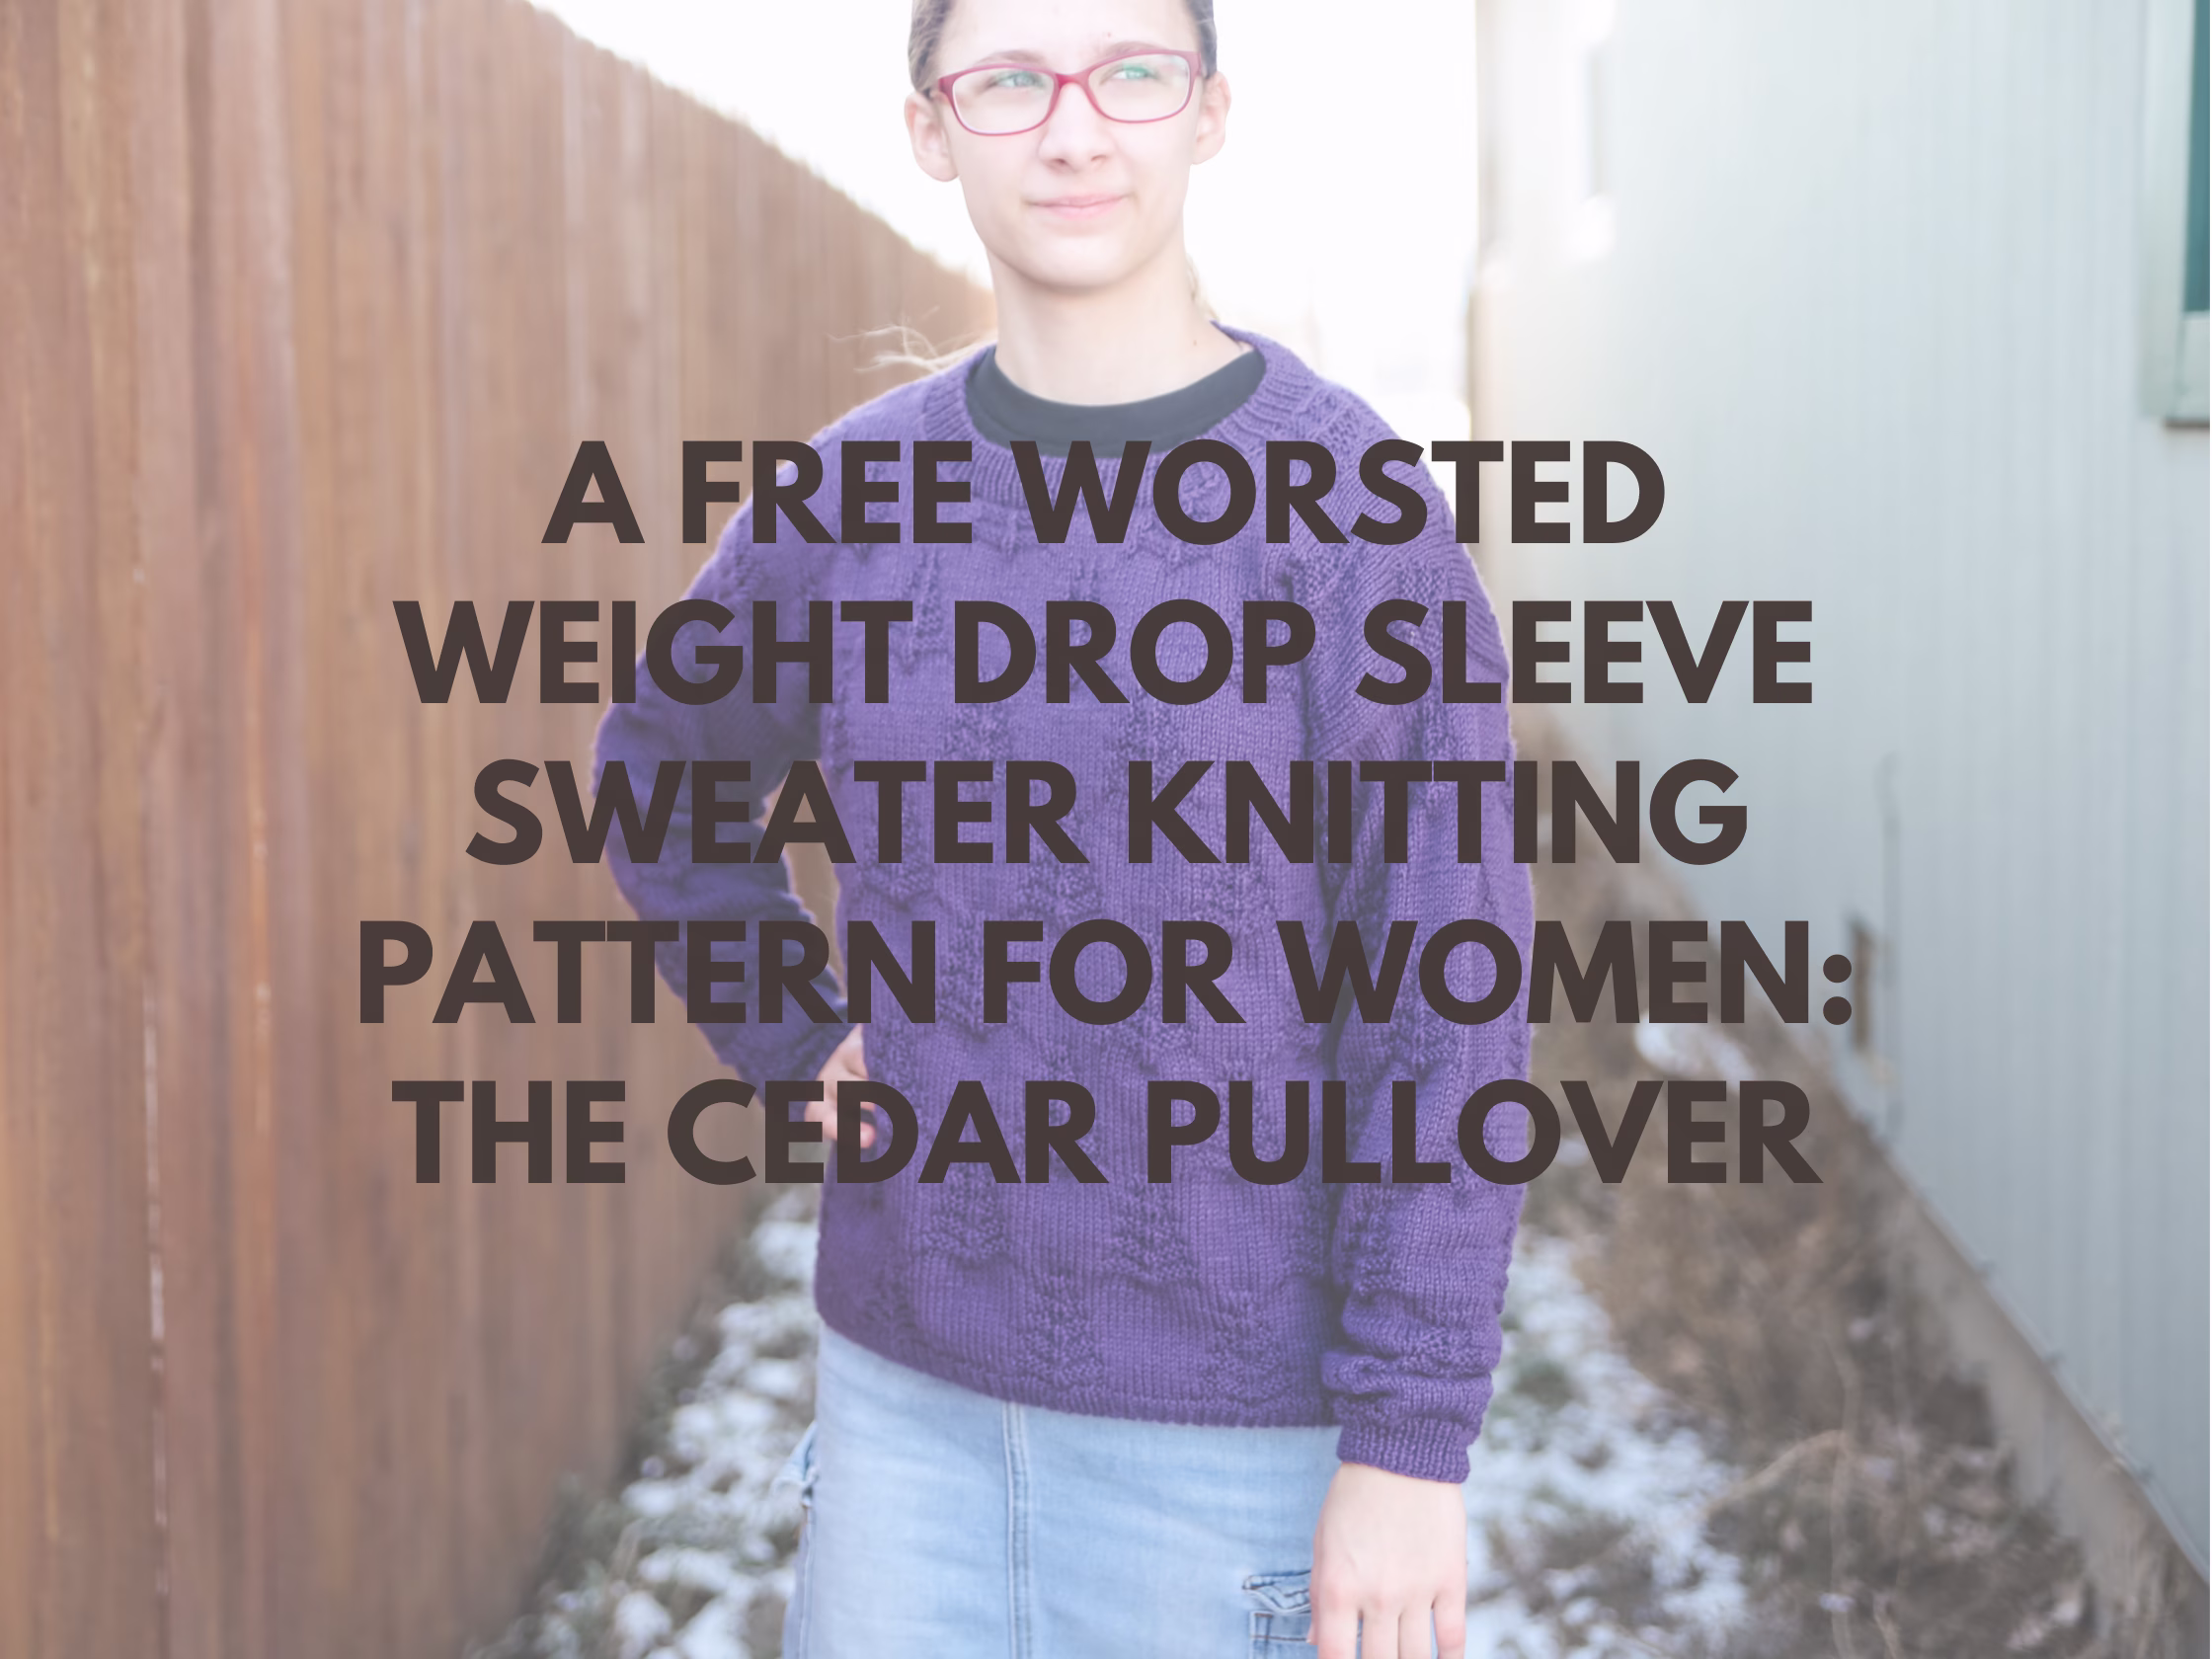
This free dk weight drop sleeve sweater knitting pattern is part of my collection of free sweater knitting patterns designed to help you create something wearable, textured, and actually enjoyable to knit.
If you’ve ever wanted a sweater that looks detailed without feeling overwhelming, this pattern solves that problem by combining simple construction with a repeating texture that quickly becomes second nature. This free dk weight drop sleeve sweater knitting pattern for women gives you a clear path from cast on to finished sweater, without complicated shaping or confusing steps. It’s the kind of project that builds confidence while still keeping your hands busy with something interesting.

If you’ve been wanting to try a sweater but felt unsure where to start, this is a great place to begin.
It’s structured enough to teach you something new, but relaxed enough that you won’t feel stuck or frustrated along the way. By the time you finish, you’ll understand sweater construction in a way that actually sticks.
What materials do you need for this free dk weight drop sleeve sweater knitting pattern?
For this free dk weight drop sleeve sweater knitting pattern, I used Berroco Vintage DK yarn because it holds texture beautifully while still feeling soft and wearable. You’ll also need US size 7 (4.5 mm) knitting needles for the main fabric and US size 5 (3.75 mm) needles for ribbing, along with stitch markers, a tapestry needle, and a measuring tape.
This yarn choice really makes a difference in how the texture shows up. The wool blend gives just enough structure for the purled tree motif to stand out clearly, while still staying comfortable for everyday wear. If you substitute yarn, look for something with similar elasticity so your finished sweater keeps its shape.

Once you have your materials ready, everything else starts to fall into place. This is one of those projects where the right setup makes the entire knitting experience smoother from the very beginning.
How does the construction work in this free dk weight drop sleeve sweater knitting pattern?
This free dk weight drop sleeve sweater knitting pattern is worked from the bottom up, starting in the round and then transitioning to flat knitting at the armholes. That shift gives you a chance to learn how sweater pieces come together without adding complicated shaping.
The drop sleeve design keeps things simple and relaxed. Instead of shaping tight armholes, the sleeves are added lower on the body, which creates that easy, everyday fit that works with just about anything in your closet.

As you work through the pattern, the repeating texture becomes something you can do without constantly checking instructions. It’s steady, predictable, and surprisingly relaxing once you get into the rhythm.
Looking for more free sweater knitting patterns like this one?
If you enjoyed this free dk weight drop sleeve sweater knitting pattern, there are several other designs that follow a similar idea of simple construction with beautiful texture:
• Peace Sweater
• Wisdom Sweater
• Michael Sweater
• Saffron Sweater
• Joanna Cardigan
Each of these patterns offers a slightly different texture or construction style, so you can keep building your skills while still making pieces you’ll actually wear. Some focus more on ribbing, others on lace or cables, but they all stay practical and approachable.

If you love having a go-to sweater that works for everyday life, this pattern fits right in. It’s the kind of knit you’ll reach for again and again, both while making it and after it’s finished.
Cedar Pullover Free Pattern
MATERIALS AND INFO
Size: : xs, s (m, l) xl, 2x (3x, 4x)
Materials: Approximately 1277, 1520 (1580, 1667) 1807, 1936 (2048, 2225) yds of Berroco Vintage DK 100g/2290yds yarn needle, stitch markers
Needle Size: 5(US) 3.75mm circular needles and dpn, 4(US) 3.5mm circular and dpn
Gauge (tension): 24sts & 32 rows to make 10cm square, using size 5(US) 3.75mm needles working in stockinette stitch
Chest Measurement: 75, 85 (95, 105) 115, 125 (135, 145) cm or 30, 34 (38, 42) 46, 50 (54, 58)
METHOD
Cedar Pullover is bottom-up drop sleeve pullover. It is worked in the round until the sleeves. Created for our 3rd child, she saw a similar sweater on shein and asked if I could make her one instead because “It’ll be nicer.” It made me so happy that she recognized the difference in quality. I looked all over for a pattern and couldn’t find one so created one for her.
Abbreviations can be found on the last page.
Note: choose size based on chest measurement for best fit. Measurements above are measurement of the person not sweater measurements. This sweater has 6ins of positive ease.
1X1 RIB PATTERN
Row 1 (right side row) – (k1, p1) across
Row 2 – knit all the knit stitches, purl all the purl stitches.

Row Instructions
Row 1 – [k11, m1r, k4, vdd, k4, m1l]
Row 2 – [k5, p1, k5, p11]
Row 3 – [k11, p5, k1, p5]
Row 4 – purl across
Row 5 – [k12, m1r, k3, vdd, k3, m1l, k1]
Row 6 – [p1, k4, p1, k4, p12]
Row 7 – [k12, p4, k1, p4, k1]
Row 8 – purl across
Row 9 – [k13, m1r, k2, vdd, k2, m1l, k2]
Row 10 – [p2, k3, p1, k3, p13]
Row 11 – [k13, p3, k1, p3, k2]
Row 12 – purl across
Row 13 – [k14, m1r, k1, vdd, k1, m1l, k3]
Row 14 – [p3, k2, p1, k2, p14]
Row 15 – [k14, p2, k1, p2, k3]
Row 16 – purl across
Row 17 – [k15, m1r, vdd, m1l, k4]
Row 18 – [p4, k1, p1, k1, p15]
Row 19 – [k15, p1, k1, p1, k4]
Row 20 – purl across
Row 21 – [m1r, k4, vdd, k4, m1l, k11]
Row 22 – [p11, k5, p1, k5]
Row 23 – [p5, k1, p5, k11]
Row 24 – purl across
Row 25 – [k1, m1r, k3, vdd, k3, m1l, k12]
Row 26 – [p12, k4, p1, k4]
Row 27 – [p4, k1, p4, k12]
Row 28 – purl across
Row 29 – [k2, m1r, k2, vdd, k2, m1l, k13]
Row 30 – [p13, k3, p1, k3]
Row 31 – [p3, k1, p3, k13]
Row 32 – purl across
Row 33 – [k3, m1r, k1, vdd, k1, m1l, k14]
Row 34 – [p14, k2, p1, k2]
Row 35 – [p2, k1, p2, k14]
Row 36 – purl across
Row 37 – [k4, m1r, vdd, m1l, k14]
Row 38 – [p14, k2, p1, k2]
Row 39 – [p2, k1, p2, k14]
Row 40 – purl across

In the Round Instructions
Row 1 – [k11, m1r, k4, vdd, k4, m1l]
Row 2 – [k11, p5, k1, p5,]
Row 3 – [k11, p5, k1, p5]
Row 4 – knit across
Row 5 – [k12, m1r, k3, vdd, k3, m1l, k1]
Row 6 – [k12, p4, k1, p4, k1]
Row 7 – [k12, p4, k1, p4, k1]
Row 8 –knit across
Row 9 – [k13, m1r, k2, vdd, k2, m1l, k2]
Row 10 – [k13, p3, k1, p3, k2]
Row 11 – [k13, p3, k1, p3, k2]
Row 12 – knit across
Row 13 – [k14, m1r, k1, vdd, k1, m1l, k3]
Row 14 – [k14, p2, k1, p2, k3]
Row 15 – [k14, p2, k1, p2, k3]
Row 16 – knit across
Row 17 – [k15, m1r, vdd, m1l, k4]
Row 18 – [k15, p1, k1, p1, k4]
Row 19 – [k15, p1, k1, p1, k4]
Row 20 – knit across
Row 21 – [m1r, k4, vdd, k4, m1l, k11]
Row 22 – [p5, k1, p5, k11]
Row 23 – [p5, k1, p5, k11]
Row 24 – knit across
Row 25 – [k1, m1r, k3, vdd, k3, m1l, k12]
Row 26 – [p4, k1, p4, k12]
Row 27 – [p4, k1, p4, k12]
Row 28 – knit across
Row 29 – [k2, m1r, k2, vdd, k2, m1l, k13]
Row 30 – [p3, k1, p3, k13]
Row 31 – [p3, k1, p3, k13]
Row 32 – knit across
Row 33 – [k3, m1r, k1, vdd, k1, m1l, k14]
Row 34 – [p2, k1, p2, k14]
Row 35 – [p2, k1, p2, k14]
Row 36 – knit across
Row 37 – [k4, m1r, vdd, m1l, k14]
Row 38 – [p2, k1, p2, k14]
Row 39 – [p2, k1, p2, k14]
Row 40 – knit across
BODY
Cast on using smaller circular needle: 220, 264 (264, 286) 308, 330 (374, 396) sts. Join in the round.
Work in 1×1 ribbing for 4, 4 (4, 4) 4, 4 (4, 4) cms or 1.5, 1.5 (1.5, 1.5) 1.5, 1.5 (1.5, 1.5)ins.
Switch to larger needles.
Work in charted stitch pattern until piece measures 36, 36 (35, 35) 35, 36 (35, 35) cm or 14.5, 14.5 (14, 14) 14, 14.5 (14, 14) measuring from cast on ending after completing an even round on the stitch chart.
SEPARATE FOR ARMHOLE
Cast on 1 sts, work 110, 132 (132, 143) 154, 165 (187, 198) sts, cast on 1 sts, place remaining 110, 132 (132, 143) 154, 165 (187, 198) sts on holder. Those cast on stitches are salvage stitches to sew the sleeve onto without interrupting the stitch pattern already established. These salvage stitches will be worked in stockinette.
You will now work flat.
Work in stitch chart pattern until piece measures 54, 55 (56, 56) 57.5, 58.5 (58.5, 60) cms or 21.5, 22 (22.5, 22.5) 23, 23.5 (23.5, 24) ins from cast on bottom edge, ending after completing a wrong side row.
SHAPE BACK SHOULDERS
Bind off 12, 13 (15, 16) 17, 21 (21, 22) sts at beginning of the next 2 rows.
Bind off 11, 12 (14, 15) 17, 20 (20, 21) sts at beginning of row, work in pattern for 13, 16 (16, 18) 20, 23 (23, 25) [14, 15 (17, 19) 21, 24 (24, 26) sts on working needle].
Put remaining sts on stitch holder.
Turn, bind off 3sts, work to end of row.
Turn, bind off remaining 11, 13 (14, 16) 18, 21 (21, 23) sts
With right side facing, rejoin yarn to stitches on hold, bind off 38, 38 (42, 45) 44, 37 (59, 62) knit remaining 25, 28 (31, 34) 38, 44 (44, 47) sts.
Turn, bind off 11, 12 (14, 15) 17, 20 (20, 21) sts work to end of row
Turn, bind off 3sts
Turn, bind off 11, 13 (14, 16) 18, 21 (21, 23) sts
SHAPE FRONT ARMHOLES
With larger needle pick up the 110, 132 (132, 143) 154, 165 (187, 198) sts on hold. Cast on 1 sts on either end of the first row. Those cast on stitches are salvage stitches to sew the sleeve onto without interrupting the stitch pattern already established. These salvage stitches will be worked in stockinette.
Work in stitch chart pattern until you have worked 47.5, 47.5 (49, 49) 50, 50 (50, 51) cm or 19, 19 (19.5, 19.5) 20, 20 (20, 20.5) measuring from cast on.
LEFT FRONT NECK SHAPING
Work 44, 48 (53, 58) 64, 72 (74, 79) sts in pattern, put remaining sts on holder, turn.
Decrease 1 st at neck edge of next 6, 6 (6, 6) 6, 6 (7, 7) rows.
Then decrease 1 st at neck edge of every other row 3, 3 (3, 3) 3, 3 (4, 4) times.
Then decrease 1 st at neck edge every 4th row 1, 1 (1, 2) 2, 1 (2, 2) times
34, 38 (43, 47) 53, 62 (62, 66) sts remain.
Work in stitch chart pattern until piece measures 54, 55 (56, 56) 57.5, 58.5 (58.5, 60) cms or 21.5, 22 (22.5, 22.5) 23, 23.5 (23.5, 24) ins from bottom cast on edge. Finish after completing a wrong side row.
LEFT FRONT SHOULDER SHAPING
Starting on a right-side row, bind off 12, 13 (15, 16) 17, 21 (21, 22) sts, work across remains sts, turn.
Work 1 row with no decreases, turn.
bind off 11, 12 (14, 15) 17, 20 (20, 21) sts, work across remains sts, turn.
Work 1 row with no decreases, turn.
Bind off remaining 11, 13 (14, 16) 18, 21 (21, 23) sts.
RIGHT FRONT NECK SHAPING
Rejoin yarn to work on stitch holder and bind off 24, 24 (30, 29) 28, 23 (41, 42) sts
Work to the end of the row.
Decrease 1 st at neck edge of next 6, 6 (6, 6) 6, 6 (7, 7) rows.
Then decrease 1 st at neck edge of every other row 3, 3 (3, 3) 3, 3 (4, 4) times.
Then decrease 1 st at neck edge every 4th row 1, 1 (1, 2) 2, 1 (2, 2) times
(34, 38 (43, 47) 53, 62 (62, 66) sts remain.
Work in stitch chart pattern until piece measures 54, 55 (56, 56) 57.5, 58.5 (58.5, 60) cms or 21.5, 22 (22.5, 22.5) 23, 23.5 (23.5, 24) ins from bottom cast on edge. Finish after completing a right side row.
RIGHT FRONT SHOULDER SHAPING
Starting on a wrong-side row, bind off 12, 13 (15, 16) 17, 21 (21, 22) sts, work across remains sts, turn.
Work 1 row with no decreases, turn.
bind off 11, 12 (14, 15) 17, 20 (20, 21) sts, work across remains sts, turn.
Work 1 row with no decreases, turn.
Bind off remaining 11, 13 (14, 16) 18, 21 (21, 23) sts.
Sew shoulder seams.
SLEEVES (MAKE 2)
With smaller needles, cast on 46, 46 (46, 46) 48, 50 (52, 54) sts.
Work in 1×1 ribbing for 1.5ins or 4cms.
Switch to larger sized needles.
K1,1 (1, 1) 2, 3 (4, 5) work in charted stitch pattern 2, 2 (2, 2) 2, 2 (2, 2) times, k1, 1 (1, 1) 2, 3 (4, 5) for 4, 4 (4, 4) 4, 4 (4, 4) rows.
DECREASES
Decrease 1st at each side of marker every other round 0, 0 (10, 11) 13, 11 (16, 19) times,
Then decrease 1st at each side of marker every 4th round 16, 22 (22, 22) 21, 22 (20, 19) times,
Then decrease 1 st at each side of marker every 6th round 7, 4 (0, 0) 0, 0 (0, 0) times
92, 98 (110, 112) 116, 116 (124, 138) sts
Work in stockinette until sleeve measures from cast on stitches 42.5, 44 (45, 45) 45, 46 (46, 47.5) ins or 17, 17.5 (18, 18) 18, 18.5 (18.5, 19) cms or desired sleeve length.
Bind off.
NECKBAND.
With right side facing pick up:
19, 20 (22, 22) 24, 26 (25, 27) sts down front of neck,
24, 24 (28, 29) 28, 23 (41, 42) sts from front neck edge,
19, 20 (22, 22) 24, 26 (25, 27) sts up front neck,
44, 44 (48, 51) 50, 45 (65, 68) sts on back neck edge.
[106, 108 (120, 124) 126, 120 (156, 164) sts]
Work in 1×1 ribbing for a total of 2.5, 2.5 (2.5, 2.5) 2.5, 2.5 (2.5, 2.5) cms or 1, 1 (1, 1) 1, 1 (1, 1) ins.
Bind off all sts in pattern.
FINISHING
Sew sleeves onto the armholes then sew underarm seam.
Weave in all ends. Block as desired.
ABBREVIATIONS
K – knit
m1l – With left needle pick up strand between 2 stitches front to back. Knit through back loop
m1r – With left needle pick up strand between 2 stitches back to front. Knit through front loop
p – purl
st(s) – stitch(es)
vdd – vertical double decrease – slip the next 2 stitches on the left needle as if to knit them together and then slip them off the left needle and onto the right needle, knit the next st, pass slipped stitches over the knitted stitch together

Have you tried this free dk weight drop sleeve sweater knitting pattern yet? I’d love to hear what yarn you chose or what part you enjoyed most—leave a comment and share your experience!
This post may contain affiliate links. This means I may earn a small commission at no extra cost to you if you choose to purchase through them.
Sweater looks beautiful
Thank you
Hi
Looks nice on Rav but no images or pdf here?
There are images and a the pdf is at the bottom of the post free to download. I’m not sure how to help. It is all present and available. I can see several downloads from yesterday so it is functioning.
I’m a beginnner. How do I print your free patterns without all the ads so its easier to follow? I don’t see a print function. Downloading the webpages & converting to a PDF to print is wasteful and still hard to read & follow.
Thanks
if you go to the bottom of the post there is a pdf file of the pattern that you can download. No need to make a pdf of the webpage as there is a pdf already available at the bottom of the post.