
Looking for a cute and comfy free ankle sock knitting pattern? The Danielle Ankle Sock is just what you need! Check out all of our free sock pattern here.

I’ve been on an ankle sock knitting spree for the last few months—blame it on the warming weather or my sheer love for cozy handmade socks! No pun intended. Well, maybe just a little. First came the September Ankle Sock, then the Deborah Ankle Sock, and now, let me introduce you to my newest obsession: the Danielle Ankle Sock.
This free ankle sock knitting pattern was born from my favorite way to “swatch” new stitch patterns—by knitting actual socks! Instead of making tiny squares that inevitably get lost in my project bag, I just cast on a new sock and test out my ideas in a way that’s both practical and fun. If the stitch pattern turns out amazing, I’ve got a brand-new pair of socks. If I don’t love it? No worries! Most of the time, my feet are hidden inside shoes anyway.
A Free Ankle Sock Knitting Pattern with a Purpose
The Danielle Ankle Sock was my way of experimenting with a faux cable stitch and seeing how it interacts with shaping and decreases. Would it pull too much? Would it distort the structure? Would it look strange when paired with other design elements? These are the kinds of questions I like to answer before committing to a full-sized project, like a sweater. And let me tell you—this sock passed the test with flying colors!
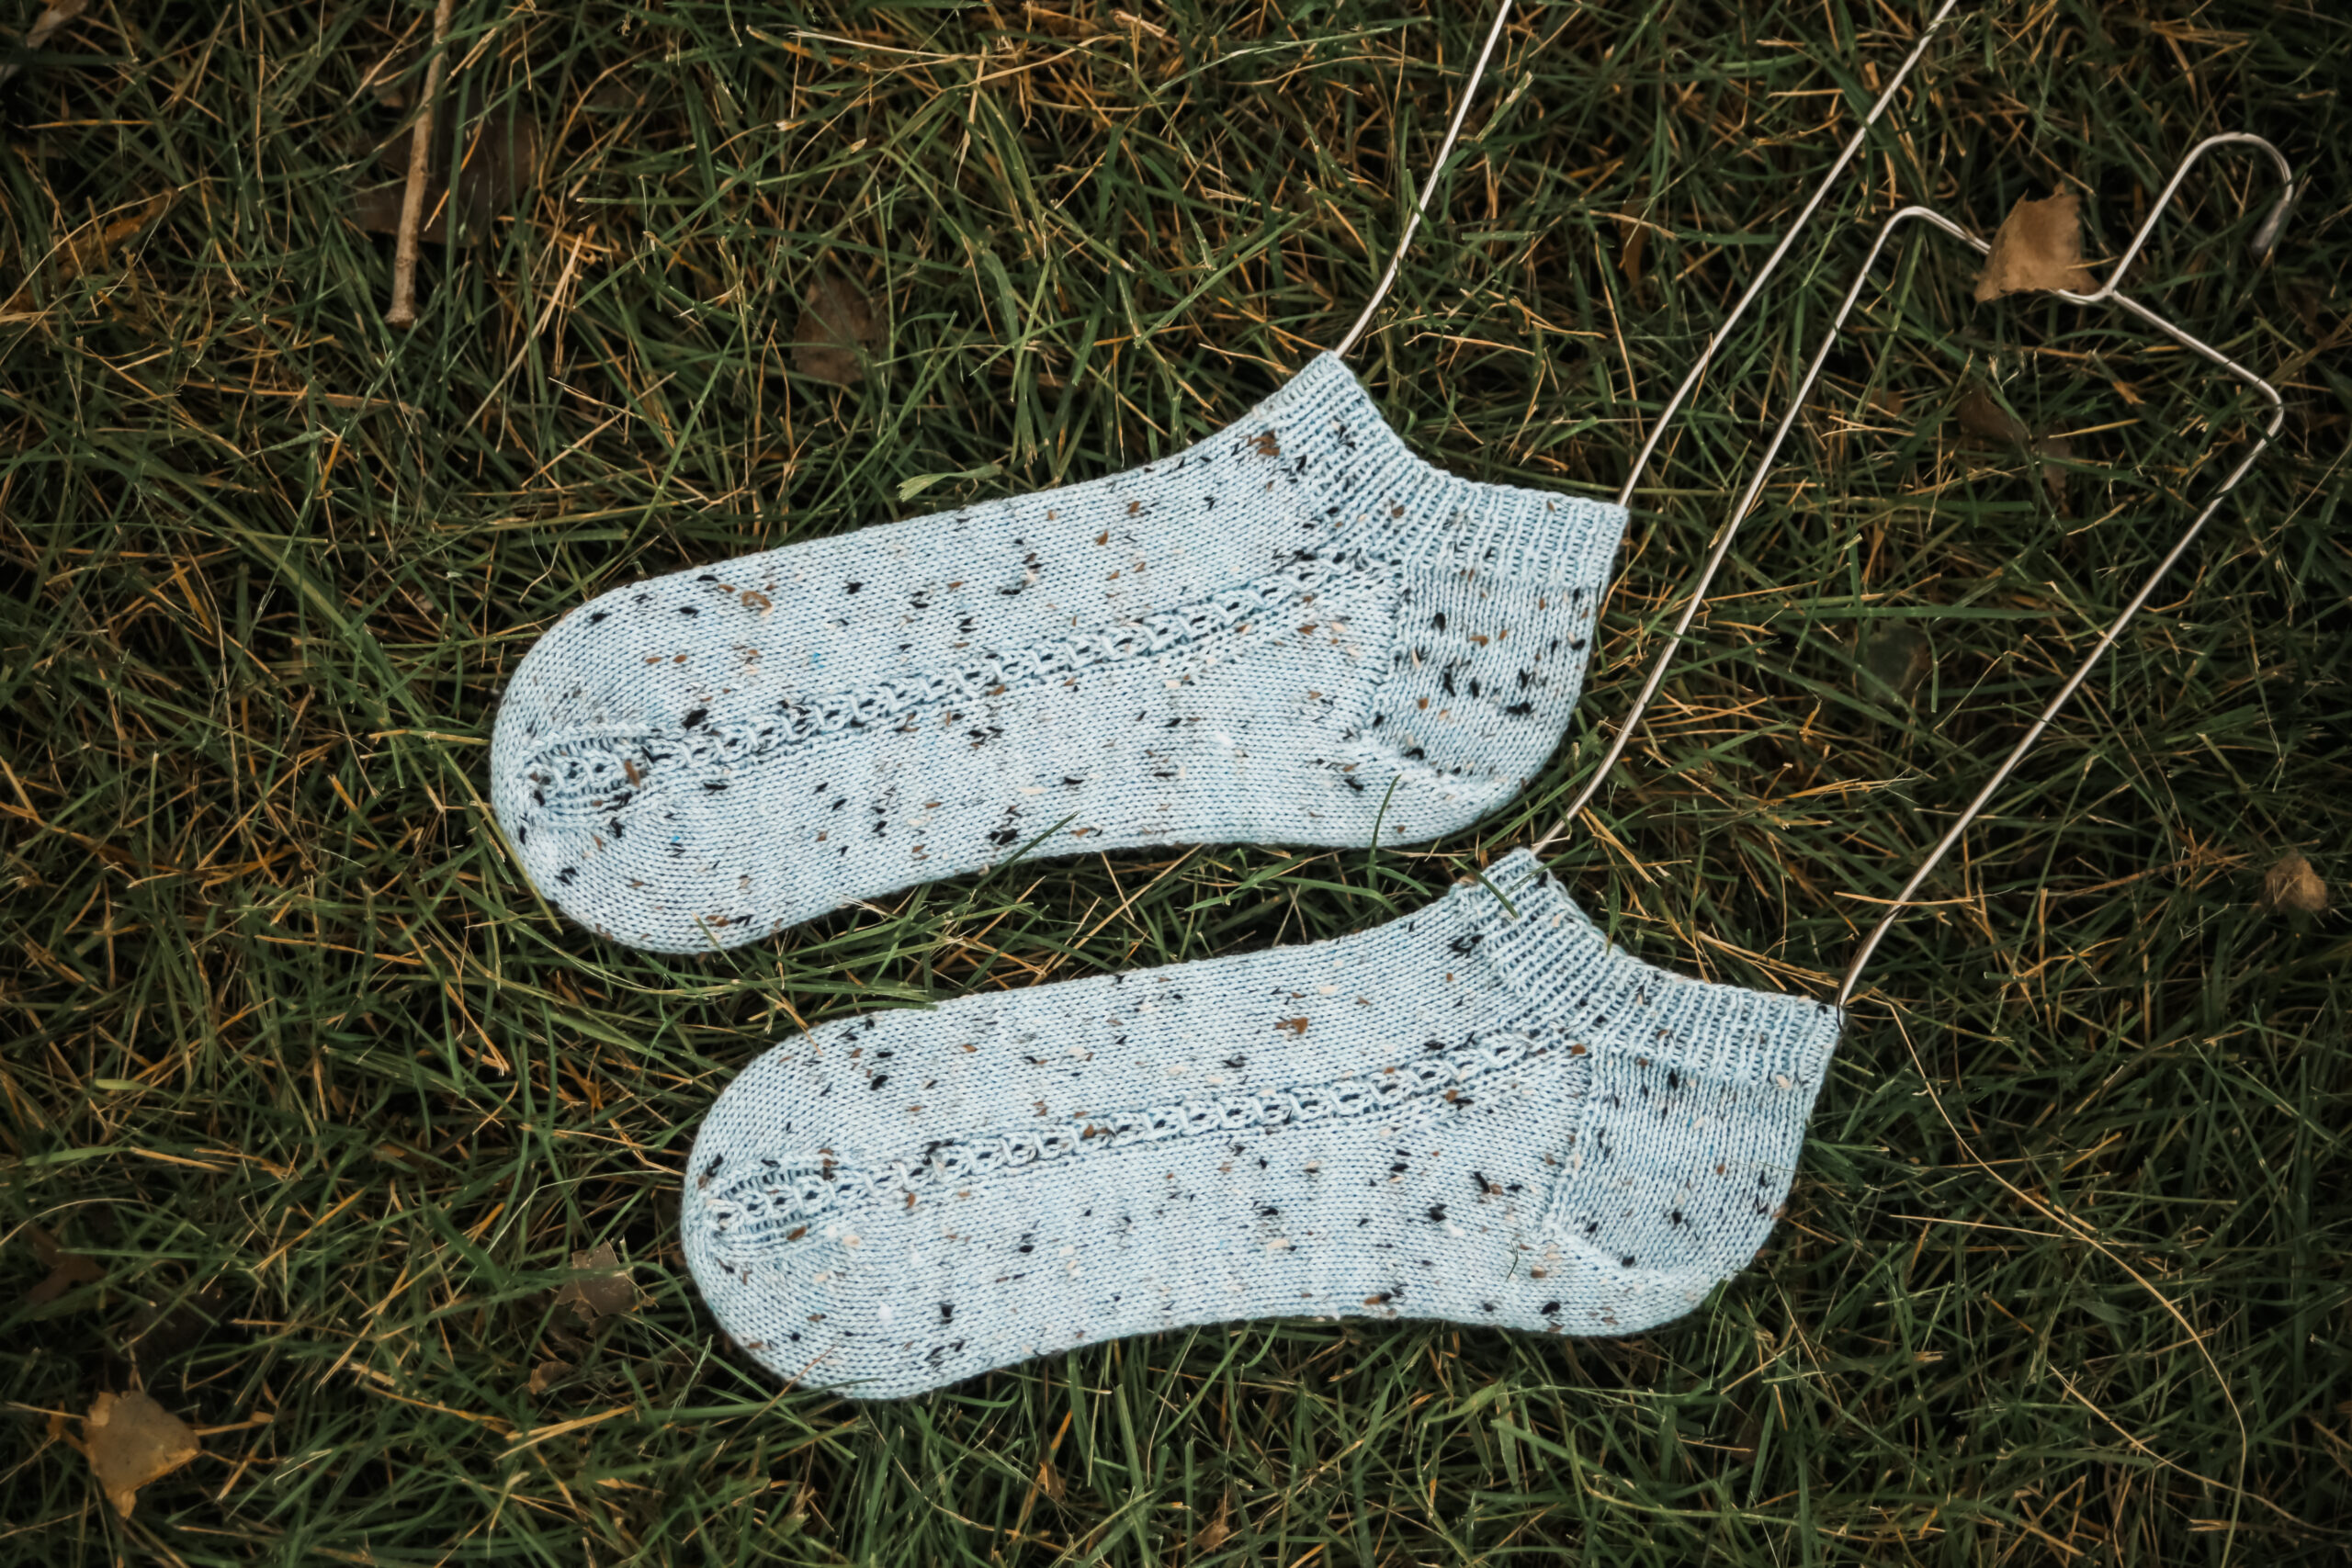
The texture is subtle but elegant, making it perfect for anyone who wants a little flair without anything too complicated. Plus, it’s knit in KnitPicks Stroll Tweed (affiliate link), which gives it that classic, slightly rustic look with just the right amount of softness. I can’t get enough of this yarn—it’s durable, warm, and has that speckled, tweedy charm that makes any project feel instantly cozy.

What Makes This Free Ankle Sock Knitting Pattern Special?
There are so many reasons why I’m obsessed with the Danielle Ankle Sock, but here are my top three:
- It’s a Swatch Sock – I love using socks as a way to test out new stitch patterns. This one was all about seeing how faux cables behave next to decreases, and it turned out beautifully.
- It’s Quick and Satisfying – No long cuffs or endless leg knitting. Just a fun, fast project that’s perfect for spring and summer.
- It’s Perfect for KnitPicks Stroll Tweed (affiliate link) – This yarn adds a gorgeous texture that complements the stitch pattern, and it’s sturdy enough to handle regular wear.
If you’ve been looking for a free ankle sock knitting pattern that’s both interesting and beginner-friendly, this is the one for you!
My Favorite Things About KnitPicks Stroll Tweed (Affiliate Link)
I know I already mentioned how much I love KnitPicks Stroll Tweed (affiliate link), but let’s take a moment to really appreciate it. This yarn is one of my go-to choices for sock knitting because:
- It has a soft yet sturdy texture that holds up well over time.
- The tweedy flecks add a beautiful depth to any stitch pattern.
- It comes in so many lovely colors—I want to knit socks in every shade!
Seriously, if you haven’t tried KnitPicks Stroll Tweed (affiliate link) yet, this is the perfect project to test it out.

A Sneak Peek at What’s Next
Knitting this free ankle sock knitting pattern got me even more excited for my next big project—a cozy faux cable sweater! I’ve been dreaming up ideas, and this sock was the perfect test run to see how the stitch pattern behaves. Spoiler alert: It’s going to be amazing!
But in the meantime, I hope you enjoy knitting your own pair of Danielle Ankle Socks. Whether you’re making them as a stash-busting project, a gift for a fellow sock lover, or just because you need another pair (because let’s be honest, you can never have too many handmade socks), I can’t wait to see how yours turn out!
Get the Free Ankle Sock Knitting Pattern Now!
Ready to cast on? You can find the free ankle sock knitting pattern here: [insert your blog link].
If you knit a pair, be sure to share a picture! I love seeing how everyone makes their socks their own with different colors and yarn choices. And if you use KnitPicks Stroll Tweed (affiliate link), let me know what you think—I have a feeling you’ll love it as much as I do.
Happy knitting!

Materials and Info
Yarn: 1 (1, 1) 1, 1 (1, 2) skeins of Knitpicks Stroll Tweed (50g/231yd) Needles: US #1 / 2.25mm DPNs (or circular for magic loop) Notions: stitch markers, needle
Gauge: 8sts x 11rows per inch
sizing: baby (toddler, child,) lg child, adult S, (M, L)
Finished measurements (unstretched): Leg Length (adjustable): 2.5 (3.5, 4) 4.5, 5, (6, 7)” Foot Length (adjustable): 4 (6, 7.25), 8, 9, (10, 11.25)”
Danielle Ankle Socks were created as a swatch for a summer sweater I was planning. Waste not want not, right?!
I chose to use KnitPicks Stroll Tweed because it is super soft and the colors are lovely.
Model is wearing a adult medium.
Abbreviations can be found at the very bottom of this page.
Danielle Faux Cable Patten
Round 1 – p1, k2, p1
Round 2 – p1, k1, yo, k1, p1 (1 stitch increased)
Round 3 – p1, k3, p1
Round 4 – p1, sl1, k2, psso2, p1 (1 stitch decreased)


Danielle Ankle Sock Pattern
Cuff
Cast on 40 (44, 52) 56, 60, (64, 72) sts, join for working in the round.
Separate stitches on your dpn as follows:
1st needle 20 (22, 26) 28, 30 (32, 36) sts
2nd and 3rd needle 10 (11, 13) 14, 15 (16, 18) sts each needle
Work in 1×1 rib (k1, p1 around) for 8 (8, 10) 10, 12 (12, 14) rounds.
Heel Flap
Next round: You will work the heel flap on the next 20 (22, 26), 28, 30, (32, 36), sts. Place the remaining 20 (22, 26), 28, 30, (32, 36), sts on hold.
Row 1 (RS): sl1, knit to end, turn work.
Row 2 (WS): sl1, purl to end, turn work.
Repeat rows 1-2 a total of 8 (10, 12), 13, 14, (16, 18) times.
This is a total of 16 (20, 24), 26, 28, (32, 36) rows.
Heel Turn
Row 1 (RS): sl1, k12 (12, 14), 15, 16, (18, 20), ssk, k1, turn work.
Row 2 (WS): sl1, p7 (5, 5) 5, 5, (7, 7), p2tog, p1, turn work.
Row 3: sl1, knit to 1 st before the gap, ssk, k1, turn work.
Row 4: sl1, purl to 1 st before the gap, p2tog, p1, turn work.
Repeat rows 3-4 until all stitches have been worked: 14 (14, 16), 16, 18, (20, 22) sts remain.
Knit across these heel stitches slipping the first st.
Gusset
Pick up and knit 9 (11, 13), 14, 15, (17, 19) sts along the edge of heel flap, PM, p1, k2, p1, knit across to last 4 sts before heel flap, p1, k2, p1 (this is your Danielle Faux Cable set-up round), PM, pick up and knit 9 (11, 13), 14, 15, (17, 19) sts along heel flap, k7 (7, 8) 8, 9, (10, 11) sts, mark the new BOR (located at the bottom of the foot). [52 (58, 68) 72, 78, (86, 96) sts]
Round 1: k 16 (18, 21) 22, 24 (27, 30) sts, work across front 20 (22, 26), 28, 30, (32, 36) stitches keeping Danielle Faux Cables in pattern throughout, k 16 (18, 21) 22, 24 (27, 30) sts
Round 2: knit to 3 sts before marker, k2tog, k1, sm, work across front 20 (22, 26), 28, 30, (32, 36) stitches keeping Danielle Faux Cables in pattern throughout sm, k1, ssk, knit to end [2 sts dec]
Work rounds 1-2 a total of 6 (7, 8) 8, 9, (11, 12) times. [40 (44, 52) 56, 60, (64, 72) sts]
Foot
Shift beginning of round (BOR) remove marker as follows: remove marker, k10 (11, 13) 14, 15, (16, 18), place marker – this is the new BOR, located at the side of the foot.
Continue working in the round, keeping the top of foot in pattern, until the piece measures 3 (5, 6) 6.5, 7, (8, 9)” from back of heel, or 1 (1, 1.5) 1.75, 2, (2, 2.25)” short of desired foot length.
Toe
Round 1: keep first 4 stitches in pattern, ssk, knit to 2sts before Danielle Faux Cable, k2tog, work 4 stitches in pattern, k1, ssk, knit to 3 sts before end of round, k2tog, k1 [4 sts dec]
Round 2: work 1 round in pattern
Work rounds 1-2 a total of 5 (6, 7) 8, 9, (9, 10) times. until 16 (16, 20) 20, 20, (24, 24) sts remain.
Cut yarn leaving a 12” tail, then graft toe using Kitchener stitch.
Weave in all ends

Abbreviations and Tutorials
Kitchener stitch:
Place half the stitches on one needle, half the stitches on the other needle, (top and bottom NOT side to side)
Cut yarn (leaving a long yarn tail) and thread through a blunt needle.
Set-up steps: Insert needle purlwise (back to front) through the first st on front needle, leaving the st on the needle. Then insert needle knitwise (front to back) through the first st on the back needle, leaving the st on the needle.
Step 1: Insert needle knitwise through first st on front needle, then slip this st off the needle.
Step 2: Insert needle purlwise through the second st on front needle, leaving the st on the needle.
Step 3: Insert needle purlwise through first st on back needle, then drop this stitch off the needle.
Step 4: Insert needle knitwise through second st on back needle, leaving the st on the needle.
From this point to the end, repeat steps 1-4.
Kitchener stitch can be intimidating, but you get into a rhythm:
Front needle: knitwise drop off, purlwise leave on,
Back needle: purlwise drop off, knitwise leave on,
Repeat!
At the end of the row, there is only 1 stitch left on each needle.
Work steps 1 and 3 once more.
Abbreviations
k – knit
P – purl
sm – slip maker
pm – place marker
st – stich
sts – stitches
k2tog -knit 2 stitches together
psso2 – pass the slipped stitch over the 2 stitches you just knit after slippin
ssk – slip next st knitwise, slip next st knitwise, place stitches back onto left needle, knit both slipped sts together
Download Danielle Ankle Socks PDF

Disclaimer: This page contains affiliate links. If you choose to make a purchase after clicking a link, I may receive a commission at no additional cost to you. Thank you for your support!