
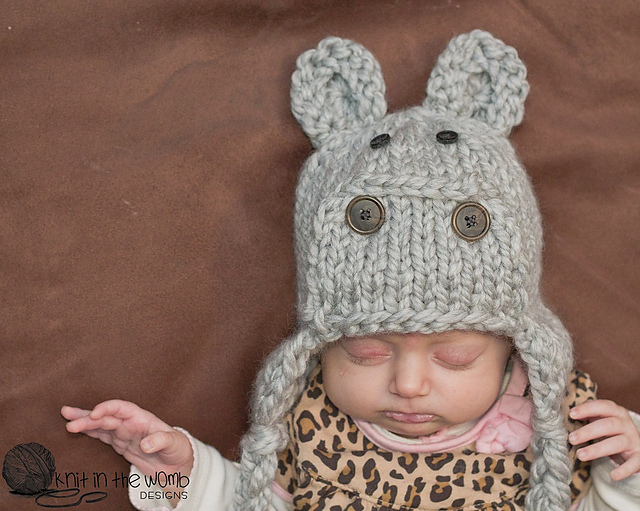
Love fun animal hats? This free Hippo Hat Knit Pattern is at the bottom—see all my other photo prop patterns here.

As a passionate knitter, there’s nothing I love more than diving into a new project that’s both fun and functional. Today, I’m thrilled to share my journey with the Happy Hippo Hat, a delightful and free knitting pattern that brings joy and warmth to every stitch. This hat, made with Lion Brand Thick and Quick yarn, is not just a whimsical addition to any wardrobe, but also a great way to practice knitting with chunky yarn.
Why the Happy Hippo Hat?
When I first stumbled upon the Happy Hippo Hat pattern, I was instantly charmed by its playful design. The name alone conjured images of cartoonish fun and silliness, perfect for brightening up any cold day. Knitting should be enjoyable, and the Happy Hippo Hat promises just that—fun, chunky, and downright silly.
Choosing the Yarn: Lion Brand Thick and Quick
One of the reasons I was excited to start this project was the yarn choice. Lion Brand Thick and Quick is a dream to work with. It’s a super bulky yarn that works up quickly, making it perfect for a cozy hat. Plus, it comes in a variety of vibrant colors, allowing for plenty of creative freedom. For my hat, I chose a bright, cheerful color that would stand out on dreary winter days.
The texture of Lion Brand Thick and Quick is wonderfully soft and plush, ideal for a hat that’s as comfy as it is cute. Its thickness means the hat will be warm and snuggly, just what you need when the temperature drops.
Getting Started
With my yarn and needles ready, I jumped right into the pattern. One of the first things that struck me was how quickly the hat began to take shape. Working with chunky yarn is incredibly satisfying because progress is so visible. After just a few rows, I could already see the character of the hat emerging.
The pattern is straightforward and well-suited for knitters of all levels. If you’re a beginner, this is a fantastic project to get comfortable with knitting in the round and working with super bulky yarn. More experienced knitters will appreciate the simplicity and the fun of watching the hippo face come to life.
The Fun Details
What sets the Happy Hippo Hat apart are the delightful details. The pattern includes instructions for creating the hippo’s ears and face, giving the hat its signature silly look. As I knitted the ears, I couldn’t help but smile at how cute they were turning out.
The eyes and nostrils are added using simple embroidery, which is a fun way to practice adding embellishments to your knits. If you’ve never tried embroidery on knitting before, don’t worry—it’s easy to pick up and adds a lot of character to the finished hat.
Assembly and Finishing Touches
Once the main body of the hat and the ears were complete, it was time to assemble everything. Attaching the ears was straightforward, and seeing the hat come together was incredibly rewarding. I used a simple whip stitch to sew the ears in place, ensuring they were secure and evenly positioned.
Next came the embroidery for the eyes and nostrils. I opted for black yarn to make the features stand out against the bright background. This step is where you can really personalize your hippo—experiment with different expressions to give your hat a unique personality.
The Finished Product
The final product was everything I had hoped for and more. The Happy Hippo Hat turned out to be a cozy, chunky, and incredibly cute accessory. It’s impossible not to smile when you see it, and it’s even more fun to wear. The Lion Brand Thick and Quick yarn was perfect for this project, providing the right amount of warmth and softness.
Not only is the Happy Hippo Hat functional, but it also makes a great gift. Whether you’re knitting for a child, a friend, or yourself, this hat is sure to bring joy. It’s a wonderful way to add a touch of whimsy to your winter wardrobe and makes for a delightful conversation starter.
Tips and Tricks
Here are a few tips I picked up along the way that might help you as you knit your own Happy Hippo Hat:
- Choose the Right Color: While any color will look great, choosing a bright and fun color will really make your hippo pop. Consider your recipient’s favorite color or a shade that will add a bit of cheer to a gray winter day.
- Pay Attention to Gauge: With super bulky yarn, gauge can affect the size of your hat significantly. Be sure to check your gauge before you start to ensure a good fit.
- Embrace the Embellishments: Don’t be afraid to get creative with the embroidery. You can experiment with different expressions or even add extra details like a little bow or a flower.
- Enjoy the Process: Remember, the Happy Hippo Hat is all about having fun. Enjoy the quick progress, the soft yarn, and the adorable outcome. Knitting should be a joyful experience, and this project certainly delivers on that front.
Conclusion
Knitting the Happy Hippo Hat was an absolute delight from start to finish. The combination of a fun, silly design and the luxurious feel of Lion Brand Thick and Quick yarn made this one of my favorite projects to date. Whether you’re looking to add a bit of fun to your knitting routine or searching for the perfect gift, the Happy Hippo Hat is sure to bring smiles. So grab your needles, pick your favorite color, and get ready to knit your way to happiness!

Materials and Info
Material: Super bulky (size 6) yarn appx 70yds for smaller sizes and 120yds for larger (I used Lion Brand Thick and Quick), size 13 (9mm) double pointed needles, 2 black small buttons and 2 large buttons
Gauge: 2.5sts/in ~Gauge is VERY important! Swatch before starting!~
Sizes (appx finished circumference): newborn (13ins), 0-3mths (14ins), 3-6mths (15ins), 6-12mths (16ins), toddler (17ins), child (18ins)
Happy Hippo Hat Pattern
Newborn
Earflaps
Cast on 4sts
Row 1 – purl across
Row 2 – K1 M1 K2 M1 K1 (6sts)
Row 3 – purl across
Row 4 – K1 M1 K4 M1 K1 (8sts)
Rows 5 & 7 – purl across
Rows 6 & 8 – knit across
Cast on 8 sts and cut yarn leaving enough for weaving in ends. Set aside. Repeat for other earflap casting on 8sts but do NOT cut yarn. With the right side facing out, join in the round. You should now have 32sts on your needles.
Hat Body
Knit in the round until your work measures appx 3.5ins from the cast on sts in between the earflaps.
Decrease rounds
Round 1 – (k2tog k2) repeat around (24sts)
Round 2 – knit around
Round 3 – (k2tog k1) repeat around (16sts)
Round 4 – k2tog around (8sts)
Do NOT bind off. Cut yarn and pull through the remaining sts.
Nose
With right side facing, pick up 8sts.
Row 1 – p1 m1 p6 m1 p1 (10sts)
Rows 2 & 4 – knit
Rows 3 & 5 – purl
Row 6 – k1 ssk k4 k2tog k1 (8sts)
Row 7 – p1 p2og p2 p2tog tbl p1 (6sts)
Bind off knitwise. Tack down the nose with your larger buttons.
Ears – make 2
Cast on 10sts
Rows 1 & 3 – knit
Rows 2 & 4 – purl
Do NOT bind off. Cut yarn leaving a long enough tail to sew the ears onto the hat (appx 8-12ins) and pull through the sts. Sew the ears at the top of the hat.
Weave in all ends. Add the small buttons for eyes. Cut 3 pieces of yarn appx 30ins long. Fold them in half and pull a loop through the bottom of the earflap. Pull the ends through this loop and secure. Now braid loosely to desired length. Clip ends. Repeat on the other side.
0-3mth
Earflaps
Cast on 4sts
Row 1 – purl across
Row 2 – K1 M1 K2 M1 K1 (6sts)
Row 3 – purl across
Row 4 – K1 M1 K4 M1 K1 (8sts)
Rows 5 & 7 – purl across
Rows 6 & 8 – knit across
Cast on 9 sts and cut yarn leaving enough for weaving in ends. Set aside. Repeat for other earflap but cast on 10 sts and do NOT cut yarn. With the right side facing out, join in the round. You should now have 35sts on your needles.
Hat Body
Knit in the round until your work measures appx 4ins from the cast on sts in between the earflaps.
Decrease rounds
Round 1 – (k2tog k3) repeat around (28sts)
Round 2 – knit around
Round 3 – (k2tog k2) repeat around (21sts)
Round 4 – (k2tog k1) repeat around (14sts)
Round 5 – k2tog around (7sts)
Do NOT bind off. Cut yarn and pull through the remaining sts.
Nose
With right side facing, pick up 10sts.
Row 1 – p1 m1 p8 m1 p1 (12sts)
Rows 2, 4 & 6 – knit
Rows 3 & 5 – purl
Row 7 – p1 p2og p6 p2tog tbl p1 (10sts)
Row 8 – k1 ssk k4 k2tog k1 (8sts)
Bind off knitwise. Tack down the nose with your larger buttons.
Ears – make 2
Cast on 10sts
Rows 1 & 3 – knit
Rows 2 & 4 – purl
Do NOT bind off. Cut yarn leaving a long enough tail to sew the ears onto the hat (appx 8-12ins) and pull through the sts. Sew the ears at the top of the hat.
Weave in all ends. Add the small buttons for eyes. Cut 3 pieces of yarn appx 30ins long. Fold them in half and pull a loop through the bottom of the earflap. Pull the ends through this loop and secure. Now braid loosely to desired length. Clip ends. Repeat on the other side.
3-6mths
Earflaps
Cast on 4sts
Row 1 – purl across
Row 2 – K1 M1 K2 M1 K1 (6sts)
Row 3 – purl across
Row 4 – K1 M1 K4 M1 K1 (8sts)
Rows 5 & 7 – purl across
Rows 6 & 8 – knit across
Cast on 10 sts and cut yarn leaving enough for weaving in ends. Set aside. Repeat for other earflap but cast on 11 sts and do NOT cut yarn. With the right side facing out, join in the round. You should now have 37sts on your needles.
Hat Body
Knit in the round until your work measures appx 4.5ins from the cast on sts in between the earflaps.
Decrease rounds
Round 1 – K2tog k5, k2tog k6, k2tog k5, k2tog k6, k2tog k5 (32sts)
Round 2 – (k2tog k2) repeat around (24sts)
Round 3 – knit around
Round 4 – (k2tog k1) repeat around (16sts)
Round 5 – k2tog around (8sts)
Do NOT bind off. Cut yarn and pull through the remaining sts.
Nose
With right side facing, pick up 11sts.
Row 1 – p1 m1 p9 m1 p1 (13sts)
Rows 2, 4 & 6 – knit
Rows 3, 5 & 7 – purl
Row 8 – k1 ssk k7 k2tog k1 (11sts)
Row 9 – p1 p2tog p5 p2tog tbl p1 (9sts)
Bind off knitwise. Tack down the nose with your larger buttons.
Ears – make 2
Cast on 10sts
Rows 1 & 3 – knit
Rows 2 & 4 – purl
Do NOT bind off. Cut yarn leaving a long enough tail to sew the ears onto the hat (appx 8-12ins) and pull through the sts. Sew the ears at the top of the hat.
Weave in all ends. Add the small buttons for eyes. Cut 3 pieces of yarn appx 30ins long. Fold them in half and pull a loop through the bottom of the earflap. Pull the ends through this loop and secure. Now braid loosely to desired length. Clip ends. Repeat on the other side.
6-12mth
Earflaps
Cast on 4sts
Row 1 – purl across
Row 2 – K1 M1 K2 M1 K1 (6sts)
Row 3 – purl across
Row 4 – K1 M1 K4 M1 K1 (8sts)
Row 5 – purl across
Row 6 – K1 M1 K6 M1 K1 (10sts)
Rows 7 & 9– purl across
Rows 8 & 10 – knit across
Cast on 10 sts and cut yarn leaving enough for weaving in ends. Set aside. Repeat for other earflap but cast on 10 sts and do NOT cut yarn. With the right side facing out, join in the round. You should now have 40sts on your needles.
Hat Body
Knit in the round until your work measures appx 5ins from the cast on sts in between the earflaps.
Decrease rounds
Round 1 – (k2tog k3) repeat around (32sts)
Round 2 – knit around
Round 3 – (k2tog k2) repeat around (24sts)
Round 4 – (k2tog k1) repeat around (16sts)
Round 5 – k2tog around (8sts)
Do NOT bind off. Cut yarn and pull through the remaining sts.
Nose
With right side facing, pick up 10sts.
Row 1 – p1 m1 p8 m1 p1 (12sts)
Rows 2, 4 & 6 – knit
Rows 3, 5 & 7 – purl
Row 8 – k1 ssk k6 k2tog k1 (10sts)
Row 9 – p1 p2og p4 p2tog tbl p1 (8sts)
Bind off knitwise. Tack down the nose with your larger buttons.
Ears – make 2
Cast on 10sts
Rows 1 & 3 – knit
Rows 2 & 4 – purl
Do NOT bind off. Cut yarn leaving a long enough tail to sew the ears onto the hat (appx 8-12ins) and pull through the sts. Sew the ears at the top of the hat.
Weave in all ends. Add the small buttons for eyes. Cut 3 pieces of yarn appx 30ins long. Fold them in half and pull a loop through the bottom of the earflap. Pull the ends through this loop and secure. Now braid loosely to desired length. Clip ends. Repeat on the other side.
Toddler
Earflaps
Cast on 4sts
Row 1 – purl across
Row 2 – K1 M1 K2 M1 K1 (6sts)
Row 3 – purl across
Row 4 – K1 M1 K4 M1 K1 (8sts)
Row 5 – purl across
Row 6 – K1 M1 K6 M1 K1 (10sts)
Rows 7 & 9– purl across
Rows 8 & 10 – knit across
Cast on 11 sts and cut yarn leaving enough for weaving in ends. Set aside. Repeat for other earflap but cast on 12 sts and do NOT cut yarn. With the right side facing out, join in the round. You should now have 43sts on your needles.
Hat Body
Knit in the round until your work measures appx 5.5ins from the cast on sts in between the earflaps.
Decrease rounds
Round 1 – (K2tog K12) 2 times K2tog K13 (40sts)
Round 1 – (k2tog k3) repeat around (32sts)
Round 2 – knit around
Round 3 – (k2tog k2) repeat around (24sts)
Round 4 – (k2tog k1) repeat around (16sts)
Round 5 – k2tog around (8sts)
Do NOT bind off. Cut yarn and pull through the remaining sts.
Nose
With right side facing, pick up 12sts.
Row 1 – p1 m1 p10 m1 p1 (14sts)
Rows 2, 4, 6 & 8– knit
Rows 3, 5, 7 & 9– purl
Row 10 – k1 ssk k6 k2tog k1 (10sts)
Row 11 – p1 p2og p4 p2tog tbl p1 (8sts)
Bind off knitwise. Tack down the nose with your larger buttons.
Ears – make 2
Cast on 10sts
Rows 1 & 3 – knit
Rows 2 & 4 – purl
Do NOT bind off. Cut yarn leaving a long enough tail to sew the ears onto the hat (appx 8-12ins) and pull through the sts. Sew the ears at the top of the hat.
Weave in all ends. Add the small buttons for eyes. Cut 3 pieces of yarn appx 30ins long. Fold them in half and pull a loop through the bottom of the earflap. Pull the ends through this loop and secure. Now braid loosely to desired length. Clip ends. Repeat on the other side.
Child
Earflaps
Cast on 4sts
Row 1 – purl across
Row 2 – K1 M1 K2 M1 K1 (6sts)
Row 3 – purl across
Row 4 – K1 M1 K4 M1 K1 (8sts)
Row 5 – purl across
Row 6 – K1 M1 K6 M1 K1 (10sts)
Rows 7 & 9– purl across
Rows 8 & 10 – knit across
Cast on 12 sts and cut yarn leaving enough for weaving in ends. Set aside. Repeat for other earflap but cast on 13 sts and do NOT cut yarn. With the right side facing out, join in the round. You should now have 45sts on your needles.
Hat Body
Knit in the round until your work measures appx 5.5ins from the cast on sts in between the earflaps.
Round 1 – (k2tog k3) repeat around (36sts)
Round 2 – knit around
Round 3 – (k2tog k2) repeat around (27sts)
Round 4 – (k2tog k1) repeat around (18sts)
Round 5 – k2tog around (9sts)
Do NOT bind off. Cut yarn and pull through the remaining sts.
Nose
With right side facing, pick up 13sts.
Row 1 – p1 m1 p11 m1 p1 (15sts)
Rows 2, 4 & 6 – knit
Rows 3, 5 & 7 – purl
Row 8 – k1 ssk k9 k2tog k1 (13sts)
Row 9 – p1 p2og p7 p2tog tbl p1 (11sts)
Bind off knitwise. Tack down the nose with your larger buttons.
Ears – make 2
Cast on 10sts
Rows 1 & 3 – knit
Rows 2 & 4 – purl
Do NOT bind off. Cut yarn leaving a long enough tail to sew the ears onto the hat (appx 8-12ins) and pull through the sts. Sew the ears at the top of the hat.
Weave in all ends. Add the small buttons for eyes. Cut 3 pieces of yarn appx 30ins long. Fold them in half and pull a loop through the bottom of the earflap. Pull the ends through this loop and secure. Now braid loosely to desired length. Clip ends. Repeat on the other side.
Happy Hippo Hat PDF

Disclaimer: This page contains affiliate links. If you choose to make a purchase after clicking a link, I may receive a commission at no additional cost to you. Thank you for your support!