
Fall in love with this cable bonnet knitting pattern—a sweet photo prop featured on my free photo prop pattern page. THIS pattern is at the bottom of the post!

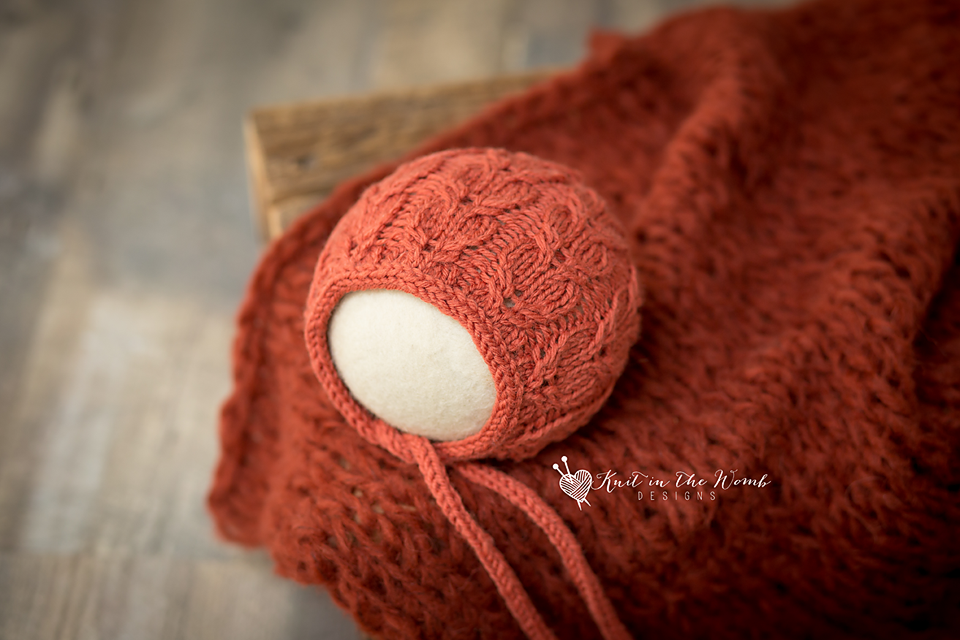
I’ve always had a soft spot for heirloom-quality knits—especially when they’re tiny enough to fit in the palm of your hand. There’s something so satisfying about creating a snug little accessory for a brand-new baby, and this cable bonnet knitting pattern really checks all the boxes for me. Meet the Lewis Bonnet, a baby photo prop that’s as textured and classic as they come. You’ll find the free pattern at the bottom of this post, and if you’re itching for more baby-ready knits, you can check out the full lineup on my photo prop pattern page.

Why I Fell in Love with This Cable Bonnet Knitting Pattern
This cable bonnet knitting pattern is one I designed with both form and function in mind. It’s got those beautiful twisty cables that knitters adore, paired with a snug, structured fit that looks just right on a tiny newborn head. And since I used KnitPicks Comfy (affiliate link), it’s incredibly soft, washable, and baby-friendly—basically everything I want in a baby knit.
Even though it’s a fairly quick knit, there’s so much heart in it. I named it after my dear friend’s first baby, Lewis. Every twist in this cable bonnet knitting pattern makes me think of the journey parents take—unexpected, beautiful, and full of love.
Safety Note: As always, babies should never be left unattended in this bonnet or any knit photo prop.

Let’s Talk Yarn (Spoiler: I’m Obsessed)
When I first started working on this cable bonnet knitting pattern, I knew I wanted to use something ultra-soft and breathable—nothing itchy or stiff. That’s where KnitPicks Comfy (affiliate link) came in like a dream come true.
Made from 75% Pima cotton and 25% acrylic, KnitPicks Comfy (affiliate link) gives you all the cozy, cloudlike goodness of cotton with a little extra stretch and durability. That’s a big deal when your work is going on a real live wriggly baby. Plus, it comes in so many dreamy colors. I personally love using neutrals like soft cream or dove gray, but if you’re into pinks, blues, or bold modern hues, you’ll find plenty to match your vision.
And yes—this cable bonnet knitting pattern looks extra lovely in those smooth, even stitches. Cables really pop in this yarn, making every twist and turn stand out.

Cables Don’t Have to Be Scary
Let’s bust a myth real quick: cables are not just for fancy knitters. They look intricate, but they’re really just a matter of moving stitches around on a cable needle and knitting in order. If you’re feeling a little nervous, take a deep breath. This cable bonnet knitting pattern is a great intro to cable work—it’s interesting without being overwhelming.
What I love most is watching the design build up row by row. There’s something a little addicting about watching cables bloom across your fabric. You’ll be whipping up this cable bonnet knitting pattern while sipping coffee and feeling like a total knitting superstar.

It’s More Than a Bonnet—It’s an Heirloom
Any time I work on a baby project, I’m thinking about the big picture. I don’t just want something cute for a single photo shoot. I want something that can be tucked away in a memory box or passed down to future babies. And that’s what this cable bonnet knitting pattern gives you—timeless style that lasts.
I always take extra time with finishing when I’m working on heirloom-quality knits. I block the bonnet carefully so the cables lay just right. I sew the ties securely and make sure they’re the right length for comfort and safety. This little extra care helps ensure your bonnet looks polished and professional.
Pro Tip: Add a sweet little tag inside with the baby’s name or birthdate. It’s the perfect finishing touch.

Styling Tips for Photo Perfection
This cable bonnet knitting pattern really shines in newborn photos, and I’ve picked up a few tricks to make your shoot go smoothly:
- Use soft, natural light—no harsh flashes or shadows. Morning light from a window is ideal.
- Keep the background simple. Neutral blankets or fur throws are perfect. Let the bonnet (and baby!) be the star.
- Position it carefully. Make sure the cables are centered and the fit is snug (but not too tight).
- Get those close-ups. Cable texture photographs beautifully—don’t be afraid to zoom in.
- Pair with coordinating knits. A simple knit diaper cover or booties can take the whole look to the next level.

Gifting and Sharing the Joy
One of the best parts of designing this cable bonnet knitting pattern has been watching other knitters fall in love with it. Whether you’re making one for your own little one or gifting it to a new parent, the Lewis Bonnet always gets a warm reception. It’s thoughtful, practical, and beautiful—a total triple threat.
And since KnitPicks Comfy (affiliate link) is so budget-friendly, it’s easy to make a few extras to keep on hand for baby showers or last-minute gifts.

Tips for Knitting the Best Bonnet
If you’re ready to cast on your own Lewis Bonnet, here are a few tips to help you succeed:
- Use stitch markers to keep track of the pattern repeat.
- Block your bonnet after knitting to even out the cables and give it a polished look.
- Choose the right size needle. I used a size that worked well with KnitPicks Comfy (affiliate link) for a firm but gentle fabric.
And remember—every stitch you make is a little love letter to that new baby. That’s what makes this cable bonnet knitting pattern so meaningful to me.
Don’t Miss More Photo Prop Patterns
Before you scroll down to grab the free Lewis Bonnet cable bonnet knitting pattern, don’t forget that there are plenty more baby photo props waiting for you over on my free photo prop pattern page. From lacy bonnets to sweet little hats with ears, it’s a treasure trove of newborn cuteness.
Ready to Knit the Lewis Bonnet?
This cable bonnet knitting pattern is at the bottom of this post—just scroll down to get started! Grab your KnitPicks Comfy (affiliate link), your favorite cable needle, and a cozy afternoon. Whether it’s your first cable project or your fiftieth, I hope it brings you as much joy to knit as it brought me to design.
Happy knitting—and don’t forget, baby should never be left unattended in this bonnet!

Materials and Info
Materials: Worsted weight yarn (appx 70-150 yards) I used Knitpicks Comfy, size 8 (5mm) straight and double pointed needles (or size needed to obtain gauge), cable needle, yarn needle, 5mm crochet hook
Gauge: appx 4sts/inch in stockinette stitch Gauge is very important!
Sizes (appx finished head circumference) : newborn (13ins), 3mths (15ins), sitter (16ins), toddler (17ins)
Great provisional cast on tutorial: https://www.youtube.com/watch?v=UeExgbgTOgs
Great i-cord bind off tutorial: https://www.youtube.com/watch?v=Ij8aSPnAcjs
I-cord instructions – To make an i-cord cast on 3 sts on double pointed needles. Slide these sts to the right of your needle. Knit the row. Slide the sts to the right of the needle. Knit the row and slide the sts to the right of the needle. Continue in this manner until you reach your desired length, occasionally giving the resulting cord a gentle tug.
Stitch Key:
K – knit
p – purl
k2tog – knit 2 together
sl – slip st
C3L – cable 3 left – sl next st to cable ndl, hold in front, k2, k1 from cable ndl
C3R – cable 3 right – sl next 2sts to cable ndl, hold in back, k1, k2 from cable ndl

Lewis Bonnet Pattern
Newborn
Provisional cast on 54sts.
Row 1 (wrong side)– k3, [p6,k1] repeat [to] across to last 2 stitches, k2
Row 2 – k2, p1, [k6, p1] repeat [to] across to last 2 stitches, k2
Row 3 – k3, [p2, with yarn forward sl2, p2, k1] repeat [to] across to last 2 stitches, k2
Row 4 – k2, p1, [C3R, C3L, p1] repeat [to] across to last 2 stitches, k2
Row 5 – repeat row 3
Row 6 – repeat row 4
Row 7 – repeat row 1
Row 8 – repeat row 2
Continue working in this 8 row pattern until your work measures appx 4ins from cast on edge. You will now switch to double pointed needles and start working in the round.
Decreases
Round 1 – [k2tog, k4] around (45sts)
Round 2 – knit around
Round 3 – [k2tog, k3] around (36sts)
Round 4 – knit around
Round 5 – [k2tog, k2] around (27sts)
Round 6 – knit around
Round 7 – [k2tog, k1] around (18sts)
Round 8 – k2tog around (9sts)
Do not bind off. Cut yarn leaving appx 6-8ins. Pull tail through remaining 10sts.
Cast on 3sts on double pointed needles and work appx 8ins of i-cord. Place all of the provisional cast on sts on your straight needle (I like to use a circular needle for this but straight will do) and begin i-cord bind off using the 8ins of icord you have already worked. Once all of the bonnet sts have been bound off work an additional 8ins of i-cord with your 3 left over icord sts. Weave in ends.
3 MONTHS
Provisional cast on 61sts.
Row 1 (wrong side)– k3, [p6,k1] repeat [to] across to last 2 stitches, k2
Row 2 – k2, p1, [k6, p1] repeat [to] across to last 2 stitches, k2
Row 3 – k3, [p2, with yarn forward sl2, p2, k1] repeat [to] across to last 2 stitches, k2
Row 4 – k2, p1, [C3R, C3L, p1] repeat [to] across to last 2 stitches, k2
Row 5 – repeat row 3
Row 6 – repeat row 4
Row 7 – repeat row 1
Row 8 – repeat row 2
Continue working in this 8 row pattern until your work measures appx 4.5ins from cast on edge. You will now switch to double pointed needles and start working in the round.
Decreases
Round 1 – k2tog, k59 (60sts)
Round 2 – [k2tog, k4] around (50sts)
Round 3 – knit around
Round 4 – [k2tog, k3] around (40sts)
Round 5 – knit around
Round 6 – [k2tog, k2] around (30sts)
Round 7 – knit around
Round 8 – [k2tog, k1] around (20sts)
Round 9 – k2tog around (10sts)
Do not bind off. Cut yarn leaving appx 6-8ins. Pull tail through remaining 10sts.
Cast on 3sts on double pointed needles and work appx 8ins of i-cord. Place all of the provisional cast on sts on your straight needle (I like to use a circular needle for this but straight will do) and begin i-cord bind off using the 8ins of icord you have already worked. Once all of the bonnet sts have been bound off work an additional 8ins of i-cord with your 3 left over icord sts. Weave in ends.

SITTER
Provisional cast on 68sts.
Row 1 (wrong side)– k3, [p6,k1] repeat [to] across to last 2 stitches, k2
Row 2 – k2, p1, [k6, p1] repeat [to] across to last 2 stitches, k2
Row 3 – k3, [p2, with yarn forward sl2, p2, k1] repeat [to] across to last 2 stitches, k2
Row 4 – k2, p1, [C3R, C3L, p1] repeat [to] across to last 2 stitches, k2
Row 5 – repeat row 3
Row 6 – repeat row 4
Row 7 – repeat row 1
Row 8 – repeat row 2
Continue working in this 8 row pattern until your work measures appx 5ins from cast on edge. You will now switch to double pointed needles and start working
in the round.
Decreases
Round 1 – [k2tog, k15] around (64sts)
Round 2 – [k2tog, k6] around (56sts)
Round 3 – knit around
Round 4 – [k2tog, k5] around (48sts)
Round 5 – knit around
Round 6 – [k2tog, k4] around (40sts)
Round 7 – knit around
Round 8 – [k2tog, k3] around (32sts)
Round 9 – [k2tog, k2] around (24sts)
Round 10 – [k2tog, k1] around (16sts)
Round 11 – k2tog around (8sts)
Do not bind off. Cut yarn leaving appx 6-8ins. Pull tail through remaining 10sts.
Cast on 3sts on double pointed needles and work appx 8ins of i-cord. Place all of the provisional cast on sts on your straight needle (I like to use a circular needle for this but straight will do) and begin i-cord bind off using the 8ins of icord you have already worked. Once all of the bonnet sts have been bound off work an additional 8ins of i-cord with your 3 left over icord sts. Weave in ends.
TODDLER/SMALL CHILD
Provisional cast on 75sts.
Row 1 (wrong side)– k3, [p6,k1] repeat [to] across to last 2 stitches, k2
Row 2 – k2, p1, [k6, p1] repeat [to] across to last 2 stitches, k2
Row 3 – k3, [p2, with yarn forward sl2, p2, k1] repeat [to] across to last 2 stitches, k2
Row 4 – k2, p1, [C3R, C3L, p1] repeat [to] across to last 2 stitches, k2
Row 5 – repeat row 3
Row 6 – repeat row 4
Row 7 – repeat row 1
Row 8 – repeat row 2
Continue working in this 8 row pattern until your work measures appx 6ins from cast on edge. You will now switch to double pointed needles and start working in the round.
Decreases
Round 1 – [k2tog, k23] around (72sts)
Round 2 – [k2tog, k6] around (63sts)
Round 3 – knit around
Round 4 – [k2tog, k5] around (54sts)
Round 5 – knit around
Round 6 – [k2tog, k4] around (45sts)
Round 7 – knit around
Round 8 – [k2tog, k3] around (36sts)
Round 9 – [k2tog, k2] around (24sts)
Round 10 – [k2tog, k1] around (18sts)
Round 11 – k2tog around (9sts)
Do not bind off. Cut yarn leaving appx 6-8ins. Pull tail through remaining 10sts.
Cast on 3sts on double pointed needles and work appx 8ins of i-cord. Place all of the provisional cast on sts on your straight needle (I like to use a circular needle for this but straight will do) and begin i-cord bind off using the 8ins of icord you have already worked. Once all of the bonnet sts have been bound off work an additional 8ins of i-cord with your 3 left over icord sts. Weave in ends.

Lewis Bonnet PDF

Disclaimer: This page contains affiliate links. If you choose to make a purchase after clicking a link, I may receive a commission at no additional cost to you. Thank you for your support!