
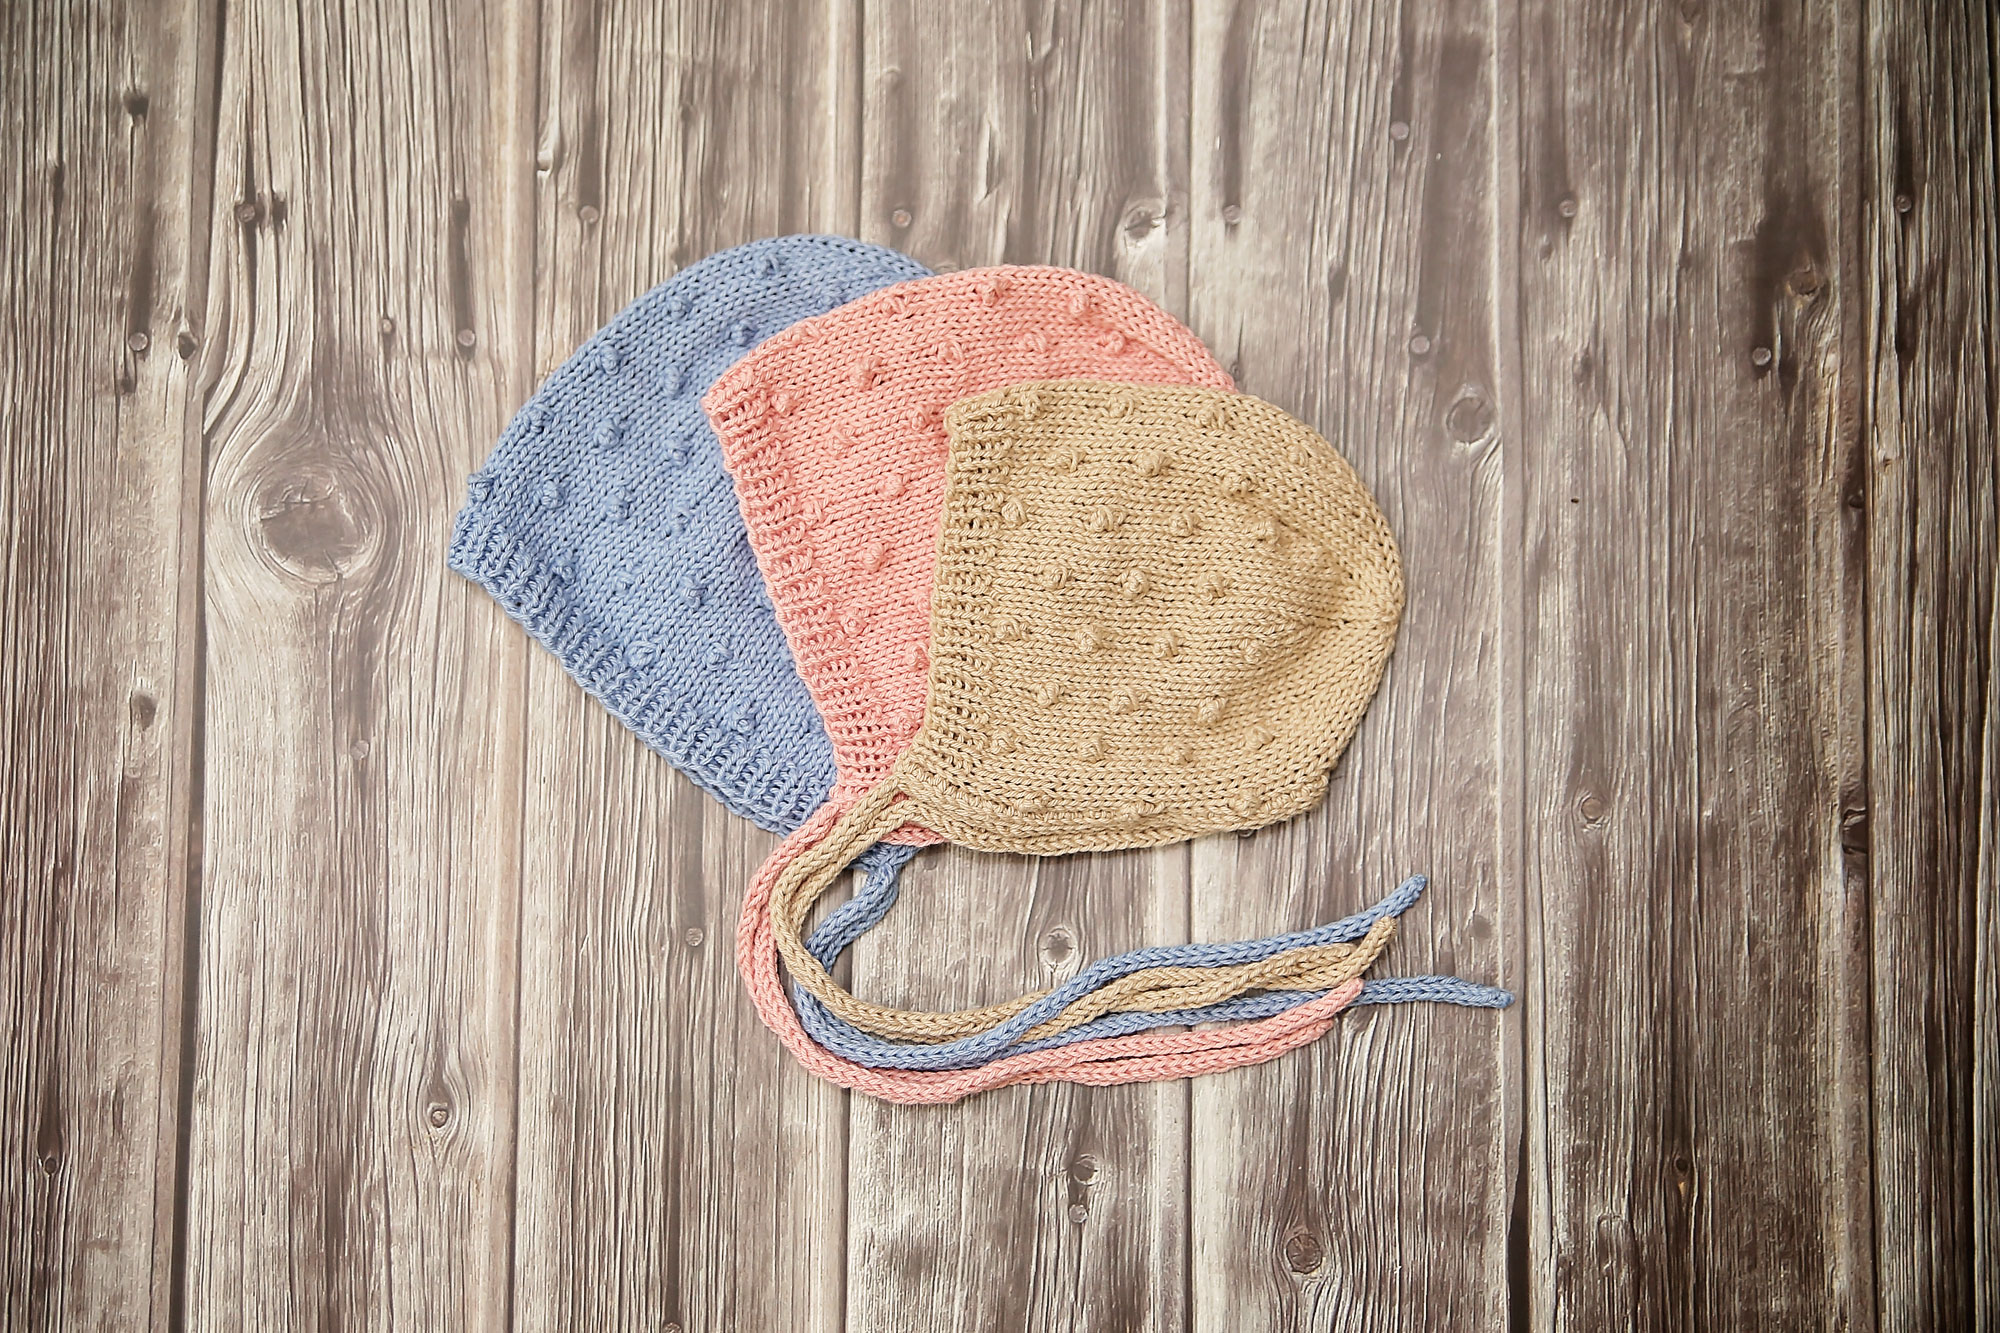
Free knitting pattern for a mini bobble baby bonnet in sport weight cotton yarn, sized for newborns through children for everyday wear.

This free knitting pattern is a mini bobble baby bonnet designed for newborns through child sizes, making it a practical option for everyday wear. The bonnet is knit using sport weight cotton yarn, which creates a lightweight, breathable fabric that works especially well for spring and summer weather. The construction is simple and approachable: the bonnet is worked flat at the beginning to shape the sides, then joined in the round at the crown for the decrease section. This method keeps finishing straightforward while creating a comfortable fit that stays in place. The cotton yarn helps the bonnet feel soft without being too warm, making it a useful layer for mild temperatures, outdoor outings, and daily use.
After 121 days in the NICU, I was adjusting to life at home, exclusively pumping due to my baby’s feeding challenges, and healing from the trauma of it all. Creativity felt distant, and inspiration seemed out of reach.
However, the Mini Bobble Bonnet became a turning point—a spark that reignited my passion for designing.
A Special Victory
The only photo I have of this bonnet in use is a quick cell phone picture of my daughter in her car seat, wearing it just weeks after coming home. That image represents a victory: the baby we were told wouldn’t survive was alive and thriving.
This free baby bonnet knitting pattern marked a return to normalcy I feared we might never experience. Creating and sharing this pattern became a way to heal deep emotional wounds.

Yarn for the Mini Bobble Bonnet
Originally knit with a now-discontinued yarn, an excellent substitute is Hobbii Baby Cotton Organic Mercerized (affiliate link). This yarn provides the perfect combination of softness and durability, making it ideal for baby knits like this free baby bonnet knitting pattern.
If you’re curious about the needles, tools, and other supplies I regularly use alongside this yarn, you can find everything gathered on my Shop My Knitting Bag page.
Why Choose the Mini Bobble Bonnet?
The Mini Bobble Bonnet is not just a knitting project; it’s a symbol of resilience and love. This free baby bonnet knitting pattern is:
- Beginner-friendly: Simple enough for those new to knitting.
- Adorable and practical: Keeps little ones cozy and stylish.
- Personalized: A heartfelt gift idea for newborns.
If you want extra guidance while working through any of these steps, you can find helpful walkthroughs for common techniques on my Knitting Tutorials page.
Knit Your Own Mini Bobble Bonnet
To get started on this free baby bonnet knitting pattern, you’ll need:
- Hobbii Baby Cotton Organic Mercerized yarn (affiliate link).
- Circular or double-pointed needles in the recommended size.
- Stitch markers and tapestry needle for finishing.

Frequently Asked Questions
Maybe. This bonnet uses simple stitches and straightforward shaping, making it approachable for newer knitters who are comfortable with knit, purl, and basic decreases. The construction begins flat and then joins in the round, which helps keep the process easy to follow. The bobble is more of an advanced beginner skill.
Sport weight cotton yarn works best because it creates a lightweight, breathable fabric that is comfortable for everyday wear, especially during spring and summer months. Cotton also helps the bonnet hold its shape without feeling too warm.
The pattern includes sizes from newborn through child, so it can be used for everyday wear as babies grow or for knitting matching bonnets for siblings.
Yes. The cotton yarn and lighter fabric make it a practical option for mild and warm temperatures when wool bonnets may feel too heavy.
You can substitute another sport weight yarn, but choosing a breathable fiber like cotton or a cotton blend will give the closest result in fit and drape.
If you enjoy this style, you may also like the Asher Bonnet and the Bethany Pixie Bonnet. Both are cotton baby bonnet patterns designed for comfortable everyday wear and offer a slightly different look while using similarly practical yarn choices.
Try knitting the bobbles with consistent tension and gently shaping them with your fingers after blocking. Cotton yarn helps the texture stay defined without becoming bulky.
Light blocking is recommended to even out stitches and help the bonnet settle into its final shape, especially around the crown decreases and edges.
Share Your Mini Bobble Bonnet
Have you completed this free baby bonnet knitting pattern? I’d love to see your creations! Share them on social media and tag me so I can celebrate your work.
The Mini Bobble Bonnet is more than just a project; it’s a piece of my story, and I’m honored to share it with you. Whether you’re creating for your little one or gifting it to a loved one, this free baby bonnet knitting pattern is sure to be treasured for years to come.

Materials and Info
Yarn – Hobbii Baby Cotton Organic Mercerized yarn (affiliate link)
Gauge – 26st per 4x4in or 10x10cm
Needles – 3 (3.25mm) circular and dpn
Sizes – newborn, (infant, baby, toddler) child
Head Measurement – 12-14in/30-35cm, (13-15in/32.5-37.5cm, 14-16in/35/40cm, 15-17in/37.5-42.5), 16-18in/52.5-57.5cm
Other –yarn needle
Mini Bobble Bonnet is a classic styled bonnet for all your vintage inspired needs. Named such because of the smaller bobble used to add a simple and clean texture. It is worked flat until the crown where it is joined in the round. The ties are i-cords with an applied i-cord neck edging to connect the ties.
Abbreviations can be found on the last post.


Mini Bobble Bonnet Pattern
NEWBORN
Cast on 65sts. I used the long tail cast on.
Work in a k1p1 ribbing (k1p1 across) for .5in/1.5cm. End after completing a wrong side row.
Row 1 (right side)– knit across
Row 2 – purl across
Row 3 – k2, [(k,yo,k, turn, purl 3, turn, k3togtbl) bobble made all in the next st, k7] repeat [to] across to last 7sts, bobble in next st, knit 6
Row 4 – purl across
Row 5 – knit across
Row 6 – purl across
Row 7 – k2 [k4, bobble, k3] repeat [to] across to last 7sts, k4, bobble, k2
Row 8 – purl across
Repeat rows 1-8 until your work measures appx 4in/10cm ending after completing a right side
row. Transfer sts to dpn. Join in the round by knitting the first and last stitch together. (64sts)
DECREASES
Round 1 – [k2tog, K6] Repeat [to] around (56sts)
Round 2 – knit around
Round 3 – [k2tog, K5] Repeat [to] around (48sts)
Round 4 – knit around
Round 5 – [k2tog, K4] Repeat [to] around (40sts)
Round 6 – knit around
Round 7 – [k2tog, K3] Repeat [to] around (32sts)
Round 8 – knit around
Round 9 – [k2tog, K2] Repeat [to] around (24sts)
Round 10 – knit around
Round 11 – [k2tog, K1] Repeat [to] around (16sts)
Round 12 – knit around
Round 13 – [k2tog] Repeat [to] around (8sts)
Do not bind off. Cut a tail appx 6-8ins long. Using a yarn needle, pull through remaining stitches and cinch sts closed tightly. Weave in ends.
I-cord Ties:
Cast on 3sts on double pointed needles and work appx 9-10ins for personal use and 12-14ins for photography use of i-cord (tutorial at the end of the pattern).
Begin i-cord edging by using the length of i-cord you have already worked. Do so by knitting 2 icord sts, slip the last st, dip the needle into the edge of the back loop of the bonnet, and bringing the yarn around to knit, pick up a stitch in your salvage edge. Knit the last stitch of Icord together with the picked stitch of the bonnet. Once you have picked up and knit across salvage edge stitches, work an additional length of i-cord that matches the other tie. Weave in ends. You can find a tutorial I made for left handed knitters here: https://youtu.be/3liQWHn8B0 Even if you are a right handed knitter it should be helpful to explain the process.
INFANT
Cast on 73sts. I used the long tail cast on.
Work in a k1p1 ribbing (k1p1 across) for .75in/2cm. End after completing a wrong side row.
Row 1 (right side)– knit across
Row 2 – purl across
Row 3 – k2, [(k,yo,k, turn, purl 3, turn, k3togtbl) bobble made all in the next st, k7] repeat [to] across to last 7sts, bobble in next st, knit 6
Row 4 – purl across
Row 5 – knit across
Row 6 – purl across
Row 7 – k2 [k4, bobble, k3] repeat [to] across to last 7sts, k4, bobble, k2
Row 8 – purl across
Repeat rows 1-8 until your work measures appx 4.5in/11cm ending after completing a right
side row. Transfer sts to dpn. Join in the round by knitting the first and last stitch together. (72sts)
DECREASES
Round 1 – [k2tog, K6] Repeat [to] around (63sts)
Round 2 – knit around
Round 3 – [k2tog, K5] Repeat [to] around (54sts)
Round 4 – knit around
Round 5 – [k2tog, K4] Repeat [to] around (45sts)
Round 6 – knit around
Round 7 – [k2tog, K3] Repeat [to] around (36sts)
Round 8 – knit around
Round 9 – [k2tog, K2] Repeat [to] around (27sts)
Round 10 – knit around
Round 11 – [k2tog, K1] Repeat [to] around (18sts)
Round 12 – knit around
Round 13 – [k2tog] Repeat [to] around (9sts)
Do not bind off. Cut a tail appx 6-8ins long. Using a yarn needle, pull through remaining stitches and cinch sts closed tightly. Weave in ends.
I-cord Ties:
Cast on 3sts on double pointed needles and work appx 9-10ins for personal use and 12-14ins for photography use of i-cord (tutorial at the end of the pattern).
Begin i-cord edging by using the length of i-cord you have already worked. Do so by knitting 2 icord sts, slip the last st, dip the needle into the edge of the back loop of the bonnet, and bringing the yarn around to knit, pick up a stitch in your salvage edge. Knit the last stitch of Icord together with the picked stitch of the bonnet. Once you have picked up and knit across salvage edge stitches, work an additional length of i-cord that matches the other tie. Weave in ends. You can find a tutorial I made for left handed knitters here: https://youtu.be/3liQWHn8B0 Even if you are a right handed knitter it should be helpful to explain the process.
BABY
Cast on 81sts. I used the long tail cast on.
Work in a k1p1 ribbing (k1p1 across) for .75in/2cm. End after completing a wrong side row.
Row 1 (right side)– knit across
Row 2 – purl across
Row 3 – k2, [(k,yo,k, turn, purl 3, turn, k3togtbl) bobble made all in the next st, k7] repeat [to] across to last 7sts, bobble in next st, knit 6
Row 4 – purl across
Row 5 – knit across
Row 6 – purl across
Row 7 – k2 [k4, bobble, k3] repeat [to] across to last 7sts, k4, bobble, k2
Row 8 – purl across
Repeat rows 1-8 until your work measures appx 5in/12.5cm ending after completing a right side row. Transfer sts to dpn. Join in the round by knitting the first and last stitch together. (80sts)
DECREASES
Round 1 – [k2tog, K6] Repeat [to] around (70sts)
Round 2 – knit around
Round 3 – [k2tog, K5] Repeat [to] around (60sts)
Round 4 – knit around
Round 5 – [k2tog, K4] Repeat [to] around (50sts)
Round 6 – knit around
Round 7 – [k2tog, K3] Repeat [to] around (40sts)
Round 8 – knit around
Round 9 – [k2tog, K2] Repeat [to] around (30sts)
Round 10 – knit around
Round 11 – [k2tog, K1] Repeat [to] around (20sts)
Round 12 – knit around
Round 13 – [k2tog] Repeat [to] around (10sts)
Do not bind off. Cut a tail appx 6-8ins long. Using a yarn needle, pull through remaining stitches and cinch sts closed tightly. Weave in ends.
I-cord Ties:
Cast on 3sts on double pointed needles and work appx 9-10ins for personal use and 12-14ins
for photography use of i-cord (tutorial at the end of the pattern).
Begin i-cord edging by using the length of i-cord you have already worked. Do so by knitting 2 icord sts, slip the last st, dip the needle into the edge of the back loop of the bonnet, and bringing the yarn around to knit, pick up a stitch in your salvage edge. Knit the last stitch of Icord together with the picked stitch of the bonnet. Once you have picked up and knit across salvage edge stitches, work an additional length of i-cord that matches the other tie. Weave in ends. You can find a tutorial I made for left handed knitters here: https://youtu.be/3liQWHn8B0 Even if you are a right handed knitter it should be helpful to explain the process.
TODDLER
Cast on 89sts. I used the long tail cast on.
Work in a k1p1 ribbing (k1p1 across) for .75in/2cm. End after completing a wrong side row.
Row 1 (right side)– knit across
Row 2 – purl across
Row 3 – k2, [(k,yo,k, turn, purl 3, turn, k3togtbl) bobble made all in the next st, k7] repeat [to] across to last 7sts, bobble in next st, knit 6
Row 4 – purl across
Row 5 – knit across
Row 6 – purl across
Row 7 – k2 [k4, bobble, k3] repeat [to] across to last 7sts, k4, bobble, k2
Row 8 – purl across
Repeat rows 1-8 until your work measures appx 5.5in/13.5cm ending after completing a right side row. Transfer sts to dpn. Join in the round by knitting the first and last stitch together. (88sts)
DECREASES
Round 1 – [k2tog, K6] Repeat [to] around (77sts)
Round 2 – knit around
Round 3 – [k2tog, K5] Repeat [to] around (66sts)
Round 4 – knit around
Round 5 – [k2tog, K4] Repeat [to] around (55sts)
Round 6 – knit around
Round 7 – [k2tog, K3] Repeat [to] around (44sts)
Round 8 – knit around
Round 9 – [k2tog, K2] Repeat [to] around (33sts)
Round 10 – knit around
Round 11 – [k2tog, K1] Repeat [to] around (22sts)
Round 12 – knit around
Round 13 – [k2tog] Repeat [to] around (11sts)
Do not bind off. Cut a tail appx 6-8ins long. Using a yarn needle, pull through remaining stitches and cinch sts closed tightly. Weave in ends.
I-cord Ties:
Cast on 3sts on double pointed needles and work appx 9-10ins for personal use and 12-14ins
for photography use of i-cord (tutorial at the end of the pattern).
Begin i-cord edging by using the length of i-cord you have already worked. Do so by knitting 2 icord sts, slip the last st, dip the needle into the edge of the back loop of the bonnet, and bringing the yarn around to knit, pick up a stitch in your salvage edge. Knit the last stitch of Icord together with the picked stitch of the bonnet. Once you have picked up and knit across salvage edge stitches, work an additional length of i-cord that matches the other tie. Weave in ends. You can find a tutorial I made for left handed knitters here: https://youtu.be/3liQWHn8B0 Even if you are a right handed knitter it should be helpful to explain the process.
CHILD
Cast on 97sts. I used the long tail cast on.
Work in a k1p1 ribbing (k1p1 across) for 1in/2.5cm. End after completing a wrong side row.
Row 1 (right side)– knit across
Row 2 – purl across
Row 3 – k2, [(k,yo,k, turn, purl 3, turn, k3togtbl) bobble made all in the next st, k7] repeat [to] across to last 7sts, bobble in next st, knit 6
Row 4 – purl across
Row 5 – knit across
Row 6 – purl across
Row 7 – k2 [k4, bobble, k3] repeat [to] across to last 7sts, k4, bobble, k2
Row 8 – purl across
Repeat rows 1-8 until your work measures appx 6in/15cm ending after completing a right side row. Transfer sts to dpn. Join in the round by knitting the first and last stitch together. (96sts)
DECREASES
Round 1 – [k2tog, K6] Repeat [to] around (84sts)
Round 2 – knit around
Round 3 – [k2tog, K5] Repeat [to] around (72sts)
Round 4 – knit around
Round 5 – [k2tog, K4] Repeat [to] around (60sts)
Round 6 – knit around
Round 7 – [k2tog, K3] Repeat [to] around (48sts)
Round 8 – knit around
Round 9 – [k2tog, K2] Repeat [to] around (36sts)
Round 10 – knit around
Round 11 – [k2tog, K1] Repeat [to] around (24sts)
Round 12 – knit around
Round 13 – [k2tog] Repeat [to] around (12sts)
Round 14 – [k2tog] Repeat [to] around (6sts)
Do not bind off. Cut a tail appx 6-8ins long. Using a yarn needle, pull through remaining stitches and cinch sts closed tightly. Weave in ends.
I-cord Ties:
Cast on 3sts on double pointed needles and work appx 9-10ins for personal use and 12-14ins
for photography use of i-cord (tutorial at the end of the pattern).
Begin i-cord edging by using the length of i-cord you have already worked. Do so by knitting 2 icord sts, slip the last st, dip the needle into the edge of the back loop of the bonnet, and bringing the yarn around to knit, pick up a stitch in your salvage edge. Knit the last stitch of Icord together with the picked stitch of the bonnet. Once you have picked up and knit across salvage edge stitches, work an additional length of i-cord that matches the other tie. Weave in ends. You can find a tutorial I made for left handed knitters here: https://youtu.be/3liQWHn8B0 Even if you are a right handed knitter it should be helpful to explain the process.

Abbreviations
k – knit
P – purl
yo – yarn over
k2tog -knit 2 stitches together
k3togtbl – knit 3 together through back loop
bobble – (k, yo, k, turn, purl 3, turn k3togtbl) all in the next stitch
I-cord instructions – To make an i-cord cast on 3 sts on double pointed needles. Slide these sts to the right of your needle. Knit the row. Slide the sts to the right of the needle. Knit the row and slide the sts to the right of the needle. Continue in this manner until you reach your desired length, occasionally giving the resulting cord a gentle tug.
Download Mini Bobble Bonnet PDF

Disclaimer: This page contains affiliate links. If you choose to make a purchase after clicking a link, I may receive a commission at no additional cost to you. Thank you for your support!