
Looking for the perfect free sleep cap pattern to add to your newborn photo prop collection? This pattern has been a best-seller from my old prop shop days, and I’m so excited to share it with you! Plus, it even includes a bonus shorts pattern. If you love this pattern be sure to check out all of my free photo prop pattern here.

My Go-To Free Sleep Cap Pattern for Photo Props
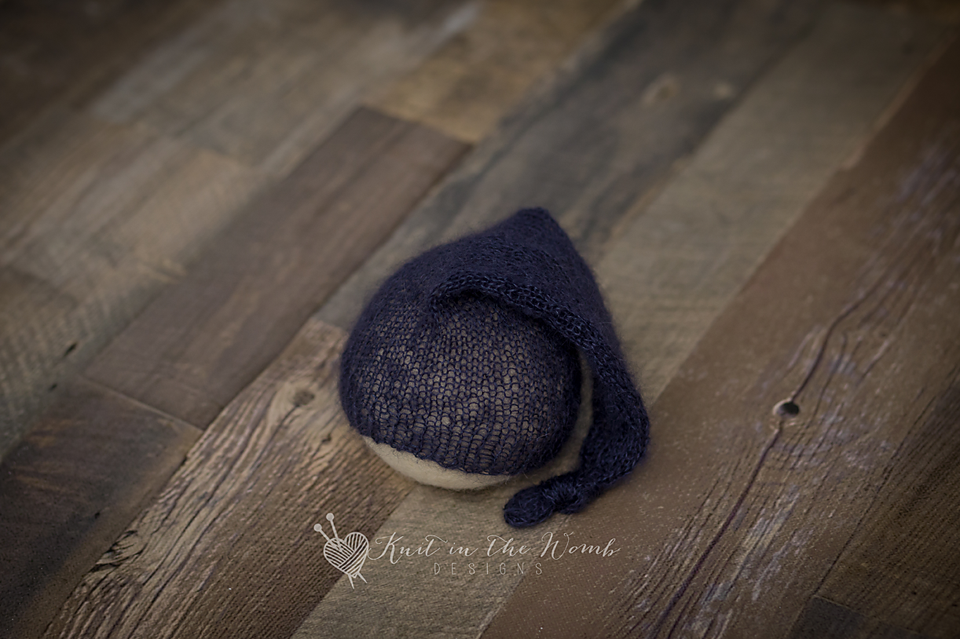
Years ago, when I was running my newborn prop shop, I couldn’t keep these mohair sleep caps in stock. Every holiday season, especially around Christmas, I would knit up free sleep cap pattern variations in classic red and white to create adorable Santa hats. These tiny mohair caps were a hot seller—I was shipping out hundreds every year!
Now, I get to share this free sleep cap pattern with you, and I truly hope it becomes just as successful for you as it was for me. Whether you’re knitting them to sell or just making a few for personal use, this pattern is a must-have.
And guess what? I’ve also included a little bonus: a matching pair of newborn shorts! These snug little bloomers are perfect for keeping tiny baby bums covered in photo sessions, adding an extra touch of sweetness to your newborn photography setup.
Why This Free Sleep Cap Pattern is a Bestseller
If you’re thinking about selling newborn photo props, this free sleep cap pattern is an excellent place to start. Here’s why:
- Quick to Make: This is a fast and simple knit, perfect for filling up your shop inventory.
- Uses Minimal Yarn: You can knit multiple caps from just one skein.
- Affordable for Makers: Mohair yarn is budget-friendly while giving a high-end look.
- Always in Demand: Photographers love mohair props because they add a soft, dreamy texture to newborn portraits.
Choosing the Right Yarn for the Free Sleep Cap Pattern
To get the best results, you’ll need a lace-weight mohair/silk yarn. My top pick? KnitPicks Aloft (affiliate link). This yarn is an absolute dream to work with! It has just the right amount of fluff and softness, giving the finished cap a delicate, airy feel.
Not only does KnitPicks Aloft (affiliate link) make your sleep cap look luxurious, but it’s also lightweight and stretchy—exactly what you need for a newborn-sized cap. And if you’re knitting to sell, the cost-to-profit ratio is excellent because you can make multiple caps from just one skein.
How Much Yarn Do You Need?
One skein of KnitPicks Aloft (affiliate link) is all you need to complete any size of this free sleep cap pattern. If you’re making newborn-sized hats, you’ll easily get multiple caps from just one skein. And if you want to make the matching shorts? Still just one skein!
This makes it a great choice for knitters who are looking to create affordable, high-quality handmade items without breaking the bank.

Tips for Knitting the Free Sleep Cap Pattern
I’ve knit more of these sleep caps than I can count, so here are a few of my favorite tips to make the process even smoother:
- Use the Right Needles: Since mohair yarn is so fine, it helps to use sharp-pointed needles to avoid splitting the fibers.
- Be Gentle: Mohair is known for being a little tricky to frog (rip out stitches), so knit carefully to avoid needing to unravel.
- Block for the Best Shape: Lightly steaming the finished cap will help the stitches settle and give the cap that perfectly soft and fluffy look.
- Keep It Simple: Let the mohair shine! This pattern doesn’t need extra embellishments—the yarn does all the work for you.
Selling Your Sleep Caps and Shorts
If you’re a maker looking to sell your knit goods, this free sleep cap pattern is an amazing addition to your shop. Mohair sleep caps are always in high demand because they photograph beautifully, making them a favorite for professional newborn photographers.
Here’s how to maximize sales:
- Offer Multiple Colors: Soft pastels, neutrals, and classic white are always popular.
- Bundle with the Matching Shorts: A full set means a higher price point and more value for your customers.
- Market for the Holidays: Christmas, Easter, and baby shower season are the best times to sell mohair props.
- Showcase Your Work: Take high-quality photos of your finished caps on a newborn mannequin or in a styled setting.
How This Free Sleep Cap Pattern Saves You Money
One of the best things about this free sleep cap pattern is that it’s cost-effective. Since you only need one skein of KnitPicks Aloft (affiliate link), you’re getting a full newborn photo prop set (cap + shorts) for a fraction of the price of buying ready-made props.
Photographers are often willing to pay premium prices for high-quality handmade items, so the profit margin on these hats is excellent. If you’re making these to sell, you could easily make back your investment in one sale!
Final Thoughts on the Free Sleep Cap Pattern
I’m so excited to pass along this pattern to you, and I hope it becomes one of your favorites. Whether you’re knitting for your own little one, gifting to a photographer friend, or building an inventory for your shop, this free sleep cap pattern is a winner.
Ready to get started? Grab your KnitPicks Aloft (affiliate link), download the pattern below, and start knitting! I’d love to see what you make, so be sure to share your finished projects.
Happy knitting! 🎉

Materials and Supplies
Materials – one skein of lace weight mohair yarn, size 6 (4mm) dpn OR 30in circular needle for magic loop, stitch holder, yarn needle
Gauge – 5sts/in ~GAUGE IS VERY IMPORTANT!!! SWATCH FIRST!!!~
Head circumference: nb (13ins). 0-3mths (14ins), 3-6mth (15ins), 6-12mths (16ins)

Mohair Sleep Cap and Shorts Pattern
Newborn
Sleep Cap
Cast on 60sts and join in the round.
k1p1 for 10 rounds
Work in stockinette st until work measures appx 3ins from cast on edge
Decreases
Round 1 – [k2tog k8] repeat from [to] around (54)
Knit 5 rounds
Round 7 – [k2tog k7] repeat from [to] around (48)
Knit 5 rounds
Round 13 – [k2tog k6] repeat from [to] around (42)
Knit 5 rounds
Round 19 – [k2tog k5] repeat from [to] around (36)
Knit 5 rounds
Round 26 – [k2tog k4] repeat from [to] around (30)
Knit 5 rounds
Round 32 – [k2tog k3] repeat from [to] around (24)
Knit 5 rounds
Round 39 – [k2tog k2] repeat from [to] around (18)
knit for 4-6ins
Do not bind off. Cut yarn leaving 8-10ins. Thread yarn onto yarn needle and pull through remaining stitches. Tie off. Weave in all ends. Tie the top of the hat into a loose knot.
Shorts
Cast on 60sts join in the round
Work k1p1 for 10 rounds
Work in stockinette until your work measures 5ins from cast on edge.
Gusset
Round 1: [place marker m1 k1 m1 place marker (the stitches between these markers are your gusset stitches) k29] repeat once more (64sts)
Round 2: knit around
Cut yarn leaving appx 8-10ins. Slip the last 29sts you worked onto a st holder or scrap piece of yarn. Kitchener st the gusset stitches from the front and back together. (tutorial at the end of pattern)
Legs
With main color
Round 1 – knit 29sts, pick up 1st on the gusset (30sts)
Work k1p1 for 10 rounds
Bind off. I like to use a sewn bind off since it has a lot of stretch but it’s not necessary.
Pick up the 29sts on your stitch holder and repeat from round 1 of legs for the other leg.
Weave in all ends.

0-3mths
Sleep Cap
Cast on 66sts and join in the round.
k1p1 for 10 rounds
Work in stockinette st until work measures appx 3.5ins from cast on edge
Decreases
Round 1 – [k2tog, k9] repeat from [to] around (60sts)
Knit 5 rounds
Round 7 – [k2tog k8] repeat from [to] around (54sts)
Knit 5 rounds
Round 13 – [k2tog k7] repeat from [to] around (48sts)
Knit 5 rounds
Round 19 – [k2tog k6] repeat from [to] around (42)
Knit 5 rounds
Round 25 – [k2tog k5] repeat from [to] around (36)
Knit 5 rounds
Round 31 – [k2tog k4] repeat from [to] around (30)
Knit 5 rounds
Round 37 – [k2tog k3] repeat from [to] around (24)
Knit 5 rounds
Round 43– [k2tog k2] repeat from [to] around (18)
knit for 4-6ins
Do not bind off. Cut yarn leaving 8-10ins. Thread yarn onto yarn needle and pull through remaining stitches. Tie off. Weave in all ends. Tie the top of the hat into a loose knot.
Shorts
Cast on 66sts join in the round
Work k1p1 for 10 rounds
Work in stockinette until your work measures 5.5ins from cast on edge.
Gusset
Round 1: [place marker m1 k1 m1 place marker (the stitches between these markers are your gusset stitches) k32] repeat once more (70sts)
Round 2: knit around
Cut yarn leaving appx 8-10ins. Slip the last 32sts you worked onto a st holder or scrap piece of yarn. Kitchener st the gusset stitches from the front and back together. (tutorial at the end of pattern)
Legs
With main color
Round 1 – knit 32sts, pick up 2st on the gusset (34sts)
Work k1p1 for 10 rounds
Bind off. I like to use a sewn bind off since it has a lot of stretch but it’s not necessary.
Pick up the 32sts on your stitch holder and repeat from round 1 of legs for the other leg.
Weave in all ends.

3-6mths
Sleep Cap
Cast on 70sts and join in the round.
k1p1 for 12 rounds
Work in stockinette st until work measures appx 4ins from cast on edge
Decreases
Round 1 – [k2tog k8] repeat from [to] around (63)
Knit 6 rounds
Round 8 – [k2tog k7] repeat from [to] around (56)
Knit 6 rounds
Round 15 – [k2tog k6] repeat from [to] around (49)
Knit 6 rounds
Round 22 – [k2tog k5] repeat from [to] around (42)
Knit 6 rounds
Round 29 – [k2tog k4] repeat from [to] around (35)
Knit 6 rounds
Round 36 – [k2tog k3] repeat from [to] around (28)
Knit 6 rounds
Round 43 – [k2tog k2] repeat from [to] around (21)
knit for 4-6ins
Do not bind off. Cut yarn leaving 8-10ins. Thread yarn onto yarn needle and pull through remaining stitches. Tie off. Weave in all ends. Tie the top of the hat into a loose knot.
Shorts
Cast on 70sts join in the round
Work k1p1 for 12 rounds
Work in stockinette until your work measures 6ins from cast on edge.
Gusset
Round 1: [place marker m1 k1 m1 place marker (the stitches between these markers are your gusset stitches) k34] repeat once more (74sts)
Round 2: knit around
Cut yarn leaving appx 8-10ins. Slip the last 34sts you worked onto a st holder or scrap piece of yarn. Kitchener st the gusset stitches from the front and back together. (tutorial at the end of pattern)
Legs
With main color
Round 1 – knit 34sts, pick up 2st on the gusset (36sts)
Work k1p1 for 12 rounds
Bind off. I like to use a sewn bind off since it has a lot of stretch but it’s not necessary.
Pick up the 34sts on your stitch holder and repeat from round 1 of legs for the other leg.
Weave in all ends.

6-12mths
Sleep Cap
Cast on 76sts and join in the round.
k1p1 for 12 rounds
Work in stockinette st until work measures appx 4.5ins from cast on edge
Decreases
Round 1 – [k2tog, k9] repeat from [to] around (70sts)
Knit 6 rounds
Round 8 – [k2tog k8] repeat from [to] around (63)
Knit 6 rounds
Round 15 – [k2tog k7] repeat from [to] around (56)
Knit 6 rounds
Round 22 – [k2tog k6] repeat from [to] around (49)
Knit 6 rounds
Round 29 – [k2tog k5] repeat from [to] around (42)
Knit 6 rounds
Round 36 – [k2tog k4] repeat from [to] around (35)
Knit 6 rounds
Round 43 – [k2tog k3] repeat from [to] around (28)
Knit 6 rounds
Round 50 – [k2tog k2] repeat from [to] around (21)
knit for 4-6ins
Do not bind off. Cut yarn leaving 8-10ins. Thread yarn onto yarn needle and pull through remaining stitches. Tie off. Weave in all ends. Tie the top of the hat into a loose knot.
Shorts
Cast on 76sts join in the round
Work k1p1 for 12 rounds
Work in stockinette until your work measures 6.5ins from cast on edge.
Gusset
Round 1: [place marker m1 k1 m1 place marker (the stitches between these markers are your gusset stitches) k37] repeat once more (80sts)
Round 2: knit around
Cut yarn leaving appx 8-10ins. Slip the last 37sts you worked onto a st holder or scrap piece of yarn. Kitchener st the gusset stitches from the front and back together. (tutorial at the end of pattern)
Legs
With main color
Round 1 – knit 37sts, pick up 1st on the gusset (38sts)
Work k1p1 for 12 rounds
Bind off. I like to use a sewn bind off since it has a lot of stretch but it’s not necessary.
Pick up the 37sts on your stitch holder and repeat from round 1 of legs for the other leg.
Weave in all ends.

Stitch Key and Tutorials
Stitch Key:
K – knit
P – purl
k2tog – knit 2 together
Kitchener Stitch:
Hold the two pieces of knitting parallel to one another with the wrong sides facing. Thread the working yarn with a yarn needle. *Insert the yarn needle knitwise into the first stitch on the front knitting needle. Draw through the stitch and slip the stitch off of the front needle. Insert the yarn needle purlwise into the next stitch on the front knitting needle. Draw through the stitch. Leave the stitch on the needle. Insert the yarn needle purlwise into the first stitch on the back knitting needle. Draw through the stitch and slip the stitch off of the back needle. Insert the yarn needle knitwise into the next stitch on the back knitting needle. Draw through the stitch. Leave the stitch on the needle. Repeat these steps beginning at the * until all of your stitches have been grafted together.
Download Mohair Sleep Cap PDF

Disclaimer: This page contains affiliate links. If you choose to make a purchase after clicking a link, I may receive a commission at no additional cost to you. Thank you for your support!