
Looking for a versatile project? Explore my free knitting pattern for vest page—THIS pattern is at the bottom, others at the featured link!

Knitting has always been my happy place. Seriously, give me yarn, needles, and a good cup of coffee, and I’ll happily knit for hours. That’s why I’m super excited to share this free knitting pattern for vest with you today. If you’ve ever knit the Youth Peter Sweater, you’re going to love this adult vest version—introducing the Peter Vest pattern!
I absolutely adore how this pattern combines elegance with simplicity. Trust me, even if you’re new to knitting, you’ll find this free knitting pattern for vest approachable and oh-so-satisfying. And if you’re a seasoned knitting pro, it’ll be the quick, rewarding project you’ve been craving.
Why You’ll Love This Free Knitting Pattern for Vest
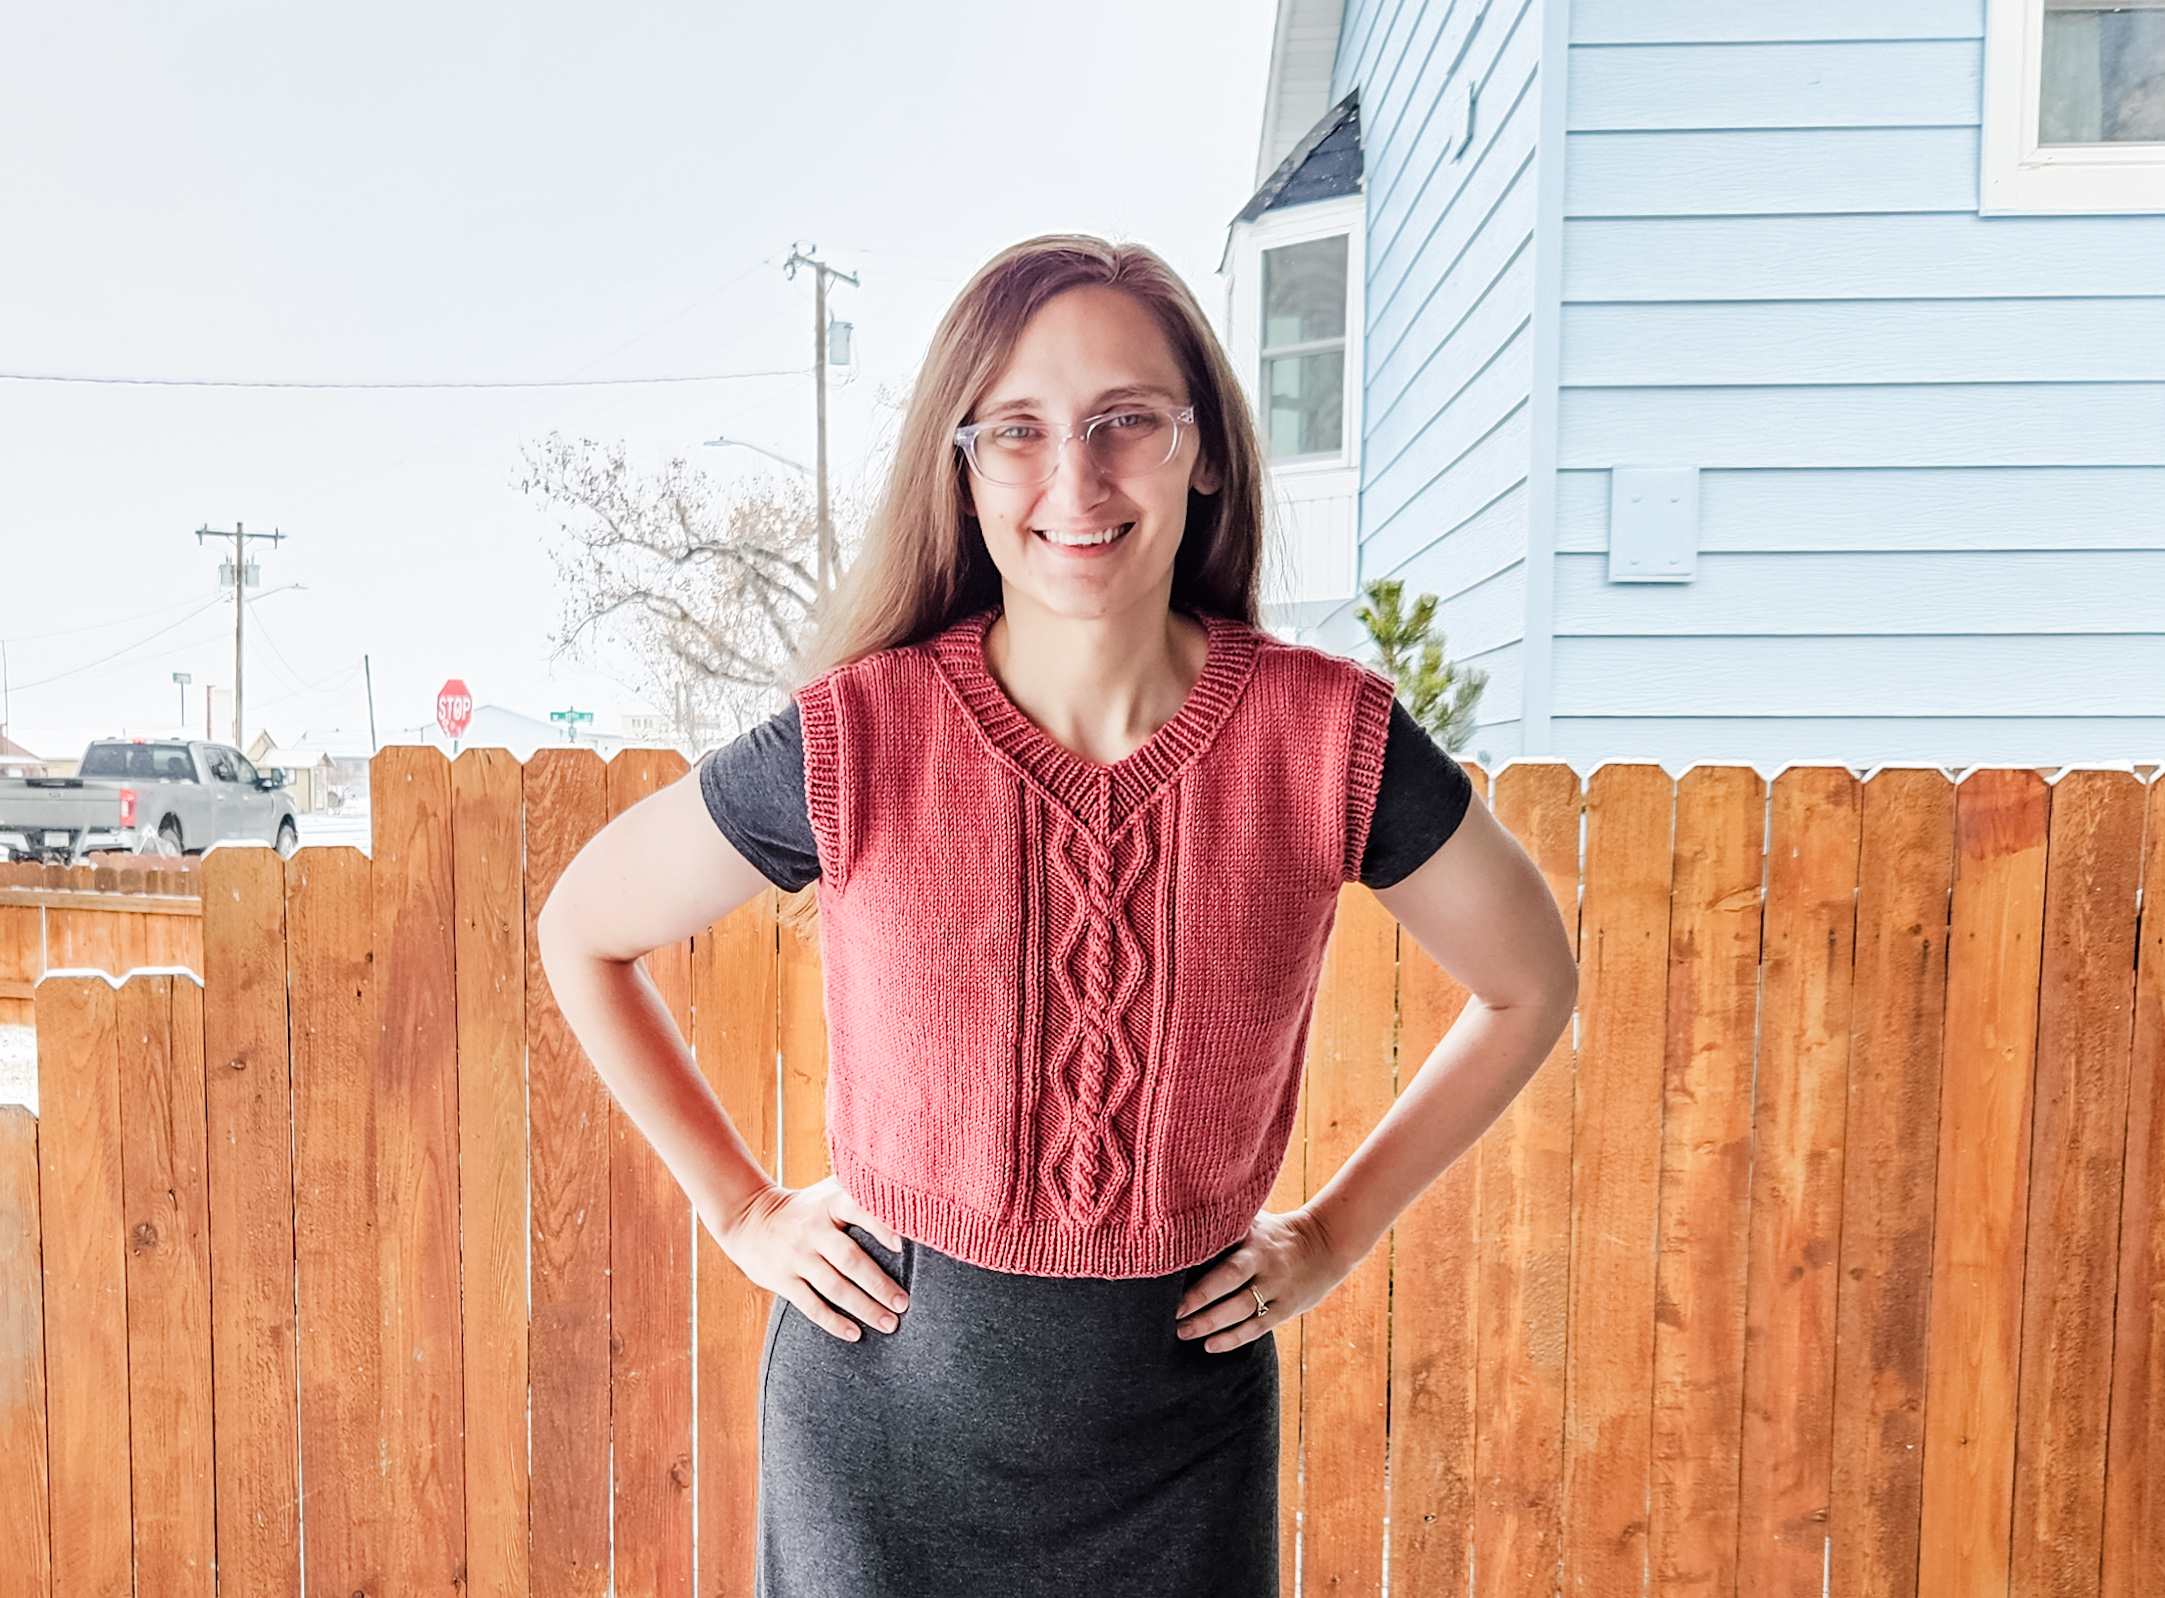
I genuinely think the Peter Vest is a total classic. It’s the kind of garment you can easily layer over your favorite shirt or dress, instantly making any outfit feel polished and cozy. The cables and clean lines of this vest scream timeless style—exactly why I couldn’t wait to share this free knitting pattern for vest with you.
And here’s the best part: it’s knit flat from the bottom up, making it an absolute breeze, even if you’re still getting the hang of knitting. Seriously, it’s just the right balance of challenging and relaxing. With both charted and written instructions for the cable stitches, you’ll feel supported every stitch of the way. Plus, who doesn’t love a project that’s quick enough to finish before you even think about losing interest?

Yarn You’ll Need for This Free Knitting Pattern for Vest
To knit this cozy vest, you’ll want to grab some Premier Yarns Anti-Pilling Everyday Worsted (affiliate link). I can’t stress enough how much I adore working with this yarn—it glides smoothly on the needles, and the anti-pilling feature means your beautiful vest will stay looking fresh wear after wear.
Since this free knitting pattern for vest is designed with worsted-weight yarn, it’s perfect for quick, satisfying progress without feeling overwhelming. I always appreciate a project that feels achievable—because let’s face it, finishing a garment is the best part!
Easily Accessible and Completely Free Knitting Pattern for Vest
Another reason I’m super excited to share this vest pattern is because it’s available right here, totally free. Yep, you heard me right—completely free! Of course, if you’d prefer a handy, ad-free PDF, there’s an option to purchase one on Ravelry right here, but otherwise, everything you need is right at the bottom of this post. I love making knitting accessible, especially for those on a tight budget.
Knitting should be fun, easy, and rewarding—never stressful. And this vest pattern hits that sweet spot perfectly. All you need is your Premier Yarns Anti-Pilling Everyday Worsted (affiliate link), straight needles, and a cozy spot to curl up in.

Personalizing Your Free Knitting Pattern for Vest
What I especially love about the Peter Vest pattern is how easy it is to personalize. You’re totally free to choose yarn colors that match your style—bright and vibrant or classic and neutral. Want something more textured or soft? Experiment away! There’s nothing better than crafting a garment that feels uniquely yours.
And don’t worry if you prefer your vests a little longer or shorter—modifying length is easy-peasy with this free knitting pattern for vest. The possibilities really are endless, and that’s exactly why I keep coming back to it.
Enjoy the Creative Journey with this Free Knitting Pattern for Vest
Let me get a little sentimental here: there’s honestly nothing quite like making your own clothing. In our fast-fashion world, knitting feels wonderfully intentional, sustainable, and rewarding. You know exactly what I’m talking about if you’ve ever finished a project and immediately felt a burst of pride (and probably started showing it off to everyone nearby—guilty!).
This vest is exactly that kind of project. Every stitch you knit will add up to something special—something you’ll genuinely love wearing. I promise this pattern is so much fun you might even knit one in every color!

Let’s Get Knitting Your New Favorite Vest!
Ready to start knitting your own Peter Vest? Perfect! Scroll down to find the full instructions for this particular free knitting pattern for vest at the bottom of this post. And if you’re hungry for even more vest patterns, be sure to explore the featured link to my full free knitting pattern for vest page—there’s plenty more where this came from!
Grab your Premier Yarns Anti-Pilling Everyday Worsted (affiliate link), put on your favorite playlist, and get ready for a relaxing, rewarding knitting session. I can’t wait to hear how your vest turns out—don’t forget to tag me in your finished creations. Happy knitting!


Materials and Info
MATERIALS AND INFO
Size: XS, S (M, L) 1X, 2X (3X, 4X)
Materials: Approximately 7, 7 (8, 8) 9, 10 (11, 13) hanks of Premier yarns Anti-Pilling Everyday (100g/180yds)
Needle Size: 7(US) 4.5mm circular needles and dpn, 6(US) 4mm circular and dpn
Gauge (tension): 22sts & 28 rows to make 10cm square, using size 7(US) 4.5mm needles working in stockinette stitch
Chest Measurement: 74, 78 (82, 90) 98, 107 (119, 131) cm
METHOD
Peter Vest is bottom-up vest in worsted yarn. It is worked flat. Created as a sister to Peter Sweater which was for our 6th child. He wanted something with cables so I created a v-neck set-in sleeve sweater for him with this vest for myself in the back of my mind. I created it specifically to go over dresses so the bottom edge is supposed to sit at the natural waist.
Abbreviations can be found on the last page.
Note: choose size based on bust measurement for best fit

Row 1 (right side) – p4, 2/1RPC, 2/2LC, 2/1LPC, p4
Row 2 – k4, p2, k1, p4, k1, p2, k4
Row 3 – p3, 2/1RPC, p1, k4, p1, 2/1LPC, p3
Row 4 – k3, p2, k2, p4, k2, p2, k3
Row 5 – p2, 2/1RPC, p2, 2/2LC, p2, 2/1LPC, p2
Row 6 – k2, p2, k3, p4, k3, p2, k2
Row 7 – p1, 2/1RPC, p3, k4, p3, 2/1LPC, p1
Row 8 – k1, p2, k4, p4, k4, p2, k1
Row 9 – 2/1RPC, p4, 2/2LC, p4, 2/1LPC
Row 10 – p2, k5, p4, k5, p2
Row 11 – 2/1LPC, p4, k4, p4, 2/1RPC
Row 12 – k1, p2, k4, p4, k4, p2, k1
Row 13 – p1, 2/1LPC, p3, 2/2LC, p3, 2/1RPC, p1
Row 14 – k2, p2, k3, p4, k3, p2, k2
Row 15 – p2, 2/1LPC, p2, k4, p2, 2/1RPC, p2
Row 16 – k3, p2, k2, p4, k2, p2, k3
Row 17 – p3, 2/1LPC, p1, 2/2LC, p1, 2/1RPC, p3
Row 18 – k4, p2, k1, p4, k1, p2, k4
Row 19 – p4, 2/1LPC, k4, 2/1RPC, p4
Row 20 – k5, p8, k5
1X1 RIB PATTERN
Row 1 (right side row) – (k1, p1) across
Row 2 – knit all the knit stitches, purl all the purl stitches.

Peter Vest Pattern
BACK
Cast on using smaller circular needle: 90, 94 (98, 108) 116, 124 (138, 150) sts. Join in the round.
Work in 1×1 ribbing for 4cms.
Switch to larger needles.
Work in pattern until piece measures 23 cm measuring from cast on.
SHAPE BACK ARMHOLES
Cast off 4, 5 (5, 5) 5, 5 (5, 5) stitches at beginning of next 2 rows. 82, 84 (88, 98) 106, 114 (128, 140) sts
Decrease 1 st at each end of following 2, 2 (3, 4) 6, 7 (9, 12) rows. 78, 80 (82, 90) 94, 100 (110, 116) sts
Then decrease 1 st each end of every right side row 2, 2 (2, 2) 2, 3 (5, 5) times 74, 76 (78, 86) 90, 94 (100, 106) sts
Continue without shaping until work measures 40, 40.5 (41, 42) 42.5, 43.5 (44, 45) cms from cast on edge.
SHAPE BACK SHOULDERS
Bind off 5, 5 (5, 6) 6, 6 (7, 8) sts at beginning of the next 2 rows.
Bind off 5, 5 (5, 6) 6, 6 (7, 8) sts at beginning of row, k7, 8 (8, 8) 9, 10 (10, 10) [8, 9 (9, 9) 10, 11 (11, 11) sts on right needle].
Put remaining sts on stitch holder.
Turn, bind off 3sts, work to end of row.
Turn, bind off remaining 5, 6 (6, 6) 7, 8 (8, 8) sts
With right side facing, rejoin yarn to stitches on hold, bind off 38, 38 (40, 42) 44, 46 (50, 52) knit remaining 13, 14 (14, 15) 16, 17 (18, 19) sts.
Turn, bind off 5, 5 (5, 6) 6, 6 (7, 8) sts
Turn, bind off 3sts, work remaining stitches.
Turn, bind off 5, 6 (6, 6) 7, 8 (8, 8) sts
FRONT
Provisional cast on using smaller circular needle: 90, 94 (98, 108) 116, 124 (138, 150) sts. Join in the round.
Work in 1×1 ribbing for 4cms.
Switch to larger needles.
Set-up Row 1: k[30, 32 (34, 39) 43, 47 (54, 60)] p2, k2, p2, pm (Peter Center Cable marker) p5, (m1, k1) 4 times, p5, pm, p2, k2, p2, k[30, 32 (34, 39) 43, 47 (54, 60)]
94, 98 (102, 112) 120, 128 (142, 154) sts
Set-up Row 2: p[30, 32 (34, 39) 43, 47 (54, 60)] k2, p2, k7, p8, k7, p2, k2, p[30, 32 (34, 39) 43, 47 (54, 60)]
Work in pattern, working Peter Center Cable between markers, until piece measures 23 cm measuring from cast on.
Work armhole shaping and AT THE SAME TIME start front neck shaping when work measures 29, 29 (29, 29) 29.5, 29.5 (29, 29) cm
SHAPE FRONT ARMHOLES
Cast off 4, 5 (5, 5) 5, 5 (5, 5) stitches at beginning of next 2 rows. 82, 84 (88, 98) 106, 114 (128, 144) sts
Decrease 1 st at each end of following 2, 2 (3, 4) 6, 7 (9, 12) rows. 78, 80 (82, 90) 94, 100 (110, 120) sts
Then decrease 1 st each end of every right side row 2, 2 (2, 2) 2, 3 (5, 5) times 74, 76 (78, 86) 90, 94 (100, 110) sts
LEFT FRONT NECK SHAPING
Work 39, 40 (41, 44) 46, 47 (52, 56) sts, put remaining sts on holder, turn.
Decrease 1 st at neck edge of next and following 18, 16 (18, 18) 18, 18 (18, 18) rows.
Then decrease 1 st at each end of each right side row 6, 8 (7, 8) 9, 10 (12, 13) times.
15, 16 (16, 18) 19, 20 (22, 24) sts remain.
Continue without shaping until work measures 40, 40.5 (41, 42) 42.5, 43.5 (44, 45) cms from cast on edge.
LEFT FRONT SHOULDER SHAPING
Starting on a right side row, bind off 5, 5 (5, 6) 6, 6 (7, 8) sts, turn.
Bind off 5, 5 (5, 6) 6, 6 (7, 8) then work to end of row, turn.
Bind off remaining 5, 6 (6, 6) 7, 8 (8, 8) sts.
RIGHT FRONT NECK SHAPING
Rejoin yarn to work on stitch holder.
Decrease 1 st at neck edge of next and following 18, 16 (18, 18) 18, 18 (18, 18) rows.
Then decrease 1 st at each end of each right side row 6, 8 (7, 8) 9, 10 (12, 13) times.
15, 16 (16, 18) 19, 20 (22, 24) sts remain.
Continue without shaping until work measures 40, 40.5 (41, 42) 42.5, 43.5 (44, 45) cms from cast on edge.
RIGHT FRONT SHOULDER SHAPING
Starting on a wrong side row, bind off 5, 5 (5, 6) 6, 6 (7, 8) sts, turn.
Bind off 5, 5 (5, 6) 6, 6 (7, 8) then work to end of row, turn.
Bind off remaining 5, 6 (6, 6) 7, 8 (8, 8) sts.
NECKBAND
Sew shoulder seams.
Pick up and knit 27, 28 (28, 30) 32, 33 (36, 38) sts down left front,
1 st at center of “v”, pm,
Pick up and knit 27, 28 (28, 30) 32, 33 (36, 38) sts up right front,
Pick up and knit 45, 45 (47, 49) 51, 53 (57, 59) sts around back.
Join in the round. 100, 102 (104, 110) 116, 120 (130, 136) sts
V-Neck rounds – work in k1p1 ribbing to 2 sts before center stitch marker, work vdd, continue in k1p1 around
Continue repeating v-neck rounds until the neck measures 2.5cms.
Bind off in pattern.
ARMBANDS
Pick up and knit 2sts for every 3 rows of arm making sure there is an even number of stitchs.
Work in k1p1 ribbing for 2cms.
Bind off in pattern.
FINISHING
Weave in all ends and block as desired.

Abbreviations
K – knit
P – purl
PM – place marker
SM – slip marker
K2tog -knit 2 stitches together
SSK – slip, slip, knit the slipped sts together
M1L – With left needle pick up strand between 2 stitches front to back. Knit through back loop
M1R – With left needle pick up strand between 2 stitches back to front. Knit through front loop
2/1LPC – slip the next 2sts onto cable needle and hold at front of work, p1 from left needle, then k2 from cable needle
2/1RPC – slip, the next st onto cable needle and hold at back of work, k2 from left needle, them p1 from cable needle
2/2LC – slip the next 2 sts onto cable needle and hold at front of work, k2 from left needle, k2 from cable needle
VDD – vertical double decrease – slip the next 2 sts together as if to knit, knit the next st, pass over the 2 slipped sts together
Download Peter Vest PDF

Disclaimer: This page contains affiliate links. If you choose to make a purchase after clicking a link, I may receive a commission at no additional cost to you. Thank you for your support!