
This boy cable sweater pattern is a timeless design from my collection of free sweater knitting patterns, and you can find even more options on my sweater pattern page.
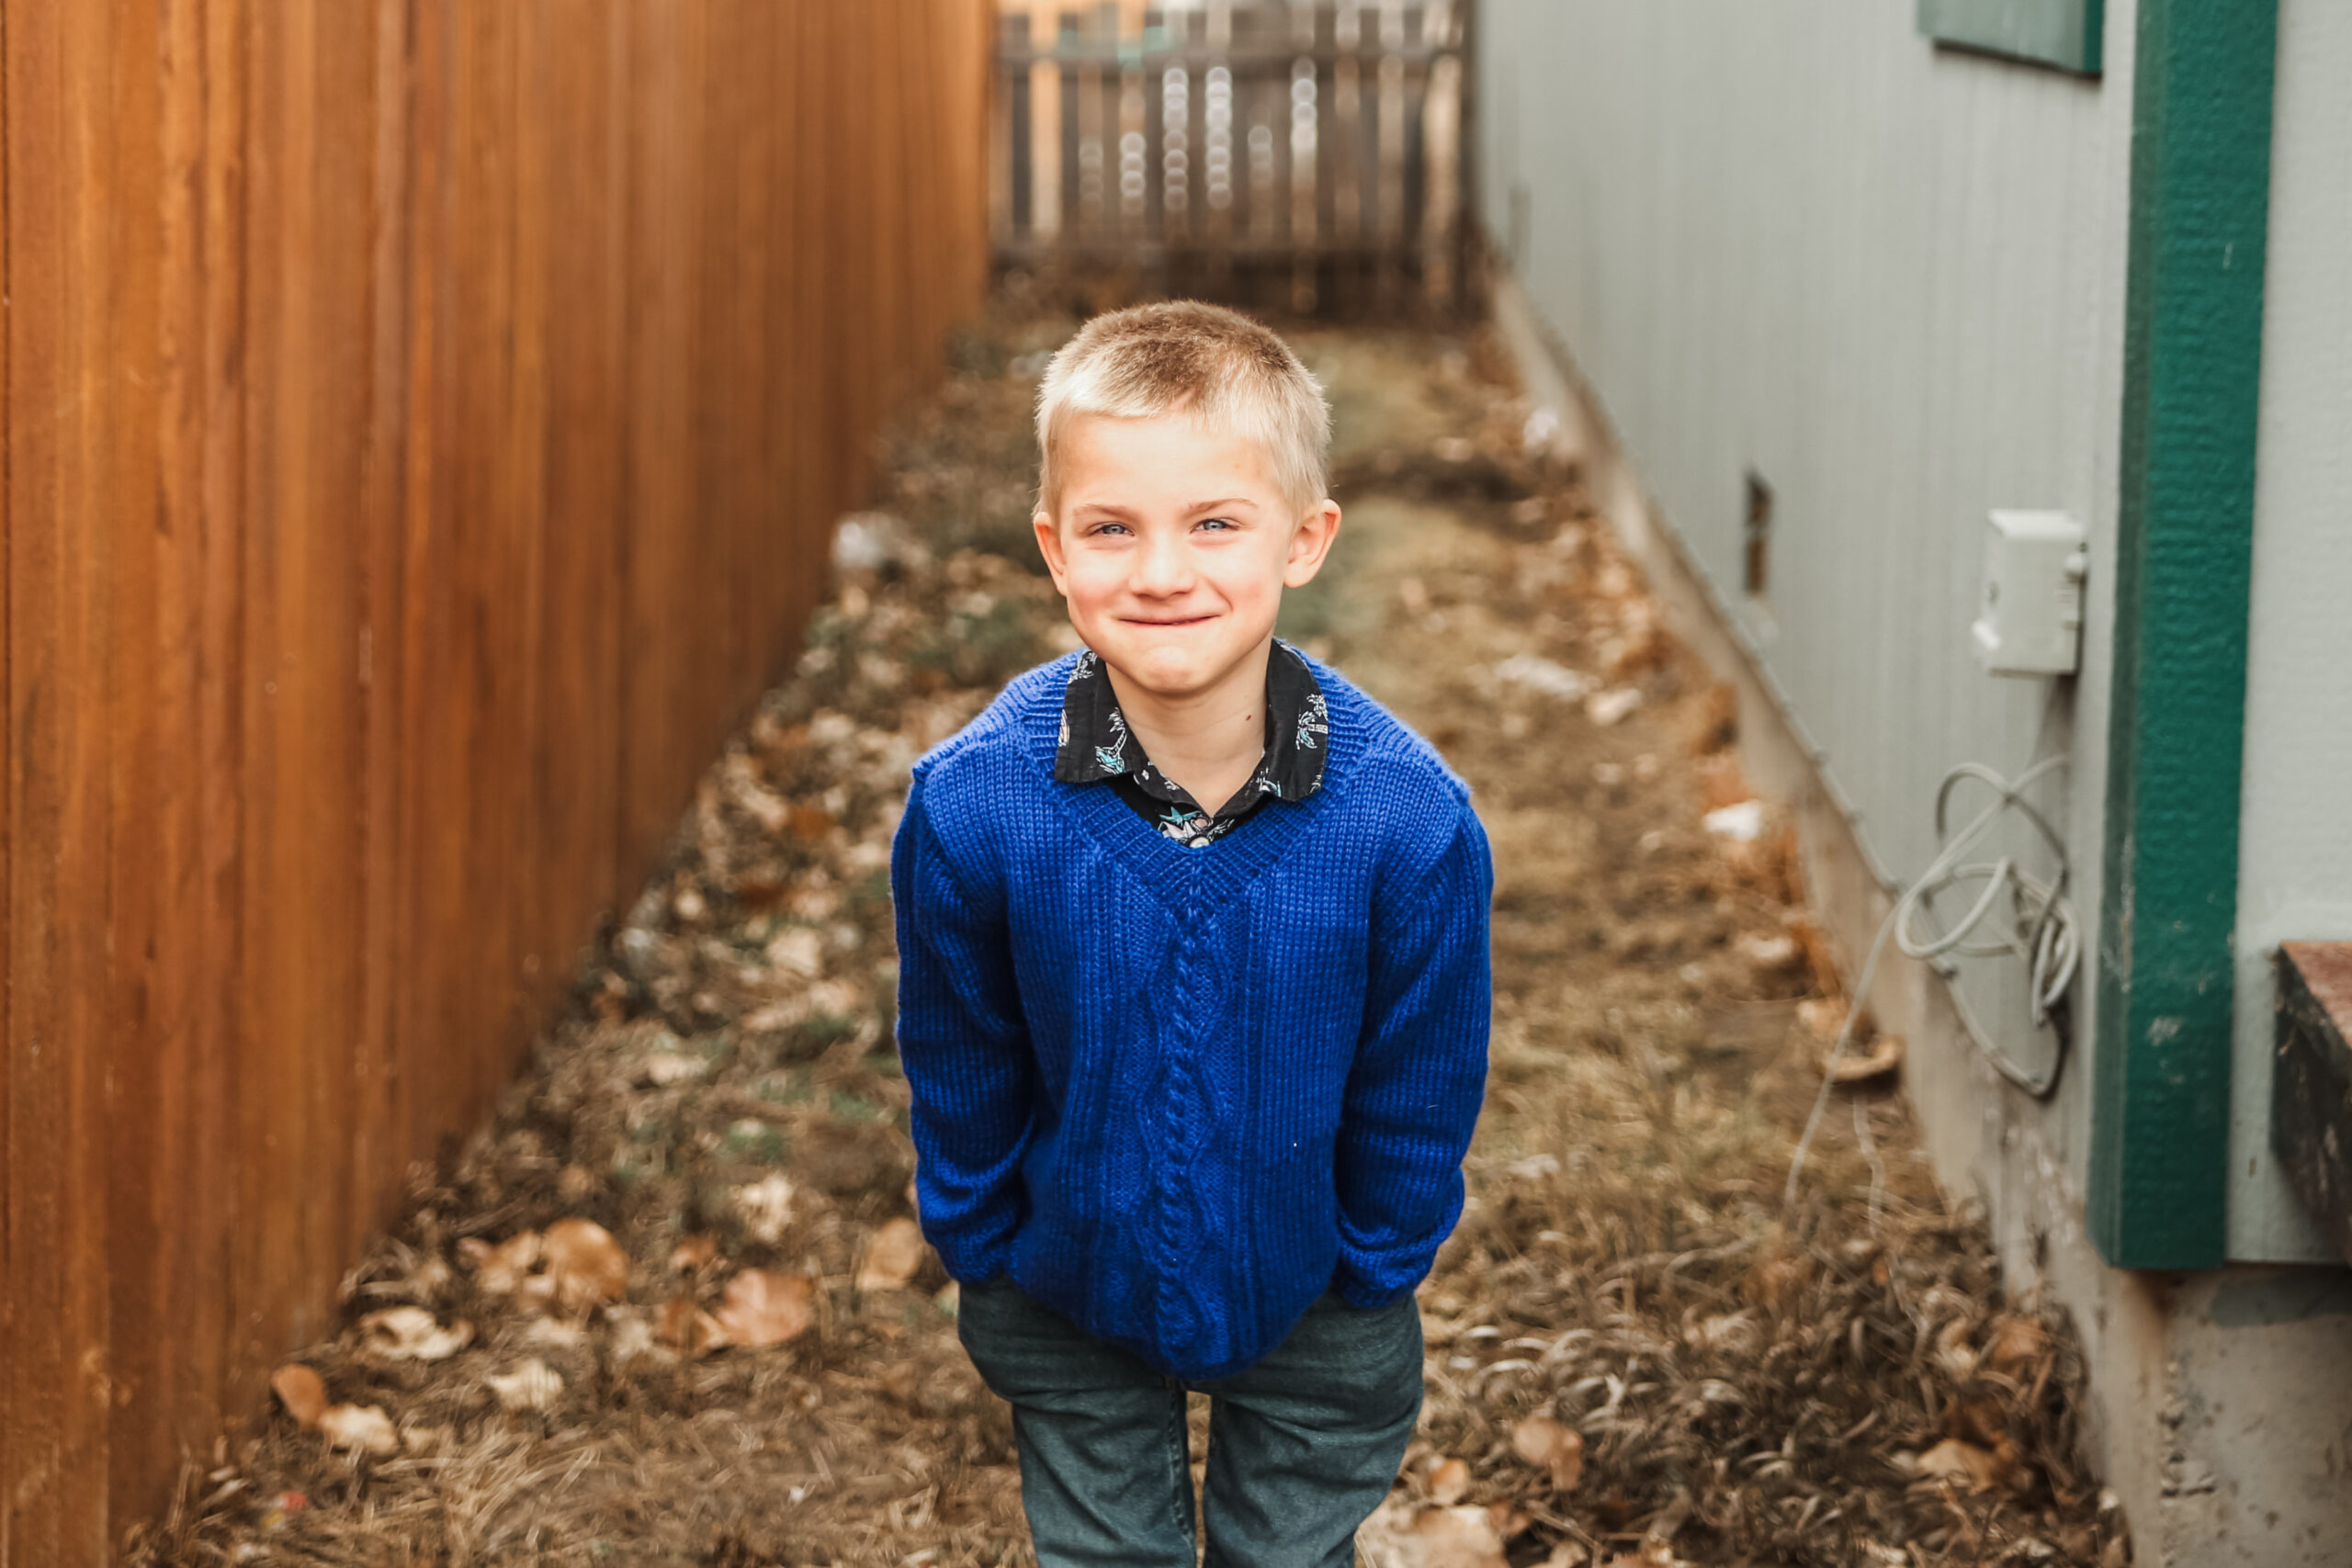
If you’ve been searching for a classic kids’ sweater with just the right amount of texture, this pattern solves that problem beautifully. It gives you a structured, polished look without feeling overwhelming to knit, even if cables are new to you. This boy cable sweater pattern is worked flat and seamed with a clean v-neck finish, making it a great option for knitters who want something traditional and wearable for everyday life.

If you’ve ever wanted a sweater that looks impressive but is still practical for real kids, this is it. The cable panel adds just enough detail to keep things interesting, while the overall construction keeps the knitting steady and manageable. It’s the kind of project you can settle into and actually enjoy.
This boy cable sweater pattern is one I keep coming back to because it works for so many ages and occasions. It’s simple, classic, and easy to customize depending on yarn and color choices.
What materials do you need for this boy cable sweater pattern?
For this boy cable sweater pattern, I used KnitPicks Mighty Stitch Worsted because it checks all the boxes for kids’ knits. It’s soft enough to wear comfortably, durable enough for everyday use, and holds up really well in the wash. When you’re knitting for kids, that last part matters more than anything.
You’ll also need 4.5mm and 4mm needles, stitch markers, and your usual finishing tools. The worsted weight yarn helps this project move along at a steady pace, which is always a win when you’re working on a sweater.

I’ve knit this pattern more than once, and the yarn choice really makes a difference in how the cables pop. A smooth, sturdy yarn like this keeps your stitches defined and your finished sweater looking sharp.
How easy are the directions for this boy cable sweater pattern?
This boy cable sweater pattern is written to be clear and approachable, even if cables feel a little intimidating at first. The cable repeat is consistent, which helps you settle into a rhythm quickly.
Because the sweater is worked flat and seamed, you’re only focusing on one section at a time. That makes it easier to manage shaping for the armholes, neckline, and sleeves without feeling like everything is happening at once.

If you’ve never knit cables before, this is a great place to start. Once you get a few rows in, it starts to click, and you’ll see the texture build row by row.
Looking for more child sweater knitting patterns?
If you enjoy this boy cable sweater pattern, you’ll probably love these too:
• child dathan sweater
• child grace sweater
• youth judah zipped cardigan
• youth damask cardigan
• youth wheat cardigan
These patterns all have their own unique texture and construction, but they’re designed with the same goal in mind—simple, wearable knits for real life. It’s fun to rotate through different styles while still keeping that handmade look consistent.
picture here
There’s something special about having a handful of go-to sweater patterns you can rely on. This one fits right into that rotation and works well alongside the others.
Youth Peter Sweater Pattern
MATERIALS AND INFO
Size: 3, 4 (5, 6) 7, 8 (9, 10) 11, 12 (13, 14)yrs
Materials: Approximately 3, 3 (3, 4) 4, 4 (5, 5) 5, 6 (6, 7) balls of KnitPick Mighty Stitch Worsted (208y/100g) needle, stitch markers
Needle Size: 7(US) 4.5mm circular needles and dpn, 6(US) 4mm circular and dpn Gauge (tension): 20sts & 28 rows to make 10cm square, using size 7(US) 4.5mm needles working in stockinette stitch
Chest Measurement: 55, 57 (59, 61) 64, 67 (70, 73) 76, 79 (82, 90) cm
METHOD
Peter Sweater is bottom-up set pullover with set in sleeves in an easy-care yarn. It is worked flat. Created for our 6th child. He wanted something with cables so I created this v-neck for him with a vest for myself in the back of my mind.
Abbreviations can be found on the last page.
Note: choose size based on bust measurement for best fit
PETER CENTER CABLE STITCH PATTERN:
Row 1 (right side) – p4, 2/1RPC, 2/2LC,
2/1LPC, p4
Row 2 – k4, p2, k1, p4, k1, p2, k4
Row 3 – p3, 2/1RPC, p1, k4, p1,
2/1LPC, p3
Row 4 – k3, p2, k2, p4, k2, p2, k3
Row 5 – p2, 2/1RPC, p2, 2/2LC, p2,
2/1LPC, p2
Row 6 – k2, p2, k3, p4, k3, p2, k2
Row 7 – p1, 2/1RPC, p3, k4, p3,
2/1LPC, p1
Row 8 – k1, p2, k4, p4, k4, p2, k1
Row 9 – 2/1RPC, p4, 2/2LC, p4, 2/1LPC
Row 10 – p2, k5, p4, k5, p2
Row 11 – 2/1LPC, p4, k4, p4, 2/1RPC
Row 12 – k1, p2, k4, p4, k4, p2, k1
Row 13 – p1, 2/1LPC, p3, 2/2LC, p3,
2/1RPC, p1
Row 14 – k2, p2, k3, p4, k3, p2, k2
Row 15 – p2, 2/1LPC, p2, k4, p2,
2/1RPC, p2
Row 16 – k3, p2, k2, p4, k2, p2, k3
Row 17 – p3, 2/1LPC, p1, 2/2LC, p1,
2/1RPC, p3
Row 18 – k4, p2, k1, p4, k1, p2, k4
Row 19 – p4, 2/1LPC, k4, 2/1RPC, p4
Row 20 – k5, p8, k5
1X1 RIB PATTERN
Row 1 (right side row) – (k1, p1) across
Row 2 – knit all the knit stitches, purl all the purl stitches.
BACK
Cast on using smaller circular needle: 70, 72 (74, 76) 80, 82 (86, 90) 92, 96 (98, 108) sts. Join in the round.
Work in 1×1 ribbing for 4cms.
Switch to larger needles.
Work in pattern until piece measures 23, 24 (25.5, 27) 28, 29.5 (30.5, 32) 33, 34 (35.5, 38.5) cm measuring from cast on.
SHAPE BACK ARMHOLES
Cast off 4, 4 (4, 4) 4, 4 (4, 5) 4, 5 (4, 5) stitches at beginning of next 2 rows. 62, 64 (66, 68) 72, 74 (78, 80) 84, 86 (90, 98) sts
Decrease 1 st at each end of following 1, 1 (1, 1) 2, 1 (2, 2) 2, 2 (2, 3) rows. 60, 62 (64, 66) 68, 72 (74, 76) 80, 82 (86, 92) sts
Then decrease 1 st each end of every right side row 2, 2 (2, 2) 2, 2 (2, 2) 2, 2 (2, 2) times 56, 58 (60, 64) 64, 68 (70, 72) 76, 82 (86, 88) sts
Continue without shaping until work measures 35, 37 (39.5, 40.5) 42.5, 44.5 (46.5, 48.5) 50.5, 52.5 (54.5, 59.5) cms
SHAPE BACK SHOULDERS
Bind off 0, 0 (0, 4) 4, 4 (4, 4) 5, 5 (6, 6) sts at beginning of the next 2 rows. Bind off 5, 5 (5, 4) 4, 4 (4, 4) 5, 5 (6, 6) sts at beginning of row, k7, 8 (8, 6) 6, 8 (8, 8) 8, 8 (8, 9) [8, 9 (9, 7) 7, 9 (9, 9) 9, 9 (9, 10) sts on right needle]. Put remaining sts on stitch holder.
Turn, bind off 3sts, work to end of row.
Turn, bind off remaining 5, 6 (6, 4) 4, 6 (6, 6) 6, 6 (6, 7) sts
With right side facing, rejoin yarn to stitches on hold, bind off 30, 30 (32, 32) 34, 34 (36, 38) 38, 40 (40, 44) knit remaining 13, 14 (14, 11) 11, 13 (13, 13) 14, 14 (15, 16) sts.
Turn, bind off 5, 5 (5, 4) 4, 4 (4, 4) 5, 5 (6, 6) sts
Turn, bind off 3sts
Turn, bind off 5, 6 (6, 4) 4, 6 (6, 6) 6, 6 (6, 7) sts
FRONT
Provisional cast on using smaller circular needle: 70, 72 (74, 76) 80, 82 (86, 90) 92, 96 (98, 108) sts. Join in the round.
Work in 1×1 ribbing for 4cms.
Switch to larger needles.
Set-up Row 1: k[22, 23 (24, 25) 27, 28 (30, 32) 33, 35 (36, 41)] p2, k2, pm (Peter Center Cable marker) p2, k2, p2, pm (Peter Center Cable marker) p5, (m1, k1) 4 times, p5, pm, p2, k2, p2, k[22, 23 (24, 25) 27, 28 (30, 32) 33, 35 (36, 41)] 74, 76 (78, 80) 84, 86 (90, 94) 96, 100 (102, 112) sts
Set-up Row 2: k[22, 23 (24, 25) 27, 28 (30, 32) 33, 35 (36, 41)] k2, p2, k7, p8, k7, p2, k2,k[22, 23 (24, 25) 27, 28 (30, 32) 33, 35 (36, 41)]
Work in pattern, working Peter Center Cable between markers, until piece measures 23, 24 (25.5, 27) 28, 29.5 (30.5, 32) 33, 34 (35.5, 38.5) cm measuring from cast on.
Work armhole shaping and AT THE SAME TIME start front neck shaping when work measures 25, 27.5 (29.5, 31) 32.5, 34 (36, 37) 39, 40.5 (42, 46) cm
SHAPE FRONT ARMHOLES
Cast off 4, 4 (4, 4) 4, 4 (4, 5) 4, 5 (4, 5) stitches at beginning of next 2 rows. 66, 68 (70, 72) 76, 78 (82, 84) 88, 90 (94, 102) sts
Decrease 1 st at each end of following 1, 1 (1, 1) 2, 1 (2, 2) 2, 2 (2, 3) rows. 64, 66 (68, 70) 72, 76 (78, 80) 84, 86 (90, 96) sts
Then decrease 1 st each end of every right side row 2, 2 (2, 2) 2, 2 (2, 2) 2, 2 (2, 2) times 60, 62 (64, 68) 68, 72 (74, 76) 80, 86 (90, 92) sts
LEFT FRONT NECK SHAPING
Work 30, 30 (31, 33) 34, 36 (37, 38) 40, 41 (43, 46) sts, put remaining sts on holder, turn.
Decrease 1 st at neck edge of next and following 11, 13 (12, 15) 15, 16 (16, 18) 16, 18 (16, 16) rows.
Then decrease 1 st at each end of each right side row 8, 6 (7, 5) 6, 6 (7, 6) 8, 7 (9, 11) times.
10, 11 (11, 12) 13, 14 (14, 14) 16, 16 (18, 19) sts remain.
Continue without shaping until work measures 35, 37 (39.5, 40.5) 42.5, 44.5 (46.5, 48.5) 50.5, 52.5 (54.5, 59.5) cms
LEFT FRONT SHOULDER SHAPING
Starting on a right side row, bind off 5, 5 (5, 4) 4, 4 (4, 4) 5, 5 (6, 6) sts, turn. Bind off 0, 0 (0, 4) 4, 4 (4, 4) 5, 5 (6, 6) turn.
Bind off remaining, 5, 6 (6, 4) 4, 6 (6, 6) 6, 6 (6, 7) sts.
RIGHT FRONT NECK SHAPING
Rejoin yarn to work on stitch holder.
Decrease 1 st at neck edge of next and following 11, 13 (12, 15) 15, 16 (16, 18) 16, 18 (16, 16) rows.
Then decrease 1 st at each end of each right side row 8, 6 (7, 5) 6, 6 (7, 6) 8, 7 (9, 11) times.
10, 11 (11, 12) 13, 14 (14, 14) 16, 16 (18, 19) sts remain.
Continue without shaping until work measures 35, 37 (39.5, 40.5) 42.5, 44.5 (46.5, 48.5) 50.5, 52.5 (54.5, 59.5) cms
RIGHT FRONT SHOULDER SHAPING
Starting on a wrong side row, bind off 5, 5 (5, 4) 4, 4 (4, 4) 5, 5 (6, 6) sts, turn. Bind off 0, 0 (0, 4) 4, 4 (4, 4) 5, 5 (6, 6) turn.
Bind off remaining, 5, 6 (6, 4) 4, 6 (6, 6) 6, 6 (6, 7) sts.
SLEEVES (MAKE 2)
With smaller needles, cast on 36, 36 (36, 36) 42, 42 (44, 44) 46, 46 (48, 50) sts. Work for 4cms in 1×1 ribbing.
Change to larger needles and begin working in stockinette stitch (knit every right side row, purl every wrong side row).
SLEEVE SHAPING TO UNDERARM
Work 2 rows in stockinette stitch.
Next row – increase 1 st at each end of following 8th row 0, 0 (2, 0) 0, 0 (0, 0) 0, 0 (0, 0) times.
Then increase 1 st at each end of every following 10th row 5, 3 (4, 5) 0, 0 (0, 0) 0, 0 (0, 3) times
Then increase 1 st at each end of every following 12th row 0, 2 (0, 1) 0, 0 (0, 3) 0, 7 (6, 5) times
Then increase 1 st at each end of every following 14th row 0, 0 (0, 0) 0, 4 (2, 3) 6, 0 (1, 0) times.
Then increase 1 st at each end of every following 16th row 0, 0 (0, 0) 0, 1 (3, 0) 0, 0 (0, 0) times.
Then increase 1 st at each end of every following 18th row 0, 0 (0, 0) 4, 0 (0, 0) 0, 0 (0, 0) times.
46, 46 (48, 48) 50, 52 (54, 56) 58, 60 (62, 66) sts
Continue in stockinette stitch until sleeve measures 22, 24 (25.5, 27.5) 28, 29.5 (31, 33) 34.5, 36 (36.5, 39) (or desired length) measuring from cast on finishing after completing a wrong side row.
SLEEVE HEAD
Bind off 4, 4 (4, 4) 4, 4 (4, 5) 4, 5 (4, 5) sts of beginning of next 2 rows. Decrease 1 st at each end of next 1, 1 (1, 1) 2, 1 (2, 2) 2, 2 (2, 3) rows. Then decrease on the following 4, 4 (2, 2) 2, 2 (2, 2) 2, 2 (2, 2) right side rows. Then every other right side row 0, 0 (1, 1) 2, 1 (2, 2) 3, 4 (3, 5) times. Then decrease on the following 0, 0 (2, 2) 2, 4 (2, 2) 4, 4 (5, 4) right side rows. Then decrease on the following 5, 5 (5, 5) 3, 4 (4, 4) 3, 5 (3, 6) rows. Bind off remaining 18, 18 (18, 18) 20, 20 (22, 22) 22, 16 (24, 16) sts.
NECKBAND
Sew shoulder seams.
Pick up and knit 24, 22 (24, 24) 25, 25 (27, 27) 28, 28 (30, 32) sts down left front, 1 st at center of “v”, pm, knit 24, 22 (24, 24) 25, 25 (27, 27) 28, 28 (30, 32) sts up right front, 37, 37 (39, 39) 41, 41 (43, 45) 45, 47 (47, 51) sts around back. Join in the round. 86, 82 (88, 88) 92, 92 (98, 100) 102, 104 (108, 116) sts
V-Neck rounds – work in k1p1 ribbing to 2 sts before center stitch marker, work vdd, continue in k1p1 around
Continue repeating v-neck rounds until the neck measures 2.5cms. Bind off in pattern.
FINISHING
Sew remaining seams, weave in all ends and block as desired.
ABBREVIATIONS
K – knit
P – purl
PM – place marker
SM – slip marker
K2tog -knit 2 stitches together
SSK – slip, slip, knit the slipped sts together
M1L – With left needle pick up strand between 2 stitches front to back. Knit through back loop
M1R – With left needle pick up strand between 2 stitches back to front. Knit through front loop
2/1LPC – slip the next 2sts onto cable needle and hold at front of work, p1 from left needle, then k2 from cable needle
2/1RPC – slip, the next st onto cable needle and hold at back of work, k2 from left needle, them p1 from cable needle
2/2LC – slip the next 2 sts onto cable needle and hold at front of work, k2 from left needle, k2 from cable needle
VDD – vertical double decrease – slip the next 2 sts together as if to knit, knit the next st, pass over the 2 slipped sts together

If you knit this boy cable sweater pattern, I would love to hear how it turned out for you. Let me know what yarn or colors you chose, or who you made it for—I always enjoy seeing your projects come to life.
This post may contain affiliate links. If you choose to make a purchase, I may earn a small commission at no extra cost to you.
Comments are closed.