
This mohair prop bonnet pattern is at the bottom of the post—see all my photo prop patterns here.

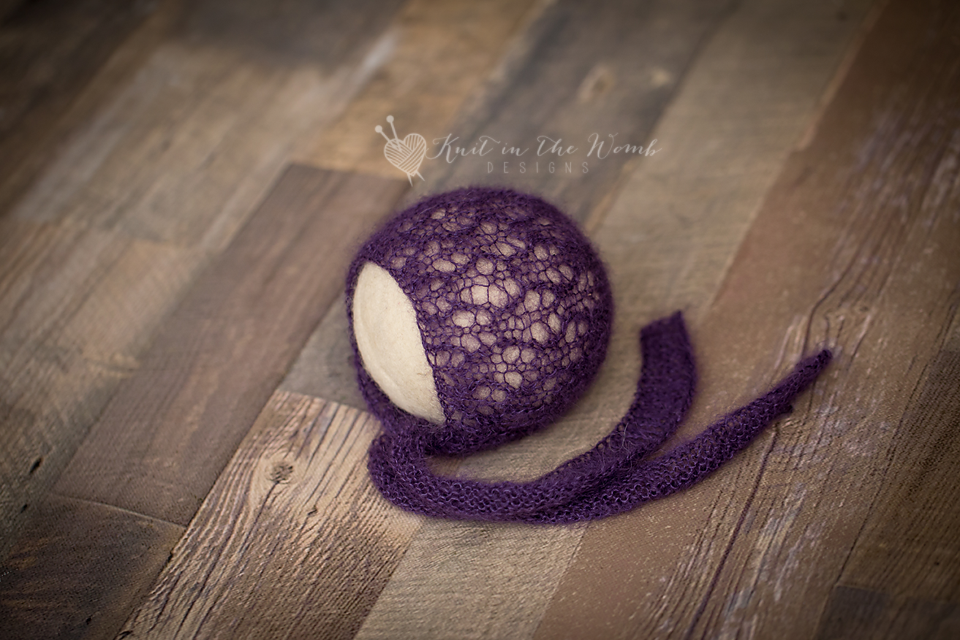
There’s just something magical (ahem—not the witchy kind, don’t worry) about knitting up a featherlight, lacy little bonnet for those sweet newborn photo sessions. If you’ve been hunting for the mohair prop bonnet pattern of your dreams, you’ve landed in the right place. I’ve got a soft spot for delicate details and soft yarn, and the Priscilla Bonnet checks every single box.
You’ll find the mohair prop bonnet pattern itself at the bottom of this post, but if you want to see all my photo prop patterns in one place, head over to this page. Now, let’s talk about why this one has become a personal favorite.
Why I Love a Good Mohair Prop Bonnet Pattern
When I think of newborn knits, my mind goes straight to light, airy textures that gently frame those squishy cheeks. The Priscilla Bonnet brings that vision to life. With its lacework and soft halo, it’s delicate without being fussy, and detailed without being difficult. It’s everything I want in a mohair prop bonnet pattern—dreamy, timeless, and actually fun to knit.
I made this one using KnitPicks Aloft (affiliate link), a glorious blend of mohair and silk that gives it that signature floaty look. Every stitch feels like a whisper on your needles, and when it blocks out, the lace practically sings.
Let’s Talk Yarn: Why Aloft is My Go-To
You can’t have a good mohair prop bonnet pattern without talking about yarn. KnitPicks Aloft (affiliate link) is my top pick for this pattern and for good reason. It’s 72% Super Kid Mohair and 28% Silk, which means it’s soft, light as a cloud, and has that gorgeous glow when it catches the light.
I’ve used KnitPicks Aloft (affiliate link) for several of my photo props and it never disappoints. Whether you’re going for dreamy neutrals or something with a pop of color, they’ve got you covered. Just remember—never leave baby unattended in this bonnet. It’s meant to be a prop for photos, not everyday wear.
Lace Doesn’t Have to Be Scary
If you’ve ever looked at a lace chart and panicked, I feel you. But don’t run just yet. This mohair prop bonnet pattern was designed to be approachable. The lace motif repeats easily, and once you get into the rhythm, it’s actually soothing.
I recommend using a lifeline (that handy trick where you thread a contrasting yarn through a row, just in case you need to frog later) to keep your peace of mind. And when you’re done, blocking will work its usual magic—your stitches will bloom, and the lace will open up beautifully.

Those Wide Knit Ties? Yes, Please.
The wide knit ties aren’t just adorable—they’re practical. They balance out the lacework with a solid structure, and they frame baby’s face beautifully in photos. You’ll see them worked right into the mohair prop bonnet pattern at the bottom of this post. My tip? Knit them with a little extra care—smooth, even stitches go a long way here.
Styling Tips for Your Newborn Photo Sessions
A mohair prop bonnet pattern like this one is so versatile when it comes to styling. I’ve used it in every kind of setup you can imagine. Need ideas?
- Rustic + Nature-Inspired: Add some dried florals or greenery for that fairy garden vibe.
- Vintage Feels: Toss it into a wicker basket lined with lace, and you’re instantly transported to a simpler time.
- Minimalist Magic: A solid neutral backdrop and a swaddled babe. Let the bonnet shine.
- Seasonal Vibes: Spring flowers? Check. Autumn leaves? Check. It works anytime.
And remember, KnitPicks Aloft (affiliate link) comes in so many colors that it’s easy to match to your chosen theme.
Personalizing Your Mohair Prop Bonnet Pattern
One of the best parts about making your own mohair prop bonnet pattern is the room for customization. Here are a few ideas to take it up a notch:
- Add Embroidery: Simple vines or tiny florals stitched onto the ties or brim can add a lovely personal touch.
- Play with Color: Try striping subtle shades of KnitPicks Aloft (affiliate link) or holding it double with another laceweight yarn for a custom color blend.
- Beads, Anyone? A few tiny beads in the lace pattern can add just the right amount of sparkle for a holiday shoot.

Tips for a Smooth Knitting Experience
I always like to pass along a few reminders that help keep the process fun:
- Swatch First: I know, it’s not the most thrilling part, but checking your gauge really does make a difference.
- Use a Lifeline: Especially if you’re new to lace. Trust me, you’ll thank yourself later.
- Block It Out: Lace doesn’t show off until it’s been blocked. So don’t skip the soak and pin!
And yes, I’ll say it again: KnitPicks Aloft (affiliate link) is a dream to block. It opens up beautifully and holds its shape without any fuss.
The Heart Behind Handmade
This mohair prop bonnet pattern is more than just stitches—it’s a keepsake. A soft, handmade touch in a moment that goes by way too fast. Whether you’re gifting it to a new mama, adding it to your own photo prop stash, or just looking for a little lacey project to unwind with, the Priscilla Bonnet delivers.
Knitting gives us a chance to slow down, savor the process, and create something meaningful. And when you finish that last stitch and see it worn in a photo, trust me—it’s all worth it.
Find the Mohair Prop Bonnet Pattern Below
I’ve dropped the mohair prop bonnet pattern right at the bottom of this post for easy access. If you’re craving more, don’t forget to check out all my free photo prop patterns right here.
Final Thoughts
So if you’re in the mood for something soft, lacy, and full of charm, this mohair prop bonnet pattern might just be your next favorite knit. Grab a skein of KnitPicks Aloft (affiliate link), clear off a cozy spot on your couch, and get ready to fall in love with lace.
And one last reminder for safety—this bonnet is meant for photo use only. Never leave baby unattended while wearing it.
Happy knitting, friend!

Materials and Info
Materials: 80-200 yds of lace weight (size 0) mohair yarn (I used knitpicks aloft), size 7 (4.5mm) straight needles, yarn needle, 2 stitch markers
Gauge: 5sts/in ~GAUGE IS VERY IMPORTANT~
Abbreviation Key:
K – knit
P – purl
k2tog – knit 2 together
ssk – slip slip knit
yo – yarn over
sm – slip marker
Head circumference: nb (13ins). 3mths (15ins), 6mth (16ins), 12mths (17ins)
Priscilla Bonnet Pattern
NEWBORN
Cast on 171
YOUR TIES ARE IN THIS CAST ON. YOU WILL BIND OFF ON ROW 8 TO FINISH THE TIES.
Row 1 (wrong side) – P60, place marker, p51, place marker, p60
Row 2 – K60, sm, k2, yo, ssk [k1, k2tog, yo, k1, yo, ssk], repeat [to] to last 5 sts before next marker, k1, k2tog, yo, k2, sm, k60
Row 3 – Purl across
Row 4 – repeat row 2
Row 5 – purl across
Row 6 – k60, sm, k2, k2tog, yo, [k1, yo, ssk, k1, k2tog, yo], repeat [to] to last 5 sts before next marker, k1, yo, ssk, k2, sm. K60
Row 7 – purl across
Row 8 – bind off LOOSELY 60, remove marker, k2, k2tog, yo, [k1, yo, ssk, k1, k2tog, yo], repeat [to] to last 5 sts before next marker, k1, yo, ssk, k2, remove marker, bind off LOOSELY (51sts)
Cut Yarn. Rejoin at remaining sts.
Row 9 – purl across
Row 10 – k2, yo, ssk [k1, k2tog, yo, k1, yo, ssk], repeat [to] to last 5 sts, k1, k2tog, yo, k2
Row 11 – purl across
Row 12 – repeat row 10
Row 13 – purl across
Row 14 – k2, k2tog, yo, [k1, yo, ssk, k1, k2tog, yo], repeat [to] to last 5 sts, k1, yo, ssk, k2,
Row 15 – purl across
Row 16 – repeat row 14
Repeat rows 9-16 until your work measures 3.75ins from cast on edge. Finish after completing a wrong side (purl) row. Place a marker on either end of your last row to mark where to sew the crown when completed.
DECREASES
Row 1 – k1 [k2tog, k5] repeat [to] across to last st, k1 (44sts)
Row 2 – purl across
Row 3 – k1 [k2tog, k4] repeat [to] across to last st, k1 (37sts)
Row 4 – purl across
Row 5 – k1 [k2tog, k3] repeat [to] across to last st, k1 (30sts)
Row 6 – purl across
Row 7 – k1 [k2tog, k2] repeat [to] across to last st, k1 (23sts)
Row 8 – purl across
Row 9 – k1 [k2tog, k1] repeat [to] across to last st, k1 (16sts)
Row 10 – purl across
Row 11 – k1 [k2tog] repeat [to] across to last st, k1 (9sts)
Cut yarn leaving appx 12ins and pull through remaining stitches. Using this end sew the crown together to your stitch markers. (I like to use the mattress stitch since it is nearly invisible). Weave in all ends.
0-3 MONTHS
Cast on 177
YOUR TIES ARE IN THIS CAST ON. YOU WILL BIND OFF ON ROW 8 TO FINISH THE TIES.
Row 1 (wrong side) – P60, place marker, p57, place marker, p60
Row 2 – K60, sm, k2, yo, ssk [k1, k2tog, yo, k1, yo, ssk], repeat [to] to last 5 sts before next marker, k1, k2tog, yo, k2, sm, k60
Row 3 – Purl across
Row 4 – repeat row 2
Row 5 – purl across
Row 6 – k60, sm, k2, k2tog, yo, [k1, yo, ssk, k1, k2tog, yo], repeat [to] to last 5 sts before next marker, k1, yo, ssk, k2, sm. K60
Row 7 – purl across
Row 8 – bind off LOOSELY 60, remove marker, k2, k2tog, yo, [k1, yo, ssk, k1, k2tog, yo], repeat [to] to last 5 sts before next marker, k1, yo, ssk, k2, remove marker, bind off LOOSELY (57sts)
Cut Yarn. Rejoin at remaining sts.
Row 9 – purl across
Row 10 – k2, yo, ssk [k1, k2tog, yo, k1, yo, ssk], repeat [to] to last 5 sts, k1, k2tog, yo, k2
Row 11 – purl across
Row 12 – repeat row 10
Row 13 – purl across
Row 14 – k2, k2tog, yo, [k1, yo, ssk, k1, k2tog, yo], repeat [to] to last 5 sts, k1, yo, ssk, k2,
Row 15 – purl across
Row 16 – repeat row 14
Repeat rows 9-16 until your work measures 4.25ins from cast on edge. Finish after completing a wrong side (purl) row. Place a marker on either end of your last row to mark where to sew the crown when completed.
DECREASES
Row 1 – k1 [k2tog, k5] repeat [to] across (49sts)
Row 2 – purl across
Row 3 – k1 [k2tog, k4] repeat [to] across (43sts)
Row 4 – purl across
Row 5 – k1 [k2tog, k3] repeat [to] across (31sts)
Row 6 – purl across
Row 7 – k1 [k2tog, k2] repeat [to] across (25sts)
Row 9 – purl across
Row 10 – k1 [k2tog, k1] repeat [to] across (17sts)
Row 11 – purl across
Row 12 – k1 [k2tog] repeat [to] across (9sts)
Cut yarn leaving appx 12ins and pull through remaining stitches. Using this end sew the crown together to your stitch markers. (I like to use the mattress stitch since it is nearly invisible). Weave in all ends.

3-6 MONTHS
Cast on 183
YOUR TIES ARE IN THIS CAST ON. YOU WILL BIND OFF ON ROW 8 TO FINISH THE TIES.
Row 1 (wrong side) – P60, place marker, p63, place marker, p60
Row 2 – K60, sm, k2, yo, ssk [k1, k2tog, yo, k1, yo, ssk], repeat [to] to last 5 sts before next marker, k1, k2tog, yo, k2, sm, k60
Row 3 – Purl across
Row 4 – repeat row 2
Row 5 – purl across
Row 6 – k60, sm, k2, k2tog, yo, [k1, yo, ssk, k1, k2tog, yo], repeat [to] to last 5 sts before next marker, k1, yo, ssk, k2, sm. K60
Row 7 – purl across
Row 8 – bind off LOOSELY 60, remove marker, k2, k2tog, yo, [k1, yo, ssk, k1, k2tog, yo], repeat [to] to last 5 sts before next marker, k1, yo, ssk, k2, remove marker, bind off LOOSELY (63sts)
Cut Yarn. Rejoin at remaining sts.
Row 9 – purl across
Row 10 – k2, yo, ssk [k1, k2tog, yo, k1, yo, ssk], repeat [to] to last 5 sts, k1, k2tog, yo, k2
Row 11 – purl across
Row 12 – repeat row 10
Row 13 – purl across
Row 14 – k2, k2tog, yo, [k1, yo, ssk, k1, k2tog, yo], repeat [to] to last 5 sts, k1, yo, ssk, k2,
Row 15 – purl across
Row 16 – repeat row 14
Repeat rows 9-16 until your work measures 4.75ins from cast on edge. Finish after completing a wrong side (purl) row. Place a marker on either end of your last row to mark where to sew the crown when completed.
DECREASES
Row 1 – [k2tog, k5] repeat [to] across (54sts)
Row 2 – purl across
Row 3 – [k2tog, k4] repeat [to] across (45sts)
Row 4 – purl across
Row 5 – [k2tog, k3] repeat [to] across (36sts)
Row 6 – purl across
Row 7 – [k2tog, k2] repeat [to] across (27sts)
Row 8 – purl across
Row 9 – [k2tog, k1] repeat [to] across (18sts)
Row 10 – purl across
Row 11 – [k2tog] repeat [to] across (9sts)
Cut yarn leaving appx 12ins and pull through remaining stitches. Using this end sew the crown together to your stitch markers. (I like to use the mattress stitch since it is nearly invisible). Weave in all ends.
6-12 MONTHS
Cast on 189
YOUR TIES ARE IN THIS CAST ON. YOU WILL BIND OFF ON ROW 8 TO FINISH THE TIES.
Row 1 (wrong side) – P60, place marker, p69, place marker, p60
Row 2 – K60, sm, k2, yo, ssk [k1, k2tog, yo, k1, yo, ssk], repeat [to] to last 5 sts before next marker, k1, k2tog, yo, k2, sm, k60
Row 3 – Purl across
Row 4 – repeat row 2
Row 5 – purl across
Row 6 – k60, sm, k2, k2tog, yo, [k1, yo, ssk, k1, k2tog, yo], repeat [to] to last 5 sts before next marker, k1, yo, ssk, k2, sm. K60
Row 7 – purl across
Row 8 – bind off LOOSELY 60, remove marker, k2, k2tog, yo, [k1, yo, ssk, k1, k2tog, yo], repeat [to] to last 5 sts before next marker, k1, yo, ssk, k2, remove marker, bind off LOOSELY (69sts)
Cut Yarn. Rejoin at remaining sts.
Row 9 – purl across
Row 10 – k2, yo, ssk [k1, k2tog, yo, k1, yo, ssk], repeat [to] to last 5 sts, k1, k2tog, yo, k2
Row 11 – purl across
Row 12 – repeat row 10
Row 13 – purl across
Row 14 – k2, k2tog, yo, [k1, yo, ssk, k1, k2tog, yo], repeat [to] to last 5 sts, k1, yo, ssk, k2,
Row 15 – purl across
Row 16 – repeat row 14
Repeat rows 9-16 until your work measures 5.25in from cast on edge. Finish after completing a wrong side (purl) row. Place a marker on either end of your last row to mark where to sew the crown when completed.
DECREASES
Row 1 – k1 [k2tog, k15] repeat across (65sts)
Row 2 – purl across
Row 3 – k1 [k2tog, k5] repeat [to] across (56sts)
Row 4 – purl across
Row 5 – k1 [k2tog, k4] repeat [to] across (47sts)
Row 6 – purl across
Row 7 – k1 [k2tog, k3] repeat [to] across (38sts)
Row 8 – purl across
Row 9 – k1 [k2tog, k2] repeat [to] across (29sts)
Row 10 – purl across
Row 11 – k1 [k2tog, k1] repeat [to] across (20sts)
Row 12 – purl across
Row 13 – k1 [k2tog] repeat [to] across (11sts)
Cut yarn leaving appx 12ins and pull through remaining stitches. Using this end sew the crown together to your stitch markers. (I like to use the mattress stitch since it is nearly invisible). Weave in all ends.
Priscilla Bonnet PDF
Disclaimer: This page contains affiliate links. If you choose to make a purchase after clicking a link, I may receive a commission at no additional cost to you. Thank you for your support!