
Discover the cutest photo prop onesie pattern ever! Find more amazing designs on my free photo prop pattern page.

If you’re anything like me, knitting for newborn photography is one of those delightful crafts that perfectly combines two of my favorite things: knitting and capturing adorable memories! I’m always on the lookout for patterns that steal the spotlight in newborn photoshoots, and today, I’m thrilled to share the charming Tyler Onesie—a dreamy photo prop onesie pattern that’ll have everyone swooning over your photos. This delightful pattern is featured at the bottom of this post, but be sure to check out more amazing designs on my dedicated [photo prop pattern page].
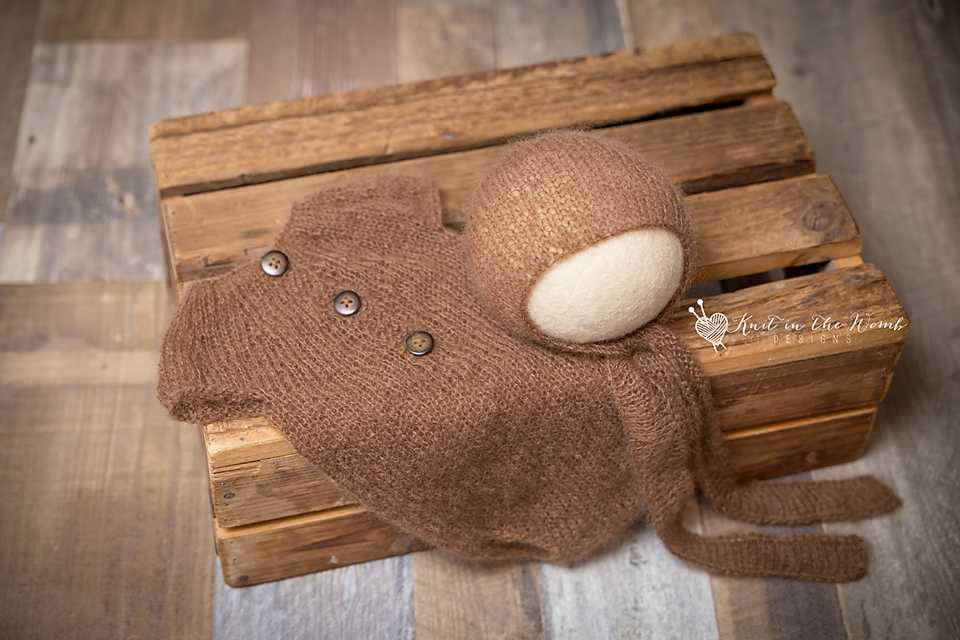
I’ve knitted countless items for newborn photography, but there’s something truly special about this particular photo prop onesie pattern. Crafted with KnitPicks Aloft (affiliate link), it has quickly become one of my favorite go-to pieces for shoots. Let’s dive into why you need to knit this charming onesie next!
Why I Chose Mohair Lace Yarn for This Photo Prop Onesie Pattern
Softness and Comfort
When knitting a photo prop onesie pattern, especially for delicate newborn skin, yarn selection matters—a lot. Mohair lace yarn, especially KnitPicks Aloft (affiliate link), is incredibly soft and gentle, making it perfect for baby’s sensitive skin. Each stitch feels like knitting a cloud—yes, it’s that soft!
Beautiful Texture
If you haven’t used mohair lace yarn before, you’re in for a delightful surprise. The tiny, fine fibers create an irresistible halo effect, adding an extra bit of dreamy softness to your newborn photography. Trust me, your photos will glow with this photo prop onesie pattern!
Warmth and Breathability
As lightweight as KnitPicks Aloft (affiliate link) feels, it’s surprisingly cozy. Newborns stay warm without overheating, which is essential during photoshoots. This breathability makes this photo prop onesie pattern even more ideal.

What Makes This Photo Prop Onesie Pattern (Tyler Onesie) So Special?
Timeless Design
Trends come and go, but classic styles never fade. The Tyler Onesie photo prop onesie pattern is timeless—simple yet elegant. Its versatility ensures it complements nearly any photoshoot theme, whether rustic, vintage, or modern chic.
Customize to Your Heart’s Content
One of my favorite aspects of this photo prop onesie pattern is how easy it is to personalize. Choose from an array of gorgeous KnitPicks Aloft (affiliate link) colors, add charming buttons, dainty ribbons, or tiny lace accents. You can even adjust sizing to fit perfectly, ensuring your photoshoot vision comes to life beautifully.
Beginner-Friendly Knitting
Don’t be fooled by the delicate look; this photo prop onesie pattern is easier than it appears. Even newer knitters can create a stunning finished piece with professional-looking results. It’s a confidence booster and a joy to knit—I promise!
Tips to Make Your Photo Prop Onesie Pattern Shine in Photos
Pairing with Props
A beautiful photo prop onesie pattern like the Tyler Onesie pairs wonderfully with soft blankets, charming headbands, tiny hats, or fluffy rugs. These extra textures add depth and visual interest to your images, making your newborn photos even more captivating.
Lighting Magic
The best way to showcase your photo prop onesie pattern? Soft, natural light. It gently highlights the fluffy halo of KnitPicks Aloft (affiliate link), giving your newborn photography a warm, inviting glow. I find mornings or late afternoons are perfect times to capture this magical effect.
Posing Comfortably
The flexibility of this photo prop onesie pattern means babies stay comfortable throughout the shoot. Easily adjustable, the Tyler Onesie ensures your little model remains cozy, calm, and content, which is crucial for capturing those perfect, peaceful photos.

My Best Tips for Knitting Success with This Photo Prop Onesie Pattern
Quality Yarn Matters
Choosing the right yarn is essential—trust me, I’ve learned the hard way. Investing in high-quality mohair lace yarn like KnitPicks Aloft (affiliate link) ensures your finished photo prop onesie pattern looks and feels luxurious. Your photographs will thank you!
Blocking Makes a Difference
Blocking your finished onesie might seem tedious, but believe me, it’s worth the effort. Proper blocking evens stitches and perfects the drape, enhancing the overall look of this lovely photo prop onesie pattern in your newborn photos.
Attention to Detail
Take your time weaving in those ends. Neatly woven ends give your photo prop onesie pattern that professional touch, elevating your newborn photos from great to absolutely stunning.
Final Thoughts on This Irresistible Photo Prop Onesie Pattern
Knitting the Tyler Onesie has been such a joy—and seeing the gorgeous photos from sessions using this piece always makes me smile. This photo prop onesie pattern isn’t just another knitting project; it’s a lovingly crafted keepsake, perfect for capturing those fleeting, precious newborn moments. Knit with KnitPicks Aloft (affiliate link), it’s destined to become a cherished favorite among photographers and parents alike.
Happy knitting, friends!
I’d absolutely love to see your beautiful creations. Share your finished photo prop onesie pattern projects by tagging me on social media or dropping a comment below. Let’s celebrate the magic of knitting together!
Ready to Get Started?
Don’t forget: the Tyler Onesie photo prop onesie pattern is at the bottom of this post! For even more adorable newborn photography ideas, visit my free photo prop pattern page and explore all the charming patterns I’ve gathered just for you.
Enjoy every stitch!

Materials and Info
Materials: 150-300 yds of lace weight (size 0) mohair yarn (I used knitpicks aloft), size 6 (4 mm) 16in long circular needles, yarn needle, 2 stitch markers, 3 buttons
Gauge: 5.5sts/in ~GAUGE IS VERY IMPORTANT~
Finished Measurements: nb (13ins chest, 12.5ins long) 3mths (15ins, 14ins long), 6mth (17ins chest, 16ins long)
K – knit
P – purl
k2tog – knit 2 together
sl – slip
yo – yarn over
sm – slip marker
m1 – make one
ssk – slip, slip, knit
Tyler Onesie Pattern
NEWBORN
YOKE
Cast on 56sts.
Row 1 (wrong side) – k4, p48, k4
Row 2 – knit across
Row 3 – k4, p48, k4
Row 4 – buttonhole row – k2, yo, k2tog, knit across
Row 5 – k4, p48, k4
Row 6 – k4, [m1, k4] repeat [to] to last 4 sts, k4 (68sts)
Row 7 – k4, p to last 4 sts, k4
Row 8 – knit across
Row 9 – k4, p to last 4 sts, k4
Row 10 – k4, [m1, k5] repeat [to] to last 4 sts, k4 (80sts)
Row 11 – k4, p to last 4 sts, k4
Row 12 – knit across
Row 13 – k4, p to last 4 sts, k4
Row 14 – k4, [m1, k6] repeat [to] to last 4 sts, k4 (92sts)
Row 15 – k4, p to last 4 sts, k4
Row 16 – knit across
Row 17 – k4, p to last 4 sts, k4
Row 18 – k4, [m1, k7] repeat [to] to last 4 sts, k4 (104sts)
Row 19 – k4, p to last 4 sts, k4
Row 20 – buttonhole row- k2, yo, k2tog, knit across
Row 21 – k4, p to last 4 sts, k4
Row 22 – k4, [m1, k24] repeat [to] to last 4 sts, k4 (108sts)
Row 23 – k4, p to last 4 sts, k4
Row 24 – knit across
Row 25 – k4, p to last 4 sts, k4
ARMS
Row 26 – k17, bind off 22, k30, bind off 22, k17 (64sts)
Row 27 – k4, purl to armhole, place marker, cast on 2, purl to armhole, cast on 2, place marker (this will become your start of round marker when you join in the round) purl to last 4sts, k4 (68sts)
BODY
Row 28 – knit across
Row 29 – k4, purl across to last 4sts, k4
Repeat rows 28 and 29 3 more times
Row 36 – buttonhole row – k2, yo, k2tog, k64
Row 37 – k4, p to last 4 sts, k4
Row 38– knit to the last 4 sts, join the button band as follows: Place the remaining 4 sts of the row on a spare needle. You will now start working in the round. Place the remaining 4 stitches on your needle from the previous row behind the first 4 sts of the row stacking them so you can knit them together (making sure the right side is facing you. Remember we are joining in the round so make sure there is no twist in your work.) Now knit the 1 st of the remaining sts together with the first st of the row. Do this 3 more times. (64sts)
Continue working in stockinette stitch until your work measures 6.5ins from row 25 armhole cast on.
LEGS
Starting at your beginning of round marker you will now start working flat again:
Row 1 – k1, ssk, k24, k2tog, k1 (28sts) keep the remaining 34 back stitches on a stitch holder.
Turn work.
Row 2 – purl across
Row 3 – k1, ssk, k22, k2tog, k1 (26sts)
Row 4 – purl across
Row 5 – k1, ssk, k20, k2tog, k1 (24sts)
Row 6 – purl across
Row 7 – k1, ssk, k18, k2tog, k1 (22sts)
Row 8 – purl across
Row 9 – k1, ssk, k16, k2tog, k1 (20sts)
Row 10 – purl across
Row 11 – k1, ssk, k14, k2tog, k1 (18sts)
Row 12 – purl across
Row 13 – k1, ssk, k12, k2tog, k1 (16sts)
Row 14 – purl across
Row 15 – knit across
Row 16 – purl across
Row 17 – knit across
Leave the remaining 16sts on a stitch holder for kitchener stitch and cut yarn. If you uncomfortable with kitchener stitch bind off and cut yarn. Pick up the 34 sts for the back.
Start work with right side facing.
Row 1 – k1, ssk, k28, k2tog, k1 (32sts)
Row 2 – purl across
Row 3 – k1, ssk, k26, k2tog, k1 (30sts)
Row 4 – purl across
Row 5 – k1, ssk, k24, k2tog, k1 (28sts)
Row 6 – purl across
Row 7 – k1, ssk, k22, k2tog, k1 (26sts)
Row 8 – purl across
Row 9 – k1, ssk, k20, k2tog, k1 (24sts)
Row 10 – purl across
Row 11 – k1, ssk, k18, k2tog, k1 (22sts)
Row 12 – purl across
Row 13 – k1, ssk, k16, k2tog, k1 (20sts)
Row 14 – purl across
Row 15 – k1, ssk, k14, k2tog, k1 (18sts)
Row 16 – purl across
Row 17 – k1, ssk, k12, k2tog, k1 (16sts)
Row 18 – purl across
Row 19 – knit across
Now you will kitchener st the front and back leg opening pieces together (making sure wrong sides are facing each other). If you are uncomfortable with kitchener stitch than you can bind off and sew the ends together.
Weave in all ends. Block as needed.

3 MONTH
YOKE
Cast on 65sts.
Row 1 (wrong side) – k4, p57, k4
Row 2 – knit across
Row 3 – k4, p57, k4
Row 4 – buttonhole row – k2, yo, k2tog, knit across
Row 5 – k4, p57, k4
Row 6 – k4, k9, [m1, k4] repeat [to] to last 4 sts, k4 (77sts)
Row 7 – k4, p to last 4 sts, k4
Row 8 – knit across
Row 9 – k4, p to last 4 sts, k4
Row 10 – k4, k9, [m1, k5] repeat [to] to last 4 sts, k4 (89sts)
Row 11 – k4, p to last 4 sts, k4
Row 12 – knit across
Row 13 – k4, p to last 4 sts, k4
Row 14 – k4, k9, [m1, k6] repeat [to] to last 4 sts, k4 (101sts)
Row 15 – k4, p to last 4 sts, k4
Row 16 – knit across
Row 17 – k4, p to last 4 sts, k4
Row 18 – k4, k9, [m1, k7] repeat [to] to last 4 sts, k4 (113sts)
Row 19 – k4, p to last 4 sts, k4
Row 20 – buttonhole row- k2, yo, k2tog, knit across
Row 21 – k4, p to last 4 sts, k4
Row 22 – k4, m1, k9, [m1, k8] repeat [to] to last 4 sts, k4 (126sts)
Row 23 – k4, p to last 4 sts, k4
Row 24 – knit across
Row 25 – k4, p to last 4 sts, k4
Row 26 – knit across
Row 27 – k4, p to last 4 sts, k4
ARMS
Row 28 – k21, bind off 25, k34, bind off 25, k21 (76sts)
Row 29 – k4, purl to armhole, cast on 1, place marker, cast on 1, purl to armhole, cast on 1, place marker, cast on 1 (this will become your start of round marker when you join in the round) purl to last 4sts, k4 (80sts)
BODY
Row 30 – knit across
Row 31 – k4, purl across to last 4sts, k4
Repeat rows 30 and 31 2 more times
Row 36 – buttonhole row – k2, yo, k2tog, k76
Row 37 – k4, p to last 4 sts, k4
Row 38 – knit to the last 4 sts, join the button band as follows: Place the remaining 4 sts of the row on a spare needle. You will now start working in the round. Place the remaining 4 stitches on your needle from the previous row behind the first 4 sts of the row stacking them so you can knit them together (making sure the right side is facing you. Remember we are joining in the round so make sure there is no twist in your work.) Now knit the 1 st of the remaining sts together with the first st of the row. Do this 3 more times. (76sts)
Continue working in stockinette stitch until your work measures 7.5ins from row 29
armhole cast on.
LEGS
Starting at your beginning of round marker you will now start working flat again:
Row 1 – k1, ssk, k30, k2tog, k1 (34sts) keep the remaining 40 back stitches on a stitch holder. Turn work.
Row 2 – purl across
Row 3 – k1, ssk, k28, k2tog, k1 (32sts)
Row 4 – purl across
Row 5 – k1, ssk, k26, k2tog, k1 (30sts)
Row 6 – purl across
Row 7 – k1, ssk, k24, k2tog, k1 (28sts)
Row 8 – purl across
Row 9 – k1, ssk, k22, k2tog, k1 (26sts)
Row 10 – purl across
Row 11 – k1, ssk, k20, k2tog, k1 (24sts)
Row 12 – purl across
Row 13 – k1, ssk, k18, k2tog, k1 (22sts)
Row 14 – purl across
Row 15 – k1, ssk, k16, k2tog, k1 (20sts)
Row 16 – purl across
Row 17 – k1, ssk, k14, k2tog, k1 (18sts)
Row 18 – purl across
Row 19 – knit across
Row 20 – purl across
Row 21 – knit across
Leave the remaining 18sts on a stitch holder. Pick up the 40 sts for the back. Start work with right side facing. If you uncomfortable with kitchener stitch bind off and cut yarn.
Row 1 – k1, ssk, k34, k2tog, k1 (38sts)
Row 2 – purl across
Row 3 – k1, ssk, k32, k2tog, k1 (36sts)
Row 4 – purl across
Row 5 – k1, ssk, k30, k2tog, k1 (34sts)
Row 6 – purl across
Row 7 – k1, ssk, k28, k2tog, k1 (32sts)
Row 8 – purl across
Row 9 – k1, ssk, k26, k2tog, k1 (30sts)
Row 10 – purl across
Row 11 – k1, ssk, k24, k2tog, k1 (28sts)
Row 12 – purl across
Row 13 – k1, ssk, k22, k2tog, k1 (26sts)
Row 14 – purl across
Row 15 – k1, ssk, k20, k2tog, k1 (24sts)
Row 16 – purl across
Row 17 – k1, ssk, k18, k2tog, k1 (22sts)
Row 18 – purl across
Row 19 – k1, ssk, k16, k2tog, k1 (20sts)
Row 20 – purl across
Row 21 – k1, ssk, k14, k2tog, k1 (18sts)
Row 22 – purl across
Row 23 – k1, ssk, k12, k2tog, k1 (16sts)
Row 24 – purl across
Row 25 – knit across
Now you will kitchener st the front and back leg opening pieces together (making sure wrong sides are facing each other). If you are uncomfortable with kitchener stitch than you can bind off and sew the ends together.
Weave in all ends. Block as needed.
6 MONTH
YOKE
Cast on 73sts.
Row 1 (wrong side) – k5, p63, k5
Row 2 – knit across
Row 3 – k5, p63, k5
Row 4 – buttonhole row – k2, yo, k2tog, knit across
Row 5 – k5, p63, k5
Row 6 – k8, [m1, k6] repeat [to] to last 5 sts, k5 (83sts)
Row 7 – k5, p to last 5 sts, k5
Row 8 – knit across
Row 9 – k5, p to last 5 sts, k5
Row 10 – k8, [m1, k7] repeat [to] to last 5 sts, k5 (93sts)
Row 11 – k5, p to last 5 sts, k5
Row 12 – knit across
Row 13 – k5, p to last 5 sts, k5
Row 14 – k8, [m1, k8] repeat [to] to last 5 sts, k5 (103sts)
Row 15 – k5, p to last 5 sts, k5
Row 16 – knit across
Row 17 – k5, p to last 5 sts, k5
Row 18 – k8, [m1, k9] repeat [to] to last 5 sts, k5 (113sts)
Row 19 – k5, p to last 5 sts, k5
Row 20 – buttonhole row- k2, yo, k2tog, knit across
Row 21 – k5, p to last 5 sts, k5
Row 22 – k8, [m1, k10] repeat [to] to last 5 sts, k5 (123sts)
Row 23 – k5, p to last 5 sts, k5
Row 24 – knit across
Row 25 – k5, p to last 5 sts, k5
Row 26 – k8, [m1, k11] repeat [to] to last 5 sts, k5 (133sts)
Row 27– k5, p to last 5 sts, k5
Row 28 – knit across
Row 29 – k5, p to last 5 sts, k5
Row 30 – k8, [m1, k12] repeat [to] to last 5 sts, k5 (143sts)
Row 31 – k5, p to last 5 sts, k5
Row 32 – knit across
Row 33 – k5, p to last 5 sts, k5
ARMS
Row 34 – k23, bind off 27, k42, bind off 27, k24 (89sts)
Row 35 – k5, purl to armhole, place marker, cast on 2, purl to armhole, cast on 2, place marker (this will become your start of round marker when you join in the round) purl to last 5sts, k5 (93sts)
BODY
Row 36 – buttonhole row – k2, yo, k2tog, k89
Row 37 – k5, p to last 5 sts, k5
Row 38- knit across
Row 39 – k5, p to last 5 sts, k5
Row 40 – knit to the last 5 sts, join the button band as follows: Place the remaining 5 sts of the row on a spare needle. You will now start working in the round. Place the remaining 5 stitches on your needle from the previous row behind the first 5 sts of the row stacking them so you can knit them together (making sure the right side is facing you. Remember we are joining in the round so make sure there is no twist in your work.) Now knit the 1 st of the remaining sts together with the first st of the row. Do this 4 more times. (88sts)
Continue working in stockinette stitch until your work measures 9ins from row 35 armhole cast on.
LEGS
Starting at your beginning of round marker you will now start working flat again:
Row 1 – k1, ssk, k36, k2tog, k1 (40sts) keep the remaining 46 back stitches on a stitch holder. Turn work.
Row 2 – purl across
Row 3 – k1, ssk, k34, k2tog, k1 (38sts)
Row 4 – purl across
Row 5 – k1, ssk, k32, k2tog, k1 (36sts)
Row 6 – purl across
Row 7 – k1, ssk, k30, k2tog, k1 (34sts)
Row 8 – purl across
Row 9 – k1, ssk, k28, k2tog, k1 (32sts)
Row 10 – purl across
Row 11 – k1, ssk, k26, k2tog, k1 (30sts)
Row 12 – purl across
Row 13 – k1, ssk, k24, k2tog, k1 (28sts)
Row 14 – purl across
Row 15 – k1, ssk, k22, k2tog, k1 (26sts)
Row 16 – purl across
Row 17 – k1, ssk, k20, k2tog, k1 (24sts)
Row 18 – purl across
Row 19 – k1, ssk, k18, k2tog, k1 (22sts)
Row 20 – purl across
Row 21 – k1, ssk, k16, k2tog, k1 (20sts)
Row 22 – purl across
Row 23 – knit across
Row 24 – purl across
Row 25 – knit across
Leave the remaining 20sts on a stitch holder. Pick up the 46 sts for the back. Start work with right side facing. If you uncomfortable with kitchener stitch bind off and cut yarn.
Row 1 – k1, ssk, k40, k2tog, k1 (44sts)
Row 2 – purl across
Row 3 – k1, ssk, k38, k2tog, k1 (42sts)
Row 4 – purl across
Row 5 – k1, ssk, k36, k2tog, k1 (40sts).
Row 6 – purl across
Row 7 – k1, ssk, k34, k2tog, k1 (38sts)
Row 8 – purl across
Row 9 – k1, ssk, k32, k2tog, k1 (36sts)
Row 10 – purl across
Row 11 – k1, ssk, k30, k2tog, k1 (34sts)
Row 12 – purl across
Row 13 – k1, ssk, k28, k2tog, k1 (32sts)
Row 14 – purl across
Row 15 – k1, ssk, k26, k2tog, k1 (30sts)
Row 16 – purl across
Row 17 – k1, ssk, k24, k2tog, k1 (28sts)
Row 18 – purl across
Row 19 – k1, ssk, k22, k2tog, k1 (26sts)
Row 20 – purl across
Row 21 – k1, ssk, k20, k2tog, k1 (24sts)
Row 22 – purl across
Row 23 – k1, ssk, k18, k2tog, k1 (22sts)
Row 24 – purl across
Row 25 – k1, ssk, k16, k2tog, k1 (20sts)
Row 26 – purl across
Row 27 – knit across
Now you will kitchener st the front and back leg opening pieces together (making sure wrong sides are facing each other). If you are uncomfortable with kitchener stitch than you can bind off and sew the ends together.
Weave in all ends. Block as needed.

Tyler Onesie PDF
Disclaimer: This page contains affiliate links. If you choose to make a purchase after clicking a link, I may receive a commission at no additional cost to you. Thank you for your support!
Comments are closed.