
Looking for a sweet baby knitted onesie pattern? Check out more free photo prop patterns here!

As a knitting designer and newborn photography enthusiast, I’m always on the hunt for the perfect props. Nothing compares to the joy of seeing a delicate knit wrapping a tiny, sleepy newborn. Today, I’m super excited to share my latest find—the Willow Onesie—a dreamy baby knitted onesie pattern that photographers and parents absolutely adore!
You’ll find this lovely baby knitted onesie pattern at the bottom of the post, but don’t forget: I’ve got lots more adorable patterns waiting for you at my free photo prop pattern page.

Why I Fell in Love with this Baby Knitted Onesie Pattern
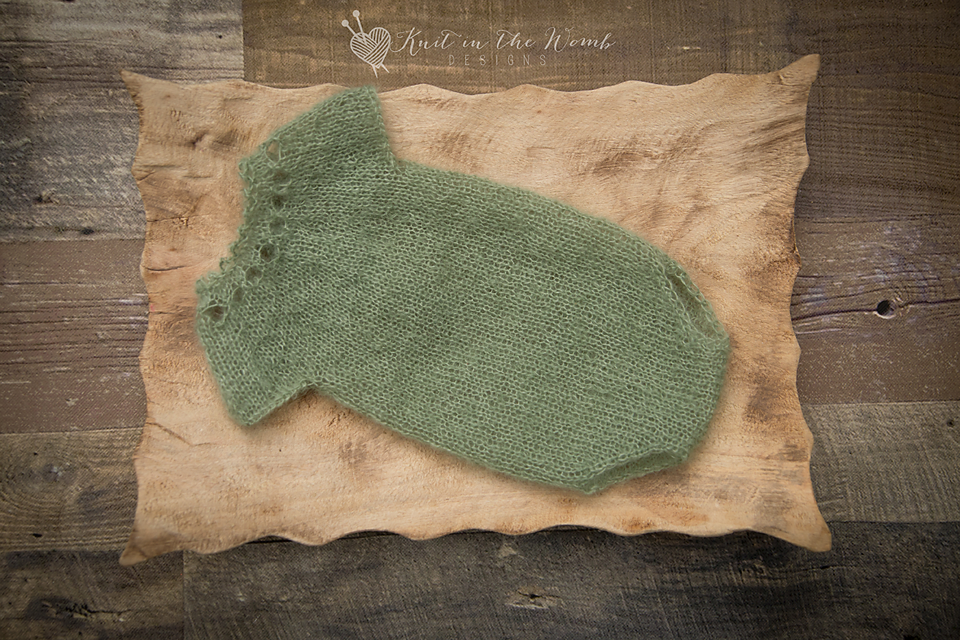
When I first designed this baby knitted onesie pattern, I wanted something elegant but still cozy enough to keep those tiny models comfy. Enter mohair lace yarn—especially my favorite, KnitPicks Aloft (affiliate link)! It’s the fluffiest yarn I’ve ever used, creating a cloud-like softness that’s ideal for snuggling newborns. KnitPicks Aloft (affiliate link) is not only gentle on baby’s delicate skin, but it also photographs beautifully, adding that soft, airy look everyone loves.
This baby knitted onesie pattern really shines thanks to its intricate lace details. The delicate stitches create just enough peek-a-boo moments to capture the baby’s natural charm while keeping everything tasteful and classic. It instantly transforms a simple photo session into something magical and memorable.

Why KnitPicks Aloft (affiliate link) is My Go-To Yarn for this Baby Knitted Onesie Pattern
When knitting a pattern for newborn photography, yarn choice matters—a lot. That’s why I recommend KnitPicks Aloft (affiliate link) every chance I get! Mohair lace yarn, especially this brand, has a luxurious feel that’s perfect for delicate newborn skin. KnitPicks Aloft (affiliate link) is incredibly light and airy, which means your baby stays comfy and cozy throughout the shoot.
What’s even better? KnitPicks Aloft (affiliate link) has a lovely natural sheen. It captures light beautifully, highlighting all those precious little details that make newborn photos so special. Trust me, once you’ve used this yarn, you’ll see exactly why it’s my absolute favorite for baby knitted onesie patterns.

How to Use This Baby Knitted Onesie Pattern in Your Photoshoot
The Willow Onesie isn’t just adorable; it’s also incredibly versatile. One of the things I love most about this baby knitted onesie pattern is how easily it fits into any style of photoshoot. If you prefer a minimalist look, simply pair it with a neutral-colored backdrop, and you’ll instantly have classic images worthy of framing.
Looking for something a bit more whimsical? Add floral crowns, soft blankets, or delicate wraps to enhance the sweet, innocent feel. The lace detailing of this baby knitted onesie pattern complements almost any prop you choose, making your creativity the only limit.

Best Time to Photograph Using this Baby Knitted Onesie Pattern
Timing matters when you’re capturing newborn photos, especially with knitted props. Babies photograph best in their first two weeks, when they’re sleepy, curled up, and irresistibly squishy. This baby knitted onesie pattern was specifically designed to fit perfectly during this magical window of time.
Its snug fit naturally accentuates the baby’s sweet little features and adorable poses. The intricate lacework of the baby knitted onesie pattern gently frames their delicate skin, allowing subtle, enchanting glimpses of your baby’s cute little rolls and tiny toes.

A Timeless Keepsake: More Than Just a Baby Knitted Onesie Pattern
One reason this baby knitted onesie pattern is such a hit is because it becomes more than just a photography prop—it’s an heirloom. Every stitch you knit with KnitPicks Aloft (affiliate link) turns this onesie into a keepsake you’ll treasure forever.
Imagine looking back years from now, holding this delicate onesie, and remembering those precious first days. The soft, airy stitches capture the fleeting moments of newborn sweetness, preserving them beautifully for years to come. It’s more than a prop; it’s part of your family’s story.

Tips for Knitting Your Baby Knitted Onesie Pattern
Ready to start your baby knitted onesie pattern adventure? Here are a few tips to help make the knitting process smooth and enjoyable:
Choose your color wisely: KnitPicks Aloft (affiliate link) comes in a range of lovely shades. Soft neutrals or pastels always photograph beautifully.

Materials and Info
Materials: 100-200 yds of lace weight (size 0) mohair yarn (I used knitpicks aloft), size 6 (4 mm) 16in long circular needles, yarn needle, 2 stitch markers, size 3.25mm crochet hook, 3 buttons (3/8in – 1/2in)
Gauge: 5.5sts/in ~GAUGE IS VERY IMPORTANT~
Finished Measurements:
nb (13ins chest, 12.5ins long)
3mths (15ins, 14ins long),
6mth (17ins chest, 16ins long)

Willow Onesie Pattern
NEWBORN
YOKE
Cast on 56sts.
Row 1 (wrong side) – k4, p48, k4
Row 2 – knit across
Row 3 – k4, p48, k4
Row 4 – buttonhole row – k2, yo, k2tog, yo, sl1, k2tog, psso, [w2, sl1, k2tog, psso] repeat [to] to last 4sts, yo, k4
Row 5 – k4, p2, p1 into 1st wrap, k1 into 2nd wrap, [p1, p1 into 1st wrap, k1 into 2nd wrap] repeat [to] to last 6sts, p2, k4
Row 6 – k4, [m1, k4] repeat [to] to last 4 sts, k4 (68sts)
Row 7 – k4, p to last 4 sts, k4
Row 8 – knit across
Row 9 – k4, p to last 4 sts, k4
Row 10 – k4, [m1, k5] repeat [to] to last 4 sts, k4 (80sts)
Row 11 – k4, p to last 4 sts, k4
Row 12 – knit across
Row 13 – k4, p to last 4 sts, k4
Row 14 – k4, [m1, k6] repeat [to] to last 4 sts, k4 (92sts)
Row 15 – k4, p to last 4 sts, k4
Row 16 – knit across
Row 17 – k4, p to last 4 sts, k4
Row 18 – k4, [m1, k7] repeat [to] to last 4 sts, k4 (104sts)
Row 19 – k4, p to last 4 sts, k4
Row 20 – knit across
Row 21 – k4, p to last 4 sts, k4
Row 22 – buttonhole row- k2, yo, k2tog, [m1, k24] repeat [to] to last 4 sts, k4 (108sts)
Row 23 – k4, p to last 4 sts, k4
ARMS
Row 24 – k17, bind off 22, k30, bind off 22, k17 (64sts)
Row 25 – k4, purl to armhole, cast on 2, place marker (this will become your start of round marker when you join in the round), purl to armhole, place marker, cast on 2, purl to last 4sts, k4 (68sts)
BODY
Row 26 – knit across
Row 27 – k4, purl across to last 4sts, k4
Repeat rows 26 and 27 5 more times
Row 38 – buttonhole row – k2, yo, k2tog, k64
Row 39 – k4, p to last 4 sts, k4
Row 40 – knit to the last 4 sts, join the button band as follows: Place the remaining 4 sts of the row on a spare needle. You will now start working in the round. Place the remaining 4 stitches on your needle from the previous row behind the first 4 sts of the row stacking them so you can knit them together (making sure the right side is facing you. Remember we are joining in the round so make sure there is no twist in your work.) Now knit the 1st of the remaining sts together with the first st of the row. Do this 3 more times. (a tutorial for this will be at the end if you need photos) (64sts)
Continue working in stockinette stitch until your work measures 6.5ins from row 25 armhole cast on.
LEGS
Starting at your beginning of round marker you will now start working flat again:
Row 1 – k1, ssk, k24, k2tog, k1 (28sts) keep the remaining 34 back stitches on a stitch holder. Turn work.
Row 2 – purl across
Row 3 – k1, ssk, k22, k2tog, k1 (26sts)
Row 4 – purl across
Row 5 – k1, ssk, k20, k2tog, k1 (24sts)
Row 6 – purl across
Row 7 – k1, ssk, k18, k2tog, k1 (22sts)
Row 8 – purl across
Row 9 – k1, ssk, k16, k2tog, k1 (20sts)
Row 10 – purl across
Row 11 – k1, ssk, k14, k2tog, k1 (18sts)
Row 12 – purl across
Row 13 – k1, ssk, k12, k2tog, k1 (16sts)
Row 14 – purl across
Row 15 – knit across
Row 16 – purl across
Row 17 – knit across
Leave the remaining 16sts on a stitch holder. Pick up the 34 sts for the back. Start work with right side facing.
Row 1 – k1, ssk, k28, k2tog, k1 (32sts)
Row 2 – purl across
Row 3 – k1, ssk, k26, k2tog, k1 (30sts)
Row 4 – purl across
Row 5 – k1, ssk, k24, k2tog, k1 (28sts)
Row 6 – purl across
Row 7 – k1, ssk, k22, k2tog, k1 (26sts)
Row 8 – purl across
Row 9 – k1, ssk, k20, k2tog, k1 (24sts)
Row 10 – purl across
Row 11 – k1, ssk, k18, k2tog, k1 (22sts)
Row 12 – purl across
Row 13 – k1, ssk, k16, k2tog, k1 (20sts)
Row 14 – purl across
Row 15 – k1, ssk, k14, k2tog, k1 (18sts)
Row 16 – purl across
Row 17 – k1, ssk, k12, k2tog, k1 (16sts)
Row 18 – purl across
Row 19 – knit across
Now you will kitchener st the front and back leg opening pieces together (making sure wrong sides are facing each other).
Neck Edging – using your crochet hook – with right side facing sl1 into the edge st under the first yo, ch3, sl1 into first ch, ch1, sl1 into edge st under the next w2, [ch3, sl1 into first ch, ch1, sl1 into edge st under the next w2], repeat [to] until you reach the edge under the last yo, sl1 into the edge st under the last yo.
Weave in all ends. Block as needed.
3 MONTH
YOKE
Cast on 65sts.
Row 1 (wrong side) – k4, p57, k4
Row 2 – knit across
Row 3 – k4, p57, k4
Row 4 – buttonhole row – k2, yo, k2tog, yo, sl1, k2tog, psso, [w2, sl1, k2tog, psso] repeat [to] to last 4sts, yo, k4
Row 5 – k4, p2, p1 into 1st wrap, k1 into 2nd wrap, [p1, p1 into 1st wrap, k1 into 2nd wrap] repeat [to] to last 6sts, p2, k4
Row 6 – k4, k9, [m1, k4] repeat [to] to last 4 sts, k4 (77sts)
Row 7 – k4, p to last 4 sts, k4
Row 8 – knit across
Row 9 – k4, p to last 4 sts, k4
Row 10 – k4, k9, [m1, k5] repeat [to] to last 4 sts, k4 (89sts)
Row 11 – k4, p to last 4 sts, k4
Row 12 – knit across
Row 13 – k4, p to last 4 sts, k4
Row 14 – k4, k9, [m1, k6] repeat [to] to last 4 sts, k4 (101sts)
Row 15 – k4, p to last 4 sts, k4
Row 16 – knit across
Row 17 – k4, p to last 4 sts, k4
Row 18 – k4, k9, [m1, k7] repeat [to] to last 4 sts, k4 (113sts)
Row 19 – k4, p to last 4 sts, k4
Row 20 – knit across
Row 21 – k4, p to last 4 sts, k4
Row 22 – buttonhole row- k2, yo, k2tog, m1, k9, [m1, k8] repeat [to] to last 4 sts, k4 (126sts)
Row 23 – k4, p to last 4 sts, k4
Row 24 – knit across
Row 25 – k4, p to last 4 sts, k4
Row 26 – knit across
Row 27 – k4, p to last 4 sts, k4
ARMS
Row 28 – k21, bind off 25, k34, bind off 25, k21 (76sts)
Row 29 – k4, purl to armhole, cast on 1, place marker (this will become your start of round marker when you join in the round), cast on 1, purl to armhole, cast on 1, place marker, cast on 1 purl to last 4sts, k4 (80sts)
BODY
Row 30 – knit across
Row 31 – k4, purl across to last 4sts, k4
Repeat rows 30 and 31 3 more times
Row 38 – buttonhole row – k2, yo, k2tog, k76
Row 39 – k4, p to last 4 sts, k4
Row 40 – knit to the last 4 sts, join the button band as follows: Place the remaining 4 sts of the row on a spare needle. You will now start working in the round. Place the remaining 4 stitches on your needle from the previous row behind the first 4 sts of the row stacking them so you can knit them together (making sure the right side is facing you. Remember we are joining in the round so make sure there is no twist in your work.) Now knit the 1st of the remaining sts together with the first st of the row. Do this 3 more times. (a tutorial for this will be at the end if you need photos) (76sts)
Continue working in stockinette stitch until your work measures 7.5ins from row 29 armhole cast on.
LEGS
Starting at your beginning of round marker you will now start working flat again:
Row 1 – k1, ssk, k30, k2tog, k1 (34sts) keep the remaining 40 back stitches on a stitch holder. Turn work.
Row 2 – purl across
Row 3 – k1, ssk, k28, k2tog, k1 (32sts)
Row 4 – purl across
Row 5 – k1, ssk, k26, k2tog, k1 (30sts)
Row 6 – purl across
Row 7 – k1, ssk, k24, k2tog, k1 (28sts)
Row 8 – purl across
Row 9 – k1, ssk, k22, k2tog, k1 (26sts)
Row 10 – purl across
Row 11 – k1, ssk, k20, k2tog, k1 (24sts)
Row 12 – purl across
Row 13 – k1, ssk, k18, k2tog, k1 (22sts)
Row 14 – purl across
Row 15 – k1, ssk, k16, k2tog, k1 (20sts)
Row 16 – purl across
Row 17 – k1, ssk, k14, k2tog, k1 (18sts)
Row 18 – purl across
Row 19 – knit across
Row 20 – purl across
Row 21 – knit across
Leave the remaining 18sts on a stitch holder. Pick up the 40 sts for the back. Start work with right side facing.
Row 1 – k1, ssk, k34, k2tog, k1 (38sts)
Row 2 – purl across
Row 3 – k1, ssk, k32, k2tog, k1 (36sts)
Row 4 – purl across
Row 5 – k1, ssk, k30, k2tog, k1 (34sts)
Row 6 – purl across
Row 7 – k1, ssk, k28, k2tog, k1 (32sts)
Row 8 – purl across
Row 9 – k1, ssk, k26, k2tog, k1 (30sts)
Row 10 – purl across
Row 11 – k1, ssk, k24, k2tog, k1 (28sts)
Row 12 – purl across
Row 13 – k1, ssk, k22, k2tog, k1 (26sts)
Row 14 – purl across
Row 15 – k1, ssk, k20, k2tog, k1 (24sts)
Row 16 – purl across
Row 17 – k1, ssk, k18, k2tog, k1 (22sts)
Row 18 – purl across
Row 19 – k1, ssk, k16, k2tog, k1 (20sts)
Row 20 – purl across
Row 21 – k1, ssk, k14, k2tog, k1 (18sts)
Row 22 – purl across
Row 23 – k1, ssk, k12, k2tog, k1 (16sts)
Row 24 – purl across
Row 25 – knit across
Now you will kitchener st the front and back leg opening pieces together (making sure wrong sides are facing each other).
Neck Edging – using your crochet hook – with right side facing sl1 into the edge st under the first yo, ch3, sl1 into first ch, ch1, sl1 into edge st under the next w2, [ch3, sl1 into first ch, ch1, sl1 into edge st under the next w2], repeat [to] until you reach the edge under the last yo, sl1 into the edge st under the last yo.
Weave in all ends. Block as needed.
6 MONTH
YOKE
Cast on 73sts.
Row 1 (wrong side) – k5, p63, k5
Row 2 – knit across
Row 3 – k5, p63, k5
Row 4 – buttonhole row – k2, yo, k2tog, k1, yo, sl1, k2tog, psso, [w2, sl1, k2tog, psso] repeat [to] to last 5sts, yo, k5
Row 5 – k5, p2, p1 into 1st wrap, k1 into 2nd wrap, [p1, p1 into 1st wrap, k1 into 2nd wrap] repeat [to] to last 7sts, p2, k5
Row 6 – k8, [m1, k6] repeat [to] to last 5 sts, k5 (83sts)
Row 7 – k5, p to last 5 sts, k5
Row 8 – knit across
Row 9 – k5, p to last 5 sts, k5
Row 10 – k8, [m1, k7] repeat [to] to last 5 sts, k5 (93sts)
Row 11 – k5, p to last 5 sts, k5
Row 12 – knit across
Row 13 – k5, p to last 5 sts, k5
Row 14 – k8, [m1, k8] repeat [to] to last 5 sts, k5 (103sts)
Row 15 – k5, p to last 5 sts, k5
Row 16 – knit across
Row 17 – k5, p to last 5 sts, k5
Row 18 – k8, [m1, k9] repeat [to] to last 5 sts, k5 (113sts)
Row 19 – k5, p to last 5 sts, k5
Row 20 – knit across
Row 21 – k5, p to last 5 sts, k5
Row 22 – buttonhole row- k2, yo, k2tog k4, [m1, k10] repeat [to] to last 5 sts, k5 (123sts)
Row 23 – k5, p to last 5 sts, k5
Row 24 – knit across
Row 25 – k5, p to last 5 sts, k5
Row 26 – k8, [m1, k11] repeat [to] to last 5 sts, k5 (133sts)
Row 27– k5, p to last 5 sts, k5
Row 28 – knit across
Row 29 – k5, p to last 5 sts, k5
Row 30 – k8, [m1, k12] repeat [to] to last 5 sts, k5 (143sts)
Row 31 – k5, p to last 5 sts, k5
Row 32 – knit across
Row 33 – k5, p to last 5 sts, k5
ARMS
Row 34 – k23, bind off 27, k42, bind off 27, k24 (89sts)
Row 35 – k5, purl to armhole, cast on 2, place marker, purl to armhole, place marker (this will become your start of round marker when you join in the round), cast on 2, purl to last 5sts, k5 (93sts)
BODY
Row 36 – knit across
Row 37 – k5, purl across to last 5sts, k5
Repeat rows 32 and 33 1 more time
Row 40 – buttonhole row – k2, yo, k2tog, k89
Row 41 – k5, p to last 5 sts, k5
Row 42- knit across
Row 43 – k5, p to last 5 sts, k5
Row 44 – knit to the last 5 sts, join the button band as follows: Place the remaining 5 sts of the row on a spare needle. You will now start working in the round. Place the remaining 5 stitches on your needle from the previous row behind the first 4 sts of the row stacking them so you can knit them together (making sure the right side is facing you. Remember we are joining in the round so make sure there is no twist in your work.) Now knit the 1st of the remaining sts together with the first st of the row. Do this 4 more times. (a tutorial for this will be at the end if you need photos) (88sts)
Continue working in stockinette stitch until your work measures 9ins from row 35 armhole cast on.
LEGS
Starting at your beginning of round marker you will now start working flat again:
Row 1 – k1, ssk, k36, k2tog, k1 (40sts) keep the remaining 46 back stitches on a stitch holder. Turn work.
Row 2 – purl across
Row 3 – k1, ssk, k34, k2tog, k1 (38sts)
Row 4 – purl across
Row 5 – k1, ssk, k32, k2tog, k1 (36sts)
Row 6 – purl across
Row 7 – k1, ssk, k30, k2tog, k1 (34sts)
Row 8 – purl across
Row 9 – k1, ssk, k28, k2tog, k1 (32sts)
Row 10 – purl across
Row 11 – k1, ssk, k26, k2tog, k1 (30sts)
Row 12 – purl across
Row 13 – k1, ssk, k24, k2tog, k1 (28sts)
Row 14 – purl across
Row 15 – k1, ssk, k22, k2tog, k1 (26sts)
Row 16 – purl across
Row 17 – k1, ssk, k20, k2tog, k1 (24sts)
Row 18 – purl across
Row 19 – k1, ssk, k18, k2tog, k1 (22sts)
Row 20 – purl across
Row 21 – k1, ssk, k16, k2tog, k1 (20sts)
Row 22 – purl across
Row 23 – knit across
Row 24 – purl across
Row 25 – knit across
Leave the remaining 20sts on a stitch holder. Pick up the 46 sts for the back. Start work with right side facing.
Row 1 – k1, ssk, k40, k2tog, k1 (44sts)
Row 2 – purl across
Row 3 – k1, ssk, k38, k2tog, k1 (42sts)
Row 4 – purl across
Row 5 – k1, ssk, k36, k2tog, k1 (40sts).
Row 6 – purl across
Row 7 – k1, ssk, k34, k2tog, k1 (38sts)
Row 8 – purl across
Row 9 – k1, ssk, k32, k2tog, k1 (36sts)
Row 10 – purl across
Row 11 – k1, ssk, k30, k2tog, k1 (34sts)
Row 12 – purl across
Row 13 – k1, ssk, k28, k2tog, k1 (32sts)
Row 14 – purl across
Row 15 – k1, ssk, k26, k2tog, k1 (30sts)
Row 16 – purl across
Row 17 – k1, ssk, k24, k2tog, k1 (28sts)
Row 18 – purl across
Row 19 – k1, ssk, k22, k2tog, k1 (26sts)
Row 20 – purl across
Row 21 – k1, ssk, k20, k2tog, k1 (24sts)
Row 22 – purl across
Row 23 – k1, ssk, k18, k2tog, k1 (22sts)
Row 24 – purl across
Row 25 – k1, ssk, k16, k2tog, k1 (20sts)
Row 26 – purl across
Row 27 – knit across
Now you will kitchener st the front and back leg opening pieces together (making sure wrong sides are facing each other).
Neck Edging – using your crochet hook – with right side facing sl1 into the edge st under the first yo, ch3, sl1 into first ch, ch1, sl1 into edge st under the next w2, [ch3, sl1 into first ch, ch1, sl1 into edge st under the next w2], repeat [to] until you reach the edge under the last yo, sl1 into the edge st under the last yo.
Weave in all ends. Block as needed.

Stitch Key and Tutorials
K – knit
P – purl
k2tog – knit 2 together
sl – slip
yo – yarn over
sm – slip marker
w2 – yo 2 times
m1 – make one
ssk – slip, slip, knit
JOINING IN THE ROUND
Place the remaining 4 sts of the row on a spare needle. You will now start working in the round. Place the remaining 4 stitches on your needle from the previous row in front of the first 4 sts of the row stacking them so you can knit them together (making sure the right side is facing you. Remember we are joining in the round so make sure there is no twist in your work.) Now knit the 1st of the remaining sts together with the first st of the row. Do this 3 more times. Now your work is joined in the round with a 4 stitch overlap.
Download Willow Onesie Pattern

Disclaimer: This page contains affiliate links. If you choose to make a purchase after clicking a link, I may receive a commission at no additional cost to you. Thank you for your support!
Comments are closed.