
Discover your next favorite free photo prop bonnet pattern! Find more charming photo prop patterns here.

Finding the Perfect Free Photo Prop Bonnet Pattern
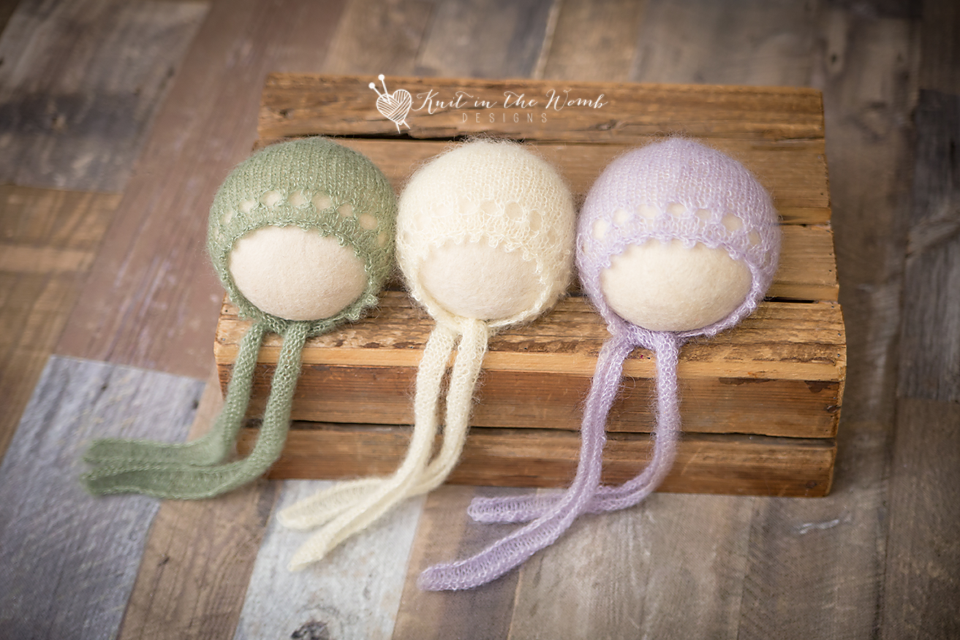
If you’re anything like me, you’re constantly on the lookout for adorable patterns to use as props for newborn photography. There’s something so special about capturing those fleeting, tiny moments, and props can truly elevate your photos to the next level. Today, I’m excited to share a gorgeous, delicate, and dreamy piece—my latest free photo prop bonnet pattern!
Before we dive in, here’s a quick heads-up: the Willow Bonnet pattern featured in this post is available at the very bottom (yay!), but if you’re itching to explore even more lovely creations, you can check out the rest of my collection on the free photo prop pattern page. Trust me, you won’t regret it!

Why You’ll Adore This Free Photo Prop Bonnet Pattern
I’m not exaggerating when I say that the Willow Bonnet stole my heart the second I knit it up. This beautiful bonnet is made from my absolute favorite yarn, KnitPicks Aloft (affiliate link). Aloft has quickly become my go-to yarn for photo props, and once you feel it, you’ll instantly understand why.
The secret to this free photo prop bonnet pattern’s dreamy look is in the luxurious mohair lace yarn. KnitPicks Aloft (affiliate link) has an incredible airy texture and gentle softness that’s unmatched. Made from mohair sourced from Angora goats, this yarn naturally captures and reflects light in the most stunning way, giving photos that delicate, angelic glow photographers (and parents!) can’t resist.

What Makes KnitPicks Aloft Yarn Special?
If you’re wondering why I’m always raving about KnitPicks Aloft (affiliate link), let me fill you in. Besides being incredibly soft (like, baby-soft!), it’s light as a feather. This airy quality means your little subjects stay comfortable, calm, and cozy throughout their newborn session—a big win for photographers and babies alike.
I also can’t help but appreciate the wide range of beautiful colors available. KnitPicks Aloft (affiliate link) offers everything from soft neutrals to vibrant hues, giving you endless possibilities for styling your photoshoots. My personal favorites are always the subtle, ethereal shades because they pair effortlessly with almost any theme.

Capturing Precious Newborn Moments with this Free Photo Prop Bonnet Pattern
Let’s talk newborn photography for a moment. Those first two weeks of a baby’s life are pure magic—babies are still curled up, sleepy, and adorable beyond words. This free photo prop bonnet pattern was specifically designed with this stage in mind. Its snug fit gently frames baby’s sweet little features, allowing just the right peek-a-boo glimpse of wispy hair underneath.
The lace pattern on this bonnet adds that elegant, timeless touch that transforms photos from cute to breathtakingly beautiful. Every stitch highlights the natural charm and innocence of your tiny subject, making it a must-have prop in your newborn photography toolkit.

Endless Styling Possibilities with One Free Photo Prop Bonnet Pattern
Versatility is my jam, and this free photo prop bonnet pattern doesn’t disappoint. Whether you’re a minimalist photographer who loves simplicity or someone who thrives on whimsical, fairy-tale scenes, this bonnet has got your back!
Pair it with a plain, soft backdrop to keep things fresh and clean, or style it with the matching onesie (find the pattern here) and mohair wraps (find five fabulous wrap patterns here). The bonnet’s elegant lace effortlessly complements any set-up, ensuring your photos never feel repetitive or dull.

More Than Just a Prop—A Treasured Keepsake
I’m always amazed by how a simple knitted piece can become a treasured keepsake. Parents love looking back on their newborn photos and reminiscing about those sweet early days. This free photo prop bonnet pattern, knit with KnitPicks Aloft (affiliate link), creates more than just memorable photos—it becomes part of a family’s story.
When crafting this pattern, I wanted it to feel special enough that parents would cherish it long after the photoshoot ends. Each stitch reflects thoughtfulness, comfort, and timeless style, making the Willow Bonnet more than just another adorable accessory.

Ready to Try This Free Photo Prop Bonnet Pattern Yourself?
I’m so excited for you to give this free photo prop bonnet pattern a try! Whether you’re a photographer building your prop stash, a parent looking to capture your newborn’s precious early days, or a fellow knitting enthusiast seeking your next creative project, you’ll fall in love with the Willow Bonnet’s delicate beauty.
You’ll find the Willow Bonnet pattern at the bottom of this post—just scroll down a bit! But remember, there’s a treasure trove of additional patterns over on my free photo prop pattern page, so head there next for even more inspiration!
A Final Thought on My Favorite Free Photo Prop Bonnet Pattern
There you have it—my complete love affair with the Willow Bonnet summed up in one fun, knitty-gritty blog post! I can’t wait to see the adorable images you create using this pattern. Be sure to tag me if you share your photos online because nothing brings me more joy than seeing my patterns in action.
Now, grab your KnitPicks Aloft (affiliate link), pick your favorite shade, and let’s get knitting!
Happy knitting, friends!

Materials and Info
Materials: 60-120 yds of lace weight (size 0) mohair yarn (I used KnitPicks Aloft) for the bonnet, appx 200yds for the wrap, size 7 (4.5mm) straight needles (for bonnet), size 9 (5.5mm) straight needles (for wrap), yarn needle, 2 stitch markers, size e (3.5mm) crochet hook (for bonnet), size g (4.mm) crochet hook (for wrap)
Gauge: 5sts/in ~GAUGE IS VERY IMPORTANT~
Head circumference: nb (13ins). 3mths (15ins), 6mth (16ins), 12mths (17ins)
Wrap width – appx 12ins

Willow Bonnet Pattern
NEWBORN
Cast on 170
*YOUR TIES ARE IN THIS CAST ON. YOU WILL BIND OFF ON ROW 8 TO FINISH THE TIES.*
Row 1 (wrong side) – P60, place marker, p50, place marker, p60
Row 2 – knit across
Row 3 – Purl across
Row 4 – k60, sm, k1, yo, sl1, k2tog, psso, [w2, sl1, k2tog, psso] repeat [to] to last st before marker, yo, k1, sm, k60
Row 5 – p60, sm, p3, p1 into 1st wrap, k1 into 2nd wrap, [p1, p1 into 1st wrap, k1 into 2nd wrap] repeat [to] to last 3 sts before marker, p3, sm, p60
Row 6 – knit across
Row 7 – purl across
Row 8 – bind off LOOSELY 60, remove marker, knit to next marker, remove marker, bind off LOOSELY 60. (50sts)
Cut Yarn. Rejoin at remaining sts.
Work in stockinette st starting with a purl row, until your work measures 3.75ins from cast on edge. Finish after completing a wrong side (purl) row. Place a marker on either end of your last row to mark where to sew the crown when completed.
DECREASES
Row 1 – k1 [k2tog, k4] repeat [to] across to last st, k1 (42sts)
Row 2 – purl across
Row 3 – k1 [k2tog, k3] repeat [to] across to last st, k1 (34sts)
Row 4 – purl across
Row 5 – k1 [k2tog, k2] repeat [to] across to last st, k1 (26sts)
Row 6 – purl across
Row 7 – k1 [k2tog, k1] repeat [to] across to last st, k1 (18sts)
Row 8 – purl across
Row 9 – k1 [k2tog] repeat [to] across to last st, k1 (10sts)
Cut yarn leaving appx 12ins and pull through remaining stitches. Using this end sew the crown together to your stitch markers. (I like to use the mattress stitch since it is nearly invisible).
Edging – using your crochet hook with right side facing– sl1 into the edge st under the first yo, ch3, sl1 into first ch, ch1, sl1 into edge st under the next w2, [ch3, sl1 into first ch, ch1, sl1 into edge st under the next w2], repeat [to] until you reach the edge under the last yo, sl1 into the edge st under the last yo.
Weave in all ends. Block as needed. Finished size should be appx 5x5ins ties appx 12ins long.

0-3 months
Cast on 176
*YOUR TIES ARE IN THIS CAST ON. YOU WILL BIND OFF ON ROW 8 TO FINISH THE TIES.*
Row 1 (wrong side) – P60, place marker, p56, place marker, p60
Row 2 – knit across
Row 3 – Purl across
Row 4 – k60, sm, k1, yo, sl1, k2tog, psso, [w2, sl1, k2tog, psso] repeat [to] to last st before marker, yo, k1, sm, k60
Row 5 – p60, sm, p3, p1 into 1st wrap, k1 into 2nd wrap, [p1, p1 into 1st wrap, k1 into 2nd wrap] repeat [to] to last 3 sts before marker, p3, sm, p60
Row 6 – knit across
Row 7 – purl across
Row 8 – bind off LOOSELY 60, remove marker, knit to next marker, remove marker, bind off LOOSELY 60. (56sts)
Cut Yarn. Rejoin at remaining sts.
Work in stockinette st starting with a purl row, until your work measures 4.25ins from cast on edge. Finish after completing a wrong side (purl) row. Place a marker on either end of your last row to mark where to sew the crown when completed.
DECREASES
Row 1 – k1 [k2tog, k4] repeat [to] across to last st, k1 (47sts)
Row 2 – purl across
Row 3 – k1 [k2tog, k3] repeat [to] across to last st, k1 (38sts)
Row 4 – purl across
Row 5 – k1 [k2tog, k2] repeat [to] across to last st, k1 (29sts)
Row 6 – purl across
Row 7 – k1 [k2tog, k1] repeat [to] across to last st, k1 (20sts)
Row 8 – purl across
Row 9 – k1 [k2tog] repeat [to] across to last st, k1 (11sts)
Cut yarn leaving appx 12ins and pull through remaining stitches. Using this end sew the crown together to your stitch markers. (I like to use the mattress stitch since it is nearly invisible).
Edging – using your crochet hook with right side facing – sl1 into the edge st under the first yo, ch3, sl1 into first ch, ch1, sl1 into edge st under the next w2, [ch3, sl1 into first ch, ch1, sl1 into edge st under the next w2], repeat [to] until you reach the edge under the last yo, sl1 into the edge st under the last yo.
Weave in all ends. Block as needed. Finished size should be appx 5.5×5.5ins ties appx 12ins long.

3-6 months
Cast on 182
*YOUR TIES ARE IN THIS CAST ON. YOU WILL BIND OFF ON ROW 8 TO FINISH THE TIES.*
Row 1 (wrong side) – P60, place marker, p62, place marker, p60
Row 2 – knit across
Row 3 – Purl across
Row 4 – k60, sm, k1, yo, sl1, k2tog, psso, [w2, sl1, k2tog, psso] repeat [to] to last st before marker, yo, k1, sm, k60
Row 5 – p60, sm, p3, p1 into 1st wrap, k1 into 2nd wrap, [p1, p1 into 1st wrap, k1 into 2nd wrap] repeat [to] to last 3 sts before marker, p3, sm, p60
Row 6 – knit across
Row 7 – purl across
Row 8 – bind off LOOSELY 60, remove marker, knit to next marker, remove marker, bind off LOOSELY 60. (62sts)
Cut Yarn. Rejoin at remaining sts.
Work in stockinette st starting with a purl row, until your work measures 4.75ins from cast on edge. Finish after completing a wrong side (purl) row. Place a marker on either end of your last row to mark where to sew the crown when completed.
DECREASES
Row 1 – k1 [k2tog, k4] repeat [to] across to last st, k1 (52sts)
Row 2 – purl across
Row 3 – k1 [k2tog, k3] repeat [to] across to last st, k1 (42sts)
Row 4 – purl across
Row 5 – k1 [k2tog, k2] repeat [to] across to last st, k1 (32sts)
Row 6 – purl across
Row 7 – k1 [k2tog, k1] repeat [to] across to last st, k1 (22sts)
Row 8 – purl across
Row 9 – k1 [k2tog] repeat [to] across to last st, k1 (12sts)
Cut yarn leaving appx 12ins and pull through remaining stitches. Using this end sew the crown together to your stitch markers. (I like to use the mattress stitch since it is nearly invisible).
Edging – using your crochet hook with right side facing – sl1 into the edge st under the first yo, ch3, sl1 into first ch, ch1, sl1 into edge st under the next w2, [ch3, sl1 into first ch, ch1, sl1 into edge st under the next w2], repeat [to] until you reach the edge under the last yo, sl1 into the edge st under the last yo.
Weave in all ends. Block as needed. Finished size should be appx 6x6ins ties appx 12ins long.

6-12 months
Cast on 188
*YOUR TIES ARE IN THIS CAST ON. YOU WILL BIND OFF ON ROW 8 TO FINISH THE TIES.*
Row 1 (wrong side) – P60, place marker, p68, place marker, p60
Row 2 – knit across
Row 3 – Purl across
Row 4 – k60, sm, k1, yo, sl1, k2tog, psso, [w2, sl1, k2tog, psso] repeat [to] to last st before marker, yo, k1, sm, k60
Row 5 – p60, sm, p3, p1 into 1st wrap, k1 into 2nd wrap, [p1, p1 into 1st wrap, k1 into 2nd wrap] repeat [to] to last 3 sts before marker, p3, sm, p60
Row 6 – knit across
Row 7 – purl across
Row 8 – bind off LOOSELY 60, remove marker, knit to next marker, remove marker, bind off LOOSELY 60. (68sts)
Cut Yarn. Rejoin at remaining sts.
Work in stockinette st starting with a purl row, until your work measures 5.25ins from cast on edge. Finish after completing a wrong side (purl) row. Place a marker on either end of your last row to mark where to sew the crown when completed.
DECREASES
Row 1 – k1 [k2tog, k20] repeat [to] across to last st, k1 (65sts)
Row 2 – purl across
Row 3 – k1 [k2tog, k5] repeat [to] across to last st, k1 (56sts)
Row 4 – purl across
Row 5 – k1 [k2tog, k4] repeat [to] across to last st, k1 (47sts)
Row 6 – purl across
Row 7 – k1 [k2tog, k3] repeat [to] across to last st, k1 (38sts)
Row 8 – purl across
Row 9 – k1 [k2tog, k2] repeat [to] across to last st, k1 (29sts)
Row 10 – purl across
Row 11 – k1 [k2tog, k1] repeat [to] across to last st, k1 (20sts)
Row 12 – purl across
Row 13 – k1 [k2tog] repeat [to] across to last st, k1 (11sts)
Cut yarn leaving appx 12ins and pull through remaining stitches. Using this end sew the crown together to your stitch markers. (I like to use the mattress stitch since it is nearly invisible).
Edging – using your crochet hook with right side facing – sl1 into the edge st under the first yo, ch3, sl1 into first ch, ch1, sl1 into edge st under the next w2, [ch3, sl1 into first ch, ch1, sl1 into edge st under the next w2], repeat [to] until you reach the edge under the last yo, sl1 into the edge st under the last yo.
Weave in all ends. Block as needed. Finished size should be appx 6.5×6.5ins ties appx 12ins long.

Wrap
Cast on 53sts using your favorite stretchy cast on.
Row 1 (wrong side) – purl across
Row 2 – knit across
Row 3 – Purl across
Row 4 –k1, yo, sl1, k2tog, psso, [w2, sl1, k2tog, psso] repeat [to] to last st, yo, k1
Row 5 –p3, p1 into 1st wrap, k1 into 2nd wrap, [p1, p1 into 1st wrap, k1 into 2nd wrap] repeat [to] to last 3 sts p3
Work in stockinette st until appx 1.25ins before your desired length, ending after completing a wrong side row.
Row 1 –k1, yo, sl1, k2tog, psso, [w2, sl1, k2tog, psso] repeat [to] to last st, yo, k1
Row 2 –p3, p1 into 1st wrap, k1 into 2nd wrap, [p1, p1 into 1st wrap, k1 into 2nd wrap] repeat [to] to last 3 sts p3
Row 3 – knit across
Row 4 – purl across
Bind off using your favorite stretchy bind off.
Edging – using your crochet hook with right side facing – sl1 into the edge st under the first yo, ch3, sl1 into first ch, ch1, sl1 into edge st under the next w2, [ch3, sl1 into first ch, ch1, sl1 into edge st under the next w2], repeat [to] until you reach the edge under the last yo, sl1 into the edge st under the last yo.
Weave in all ends. Block as needed.

Stitch Key
K – knit
P – purl
k2tog – knit 2 together
sl – slip
yo – yarn over
sm – slip marker
w2 – yo 2 times

Download Willow Bonnet PDF

Disclaimer: This page contains affiliate links. If you choose to make a purchase after clicking a link, I may receive a commission at no additional cost to you. Thank you for your support!