
Looking for the perfect vintage-inspired newborn photo prop? This free flower sleep cap knitting pattern is soft, lacy, and oh-so-dreamy! Make sure to visit the free photo prop page for more beautiful prop patterns

A Cozy, Lacy, and Free Flower Sleep Cap Knitting Pattern
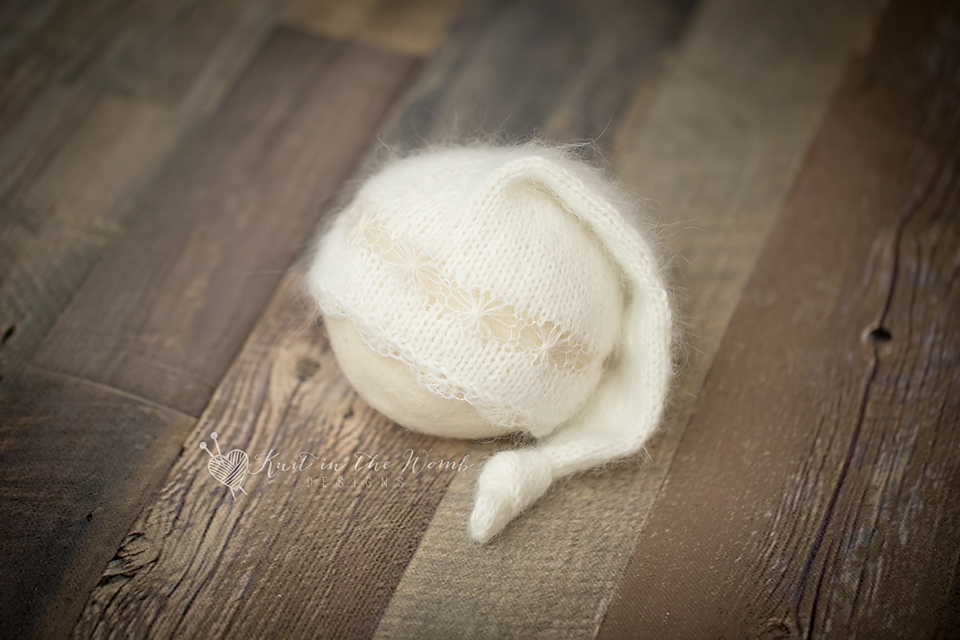
When I set out to create this free flower sleep cap knitting pattern, I wanted something delicate and feminine but also practical enough to be a newborn photo prop. If you’re anything like me, you love patterns that strike that balance—beautiful details but simple enough to knit without pulling your hair out.
The design blends the charm of my Daisy Bonnet with the relaxed, vintage feel of a sleep cap. The result? A dainty little bonnet that frames a baby’s face and a sweet floral motif. It’s one of those patterns that looks intricate but is actually very beginner-friendly, making it perfect whether you’re an experienced knitter or just getting started.
Why You’ll Love This Free Flower Sleep Cap Knitting Pattern
There’s something about a flower bonnet that instantly gives off a timeless, heirloom feel. Maybe it’s the delicate stitchwork or the way the soft yarn makes the petals pop. Either way, this free flower sleep cap knitting pattern is guaranteed to add a touch of vintage charm to any newborn’s wardrobe.
Here’s why you’ll love knitting it:
✔️ Soft & Fluffy – The yarn used in this pattern is plush and cozy, giving the bonnet that dreamy, cloud-like texture.
✔️ Easy to Customize – Whether you go for a soft pastel or a bold hue, this pattern adapts beautifully to different color palettes.
✔️ Beginner-Friendly – While the daisy motif looks intricate, the stitch pattern is easy to follow, making it a great project for all skill levels.
✔️ Perfect for Photos – This bonnet is a stunning addition to any newborn photo session, adding a delicate, vintage touch.
The Yarn That Brings It All Together
This bonnet was originally designed with a luxurious, fluffy yarn that has since been discontinued. But don’t worry! If you love the look of the Daisy Bonnet, then KnitPicks Capra (affiliate link) and KnitPicks Aloft (affiliate link) work perfectly as substitutes. These yarns give the bonnet the same finish as Daisy Bonnet that makes the floral details pop.
How to Make This Free Flower Sleep Cap Knitting Pattern
This free flower Sleep Cap knitting pattern follows a simple structure:
- Knit the Sleep Cap Shape – This pattern is knit flat and then seamed up the back for a perfect fit.
- Create the Delicate Daisy Motif – Using simple increases and decreases, the flower pattern forms naturally as you knit.
- Add the Edging – A soft, rolled edge gives this bonnet its sweet, relaxed sleep cap style.
The instructions are written clearly so you won’t be left guessing. And since the daisy motif is easy to memorize, this project knits up surprisingly fast!
Styling Your Free Flower Sleep Cap Knitting Pattern
One of my favorite things about this free flower sleep cap knitting pattern is how versatile it is. Whether you want something dainty and classic or bold and modern, this pattern delivers.
For a traditional look, go with soft neutrals—cream, dusty rose, or light gray. If you’re feeling adventurous, try a deep mustard or a rich forest green for a more vintage-inspired vibe. No matter what you choose, a fluffy or smooth yarn, the floral texture stand out beautifully.
The Perfect Handmade Gift
If you love gifting your knitted pieces, this free flower sleep cap knitting pattern is a wonderful choice. Handmade baby items are always special, but a bonnet like this—soft, delicate, and filled with charm—is extra meaningful.
Picture this: a sweet little baby bundled up in a onesie, wearing this dainty floral bonnet. It’s the kind of keepsake item that parents will cherish forever. You might even find yourself making more than one because everyone will be asking for one!
Grab Your Free Flower Bonnet Knitting Pattern
I love sharing patterns that bring joy to other knitters, and this free flower sleep cap knitting pattern is one of my favorites. It’s an easy yet satisfying knit that results in something truly special.
To get started, grab your needles, pick up some soft, soft yarn, scroll down and download the free pattern pdf.
Happy knitting! 💕

Materials and Info
Materials: appx 90-250yd dk weight yarn and 20 or so yds of lace weight mohair (I used KnitPicks Aloft), size 6 (4mm) dpn or size needed to obtain gauge), 4mm crochet hook for the crochet edge
Gauge: appx 5sts/inch Gauge is very important!
Sizes (appx finished head circumference) : newborn (13ins), 0-3mths (14 ins), 3-6mths (15ins), 6-12mths (16.5ins)

Daisy Sleep Cap Pattern
NEWBORN
Cast on 66 stitches in your dk weight yarn. Join in the round.
Work 3/4in of stockinette stitch.
Cut yarn (leaving enough to weave in ends) and pick up mohair yarn.
LACE PANEL
Round 1 – knit across
Round 2 – [p5 wrapping your yarn 3 times with each st, p1] repeat [to] across
Round 3 – [yarn back, sl purlwise into the first wrap of each of the next 5 sts, wrap your yarn around these 5 stitches twice back to front (picture tutorial at the end of pattern), p1] repeat [to] across
Round 4 – purl across
Cut yarn (leaving enough to weave in ends) and pick up dk yarn.
Work in stockinette st until your work measures 3ins from cast on edge.
DECREASES
Round 1 – [k2tog, k9] repeat [to] across (60st)
Round 2-6 – knit around
Round 7 – [k2tog, k8] repeat [to] across (54st)
Round 8-12 – knit around
Round 13 – [k2tog, k7] repeat [to] across (48st)
Round 14-18 – knit around
Round 19 – [k2tog, k6] repeat [to] across (42st)
Round 20-24 – knit around
Round 25 – [k2tog, k5] repeat [to] across (36st)
Round 26-30 – knit around
Round 31 –[k2tog, k4] repeat [to] across (30st)
Round 32-36 – knit around
Round 37 – [k2tog, k3] repeat [to] across (24st)
Round 38-42 – knit around
Round 43 – [k2tog, k2] repeat [to] across (18st)
Round 44-48 – knit around
Round 49 – [k2tog, k1] repeat [to] across (12st)
Knit for a further 4ins. Do not bind off. Cut yarn leaving appx -10ins. Pull yarn through remaining stitches top stitches together tightly. Tie a knot in the top.
EDGE
With your crochet hook and mohair yarn join yarn in first stitch on your cast on edge.
Sc, [skip 2 sts 5dc into next st, skip 2 sts, sc] repeat [to] across cast on edge.
Weave in ends.
0-3 MONTHS
Cast on 70 stitches in your dk weight yarn. Join in the round.
Work 3/4in of stockinette stitch.
Cut yarn (leaving enough to weave in ends) and pick up mohair yarn.
LACE PANEL
Round 1 – knit across
Round 2 – [p6 wrapping your yarn 3 times with each st, p1] repeat [to] across
Round 3 – [yarn back, sl purlwise into the first wrap of each of the next 6 sts, wrap your yarn around these 6 stitches twice back to front (picture tutorial at the end of pattern), p1] repeat [to] across
Round 4 – purl across
Cut yarn (leaving enough to weave in ends) and pick up dk yarn.
Work in stockinette st until your work measures 3.5ins from cast on edge.
DECREASES
Round 1 – [k2tog, k8] repeat [to] across (63st)
Round 2-7 – knit around
Round 8 – [k2tog, k7] repeat [to] across (56st)
Round 9-14 – knit around
Round 15 – [k2tog, k6] repeat [to] across (49st)
Round 16-21 – knit around
Round 22 – [k2tog, k5] repeat [to] across (42st)
Round 23-28 – knit around
Round 29 –[k2tog, k4] repeat [to] across (35st)
Round 30-35 – knit around
Round 36 – [k2tog, k3] repeat [to] across (28st)
Round 37-42 – knit around
Round 43 – [k2tog, k2] repeat [to] across (21st)
Round 44-49 – knit around
Round 50 – [k2tog, k1] repeat [to] across (14st)
Knit for a further 4ins. Do not bind off. Cut yarn leaving appx -10ins. Pull yarn through remaining stitches top stitches together tightly. Tie a knot in the top.
EDGE
With your crochet hook and mohair yarn join yarn in first stitch on your cast on edge.
Sc, [skip 2 sts 5dc into next st, skip 2 sts, sc] repeat [to] across cast on edge.
Weave in ends.
3-6 MONTHS
Cast on 77 stitches in your dk weight yarn. Join in the round.
Work 3/4in of stockinette stitch.
Cut yarn (leaving enough to weave in ends) and pick up mohair yarn.
LACE PANEL
Round 1 – knit across
Round 2 – [p6 wrapping your yarn 3 times with each st, p1] repeat [to] across
Round 3 – [yarn back, sl purlwise into the first wrap of each of the next 6 sts, wrap your yarn around these 6 stitches twice back to front (picture tutorial at the end of pattern), p1] repeat [to] across
Round 4 – purl across
Cut yarn (leaving enough to weave in ends) and pick up dk yarn.
Work in stockinette st until your work measures 4ins from cast on edge.
DECREASES
Round 1 – [k2tog, k9] repeat [to] across (70st)
Round 2-6 – knit around
Round 7 – [k2tog, k8] repeat [to] across (63st)
Round 8-12 – knit around
Round 13 – [k2tog, k7] repeat [to] across (56st)
Round 14-18 – knit around
Round 19 – [k2tog, k6] repeat [to] across (49st)
Round 20-24 – knit around
Round 25 – [k2tog, k5] repeat [to] across (42st)
Round 26-30 – knit around
Round 31 –[k2tog, k4] repeat [to] across (35st)
Round 32-36 – knit around
Round 37 – [k2tog, k3] repeat [to] across (28st)
Round 38-42– knit around
Round 43 – [k2tog, k2] repeat [to] across (21st)
Round 44-48 – knit around
Round 49 – [k2tog, k1] repeat [to] across (14st)
Knit for a further 4ins. Do not bind off. Cut yarn leaving appx -10ins. Pull yarn through remaining stitches top stitches together tightly. Tie a knot in the top.
EDGE
With your crochet hook and mohair yarn join yarn in first stitch on your cast on edge.
Sc, [skip 2 sts 5dc into next st, skip 2 sts, sc] repeat [to] across cast on edge.
Weave in ends.
6-12 MONTHS
Cast on 84 stitches in your dk weight yarn. Join in the round.
Work 1in of stockinette stitch.
Cut yarn (leaving enough to weave in ends) and pick up mohair yarn.
LACE PANEL
Round 1 – knit across
Round 2 – [p5 wrapping your yarn 3 times with each st, p1] repeat [to] across
Round 3 – [yarn back, sl purlwise into the first wrap of each of the next 5 sts, wrap your yarn around these 5 stitches twice back to front (picture tutorial at the end of pattern), p1] repeat [to] across
Round 4 – purl across
Cut yarn (leaving enough to weave in ends) and pick up dk yarn.
Work in stockinette st until your work measures 4.5ins from cast on edge.
DECREASES
Round 1 – [k2tog, k19] repeat [to] across (80sts)
Round 2-7 – knit around
Round 8 – [k2tog, k8] repeat [to] across (63st)
Round 9-14 – knit around
Round 15 – [k2tog, k7] repeat [to] across (56st)
Round 16-21 – knit around
Round 22 – [k2tog, k6] repeat [to] across (49st)
Round 23-28 – knit around
Round 29 – [k2tog, k5] repeat [to] across (42st)
Round 30-35 – knit around
Round 36 –[k2tog, k4] repeat [to] across (35st)
Round 37-42 – knit around
Round 43 – [k2tog, k3] repeat [to] across (28st)
Round 44-49 – knit around
Round 50 – [k2tog, k2] repeat [to] across (21st)
Round 51-56 – knit around
Round 57 – [k2tog, k1] repeat [to] across (14st)
Knit for a further 4ins. Do not bind off. Cut yarn leaving appx -10ins. Pull yarn through remaining stitches top stitches together tightly. Tie a knot in the top.
EDGE
With your crochet hook and mohair yarn join yarn in first stitch on your cast on edge.
Sc, [skip 2 sts 5dc into next st, skip 2 sts, sc] repeat [to] across cast on edge.
Weave in ends.

Abbreviations and Tutorials
Stitch Key
K – knit
p – purl
w – wrap
sl – slip
K2tog – knit 2 stitches together
p2tog – purl 2 stitches together
Yo- yarn over
sc – single crochet
dc – double crochet
Tutorials
ROUND 3 TUTORIAL
LEFT HANDED

RIGHT HANDED

*NOTE: THIS TUTORIAL SHOWS THE 5 STICH DAISY STITCH. SOME SIZES US A 6 STITCH DAISY STITCH. BE SURE YOU ARE USING THE RIGHT NUMBER OF STITCHES FOR YOUR SIZE.*
Place your yarn to the back. Slip the first wrap only from the 5 3wrapped stitches, DROPPING THE NEXT 2 WRAPS from Round 2 purlwise (making a long stitch). Now wrap your yarn around the post of those long stitches twice, back to front. You will need to move your stitches from holding needle to working needle as you do this. Or you could place these 5 long stitched on a safety pin, stitch marker or cable needle and wrap around them. Your daisy is now formed. Bring your yarn to the front to purl your next stitch.
Download Daisy Sleep Cap PDF

Disclaimer: This page contains affiliate links. If you choose to make a purchase after clicking a link, I may receive a commission at no additional cost to you. Thank you for your support!