
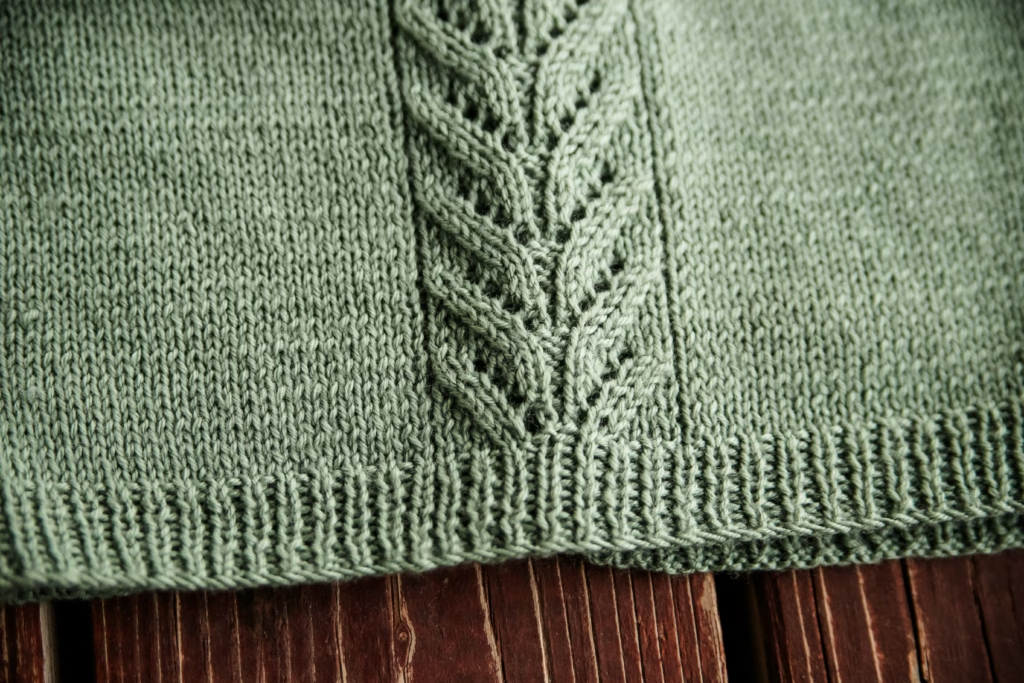
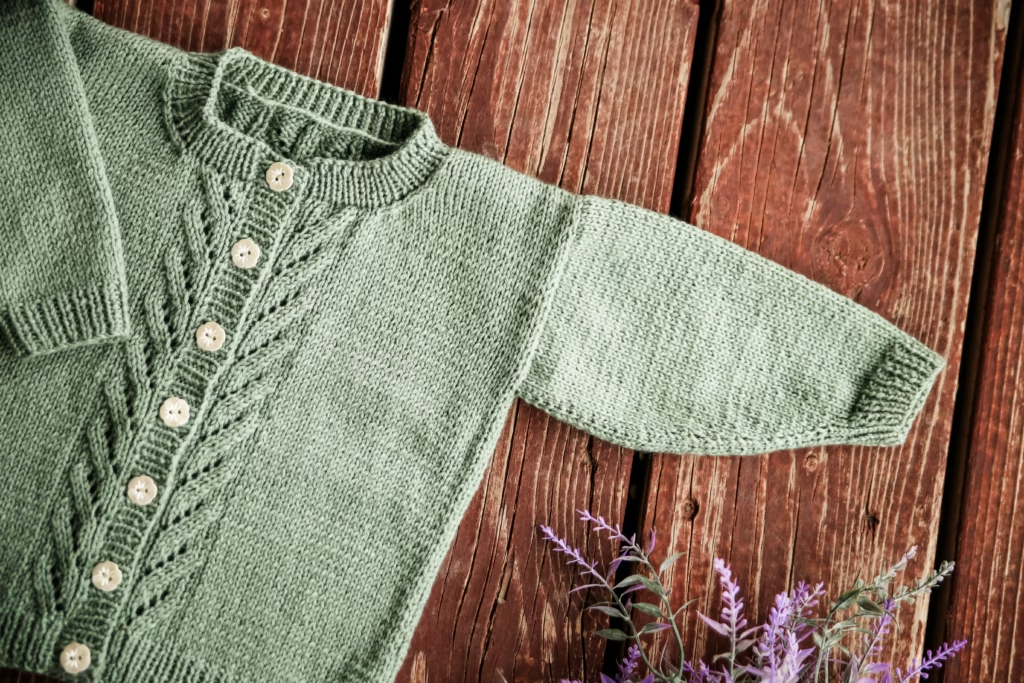
If you have been looking for a free baby cardigan knitting pattern that feels classic, sweet, and just detailed enough to keep your needles interested, meet the Baby Lydia Cardigan! This newest addition to my free sweater knitting patterns collection is a drop sleeve, crew neck cardigan with delicate lace panels running up both fronts and another lace panel centered beautifully on the back.
The Baby Lydia Cardigan gives you all the charm of lace without covering the entire sweater in a complicated stitch pattern. Most of the cardigan stays simple and classic, while those carefully placed lace panels add just enough detail to make the finished sweater feel extra special. If you love baby knits that can work for everyday outfits, gifts, photos, or special occasions, this free baby cardigan knitting pattern is such a fun one to cast on.
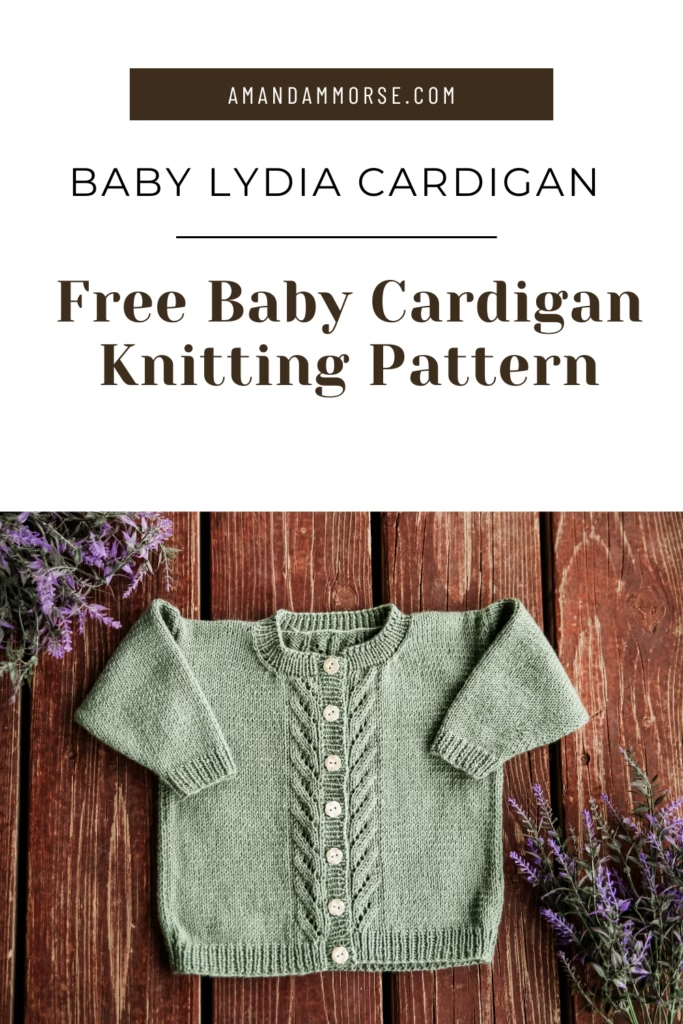
I especially love the balance in this cardigan. The lace creates that pretty heirloom-style look, but the simple drop sleeve construction keeps the overall sweater relaxed and wearable.
And because the lace runs vertically along the fronts and center back, you get something interesting to knit without having to follow lace across every single stitch of every row.
It is the kind of baby cardigan that looks fancy when it is finished but still feels very approachable while you are knitting it.
What Yarn and Needles Do You Need for This Free Baby Cardigan Knitting Pattern?
For the Baby Lydia Cardigan, I used KnitPicks Mighty Stitch Fingering with 3mm and 2.5mm knitting needles.
I have used Mighty Stitch Fingering for several baby projects now, and it works especially well when I want a lightweight sweater with nice stitch definition. I talked more about why I like it in my review of the best yarns for baby sweaters, where Mighty Stitch Fingering was my overall pick for baby sweater knitting.
It is an 80% acrylic and 20% superwash wool fingering-weight yarn, so you get a little bit of wool warmth while still keeping the finished cardigan practical for real baby life. The lighter weight also makes it easy to layer without creating a bulky sweater.
The 3mm needles are used to create the main fabric, while the smaller 2.5mm needles help keep the ribbed edges neat and structured.
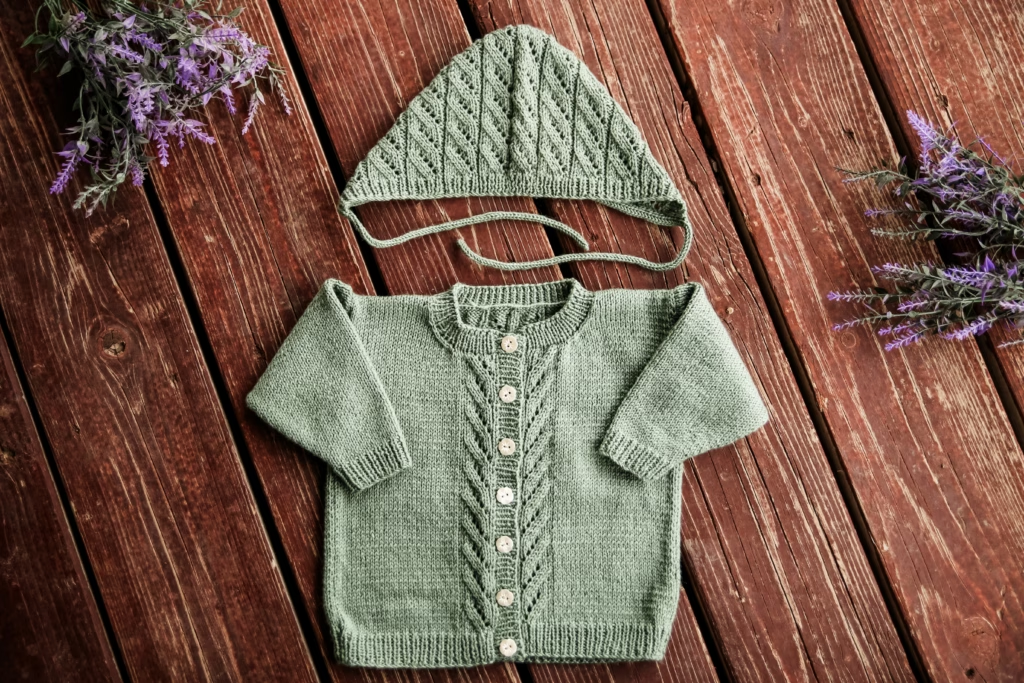
One thing I really like about using a smooth fingering-weight yarn for this design is how clearly you can see the lace panels. A solid or lightly heathered shade lets those yarn overs and decreases stand out instead of disappearing into a busy colorway.
And since this is a baby cardigan, that finer yarn creates a finished sweater that feels light enough to layer over a onesie, dress, or little collared shirt.
You get plenty of pretty detail without ending up with a heavy sweater on a tiny person.
How Is the Baby Lydia Cardigan Knitted?
The Baby Lydia Cardigan uses a classic drop sleeve construction with a crew neckline. The lace is placed strategically rather than worked across the entire cardigan, with a panel traveling up each front and one centered up the back.
That placement is one of my favorite things about this free baby cardigan knitting pattern. You still get plenty of relaxing knitting between lace repeats, but there is enough going on to keep the project from becoming boring.
If you are newer to lace, take your time with the lace rows and get into the habit of checking your stitch count after completing a patterned row. Yarn overs paired with decreases are easy once you settle into the repeat, but catching a missed yarn over right away is much easier than discovering it several rows later!
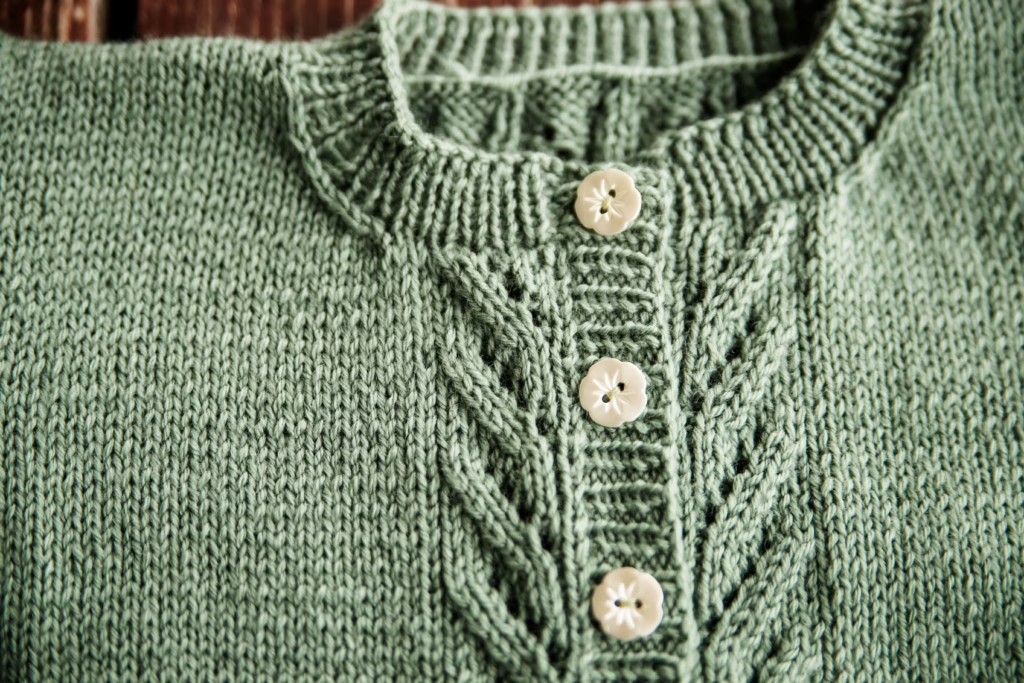
I also recommend blocking the finished cardigan before sewing on your buttons and calling it done. Lace can look a little scrunched while it is still on the needles, and blocking gives those stitches room to open and show off the pattern.
Pay special attention to the center back lace panel while blocking so it stays centered and straight. The same goes for the two front panels—taking a few minutes to line everything up makes the finished cardigan look wonderfully polished.
The drop sleeve shape keeps the construction nice and straightforward, which lets those lace details be the star of the sweater.
What Should You Knit After the Baby Lydia Cardigan?
If you love knitting tiny cardigans as much as I do, there are plenty more waiting for you! Each one has a slightly different construction or stitch pattern, so you can keep building those sweater-knitting skills without making the exact same project over and over.
The Baby Simone Cardigan is an especially fun next project if you want to keep working with fingering-weight yarn but try a different sweater construction. It uses Mighty Stitch Fingering too, but switches things up with top-down raglan shaping.
If you really love the traditional construction of the Baby Lydia Cardigan, both the Baby Wheat and Baby Damask cardigans are wonderful options. They keep that classic drop sleeve silhouette but use their stitch patterns in very different ways.
The Baby John Hooded Cardigan is another great choice when you want something a little simpler. Its stockinette fabric lets you settle into an easy rhythm, while the hood gives the finished sweater a completely different look.
Baby Lydia Cardigan Free Pattern
Size: 0-3m, 3-6m (6-12m, 12m) 18m, 24m
Materials: Approximately 320, 375 (444, 517) 579, 636 yds of KnitPicks Mighty Stitch Fingering 437yds/ 100g, 3/8in buttons, yarn needle, stitch markers
Needle Size: 1(US) 2.5mm & 2(US) 3mm straight and dpn
Gauge (tension): 28sts & 40 rows to make 10cm square, using size 2(US) 3mm needles
Chest Measurement: 41, 44 (47, 50) 52, 54 cm or 16, 17.25 (18.5, 19.75) 20.5, 21.25ins
METHOD
This pattern is for a drop sleeve style that is worked flat from the bottom up with 10cm of ease.
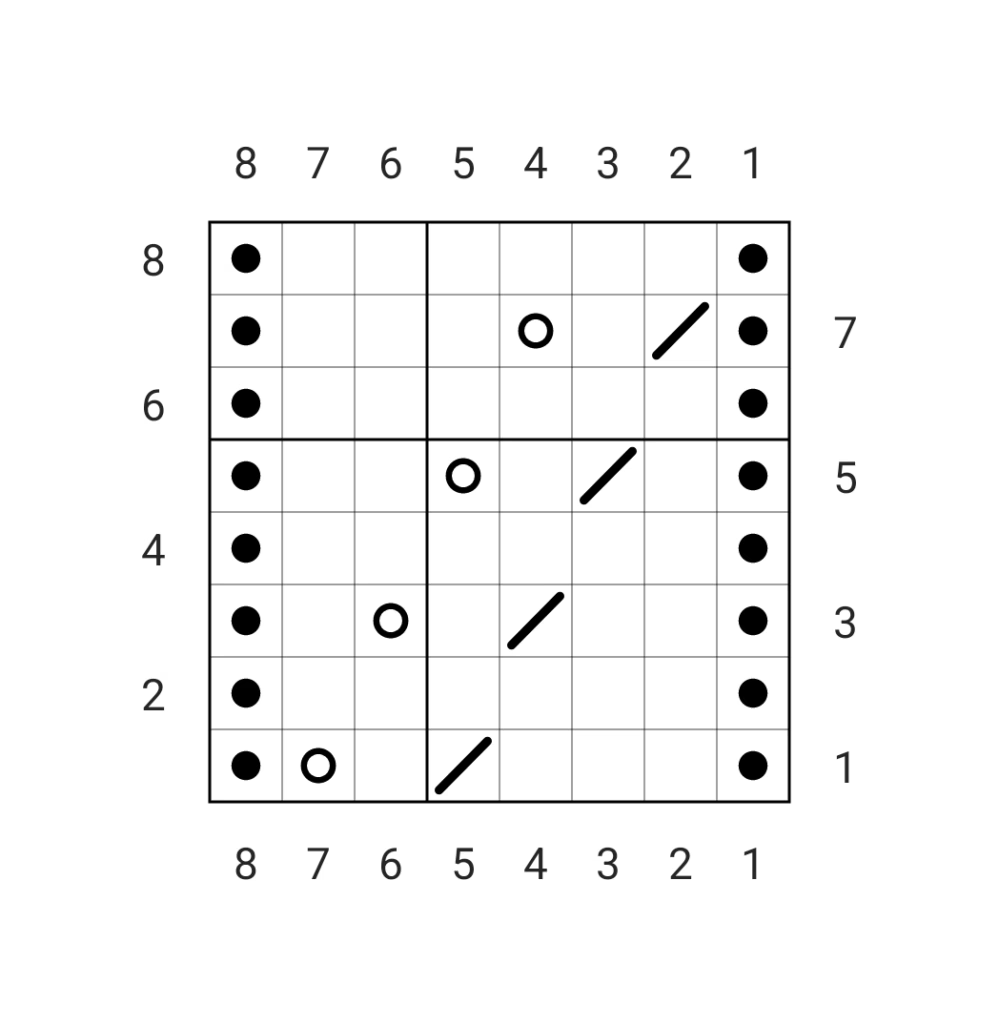
CHART A
Row 1 – Row 1 – p1, k3, k2tog, k1, yo, p1
Row 2 – k1, p6, k1
Row 3 – p1, k2, k2tog, k1, yo, k1, p1
Row 4 – k1, p6, k1
Row 5 – p1, k1, k2tog, k1, yo, k2, p1
Row 6 – k1, p6, k1
Row 7 – p1, k2tog, k1, yo, k3, p1
Row 8 – k1, p6, k1
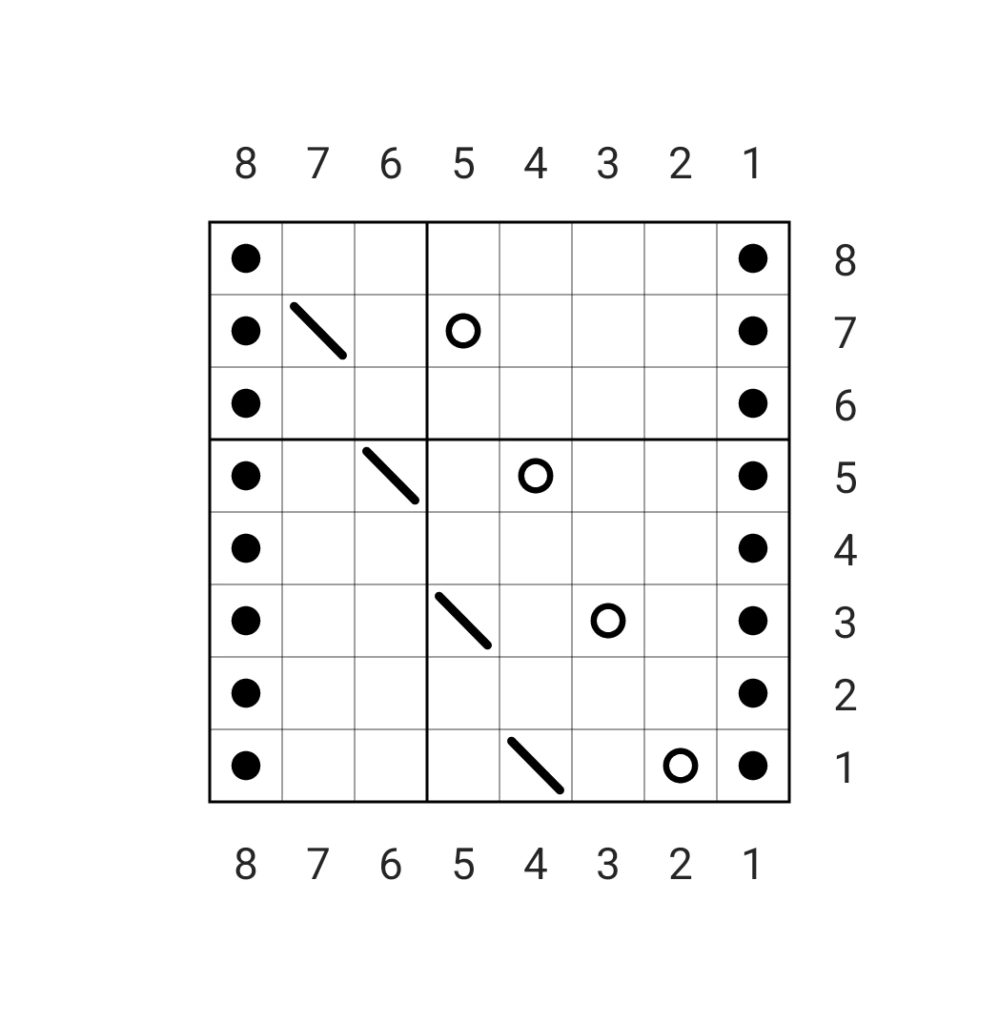
CHART B
Row 1 – p1, yo, k1, ssk, k3, p1
Row 2 – k1, p6, k1
Row 3 – p1, k1, yo, k1, ssk, k2, p1
Row 4 – k1, p6, k1
Row 5 – p1, k2, yo, k1, ssk, k1, p1
Row 6 – k1, p6, k1
Row 7 – p1, k3, yo, k1, ssk, p1
Row 8 – k1, p6, k1
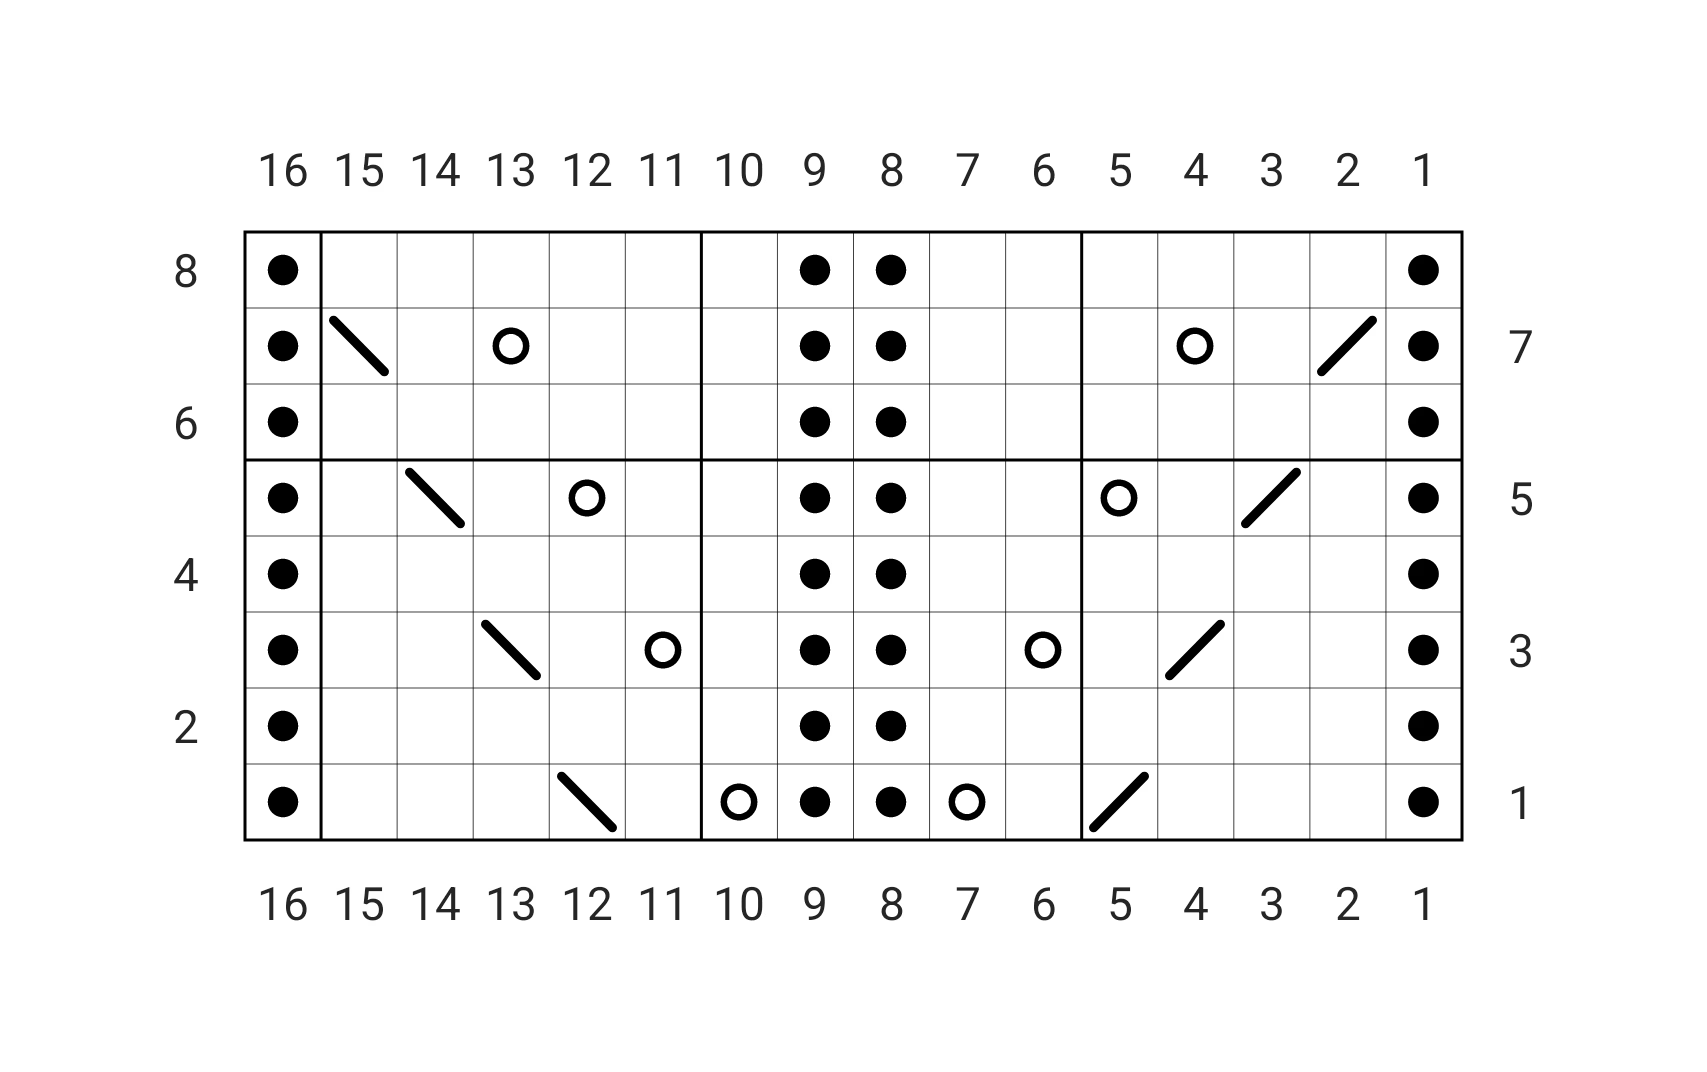
CHART C
Row 1 – p1, k3, k2tog, k1, yo, p2, yo, k1, ssk, k3, p1
Row 2 – k1, p6, k2, p6, k1
Row 3 – p1, k2, k2tog, k1, yo, k1, p2, k1, yo, k1, ssk, k2, p1
Row 4 – k1, p6, k2, p6, k1
Row 5 – p1, k1, k2tog, k1, yo, k2, p2, k2, yo, k1, ssk, k1, p1
Row 6 – k1, p6, k2, p6, k1
Row 7 – p1, k2tog, k1, yo, k3, p2, k3, yo, k1, ssk, p1
Row 8 – k1, p6, k2, p6, k1
BACK
Cast on 72, 76 (80, 84) 88, 90 sts using the smaller circular needles
Work 2, 2 (2.5, 2.5) 2.5, 2.5 cms or .75, .75 (1, 1) 1 1 ins of (k1, p1) rib.
Switch to larger size circular needles.
Work as follows: work in stockinette (knit every right-side row and purl every wrong side row) for 28, 30 (32, 34) 36, 37sts, pm, work 16sts in chart c, pm, work in stockinette for 28, 30 (32, 34) 36, 37st until your work measures 14, 15.5 (17.5, 19.5) 21, 22.5 cm or 5.5, 6 (7, 7.5) 8.25, 8.5) ins measured from the cast-on edge.
Place markers on each end of the row to mark armhole.
Continue working in pattern until work measures 22.5, 24.5 (27, 30) 32, 34 cms or 9, 10 (10.5, 12) 12.5, 13.5 ins from cast on edge ending after completing a wrong side row.
SHOULDERS
(24m only)
Bind off x, x (x, x) x, 7 sts at the beginning of the next 2 rows.
(all sizes)
Bind off 8, 9 (10, 10) 11, 7 sts at the beginning of the next row, work until 13, 13 (14, 15) 15, 13 sts are on the needle put remaining sts on a stitch holder or spare yarn
Turn and bind off 4, 4 (4, 4) 4, 4 sts, work to the end of the row.
Turn and bind off remaining 9, 9 (10, 11) 11, 9 sts
With right side facing, rejoin yarn to the sts on the stitch holder/spare yarn, bind off 30, 32 (32, 34) 36, 36 sts, work remaining sts.
Turn and bind off 8, 9 (10, 10) 11, 7 sts, work to the end of the row.
Turn and bind off 4, 4 (4, 4) 4, 4 sts, work to the end of the row.
Turn and bind off remaining 9, 9 (10, 11) 11, 9 sts
LEFT FRONT (if you knit left-handed this is your right front)
Cast on 35, 37 (39, 41) 43, 44 sts using smaller needle
Work 2, 2 (2, 2.5) 2.5, 2.5 cms or .75, .75 (.75, 1) 1 1 ins of (k1, p1) rib.
Switch to larger size circular needles.
Work as follows: work in stockinette (knit every right-side row and purl every wrong side row) for 2sts, pm, work 8sts in chart a, pm, work in stockinette for 25, 27 (29, 31) 33, 34sts until your work measures 14, 15.5 (17.5, 19.5) 21, 22.5 cm or 5.5, 6 (7, 7.5) 8.25, 8.5) ins measured from the cast-on edge.
Place marker at end of the row to mark armhole.
Continue working in pattern until work measures 17.5, 19.5 (22.5, 25) 27cm, 29 cms or 7, 7.5 (8.75, 9.75) 10.5, 11.5) ins from cast on edge ending after completing a right-side row.
NECK
Next row – Bind off 10, 11 (11, 12) 12, 12 sts, work to end of row
[25, 26 (28, 29) 31, 32 sts]
Decrease 1 sts at the neck edge of the next 5, 5 (5, 5) 5, 5 rows.
[20, 21 (23, 24) 26, 27 sts]
Decrease 1 sts at neck edge every other row 2, 2 (2, 2) 3, 3 times
[18, 19 (21, 22) 23, 24 sts]
Decrease 1 sts at neck edge every 4th row 1, 1 (1, 1) 1, 1 times
[17, 18 (20, 21) 22, 23 sts]
Continue in pattern until work measures 22.5, 24.5 (27, 30) 32, 34 cms or 9, 10 (10.5, 12) 12.5, 13.5 ins from cast on edge, ending after completing a wrong side row
SHOULDERS
(24m only)
Bind off x, x (x, x) x, 7 sts, work to end of row
Work the next row without shaping
(all sizes)
Bind off 8, 9 (10, 10) 11, 7 sts, work to end of row
Work the next row without shaping
Bind off remaining 9, 9 (10, 11) 11, 9 sts
RIGHT FRONT
Cast on 35, 37 (39, 41) 43, 44 sts using smaller needle
Work 2, 2 (2.5, 2.5) 2.5, 2.5 cms or .75, .75 (1, 1) 1 1 ins of (k1, p1) rib.
Switch to larger size circular needles.
Work as follows: work in stockinette (knit every right-side row and purl every wrong side row) for 25, 27 (29, 31) 33, 34sts, pm, work 8sts in chart b, pm, k2, until your work measures 14, 15.5 (17.5, 19.5) 21, 22.5 cm or 5.5, 6 (7, 7.5) 8.25, 8.5) ins measured from the cast-on edge.
Place marker at end of the row to mark armhole.
Continue working in pattern until work measures 17.5, 19.5 (22.5, 25) 27cm, 29 cms or 7, 7.5 (8.75, 9.75) 10.5, 11.5) ins from cast on edge ending after completing a wrong side row.
NECK
Next row – Bind off 10, 11 (11, 12) 12, 12 sts, work to end of row
[25, 26 (28, 29) 31, 32 sts]
Decrease 1 sts at the neck edge of the next 5, 5 (5, 5) 5, 5 rows.
[20, 21 (23, 24) 26, 27 sts]
Decrease 1 sts at neck edge every other row 2, 2 (2, 2) 3, 3 times
[18, 19 (21, 22) 23, 24 sts]
Decrease 1 sts at neck edge every 4th row 1, 1 (1, 1) 1, 1 times
[17, 18 (20, 21) 22, 23 sts]
Continue in pattern until work measures 22.5, 24.5 (27, 30) 32, 34 cms or 9, 10 (10.5, 12) 12.5, 13.5 ins from cast on edge, ending after completing a right side row
SHOULDERS
(24m only)
Bind off x, x (x, x) x, 7 sts, work to end of row
Work the next row without shaping
(all sizes)
Bind off 8, 9 (10, 10) 11, 7 sts, work to end of row
Work the next row without shaping
Bind off remaining 9, 9 (10, 11) 11, 9 sts
SLEEVES (MAKE 2)
Cast on now 36, 38 (38, 38) 40, 42 sts on smaller circular/straight needles.
Work 2, 2 (2, 2.5) 2.5, 2.5 cms or .75, .75 (.75, 1) 1 1 ins of (k1, p1) rib.
Switch to larger size circular needles
Work as follows: work in stockinette stitch (knit every right-side row and purl every wrong side row)
Work 4, 4 (4, 4) 4, 4 rows.
Next row: inc 1 sts on each end every right-side row 6, 5 (7, 8) 5, 5 times,
then every 4th row 2, 4 (5, 6) 9, 10 times.
[52, 56 (62, 66) 68, 72 sts]
Continue working in stockinette until work measures 11.5, 13.5 (15.5, 17.5) 19, 20.5 cms or 4.5, 5.25 (6, 7) 7.5, 8 ins from cast on edge.
Bind of all stitches.
NECK
Join both shoulder seams, using yarn on a tapestry/yarn needle.
With right side facing and smaller needles pick up and knit 10, 11 (11, 12) 12, 12 sts along right from bind off edge,
16, 17 (17, 17) 19, 19 sts up right front of neck,
38, 40 (40, 42) 44, 44 sts from back neck,
16, 17 (17, 17) 19, 19 sts up left front and side of neck,
10, 11 (11, 12) 12, 12 sts along left from bind off edge.
[90, 96 (96, 100) 106, 106 sts]
Work 1.5, 1.5 (2, 2) 2, 2 cms or .5, .5 (.75, .75) .75,.75 ins of (k1, p1) rib.
Bind off all sts in pattern.
FRONT RIB EDGES
LEFT FRONT EDGE
Pick up and knit 61, 67 (73, 79) 85, 97 sts along the edge with the smaller sized circular needles.
Work 7, 7 (7, 9) 9, 9 rows of rib (k1, p1).
Bind off in established rib pattern.
RIGHT FRONT EDGE
Pick up and knit 61, 67 (73, 79) 85, 97 sts along the edge with the smaller sized circular needles.
Work 3, 3 (3, 4) 4, 4 rows in k1p1 ribbing
Buttonhole row: Work 2 sts in established rib pattern, k2tog yo, *work 7, 8 (9, 10) 11, 13 sts in established rib pattern, work k2tog, yarn over*, repeat from * to * to the last 3 sts, work 3 sts in rib.
Work 3, 3 (3, 4) 4, 4 rows in k1p1 ribbing
Bind off in established rib pattern.
FINISHING Sew the sleeves on, side seams and sleeve seams. I prefer to use the mattress stitch because it almost appears seamless. Weave in all ends. Sew the buttons on along the left front edge across from the buttonholes
ABBREVIATIONS
K – knit
K2tog -knit 2 stitches together
P – purl
PM – place marker
SM – slip marker
SSK – slip, slip, knit the slipped sts together
YO – yarn over
I would love to know how you make your Baby Lydia Cardigan! What color are you planning to use, and are those little lace panels calling for a soft neutral, a pretty pastel, or something bright and cheerful? Leave me a comment below and tell me what you have on your needles!
This post may contain affiliate links. If you make a purchase through one of my links, I may earn a small commission at no extra cost to you. Thank you for supporting my blog and helping me continue sharing free knitting patterns!