
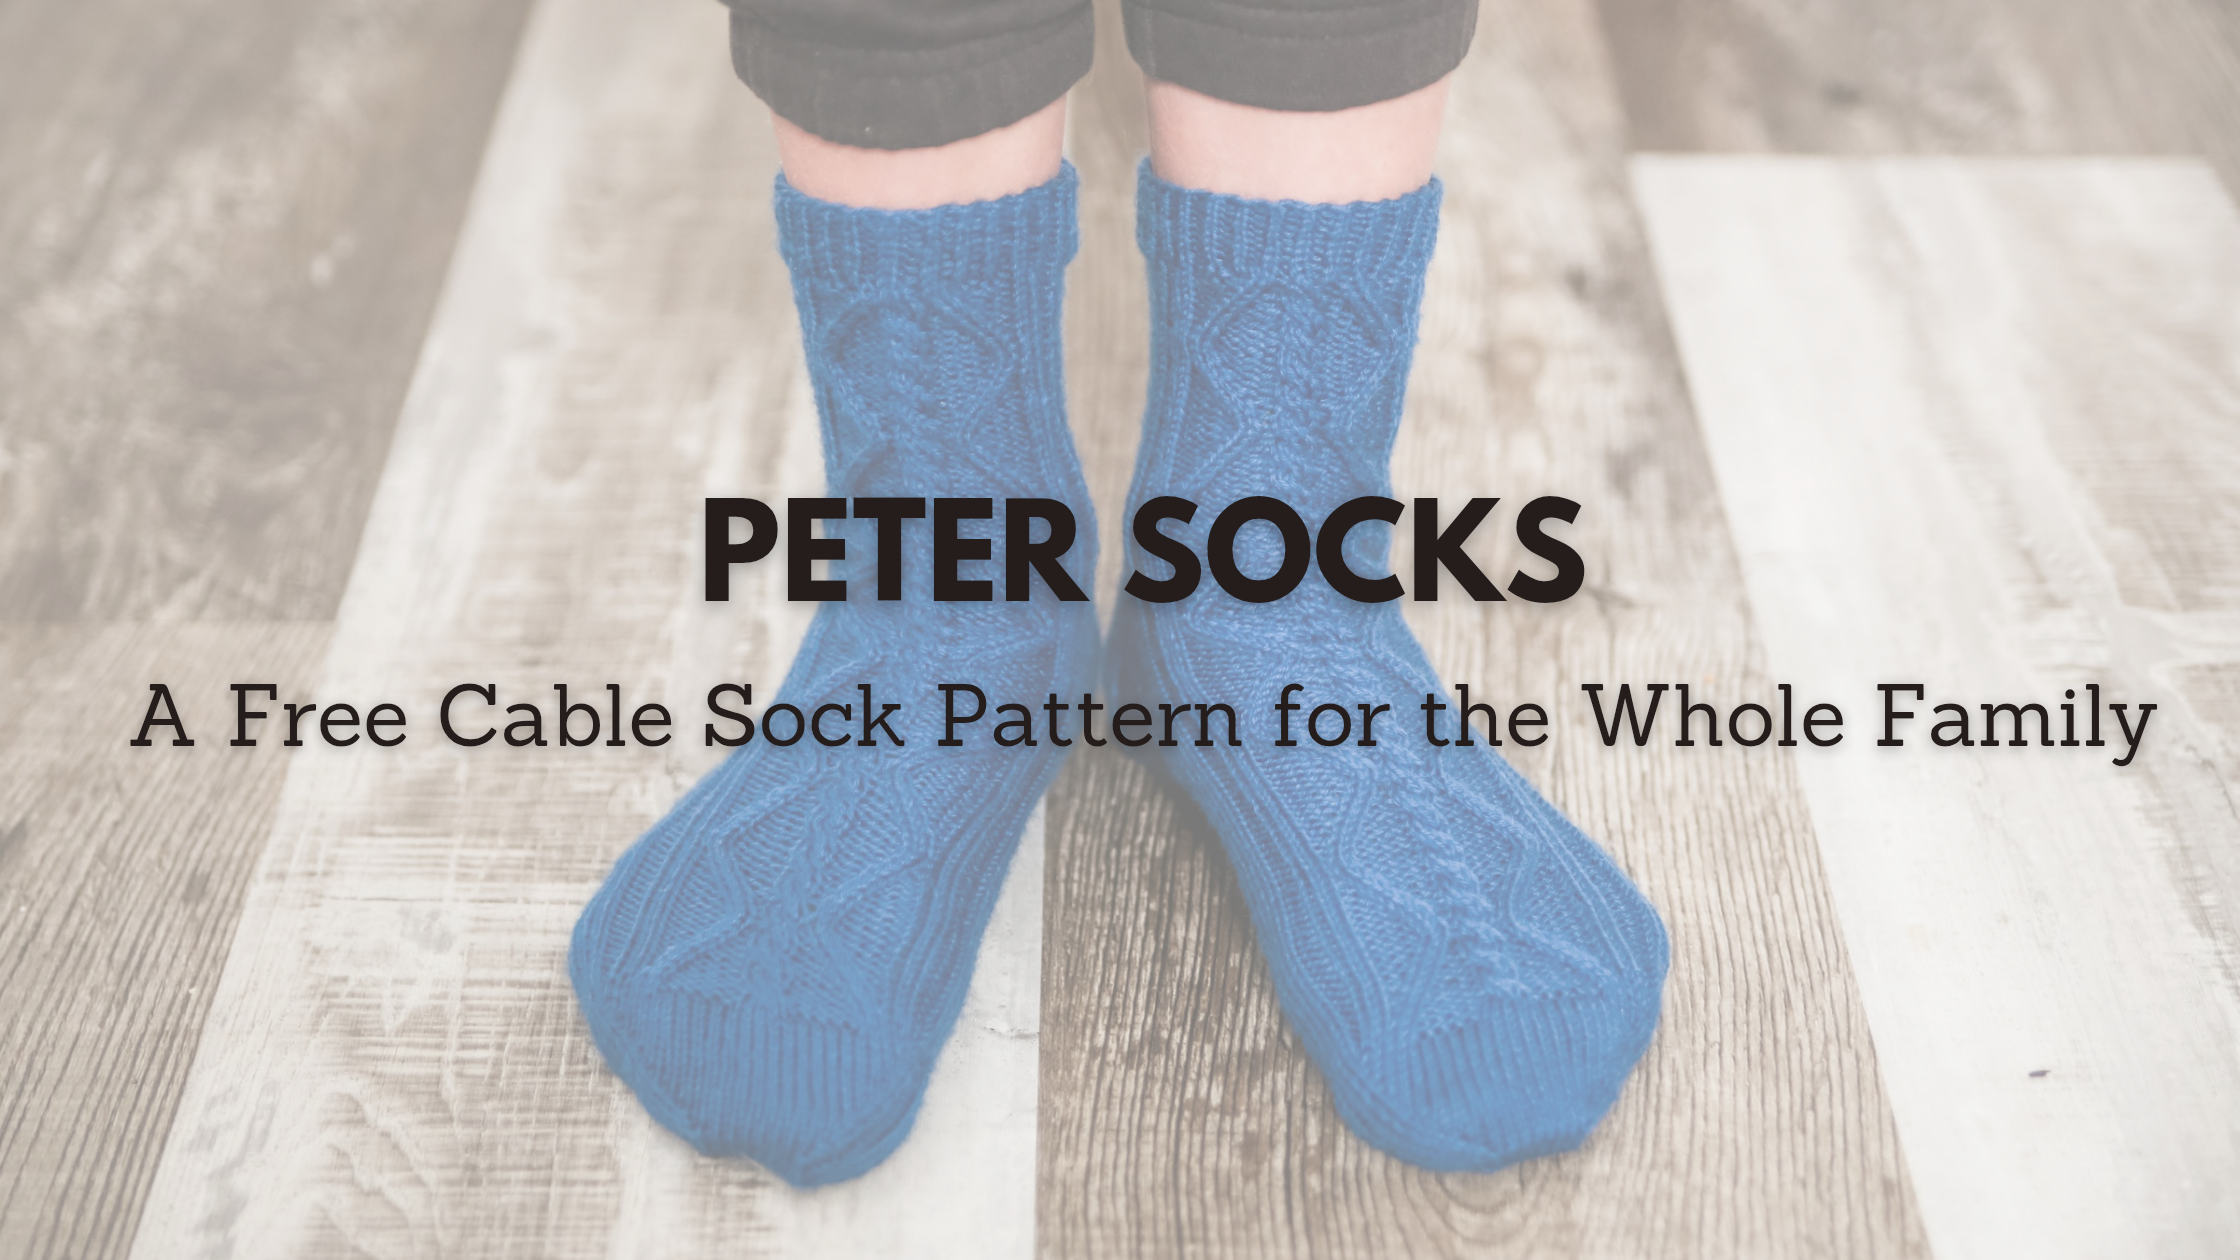
Looking for a free Cable sock pattern with beautiful texture and a snug fit? The Peter Socks pattern features a stunning diamond cable panel down the front, worked from the top down with a classic heel flap. Designed to match the Peter Sweater and Peter Vest, these socks make the perfect addition to your handmade wardrobe.

A Cozy and Classic Free Cable Sock Pattern
When I first designed the Peter Sweater, I knew I wanted to carry the same gorgeous diamond cable pattern into other projects. The Peter Vest quickly followed, but something was still missing—a perfect pair of socks to complete the set! That’s how the Peter Socks came to be.
These socks are worked top-down with a heel flap, giving them a classic structure that fits well and feels comfortable. The highlight of this design is the diamond cable panel running down the front, which adds just the right amount of texture without being too bulky. Whether you’re knitting for a toddler or an adult, this pattern provides a timeless, textured sock that looks great in any wardrobe.

Choosing the Best Yarn and Needles
For this free Cable sock pattern, I wanted a yarn that was both soft and strong—perfect for everyday wear. I chose Hobbii Unicorn Sock Yarn (affiliate link) because of its luxurious blend of wool and nylon, making it both durable and cozy. The color options are stunning, from vibrant hand-dyed hues to more subtle, classic tones.
To achieve the perfect stitch definition for the diamond cable panel, I used size 2.25mm knitting needles (affiliate link). These smaller needles create a firm, well-structured fabric that holds up well over time, especially for socks that get a lot of wear.

The Construction of the Peter Socks
If you love knitting top-down socks with a heel flap, this pattern will feel like second nature. Here’s a quick breakdown of how these socks are constructed:
- Cuff: The sock starts with a classic ribbed cuff to ensure a snug fit around the leg.
- Leg: The diamond cable panel is introduced right away, running down the front while the back is worked in stockinette.
- Heel Flap & Turn: A sturdy heel flap adds durability, followed by a smooth heel turn that shapes the sock perfectly.
- Gusset & Foot: Decreases create a snug fit around the arch before continuing in stockinette to the toe.
- Toe & Finish: The sock tapers down to a comfortable toe, finished off with grafting for a seamless look.
This structured design not only looks beautiful but also ensures a well-fitting, long-lasting sock.

Why You’ll Love This Free Cable Sock Pattern
One of my favorite things about this pattern is how versatile it is. Whether you’re knitting a pair for a little one or making a cozy set for yourself, the Peter Socks provide a satisfying project for knitters of all skill levels.
Here’s why I think you’ll love this free Cable sock pattern:
- Elegant texture: The diamond cable panel adds a touch of sophistication.
- Multiple sizes: From toddler to large adult, so the whole family can have matching socks.
- Durable yet soft yarn: Hobbii Unicorn Sock Yarn (affiliate link) gives these socks the perfect balance of warmth and durability.
- Classic construction: Top-down with a heel flap ensures a great fit and easy modifications.
- Perfect for gifts: Handmade socks are always appreciated, and this pattern works up beautifully in both solid and variegated yarns.

Tips for Knitting the Peter Socks
If you’re new to cable knitting or sock knitting in general, here are a few tips to make your knitting experience smoother:
- Use stitch markers to keep track of the cable panel, especially when working on the leg.
- Try a cable needle or go cable-free—whichever method you prefer! If you’re comfortable with cabling without a needle, it will speed up your knitting.
- Check your gauge before starting! Using size 2.25mm knitting needles (affiliate link) ensures the right fit, but if you knit tightly, you may need to size up slightly.
- Choose the right yarn color—solid or lightly speckled yarns will show off the diamond cables best. Hobbii Unicorn Sock Yarn (affiliate link) has some gorgeous semi-solid shades that work beautifully for this design.
- Use reinforced stitches on the heel for extra durability, especially if you tend to wear out socks quickly.

Styling Your Peter Socks
I love how versatile these socks are. Whether you’re making a pair for yourself or gifting them to a loved one, they work well with so many outfits. Here are some ways to wear them:
- Cozy at home: Pair them with your favorite leggings and an oversized sweater (bonus points if it’s the Peter Sweater!).
- Layered with boots: These socks are great for wearing with ankle boots, adding a peek of texture at the top.
- Matching family sets: Make a pair for yourself and a smaller set for your little one for adorable matching outfits!

Where to Get the Free Cable Sock Pattern
If you’re excited to cast on these socks, you can find the free Cable sock pattern if you keep scrolling down both written within the post and pdf download at the bottom of this post. With sizes ranging from toddler to large adult, you can make a pair for every member of the family!

Final Thoughts on the Peter Socks
Knitting socks is one of my favorite projects, and the Peter Socks are extra special because they match the Peter Sweater and Peter Vest. The diamond cable panel adds just the right amount of detail, and with Hobbii Unicorn Sock Yarn (affiliate link), they’re soft, durable, and beautifully textured.
I hope you enjoy making this free Cable sock pattern as much as I did! If you knit a pair, I’d love to see your projects—share them on Instagram and tag me so I can admire your work. Happy knitting!

Materials and Info
Materials:
Yarn: (1, 1) 1, 1 (1, 2) skeins of Hobbii Unicorn Solids (Affiliate Link) 437yd/100g
Needles: US #1 / 2.25mm DPN (affiliate link) (or circular for magic loop)
Notions: stitch markers, needle
Gauge: 32sts x 44rows per 4x4ins or 10x10cms
sizing:
(toddler, child,) lg child, adult S, (M, L)
Finished measurements (unstretched):
Foot Length (adjustable): (6, 7.25), 8, 9, (10, 11.25) ins or (15, 18.5) 20, 23 (25.5, 28.5) cms
The model size is a large child for a show size of boys US size 13.

Row 1 (right side) – p4, 2/1RPC, 2/2LC, 2/1LPC, p4
Row 2 – p4, k2, p1, k4, p1, k2, p4
Row 3 – p3, 2/1RPC, p1, k4, p1, 2/1LPC, p3
Row 4 – p3, k2, p2, k4, p2, k2, p3
Row 5 – p2, 2/1RPC, p2, 2/2LC, p2, 2/1LPC, p2
Row 6 – p2, k2, p3, k4, p3, k2, p2
Row 7 – p1, 2/1RPC, p3, k4, p3, 2/1LPC, p1
Row 8 – p1, k2, p4, k4, p4, k2, p1
Row 9 – 2/1RPC, p4, 2/2LC, p4, 2/1LPC
Row 10 – k2, p5, k4, p5, k2
Row 11 – 2/1LPC, p4, k4, p4, 2/1RPC
Row 12 – p1, k2, p4, k4, p4, k2, p1
Row 13 – p1, 2/1LPC, p3, 2/2LC, p3, 2/1RPC, p1
Row 14 – p2, k2, p3, k4, p3, k2, p2
Row 15 – p2, 2/1LPC, p2, k4, p2, 2/1RPC, p2
Row 16 – p3, k2, p2, k4, p2, k2, p3
Row 17 – p3, 2/1LPC, p1, 2/2LC, p1, 2/1RPC, p3
Row 18 – p4, k2, p1, k4, p1, k2, p4
Row 19 – p4, 2/1LPC, k4, 2/1RPC, p4
Row 20 – p5, k8, p5
Abbreviations
k – knit
P – purl
sm – slip maker
pm – place marker
bor – beginning of round
st – stich
sts – stitches
k2tog -knit 2 stitches together
ssk – slip next st knitwise, slip next st knitwise, place stitches back onto left needle, knit both slipped sts together
m1 – make one
w&t – wrap and turn – wrap the yarn around the next stitch, turn work
2/1LPC – slip the next 2sts onto cable needle and hold at front of work, p1 from left needle, then k2 from cable needle
2/1RPC – slip, the next st onto cable needle and hold at back of work, k2 from left needle, them p1 from cable needle
2/2LC – slip the next 2 sts onto cable needle and hold at front of work, k2 from left needle, k2 from cable needle

Peter Sock Pattern
Cuff
Cast on (48, 52) 56, 60, (64, 72) sts, join for working in the round.
Separate stitches on your dpn as follows:
1st needle (24, 26) 28, 30 (32, 36) sts each needle
2nd needle (12, 13) 14, 15 (16, 18) sts each needle
3rd needle (12, 13) 14, 15 (16, 18) sts each needle
Work in 1×1 rib (k1p1 around) for (8, 10) 10, 12 (12, 14) rounds
Leg
Set-up round – k[(1, 2) 3, 4 (5, 7)], m1, p1, k2, pm, m1, p4, k8, p4, m1, pm, k2, p1, m1, k around. (52, 56), 60, 64 (68, 76) sts
Work Peter Stitch pattern as follows:
K[(1, 2) 3, 4 (5, 7)], p2, k2, sm, work Peter Stitch Pattern to marker, sm, k2, p2, knit around until piece measures (3.5, 4) 4.5, 5, (6, 7)ins or (9, 10) 11.5, 12.5 (15.5, 18) cms from cast on (or desired length)
Heel Flap
Next round: work needle 1 in pattern. These worked stitches will now be placed on hold (you will NOT be using them for the heel).
The remaining (24, 26) 28, 30 (32, 36) sts will be your heel worked as below:
Row 1 (RS): (sl1, k1) to end, turn work.
Row 2 (WS): sl1, purl to end, turn work.
Work rows 1-2 a total of (11, 12) 13, 14, (15, 17) times.
This is a total of (22, 24), 26, 28, (30, 34) rows.
Heel Turn
Row 1 (RS): sl1, k(14, 14), 16, 16, (18, 20), ssk, k1, turn work
Row 2 (WS): sl1, p(7, 5) 7, 5, (7, 7), p2tog, p1, turn work
Row 3: sl1, knit to 1 st before the gap, ssk, k1, turn work
Row 4: sl1, purl to 1 st before the gap, p2tog, p1, turn work
Repeat rows 3-4 until all stitches have been worked: (16, 16), 18, 18, (20, 22) sts remain on heel.
Knit across these heel stitches slipping the first st.
Gusset
Pick up and knit (11, 13), 14, 15, (16, 18) sts along the edge of heel flap, PM, work (28, 30), 32, 34, (36, 40) in pattern, PM, pick up and knit (11, 13), 14, 15, (16, 18)sts along heel flap, k(8, 8) 9, 9, (10, 11) sts, mark the new BOR (located at the bottom of the foot). [(66, 72) 78, 82, (88, 98) sts]
Round 1: knit to marker, work to marker in pattern, knit to bor marker
Round 2: knit to 3 sts before marker, k2tog, k1, sm, work (28, 30), 32, 34, (36, 40) in pattern, sm, k1, ssk, knit to end [2 sts dec]
Work rounds 1-2 a total of (8, 8) 9, 9, (10, 11) times. [(52, 56), 60, 64 (68, 76) sts]
Foot
Shift beginning of round (BOR) remove marker as follows: remove marker, k(12, 13) 14, 15 (16, 18), place marker – this is the new BOR, located at the side of the foot.
Keep the second marker after the instep stitches in place.
Continue working in the round, keeping the top of foot in pattern, until the piece measures (5, 6) 6.5, 7, (8, 9)ins or (12.5, 15) 16.5, 18 (20.5, 23)cms from back of heel, or (1, 1.5) 1.75, 2, (2, 2.25)ins or (2.5, 3.5) 4.5, 5 (5, 5.5) cms short of desired foot length.
Toe
Set-up Round – k[(0, 1) 2, 3 (4, 6)], ssk, k2tog, k1, remove marker, knit across in pattern, remove marker, k1, ssk, p2tog, k[(0, 1) 2, 3 (4, 6)], place marker, knit around. (48, 52) 56, 60, (64, 72) sts
You will now work in stockinette for the remainder of the sock.
Round 1: k1, ssk, knit to 3 sts before marker, k2tog, k2, ssk, knit to 3 sts before end of round, k2tog, k1 [4 sts dec]
Round 2: knit around
Work rounds 1-2 a total of (8, 8) 9, 10, (10, 12) times. until (16, 20) 20, 20, (24, 24) sts remain.
Cut yarn leaving a tail long enough to sew the toe closed, then graft toe using Kitchener stitch.
Weave in all ends
Kitchener stitch:
Place half the stitches on one needle, half the stitches on the other needle, (top and bottom NOT side to side)
Cut yarn (leaving a long yarn tail) and thread through a blunt needle.
Set-up steps: Insert needle purlwise (back to front) through the first st on front needle, leaving the st on the needle. Then insert needle knitwise (front to back) through the first st on the back needle, leaving the st on the needle.
Step 1: Insert needle knitwise through first st on front needle, then slip this st off the needle.
Step 2: Insert needle purlwise through the second st on front needle, leaving the st on the needle.
Step 3: Insert needle purlwise through first st on back needle, then drop this stitch off the needle.
Step 4: Insert needle knitwise through second st on back needle, leaving the st on the needle.
From this point to the end, repeat steps 1-4.
Kitchener stitch can be intimidating, but you get into a rhythm:
Front needle: knitwise drop off, purlwise leave on,
Back needle: purlwise drop off, knitwise leave on,
Repeat!
At the end of the row, there is only 1 stitch left on each needle.
Work steps 1 and 3 once more.
For a left-handed video tutorial of this visit my youtube here
Peter Sock Pattern PDF
Affiliate Disclaimer: This post contains affiliate links. If you purchase through these links, I may earn a small commission at no extra cost to you. Thank you for supporting my blog!